
DIY Kale Bottle System: Ever dreamt of fresh, homegrown kale gracing your table, even if you’re short on space or time? I know I have! Forget those sprawling gardens that seem impossible to maintain. This article unveils a simple, ingenious, and budget-friendly method to cultivate your own vibrant kale using recycled materials.
The desire to connect with nature and grow our own food is deeply rooted in human history. From ancient civilizations cultivating herbs in clay pots to modern-day urban farmers maximizing balcony space, the urge to nurture life from a seed is timeless. But let’s face it, not everyone has the luxury of a sprawling backyard. That’s where the magic of DIY comes in!
This DIY Kale Bottle System isn’t just about growing kale; it’s about reclaiming control over your food source, reducing waste, and adding a touch of green to your surroundings. Imagine the satisfaction of harvesting your own nutrient-packed kale leaves, knowing you nurtured them from tiny seedlings. Plus, it’s a fantastic project for families, teaching children about sustainability and the wonders of plant life.
In this article, I’ll guide you step-by-step through creating your own thriving vertical kale garden using repurposed plastic bottles. We’ll cover everything from selecting the right bottles to choosing the best soil and providing optimal care for your leafy greens. Get ready to unleash your inner gardener and enjoy the delicious rewards of your labor!
DIY-Kohl-Flaschen-System: Dein eigener vertikaler Garten
Hallo liebe Gartenfreunde! Habt ihr auch so wenig Platz im Garten oder auf dem Balkon, aber trotzdem Lust auf frischen, knackigen Grünkohl? Dann habe ich hier die perfekte Lösung für euch: ein DIY-Kohl-Flaschen-System! Damit könnt ihr auf kleinstem Raum eine ordentliche Menge Grünkohl anbauen und habt immer frische Zutaten für eure Smoothies, Salate oder leckeren Grünkohlchips parat. Und das Beste: Es ist super einfach und kostengünstig!
Was du brauchst:
* Leere Plastikflaschen (PET-Flaschen, idealerweise 1,5 oder 2 Liter) – so viele, wie du Kohlpflanzen anbauen möchtest.
* Ein scharfes Messer oder eine Schere.
* Bohrmaschine oder ein Nagel und Hammer.
* Pflanzerde (am besten Bio-Qualität).
* Grünkohl-Setzlinge (oder Samen, wenn du etwas mehr Geduld hast).
* Kabelbinder oder starkes Seil.
* Optional: Sprühfarbe (um die Flaschen zu verschönern).
* Optional: Vlies oder Jute (um die Erde vor dem Herausfallen zu schützen).
* Optional: Eine lange Stange oder ein Gerüst, an dem du die Flaschen aufhängen kannst.
Vorbereitung der Flaschen:
1. Reinigung: Zuerst musst du die leeren Plastikflaschen gründlich reinigen. Entferne alle Etiketten und spüle sie mit warmem Wasser und Spülmittel aus. Achte darauf, dass keine Rückstände mehr vorhanden sind.
2. Schneiden der Öffnungen: Jetzt kommt der spannende Teil! Mit einem scharfen Messer oder einer Schere schneidest du eine große Öffnung in die Seite jeder Flasche. Diese Öffnung sollte groß genug sein, um später die Grünkohl-Setzlinge einzupflanzen. Ich empfehle, eine ovale oder rechteckige Form zu wählen, etwa 10-15 cm breit und 8-10 cm hoch. Achte darauf, dass du dich nicht schneidest!
3. Bohren der Löcher für die Aufhängung: Mit einer Bohrmaschine oder einem Nagel und Hammer bohrst du zwei Löcher in den oberen Teil jeder Flasche. Diese Löcher dienen dazu, die Flaschen später mit Kabelbindern oder Seil aufzuhängen. Die Löcher sollten sich gegenüberliegen und etwa 1-2 cm unterhalb des Flaschenhalses platziert sein.
4. Optional: Verschönerung der Flaschen: Wenn du möchtest, kannst du die Flaschen jetzt mit Sprühfarbe verschönern. Wähle Farben, die dir gefallen und die gut zu deinem Garten oder Balkon passen. Lass die Farbe gut trocknen, bevor du mit dem nächsten Schritt fortfährst. Ich persönlich mag es, wenn die Flaschen in verschiedenen Grüntönen oder mit kleinen Mustern bemalt sind. Das macht das Ganze noch etwas individueller.
5. Optional: Anbringen von Vlies oder Jute: Um zu verhindern, dass die Erde beim Gießen aus den Öffnungen rieselt, kannst du ein Stück Vlies oder Jute in die Flasche legen, bevor du sie mit Erde befüllst. Das Vlies oder die Jute sollte die Öffnung abdecken, aber nicht zu dick sein, damit das Wasser noch gut ablaufen kann.
Bepflanzung der Flaschen:
1. Befüllen mit Erde: Fülle die vorbereiteten Flaschen mit Pflanzerde. Achte darauf, dass die Erde locker und luftig ist, damit die Wurzeln der Grünkohlpflanzen gut wachsen können. Lass oben etwa 2-3 cm Platz, damit du beim Gießen nicht gleich alles überschwemmst.
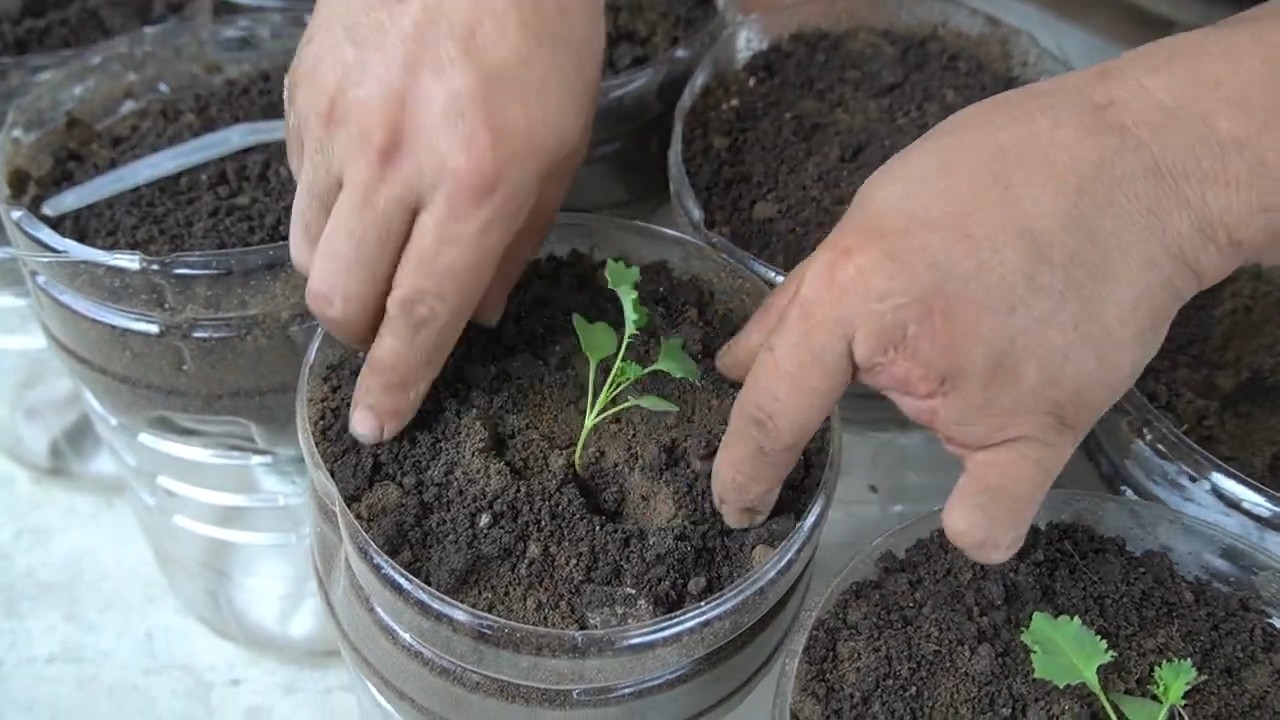
2. Einsetzen der Grünkohl-Setzlinge: Nun kannst du die Grünkohl-Setzlinge in die Flaschen pflanzen. Mach ein kleines Loch in die Erde und setze den Setzling vorsichtig hinein. Drücke die Erde leicht an, damit der Setzling gut Halt hat. Wenn du Samen verwendest, säe sie gemäß den Anweisungen auf der Samenpackung aus.
3. Gießen: Gieße die frisch bepflanzten Flaschen gründlich. Achte darauf, dass die Erde gut durchfeuchtet ist, aber nicht zu nass.
Aufhängen des Systems:
1. Befestigung der Kabelbinder oder des Seils: Führe Kabelbinder oder starkes Seil durch die Löcher im oberen Teil der Flaschen. Achte darauf, dass die Flaschen sicher befestigt sind und nicht herunterfallen können.
2. Aufhängen der Flaschen: Hänge die Flaschen an einer langen Stange, einem Gerüst oder einem anderen geeigneten Ort auf. Achte darauf, dass die Flaschen genügend Sonnenlicht bekommen (mindestens 6 Stunden pro Tag) und vor starkem Wind geschützt sind. Du kannst die Flaschen entweder nebeneinander oder untereinander aufhängen, je nachdem, wie viel Platz du hast und wie es dir am besten gefällt.
Pflege des Grünkohls:
1. Gießen: Gieße den Grünkohl regelmäßig, besonders an heißen Tagen. Die Erde sollte immer leicht feucht sein, aber nicht zu nass.
2. Düngen: Dünge den Grünkohl alle paar Wochen mit einem organischen Dünger. Das sorgt für ein gesundes Wachstum und eine reiche Ernte.
3. Schutz vor Schädlingen: Kontrolliere den Grünkohl regelmäßig auf Schädlinge wie Blattläuse oder Raupen. Bei Bedarf kannst du natürliche Schädlingsbekämpfungsmittel verwenden.
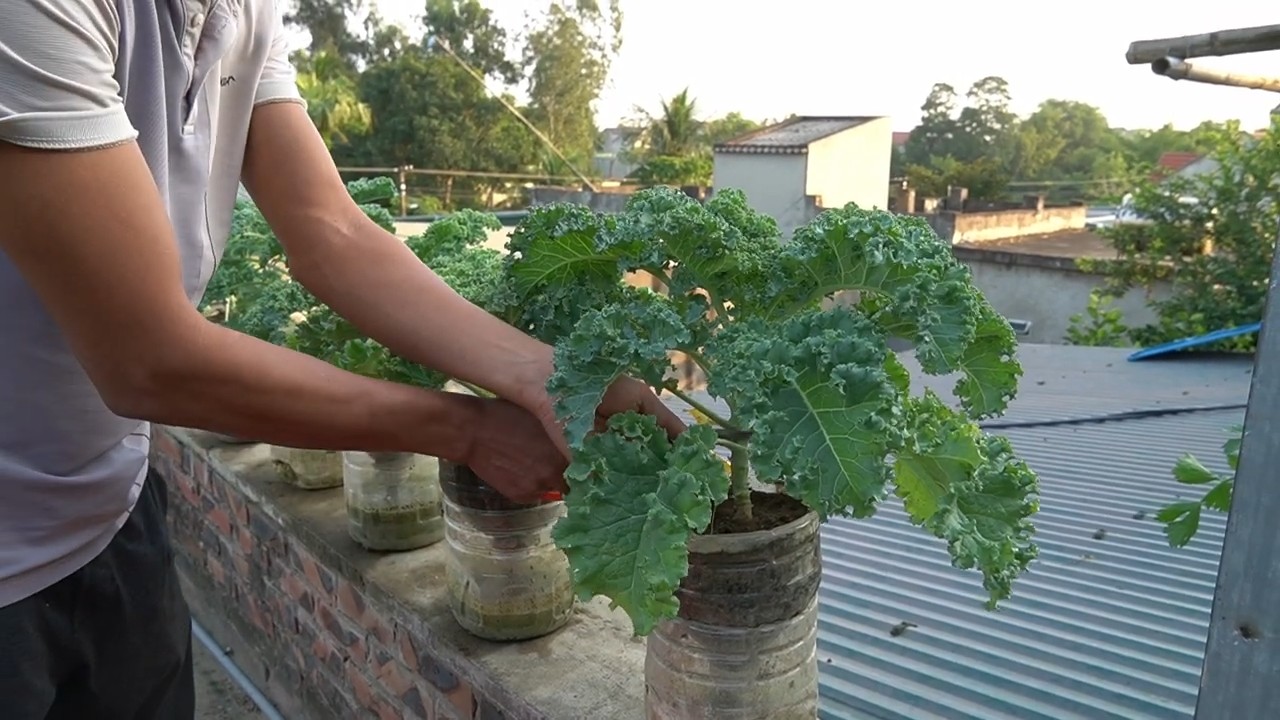
4. Ernten: Du kannst den Grünkohl ernten, sobald die Blätter groß genug sind. Schneide die äußeren Blätter ab und lass die inneren Blätter weiterwachsen. So kannst du über einen längeren Zeitraum immer wieder frischen Grünkohl ernten.
Zusätzliche Tipps:
* Wähle die richtige Sorte: Es gibt verschiedene Grünkohlsorten, die sich in Geschmack und Aussehen unterscheiden. Informiere dich, welche Sorte am besten zu deinen Bedürfnissen passt.
* Achte auf den Standort: Grünkohl braucht viel Sonnenlicht, aber auch Schutz vor starkem Wind. Wähle einen Standort, der diese Bedingungen erfüllt.
* Verwende hochwertige Erde: Eine gute Pflanzerde ist die Grundlage für ein gesundes Wachstum. Verwende am besten Bio-Qualität.
* Sei kreativ: Du kannst dein Kohl-Flaschen-System ganz nach deinen eigenen Vorstellungen gestalten. Verwende verschiedene Farben, Muster oder Materialien.
* Hab Geduld: Grünkohl braucht Zeit zum Wachsen. Sei geduldig und lass dich nicht entmutigen, wenn es nicht gleich perfekt klappt.
H3: Schritt-für-Schritt-Anleitung im Detail
Hier nochmal die einzelnen Schritte detaillierter erklärt, damit auch wirklich nichts schiefgeht:
H4: Flaschen vorbereiten
1. Flaschen sammeln und reinigen: Sammle so viele PET-Flaschen wie möglich. Je mehr, desto mehr Grünkohl kannst du anbauen! Achte darauf, dass die Flaschen sauber sind. Entferne alle Etiketten und spüle sie gründlich mit warmem Wasser und Spülmittel aus. Hartnäckige Klebereste lassen sich oft mit etwas Öl oder einem Etikettenentferner beseitigen.
2. Öffnungen schneiden: Das Schneiden der Öffnungen ist der wichtigste Schritt. Hier ist Präzision gefragt. Markiere dir mit einem Stift die gewünschte Größe und Form der Öffnung auf der Flasche. Ich empfehle, mit einem kleinen Schnitt zu beginnen und die Öffnung dann vorsichtig zu vergrößern. Verwende ein scharfes Messer oder eine Schere. Achte unbedingt auf deine Finger! Die Öffnung sollte groß genug sein, damit du später die Grünkohl-Setzlinge problemlos einpflanzen kannst.
3. Löcher bohren: Die Löcher für die Aufhängung sollten sich gegenüberliegen und etwa 1-2 cm unterhalb des Flaschenhalses platziert sein. Bohre die Löcher vorsichtig, damit die Flasche nicht reißt. Wenn du keinen Bohrer hast, kannst du auch einen Nagel und Hammer verwenden. Erhitze den Nagel kurz mit einem Feuerzeug, dann lässt er sich leichter durch das Plastik treiben.
4. Flaschen verschönern (optional): Wenn du möchtest, kannst du die Flaschen jetzt mit Sprühfarbe verschönern. Reinige die Flaschen vorher noch einmal gründlich und entfette sie mit etwas Alkohol. Sprühe die Farbe in mehreren dünnen Schichten
Conclusion
So, there you have it! Transforming discarded plastic bottles into a thriving vertical kale garden is not just a clever upcycling project; it’s a sustainable solution that brings fresh, nutritious greens right to your doorstep. This DIY kale bottle system offers a multitude of benefits, from maximizing space in urban environments to minimizing waste and promoting a healthier lifestyle.
Why is this a must-try? Because it’s empowering! You’re taking control of your food source, reducing your carbon footprint, and engaging in a rewarding hands-on activity. Imagine the satisfaction of harvesting your own vibrant kale, knowing you nurtured it from seed to table using repurposed materials. It’s a tangible connection to the earth, even in the heart of the city.
Beyond the environmental and practical advantages, this project is incredibly versatile. Feel free to experiment with different bottle sizes and configurations to create a system that perfectly suits your space and aesthetic preferences. Consider painting the bottles to add a splash of color or using different types of soil mixes to optimize growth. You can even adapt the system to grow other leafy greens like spinach, lettuce, or herbs. Think about adding a simple irrigation system using a larger reservoir bottle at the top, slowly dripping water down through the tiers. This will save you time and ensure consistent moisture for your kale.
Another variation to consider is the type of kale you choose to grow. Curly kale, Tuscan kale (also known as lacinato or dinosaur kale), and Red Russian kale all thrive in container gardens. Experiment with different varieties to discover your favorites and enjoy a diverse range of flavors and textures. You can even start your kale from seed directly in the bottles or transplant seedlings for a quicker harvest.
Don’t be afraid to get creative with the placement of your DIY kale bottle system. Hang it on a sunny balcony, lean it against a fence, or even create a free-standing structure using repurposed wood or metal. The possibilities are endless!
But the real magic happens when you share your experience. We encourage you to embark on this DIY adventure and document your progress. Take photos, share your tips and tricks, and let us know what challenges you encounter and how you overcome them. Your insights can inspire others to embrace sustainable gardening and create their own thriving kale oases.
So, grab those empty plastic bottles, gather your supplies, and get ready to transform your space into a vibrant, edible landscape. The journey of growing your own kale is not only rewarding but also a powerful statement about your commitment to a healthier planet. We can’t wait to see what you create! Share your photos and stories using #DIYKaleBottleGarden – let’s grow together!
Frequently Asked Questions (FAQ)
What type of plastic bottles are best for this project?
Ideally, you should use food-grade plastic bottles, such as those used for water, juice, or soda. Look for the recycling symbol with the number 1 (PET or PETE) or 2 (HDPE) inside. These plastics are generally considered safe for growing food. Avoid using bottles with the number 3 (PVC), 6 (PS), or 7 (other), as they may leach harmful chemicals into the soil. Thoroughly wash and sanitize the bottles before use to remove any residue.
What kind of soil should I use for my kale bottle garden?
A well-draining potting mix is essential for healthy kale growth. Avoid using garden soil, as it can become compacted in containers and restrict root growth. A good mix would consist of equal parts of compost, peat moss (or coconut coir as a sustainable alternative), and perlite or vermiculite. The compost provides nutrients, the peat moss or coconut coir retains moisture, and the perlite or vermiculite improves drainage. You can also add a slow-release fertilizer to the mix to provide a steady supply of nutrients throughout the growing season.
How much sunlight does kale need to grow in a bottle garden?
Kale thrives in full sun, which means at least 6 hours of direct sunlight per day. If you don’t have a sunny spot, you can supplement with grow lights. Place your kale bottle system in a location that receives ample sunlight, such as a south-facing balcony or patio. If you live in a hot climate, provide some afternoon shade to prevent the leaves from scorching.
How often should I water my kale bottle garden?
The frequency of watering will depend on the weather conditions, the size of the bottles, and the type of soil mix you use. Generally, you should water your kale when the top inch of soil feels dry to the touch. Avoid overwatering, as this can lead to root rot. Ensure that the bottles have drainage holes to allow excess water to escape. A good rule of thumb is to water deeply until water drains out of the bottom of the bottles.
How do I fertilize my kale bottle garden?
Kale is a heavy feeder and requires regular fertilization to thrive. You can use a liquid fertilizer diluted to half strength every two weeks or incorporate a slow-release fertilizer into the soil mix at planting time. Look for a fertilizer that is rich in nitrogen, which promotes leafy growth. Organic options include compost tea, fish emulsion, and seaweed extract.
How do I protect my kale from pests and diseases?
Regularly inspect your kale plants for signs of pests and diseases. Common pests include aphids, cabbage worms, and flea beetles. You can control these pests by handpicking them off the plants, spraying them with insecticidal soap, or using row covers to prevent them from reaching the plants. Diseases such as powdery mildew and black rot can be prevented by providing good air circulation, avoiding overwatering, and removing any infected leaves.
How long does it take for kale to grow in a bottle garden?
Kale typically takes 55-75 days to mature from seed. However, you can start harvesting leaves as soon as they are large enough to eat, usually around 30 days after planting. Harvest the outer leaves first, leaving the inner leaves to continue growing. This will encourage continuous production throughout the growing season.
Can I grow kale in a bottle garden year-round?
In mild climates, you can grow kale year-round. In colder climates, you may need to protect your plants from frost by moving them indoors or covering them with a frost blanket. Kale is relatively cold-hardy and can tolerate temperatures down to 20°F (-7°C).
How do I harvest kale from my bottle garden?
To harvest kale, simply cut or snap off the outer leaves near the base of the plant. Avoid damaging the central bud, as this will allow the plant to continue producing new leaves. Harvest regularly to encourage continuous growth and prevent the leaves from becoming tough and bitter.
What are some ways to use the kale I grow in my bottle garden?
Kale is a versatile vegetable that can be used in a variety of dishes. You can add it to salads, smoothies, soups, stews, and stir-fries. You can also bake it into kale chips or sauté it with garlic and olive oil. Kale is a nutritional powerhouse, packed with vitamins, minerals, and antioxidants. Enjoy the delicious and healthy benefits of your homegrown kale!
Leave a Comment