
DIY Vertical Veggie Garden: Imagine stepping outside your door and plucking fresh, sun-ripened tomatoes or crisp lettuce leaves for your salad, even if you only have a tiny balcony or patio! That’s the magic of a DIY vertical veggie garden, and I’m so excited to share some simple and effective ways to create your own thriving green space, no matter how limited your area might be.
For centuries, people have found creative ways to cultivate food in small spaces. From the hanging gardens of Babylon to the ingenious terrace farming techniques in ancient civilizations, the desire to grow our own food has always been a powerful motivator. Today, with increasing urbanization and a renewed focus on sustainable living, the DIY vertical veggie garden is experiencing a major resurgence.
Why is this DIY trick so essential now? Well, for starters, it allows anyone to enjoy the benefits of fresh, homegrown produce, regardless of their living situation. Plus, it’s a fantastic way to reduce your carbon footprint, save money on groceries, and add a touch of natural beauty to your home. I know I feel so much more connected to my food when I’ve nurtured it from seed to table. So, let’s dive in and discover how you can easily build your own vertical veggie oasis!
DIY Vertikaler Gemüsegarten: Dein eigener essbarer Garten an der Wand
Hallo liebe Gartenfreunde! Habt ihr auch wenig Platz, aber trotzdem Lust auf frisches Gemüse aus dem eigenen Anbau? Dann habe ich genau das Richtige für euch: einen vertikalen Gemüsegarten! Das ist nicht nur platzsparend, sondern auch ein echter Hingucker. Ich zeige euch, wie ihr mit einfachen Mitteln euren eigenen essbaren Garten an die Wand zaubern könnt. Los geht’s!
Was du für deinen vertikalen Garten brauchst:
* Holzpaletten: Am besten eine Europalette (EPAL), da diese stabil und leicht zu bearbeiten sind. Achtet darauf, dass sie unbehandelt und sauber ist.
* Gartenvlies: Zum Auskleiden der Pflanzkästen.
* Tacker: Zum Befestigen des Gartenvlieses.
* Erde: Hochwertige Pflanzerde, am besten Bio-Qualität.
* Gemüsepflanzen oder Samen: Je nach Geschmack und Saison. Ich empfehle Kräuter, Salat, Erdbeeren oder kleine Tomatensorten.
* Schleifpapier: Zum Glätten der Palette.
* Holzschutzlasur (optional): Um die Palette vor Witterungseinflüssen zu schützen.
* Handschuhe: Zum Schutz eurer Hände.
* Schere oder Cuttermesser: Zum Zuschneiden des Gartenvlieses.
* Maßband oder Zollstock: Zum Abmessen.
* Bohrmaschine und Schrauben (optional): Zum Verstärken der Palette oder zum Anbringen an der Wand.
Schritt-für-Schritt-Anleitung: So baust du deinen vertikalen Garten
1. Palette vorbereiten: Zuerst solltet ihr die Palette gründlich reinigen. Entfernt alle losen Teile, Schmutz und eventuelle Nägel oder Klammern. Mit Schleifpapier könnt ihr raue Stellen glätten, um Verletzungen zu vermeiden. Wenn ihr möchtet, könnt ihr die Palette mit einer Holzschutzlasur behandeln, um sie wetterfest zu machen. Lasst die Lasur gut trocknen, bevor ihr weitermacht. Ich persönlich mag den natürlichen Look von unbehandeltem Holz, aber das ist Geschmackssache.
2. Pflanzkästen auskleiden: Jetzt geht es ans Auskleiden der Pflanzkästen. Schneidet das Gartenvlies so zu, dass es die einzelnen Fächer der Palette komplett auskleidet. Lasst dabei genügend Überstand, um das Vlies am Holz festzutackern. Das Vlies verhindert, dass die Erde herausfällt und schützt das Holz vor Feuchtigkeit.
3. Vlies befestigen: Mit dem Tacker befestigt ihr das Gartenvlies sorgfältig an den Innenseiten der Pflanzkästen. Achtet darauf, dass das Vlies gut gespannt ist und keine Falten wirft. Tackerklammern sollten dicht genug gesetzt werden, damit das Vlies auch bei Belastung mit Erde hält. Ich tackere meist alle paar Zentimeter, um sicherzugehen.
4. Erde einfüllen: Nun könnt ihr die Pflanzkästen mit Erde befüllen. Verwendet hochwertige Pflanzerde, am besten Bio-Qualität. Füllt die Erde bis kurz unter den Rand der Fächer. Drückt die Erde leicht an, damit sie sich setzt.
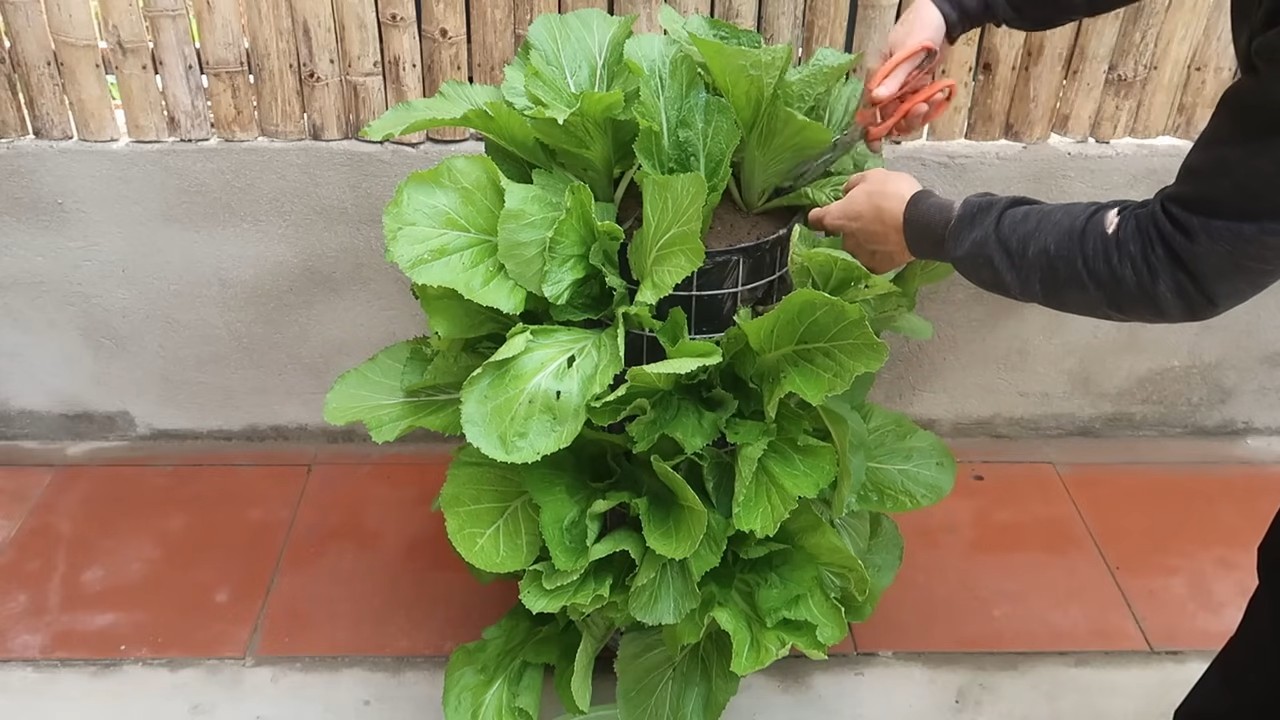
5. Pflanzen einsetzen: Jetzt kommt der schönste Teil: das Bepflanzen! Wählt eure Lieblingsgemüsesorten, Kräuter oder Erdbeeren aus und setzt sie in die vorbereiteten Pflanzkästen. Achtet darauf, dass die Pflanzen genügend Platz haben und die Erde gut um die Wurzeln angedrückt wird.
6. Gießen und pflegen: Gießt die Pflanzen nach dem Einsetzen gründlich an. Achtet darauf, dass die Erde immer feucht, aber nicht nass ist. Je nach Gemüsesorte benötigen die Pflanzen unterschiedliche Pflege. Informiert euch am besten vorher, welche Bedürfnisse eure Pflanzen haben.
Variationen und Tipps für deinen vertikalen Garten
* Die richtige Palette wählen: Achtet beim Kauf der Palette auf das Material und die Verarbeitung. Europaletten (EPAL) sind in der Regel stabiler und besser geeignet als Einwegpaletten. Vermeidet Paletten, die mit Chemikalien behandelt wurden.
* Die richtige Bepflanzung: Nicht alle Gemüsesorten eignen sich für den vertikalen Garten. Wählt am besten kleinwüchsige Sorten, die nicht zu viel Platz benötigen. Kräuter, Salat, Erdbeeren, Radieschen, Mangold und kleine Tomatensorten sind ideal.
* Bewässerung: Ein vertikaler Garten trocknet schneller aus als ein herkömmliches Beet. Achtet daher auf eine regelmäßige Bewässerung. An heißen Tagen müsst ihr möglicherweise mehrmals täglich gießen. Eine Tropfbewässerung kann hier Abhilfe schaffen.
* Düngen: Um eine reiche Ernte zu erzielen, solltet ihr eure Pflanzen regelmäßig düngen. Verwendet am besten organischen Dünger, um die Umwelt zu schonen.
* Standort: Wählt einen sonnigen Standort für euren vertikalen Garten. Die meisten Gemüsesorten benötigen mindestens sechs Stunden Sonne pro Tag.
* Befestigung: Wenn ihr die Palette an der Wand befestigen möchtet, solltet ihr sie mit stabilen Schrauben und Dübeln sichern. Achtet darauf, dass die Wand tragfähig ist. Alternativ könnt ihr die Palette auch einfach an eine Wand lehnen.
* Kreative Gestaltung: Eurer Kreativität sind keine Grenzen gesetzt! Bemalt die Palette in euren Lieblingsfarben, beklebt sie mit Mosaiksteinen oder dekoriert sie mit Lichterketten. So wird euer vertikaler Garten zu einem echten Blickfang.
* Schneckenabwehr: Schnecken lieben Salat und andere Gemüsesorten. Um eure Pflanzen vor Schnecken zu schützen, könnt ihr Schneckenkorn streuen oder Schneckenzäune aufstellen.
* Insektenhotel integrieren: Bietet Nützlingen ein Zuhause, indem ihr ein kleines Insektenhotel in euren vertikalen Garten integriert. Das fördert die Bestäubung und hält Schädlinge fern.
* Verschiedene Ebenen nutzen: Pflanzt in die oberen Fächer Pflanzen, die viel Sonne benötigen, und in die unteren Fächer Pflanzen, die Schatten vertragen. So nutzt ihr den Platz optimal aus.
* Regelmäßiges Umtopfen: Wenn die Pflanzen zu groß werden, solltet ihr sie in größere Töpfe umtopfen. So haben sie genügend Platz zum Wachsen und Gedeihen.
* Vertikale Kräuterspirale: Anstatt einer Palette könnt ihr auch eine Kräuterspirale vertikal an der Wand anbringen. Das ist besonders platzsparend und sieht toll aus.
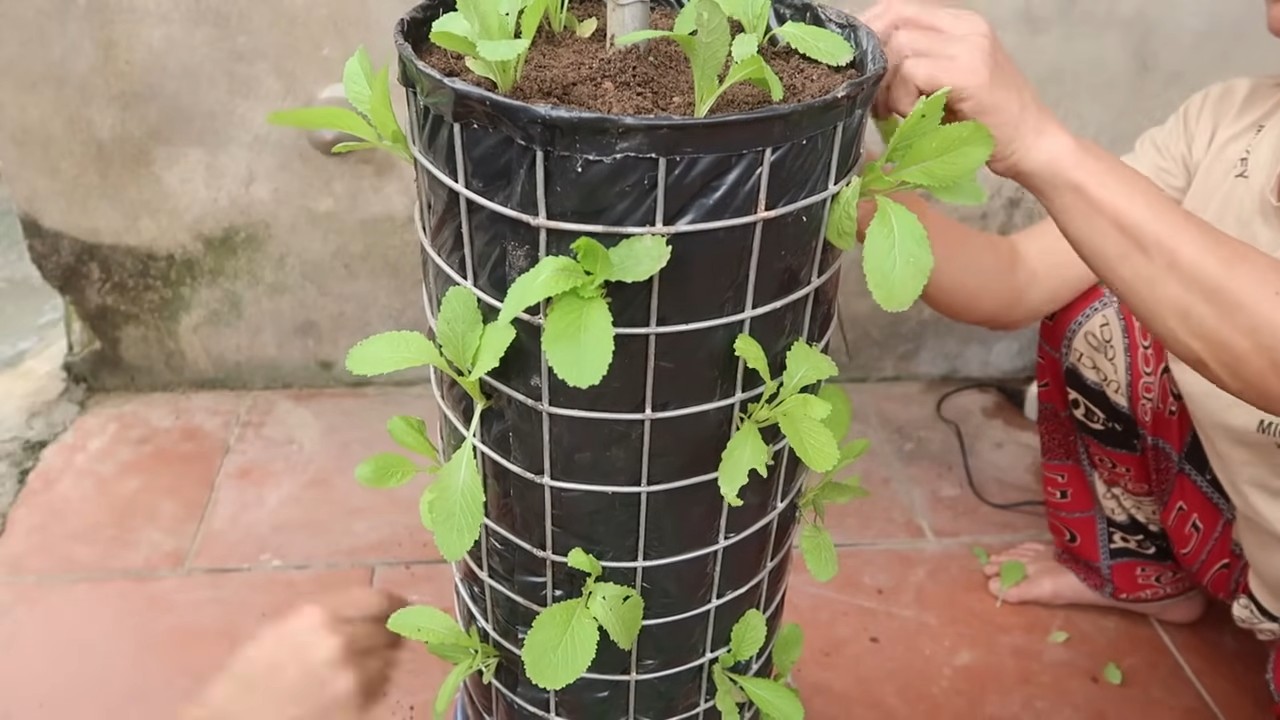
* Upcycling: Verwendet alte Konservendosen, Plastikflaschen oder Stofftaschen als Pflanzgefäße. So könnt ihr alte Gegenstände wiederverwenden und euren Garten noch nachhaltiger gestalten.
* Beschriftung: Beschriftet die einzelnen Pflanzkästen, damit ihr immer wisst, was wo wächst. Das ist besonders hilfreich, wenn ihr verschiedene Kräutersorten angebaut habt.
* Vertikale Erdbeerpyramide: Baut eine Erdbeerpyramide aus alten Reifen oder Holzpaletten. So könnt ihr auf kleinem Raum viele Erdbeeren anbauen.
* Vertikale Blumenwand: Bepflanzt die Palette mit bunten Blumen und verwandelt sie in eine vertikale Blumenwand. Das ist ein echter Hingucker auf dem Balkon oder der Terrasse.
* Automatische Bewässerung: Installiert ein automatisches Bewässerungssystem, um eure Pflanzen regelmäßig mit Wasser zu versorgen. Das ist besonders praktisch, wenn ihr im Urlaub seid.
* Saisonale Bepflanzung: Passt die Bepflanzung an die jeweilige Jahreszeit an. Im Frühjahr könnt ihr Salat, Radieschen und Kräuter anbauen, im Sommer Tomaten, Gurken und Paprika, und im Herbst Spinat, Feldsalat und Kohl.
Spezielle Tipps für verschiedene Gemüsesorten
* Tomaten: Tomaten benötigen viel Sonne und Wasser. Wählt am besten kleinwüchsige Sorten wie Buschtomaten oder Cherrytomaten. Stützt die Pflanzen mit Stäben, damit sie nicht umknicken.
* Salat: Salat ist relativ anspruchslos und wächst schnell. Achtet auf eine regelmäßige Bewässerung und schützt die Pflanzen vor Schnecken.
* K
Conclusion
So, there you have it! Creating your own DIY Vertical Veggie Garden isn’t just a trendy project; it’s a game-changer for anyone looking to maximize their gardening space, enjoy fresh, homegrown produce, and add a touch of green elegance to their surroundings. We’ve walked you through the process, highlighting the ease and affordability of building your own vertical garden, and showcasing the incredible benefits it offers.
Think about it: no more back-breaking weeding in sprawling garden beds, no more battling space constraints on a tiny balcony, and no more relying solely on store-bought vegetables that may have traveled hundreds of miles to reach your plate. With a vertical garden, you’re in control, cultivating a vibrant ecosystem right outside your door.
But the beauty of this project lies in its adaptability. Feel free to experiment with different materials. Instead of pallets, consider using repurposed plastic bottles, stacked planters, or even hanging shoe organizers. The possibilities are truly endless! For those with a penchant for aesthetics, consider painting your vertical structure in vibrant colors or adding decorative elements like fairy lights or wind chimes.
And don’t limit yourself to just vegetables! Herbs like basil, mint, and rosemary thrive in vertical gardens, adding fragrant aromas and fresh flavors to your culinary creations. Strawberries, with their cascading vines, are another excellent choice, providing a sweet treat throughout the growing season. Even certain flowers, like petunias and impatiens, can add a splash of color and attract pollinators to your garden.
The key is to choose plants that are well-suited to the amount of sunlight your vertical garden receives and to provide them with adequate water and nutrients. Regular monitoring and maintenance will ensure that your plants thrive and produce a bountiful harvest.
We genuinely believe that this DIY project is a must-try for anyone with a passion for gardening, a desire for fresh produce, or simply a love for creating beautiful and sustainable spaces. It’s a rewarding experience that connects you with nature, promotes healthy eating habits, and adds a unique touch to your home.
So, what are you waiting for? Gather your materials, unleash your creativity, and embark on your own vertical gardening adventure. We’re confident that you’ll be amazed by the results. And most importantly, we want to hear about your experience! Share your photos, tips, and stories with us in the comments below. Let’s inspire each other to create a world filled with thriving vertical gardens, one DIY project at a time. Let us know what you planted in your DIY Vertical Veggie Garden!
Frequently Asked Questions (FAQ)
What are the best vegetables to grow in a DIY vertical veggie garden?
The best vegetables for a vertical garden are generally those that don’t require deep root systems and can tolerate being grown in containers. Leafy greens like lettuce, spinach, and kale are excellent choices, as are herbs like basil, mint, and parsley. Tomatoes, peppers, and strawberries also thrive in vertical gardens, but may require more support and larger containers. Consider bush beans and dwarf varieties of cucumbers for a compact and productive harvest. Avoid large, sprawling plants like pumpkins or watermelons, as they will quickly outgrow the space. Remember to consider the amount of sunlight your vertical garden receives when selecting your plants.
How much sunlight does my vertical garden need?
Most vegetables require at least six hours of direct sunlight per day to thrive. However, some leafy greens and herbs can tolerate partial shade. Observe your garden throughout the day to determine how much sunlight it receives. If your garden is located in a shady area, consider using grow lights to supplement the natural light. South-facing locations typically receive the most sunlight, while north-facing locations receive the least. Adjust your plant selection accordingly.
What type of soil should I use for my vertical garden?
Use a high-quality potting mix specifically designed for containers. Avoid using garden soil, as it can become compacted and drain poorly in containers. A good potting mix will provide adequate drainage, aeration, and nutrients for your plants. You can also amend your potting mix with compost or other organic matter to improve its fertility. Consider adding a slow-release fertilizer to provide your plants with a steady supply of nutrients throughout the growing season.
How often should I water my vertical garden?
The frequency of watering will depend on several factors, including the type of plants you’re growing, the weather conditions, and the type of containers you’re using. Generally, you should water your vertical garden when the top inch of soil feels dry to the touch. Avoid overwatering, as this can lead to root rot. During hot, dry weather, you may need to water your garden daily. Use a watering can or a hose with a gentle spray nozzle to avoid damaging the plants. Consider installing a drip irrigation system for more efficient and consistent watering.
How do I fertilize my vertical garden?
Vertical gardens require regular fertilization to provide plants with the nutrients they need to thrive. Use a balanced fertilizer specifically designed for vegetables. You can use a liquid fertilizer, a slow-release fertilizer, or a combination of both. Follow the instructions on the fertilizer label carefully. Avoid over-fertilizing, as this can damage your plants. Consider using organic fertilizers like compost tea or fish emulsion for a more sustainable approach.
How do I protect my vertical garden from pests and diseases?
Regularly inspect your plants for signs of pests or diseases. Remove any affected leaves or plants immediately. Use organic pest control methods like insecticidal soap or neem oil to control pests. Encourage beneficial insects like ladybugs and lacewings to prey on pests. Provide good air circulation to prevent fungal diseases. Avoid overcrowding your plants. Choose disease-resistant varieties of vegetables.
Can I grow a vertical garden indoors?
Yes, you can grow a vertical garden indoors, but you’ll need to provide adequate light and ventilation. Choose plants that tolerate low light conditions, such as leafy greens and herbs. Use grow lights to supplement the natural light. Ensure good air circulation to prevent fungal diseases. Water your plants regularly and fertilize them as needed. Consider using a self-watering system to simplify watering.
How do I overwinter my vertical garden?
Depending on your climate, you may be able to overwinter some of your plants in your vertical garden. Hardy herbs like rosemary and thyme can often survive mild winters. Bring tender plants indoors before the first frost. Cut back any dead or dying foliage. Reduce watering and fertilization during the winter months. Provide adequate light and ventilation.
What if I don’t have a green thumb?
Don’t worry! Vertical gardening is surprisingly easy, even for beginners. Start with a small, simple project and gradually expand as you gain experience. Choose easy-to-grow plants like lettuce, spinach, and herbs. Don’t be afraid to experiment and learn from your mistakes. There are plenty of resources available online and at your local garden center to help you succeed. The most important thing is to have fun and enjoy the process! Remember, even experienced gardeners face challenges, so don’t get discouraged if things don’t go perfectly at first. The reward of fresh, homegrown produce is well worth the effort.


Leave a Comment