
Easy melon growing routine – that’s what we all crave, isn’t it? Imagine biting into a juicy, homegrown melon, bursting with flavor, knowing you nurtured it from a tiny seed to a delicious treat. Forget those bland, store-bought melons! This article is your passport to a thriving melon patch, even if you think you have a “brown thumb.”
Melons have a rich history, dating back to ancient Egypt and beyond, where they were prized for their sweetness and refreshing qualities. For centuries, cultures around the world have cultivated these delightful fruits, developing unique varieties and techniques. Now, it’s your turn to join this legacy!
But let’s be honest, growing melons can seem intimidating. Pests, diseases, and the sheer size of some varieties can deter even the most enthusiastic gardener. That’s where our DIY tricks and hacks come in. We’re going to demystify the process and provide you with a simple, easy melon growing routine that anyone can follow. From choosing the right variety for your climate to creating the perfect soil conditions, we’ll cover everything you need to know to enjoy a bountiful harvest. So, grab your gardening gloves, and let’s get started on your melon-growing adventure! I’m excited to share these secrets with you!
DIY: So ziehst du deine eigenen Melonen – kinderleicht!
Hallo liebe Gartenfreunde! Ich liebe Melonen, und es gibt nichts Besseres, als eine saftige, selbst angebaute Melone im Sommer zu genießen. Viele denken, Melonenanbau sei kompliziert, aber ich zeige euch, dass es wirklich einfach sein kann! Mit dieser Anleitung gelingt es auch Anfängern, eine reiche Melonenernte zu erzielen. Los geht’s!
Die Vorbereitung: Der Schlüssel zum Erfolg
Bevor wir mit dem eigentlichen Anbau beginnen, müssen wir ein paar wichtige Vorbereitungen treffen. Das ist wie beim Kochen: Gute Zutaten und die richtige Vorbereitung sind das A und O!
* Die richtige Sorte wählen: Nicht jede Melonensorte ist für jedes Klima geeignet. Informiert euch, welche Sorten in eurer Region gut gedeihen. Wassermelonen brauchen viel Wärme, während Honigmelonen etwas toleranter sind. Ich persönlich liebe die “Sugar Baby” Wassermelone, weil sie relativ klein ist und schnell reift. Honigmelonen der Sorte “Galia” sind auch eine sichere Bank.
* Der perfekte Standort: Melonen lieben die Sonne! Sucht euch einen sonnigen Platz in eurem Garten aus, der mindestens 6-8 Stunden direkte Sonneneinstrahlung pro Tag bekommt. Außerdem sollte der Boden gut durchlässig sein, damit sich keine Staunässe bildet.
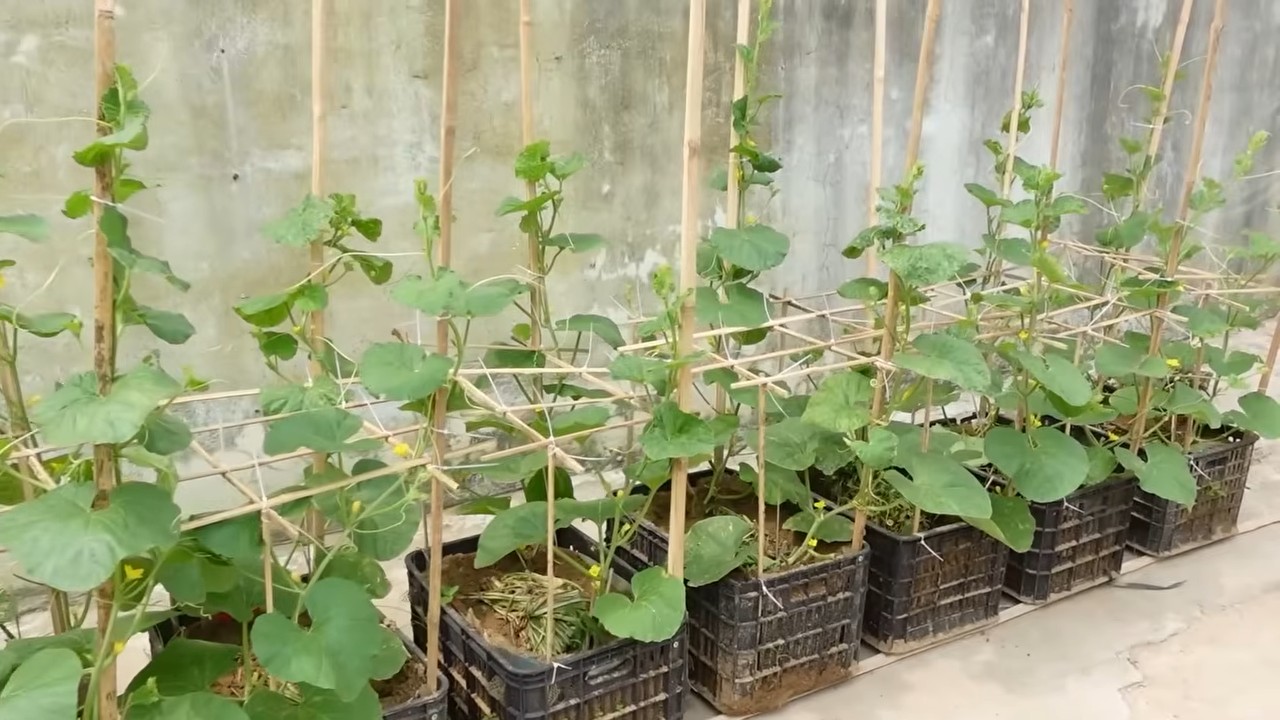
* Den Boden vorbereiten: Melonen sind Starkzehrer, das heißt, sie brauchen viele Nährstoffe. Lockert den Boden gründlich auf und mischt reichlich Kompost oder gut verrotteten Mist unter. Das sorgt für eine gute Drainage und versorgt die Pflanzen mit wichtigen Nährstoffen. Ich gebe auch gerne noch etwas Hornspäne dazu, das ist ein natürlicher Langzeitdünger.
* Vorkultur oder Direktsaat?: In kühleren Regionen empfehle ich die Vorkultur im Haus. So haben die Pflanzen einen Vorsprung und können früher ins Freie. In wärmeren Regionen kann man die Melonen auch direkt ins Beet säen, sobald die Bodentemperaturen stimmen.
Die Aussaat: Der Start ins Melonenparadies
Jetzt geht’s ans Eingemachte! Egal ob Vorkultur oder Direktsaat, hier sind die wichtigsten Schritte:
Vorkultur (empfohlen für kältere Regionen):
1. Aussaatgefäße vorbereiten: Füllt kleine Töpfe (ca. 8-10 cm Durchmesser) mit Anzuchterde. Ich verwende gerne Kokos-Quellerde, weil sie sehr locker ist und die Wurzeln gut durchwachsen können.
2. Samen säen: Legt 2-3 Samen pro Topf ca. 2-3 cm tief in die Erde. Bedeckt die Samen leicht mit Erde und gießt sie vorsichtig an.
3. Warm und hell stellen: Stellt die Töpfe an einen warmen und hellen Ort. Eine Fensterbank über der Heizung ist ideal. Die Keimtemperatur sollte zwischen 22 und 28 Grad Celsius liegen.
4. Feucht halten: Haltet die Erde gleichmäßig feucht, aber nicht nass. Am besten verwendet ihr eine Sprühflasche, um die Erde zu befeuchten.
5. Pikieren (optional): Sobald die Keimlinge ihre ersten richtigen Blätter (nach den Keimblättern) entwickelt haben, könnt ihr sie pikieren. Das bedeutet, ihr entfernt den schwächsten Keimling pro Topf, sodass nur noch der stärkste übrig bleibt.
6. Abhärten: Bevor ihr die Jungpflanzen ins Freie pflanzt, müsst ihr sie abhärten. Das bedeutet, ihr stellt sie für ein paar Tage tagsüber ins Freie, damit sie sich an die Sonne und den Wind gewöhnen.
Direktsaat (geeignet für wärmere Regionen):
1. Boden vorbereiten: Lockert den Boden gründlich auf und mischt Kompost oder Mist unter.
2. Säen: Legt 2-3 Samen pro Pflanzstelle ca. 2-3 cm tief in die Erde. Der Abstand zwischen den Pflanzstellen sollte je nach Sorte 80-100 cm betragen.
3. Gießen: Gießt die Samen vorsichtig an.
4. Schutz vor Schnecken: Melonenkeimlinge sind bei Schnecken sehr beliebt. Schützt sie mit Schneckenkorn oder einem Schneckenzaun.
Die Pflege: Damit die Melonen prächtig gedeihen
Nach der Aussaat oder dem Pflanzen ist die richtige Pflege entscheidend für eine reiche Ernte.
* Gießen: Melonen brauchen viel Wasser, besonders während der Fruchtbildung. Gießt regelmäßig, aber vermeidet Staunässe. Am besten gießt ihr morgens, damit die Blätter über Tag abtrocknen können.
* Düngen: Düngt die Melonen regelmäßig mit einem organischen Dünger. Ich verwende gerne Brennnesseljauche oder einen speziellen Melonendünger.
* Mulchen: Mulcht den Boden um die Melonenpflanzen mit Stroh oder Rasenschnitt. Das hält den Boden feucht, unterdrückt Unkraut und schützt die Früchte vor direktem Bodenkontakt.
* Rankhilfe (optional): Einige Melonensorten ranken stark. Gebt ihnen eine Rankhilfe, z.B. ein Rankgitter oder einen Zaun. Das spart Platz und sorgt für eine bessere Belüftung der Pflanzen.
* Ausgeizen (optional): Bei einigen Melonensorten kann man die Seitentriebe ausbrechen, um die Fruchtbildung zu fördern. Informiert euch, ob das bei eurer Sorte sinnvoll ist.
* Schutz vor Schädlingen und Krankheiten: Achtet auf Schädlinge wie Blattläuse oder Mehltau. Bei Bedarf könnt ihr natürliche Pflanzenschutzmittel einsetzen.
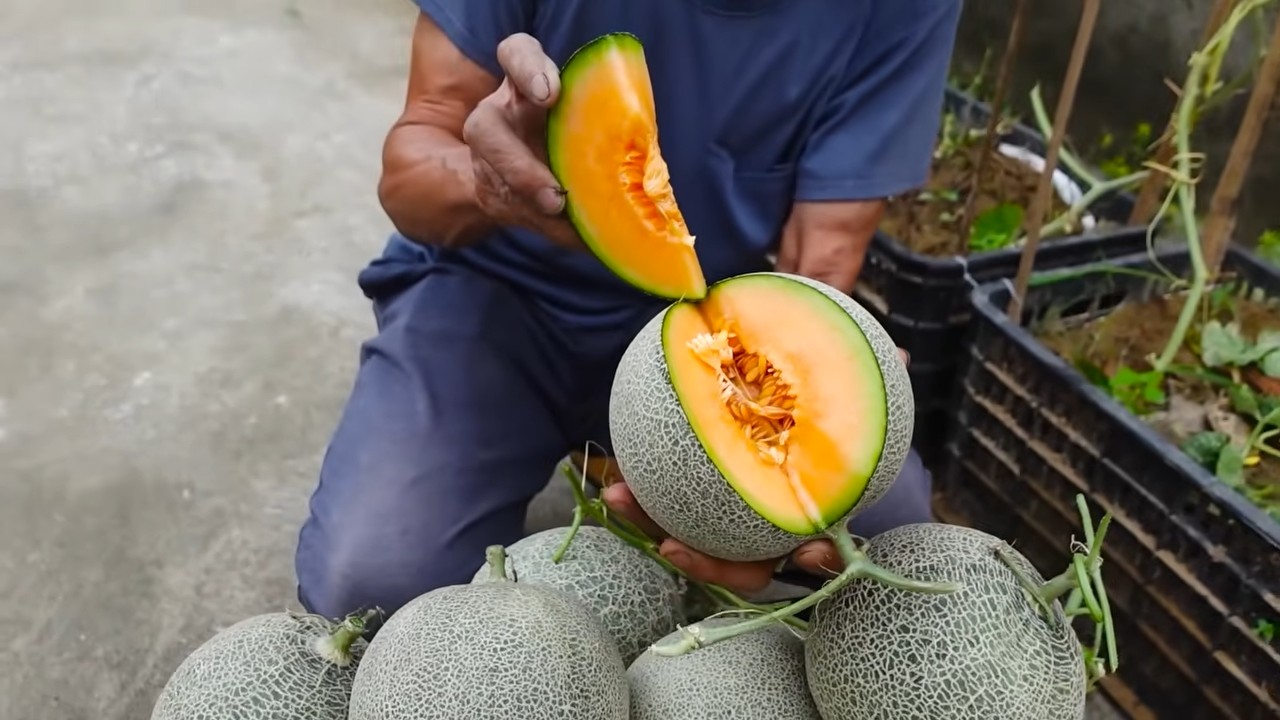
Die Ernte: Der Lohn der Mühe
Der spannendste Teil! Wann sind die Melonen reif?
* Klopftest: Klopft leicht gegen die Melone. Wenn sie hohl klingt, ist sie reif.
* Duftprobe: Reife Melonen duften intensiv.
* Stielansatz: Bei einigen Melonensorten löst sich der Stielansatz leicht, wenn die Melone reif ist.
* Farbe: Die Farbe der Melone verändert sich, wenn sie reif ist. Bei Wassermelonen wird die Unterseite, die auf dem Boden liegt, gelblich.
Schneidet die reifen Melonen vorsichtig ab und genießt sie! Selbst angebaute Melonen schmecken einfach unschlagbar!
Zusätzliche Tipps für eine erfolgreiche Melonenernte:
* Bienenfreundliche Pflanzen: Pflanzt bienenfreundliche Pflanzen in der Nähe eurer Melonen, um die Bestäubung zu fördern.
* Fruchtansatz fördern: Bei einigen Melonensorten kann man den Fruchtansatz fördern, indem man die Blüten von Hand bestäubt.
* Melonen vor Bodenkontakt schützen: Legt die Melonen auf ein Brett oder Stroh, um sie vor direktem Bodenkontakt und Fäulnis zu schützen.
* Nicht zu viele Früchte pro Pflanze: Wenn eine Pflanze zu viele Früchte trägt, werden sie nicht richtig reif. Entfernt einige Früchte, um die Reifung der übrigen zu fördern.
Ich hoffe, diese Anleitung hilft euch dabei, eure eigenen Melonen erfolgreich anzubauen. Viel Spaß beim Gärtnern und lasst es euch schmecken!
Conclusion
So, there you have it! This simple, yet effective DIY trick for melon growing is more than just a gardening hack; it’s a pathway to a more bountiful and satisfying harvest. We’ve walked you through the steps, highlighting how this method can significantly improve your melon yield, protect your precious fruits from ground pests and diseases, and even extend your growing season.
Why is this a must-try? Because it addresses some of the most common challenges faced by melon growers, particularly those with limited space or less-than-ideal soil conditions. By elevating your melons off the ground, you’re not only preventing rot and pest infestations, but you’re also allowing for better air circulation and sunlight exposure, which are crucial for healthy growth and delicious flavor. Imagine biting into a perfectly ripe, juicy melon that you nurtured from seedling to harvest, knowing that you played a key role in its success. That’s the reward waiting for you!
But don’t stop there! Feel free to experiment and adapt this DIY trick to suit your specific needs and preferences. For instance, if you’re growing smaller melon varieties like cantaloupe or honeydew, you might consider using smaller, more lightweight supports. You could also try different materials for your supports, such as repurposed plastic crates or even sturdy branches from your yard. The possibilities are endless!
For those looking to maximize their melon growing potential, consider combining this DIY trick with other proven techniques. Companion planting, for example, can help deter pests and attract beneficial insects. Regular fertilization with a balanced fertilizer will provide your melons with the nutrients they need to thrive. And of course, consistent watering is essential, especially during hot, dry periods.
Ultimately, the goal is to create a growing environment that is conducive to healthy melon development. This DIY trick is a valuable tool in achieving that goal, but it’s just one piece of the puzzle. By combining it with other best practices, you can significantly increase your chances of success.
We are confident that this DIY approach to melon growing will transform your gardening experience. It’s a simple, cost-effective, and highly rewarding way to cultivate delicious, homegrown melons. So, grab your supplies, get your hands dirty, and prepare to be amazed by the results.
Now, we want to hear from you! Have you tried this DIY trick before? What were your results? Do you have any tips or variations to share? We encourage you to try this method and share your experiences in the comments below. Let’s learn from each other and create a community of successful melon growers! Your insights could be invaluable to other gardeners who are just starting out. Let’s all become experts in **melon growing** together!
Frequently Asked Questions (FAQ)
What types of melons does this DIY trick work best for?
This DIY trick is beneficial for a wide variety of melon types, including watermelon, cantaloupe, honeydew, and even smaller varieties like Galia melons. The key is to adjust the size and strength of your support structure to accommodate the weight of the mature melon. For larger watermelons, you’ll need a more robust support system than you would for smaller cantaloupes. Consider the mature size of the melon variety you’re growing when designing your support.
What materials can I use to create the support structure?
You have several options when it comes to materials. Durable plastic crates are an excellent choice, as they are lightweight, weather-resistant, and readily available. You can also use wooden pallets, but make sure they are untreated and free of chemicals. Another option is to create a simple frame using PVC pipes or sturdy branches. The most important thing is to ensure that the support structure is strong enough to hold the weight of the melon as it grows. You can also use fabric slings or netting to provide additional support and prevent the melon from falling.
How high off the ground should I elevate the melons?
Ideally, you should elevate the melons at least 6-12 inches off the ground. This provides adequate air circulation and prevents the melons from coming into direct contact with the soil, which can lead to rot and pest infestations. The exact height will depend on the size of your melons and the overall layout of your garden. If you’re growing melons in raised beds, you may not need to elevate them as high as you would if you’re growing them directly in the ground.
When should I implement this DIY trick?
The best time to implement this DIY trick is when the melons are still relatively small, about the size of a softball. This makes it easier to lift and position them onto the support structure without damaging the vines. You can also start the support structure before the melons even begin to form, allowing the vines to grow around it naturally. This will provide a more stable and secure support system as the melons mature.
Will this DIY trick protect my melons from all pests?
While this DIY trick can significantly reduce the risk of ground-dwelling pests like squash bugs and vine borers, it won’t completely eliminate the threat. You’ll still need to monitor your plants regularly for signs of infestation and take appropriate action if necessary. Consider using organic pest control methods like neem oil or insecticidal soap to protect your melons from other pests. You can also use row covers to protect your plants from pests early in the season.
How often should I water my melons when using this DIY trick?
Melons need consistent watering, especially during hot, dry periods. When using this DIY trick, it’s important to ensure that the soil around the base of the plant remains moist but not waterlogged. Water deeply and regularly, especially when the melons are actively growing. You can also use a soaker hose or drip irrigation system to deliver water directly to the roots of the plant. Avoid overhead watering, as this can increase the risk of fungal diseases.
Can I use this DIY trick in containers?
Yes, this DIY trick can be adapted for container gardening. Choose a large container with good drainage and use a well-draining potting mix. You can then create a support structure using stakes or a trellis to elevate the melons off the ground. Make sure the container is strong enough to support the weight of the mature melons. Container-grown melons may require more frequent watering and fertilization than those grown in the ground.
What if my melon vines are too weak to support the weight of the melon even with the support structure?
Sometimes, even with a support structure, the melon vines may struggle to bear the weight of the developing fruit. In such cases, you can provide additional support by creating a sling or hammock for the melon using fabric or netting. Gently cradle the melon in the sling and attach it to the support structure. This will help distribute the weight more evenly and prevent the vine from breaking.
How does this DIY trick improve air circulation?
By elevating the melons off the ground, you’re allowing for better air circulation around the fruit. This is crucial for preventing fungal diseases and promoting healthy growth. Good air circulation helps to dry out the leaves and fruit after rain or watering, reducing the risk of rot and mildew. It also helps to regulate the temperature around the melons, preventing them from overheating in hot weather.
What are the benefits of increased sunlight exposure?
Sunlight is essential for photosynthesis, the process by which plants convert light energy into chemical energy. By elevating the melons off the ground, you’re allowing them to receive more direct sunlight, which can lead to increased sugar production and improved flavor. Sunlight also helps to ripen the melons more evenly and enhance their color. Make sure your melon plants are located in a sunny spot in your garden to maximize their sunlight exposure.
Leave a Comment