
Bag Gardening Carrots: Imagine harvesting a vibrant bunch of sweet, crunchy carrots right from your own backyard – or even your balcony! It’s easier than you think, and you don’t need acres of land to do it. Forget the traditional garden plot; we’re diving into the wonderful world of bag gardening, specifically for those delicious orange roots we all love.
Growing carrots has been a part of human history for centuries, with early varieties originating in areas like modern-day Afghanistan. While those ancient carrots might have looked a bit different from the ones we know today, the desire to cultivate our own food has always been a strong one. And let’s be honest, there’s something incredibly satisfying about pulling a perfectly grown carrot from the soil (or in this case, a bag!).
But why bag gardening carrots? Well, for many of us, space is a premium. Apartment dwellers, renters with limited garden access, or even homeowners looking for a convenient and contained gardening solution can all benefit. Plus, bag gardening offers better control over soil quality and drainage, leading to healthier, happier carrots. This DIY guide will walk you through every step, from choosing the right bag and soil to planting, watering, and harvesting your very own homegrown carrots. Get ready to enjoy the freshest, most flavorful carrots you’ve ever tasted – grown with your own two hands!
DIY Bag Gardening: Grow Carrots Anywhere!
Hey there, fellow gardening enthusiasts! Ever dreamed of growing your own crunchy, sweet carrots but thought you didn’t have the space? Well, I’m here to tell you that you absolutely can, even if you only have a balcony, patio, or even a sunny corner indoors! We’re going to dive into the wonderful world of bag gardening, specifically focusing on how to grow delicious carrots in bags. It’s easier than you think, and I’m going to walk you through every step.
Why Bag Gardening for Carrots?
Before we get started, let’s talk about why bag gardening is a fantastic option for carrots:
* Space-Saving: This is the biggest advantage! Bags take up minimal space compared to traditional garden beds.
* Portability: You can move your carrot garden around to chase the sun or protect it from harsh weather.
* Excellent Drainage: Bags typically offer better drainage than compacted garden soil, which is crucial for healthy carrot growth.
* Weed Control: It’s much easier to manage weeds in a contained bag environment.
* Soil Control: You have complete control over the soil composition, ensuring your carrots get the nutrients they need.
Materials You’ll Need
Okay, let’s gather our supplies. Here’s what you’ll need to create your carrot bag garden:
* Grow Bags: Choose fabric grow bags (at least 12 inches deep, preferably 18-24 inches for longer carrot varieties). I recommend using bags that are at least 10 gallons in size. Fabric bags allow for better air circulation and drainage.
* Potting Mix: This is super important! Don’t use garden soil. You need a light, fluffy potting mix specifically formulated for containers. Look for a mix that contains peat moss, perlite, and vermiculite.
* Carrot Seeds: Select a carrot variety that suits your taste and growing conditions. Shorter, rounder varieties like ‘Thumbelina’ or ‘Parisian’ are ideal for containers, but you can also grow longer varieties if you have deep enough bags.
* Slow-Release Fertilizer: A balanced slow-release fertilizer (e.g., 10-10-10) will provide your carrots with a steady supply of nutrients.
* Watering Can or Hose: For regular watering.
* Trowel or Small Shovel: For filling the bags with soil and planting seeds.
* Optional: Horticultural sand to improve drainage, especially if you live in a rainy area.
Step-by-Step Guide to Planting Carrots in Bags
Alright, let’s get our hands dirty! Here’s the step-by-step process for planting your carrot bag garden:
1. Prepare the Grow Bags
* Choose a Location: Select a spot that receives at least 6-8 hours of direct sunlight per day. Carrots need plenty of sunshine to thrive.
* Position the Bags: Place your grow bags in their final location *before* filling them with soil. Once they’re full, they’ll be heavy and difficult to move.
* Optional Drainage Layer: If you’re concerned about drainage, you can add a layer of gravel or horticultural sand to the bottom of the bag (about 1-2 inches). This isn’t always necessary with fabric bags, but it can be helpful in areas with heavy rainfall.
2. Fill the Grow Bags with Potting Mix
* Mix in Fertilizer: Before filling the bags, mix the slow-release fertilizer into the potting mix according to the package instructions. This will ensure your carrots have a good start.
* Fill the Bags: Gradually fill the grow bags with the prepared potting mix, leaving about 2-3 inches of space at the top. Don’t pack the soil down too tightly; you want it to be loose and airy.
3. Sow the Carrot Seeds
* Water the Soil: Gently water the potting mix until it’s evenly moist but not soggy.
* Sow the Seeds: Carrot seeds are tiny, so it’s easy to sow them too thickly. Sprinkle the seeds thinly over the surface of the soil, spacing them about 1-2 inches apart.
* Cover the Seeds: Lightly cover the seeds with a thin layer of potting mix (about 1/4 inch).
* Gently Water Again: Use a watering can with a gentle rose attachment to water the seeds again. Be careful not to wash the seeds away.
4. Maintain Your Carrot Bag Garden
* Watering: Keep the soil consistently moist but not waterlogged. Water deeply whenever the top inch of soil feels dry to the touch. Avoid overhead watering, as this can promote fungal diseases.
* Thinning: This is crucial for carrot development! Once the seedlings emerge and have a few true leaves (about 2-3 weeks after germination), thin them out to about 2-3 inches apart. This gives the remaining carrots enough space to grow. Don’t be afraid to pull out the weaker seedlings.
* Weeding: Regularly remove any weeds that pop up in the bags. Weeds compete with carrots for nutrients and water.
* Fertilizing: Carrots are heavy feeders, so you may need to supplement with liquid fertilizer every few weeks. Use a balanced fertilizer diluted to half strength.
* Sunlight: Ensure your carrot bags continue to receive at least 6-8 hours of direct sunlight per day. If you’re growing indoors, you may need to supplement with grow lights.
* Pest Control: Keep an eye out for pests like carrot rust flies or aphids. If you notice any infestations, treat them with an appropriate organic insecticide.
Troubleshooting Common Problems
Even with the best care, you might encounter a few challenges along the way. Here are some common problems and how to address them:
* Poor Germination: Carrot seeds can be slow to germinate. Make sure the soil is consistently moist and the temperature is warm enough (around 65-75°F). You can also try soaking the seeds in water for a few hours before planting to improve germination rates.
* Forked or Stunted Carrots: This is often caused by compacted soil or rocks in the soil. Make sure you’re using a light, fluffy potting mix and remove any rocks or debris.
* Carrot Root Fly: This pest can tunnel into carrot roots, causing damage. Cover your carrot bags with insect netting to prevent the flies from laying their eggs.
* Bolting: If your carrots bolt (start to produce flowers) before they’re ready to harvest, it’s usually due to stress, such as extreme temperatures or inconsistent watering. Try to maintain consistent growing conditions.
* Pale or Yellowing Leaves: This could indicate a nutrient deficiency. Supplement with a balanced fertilizer.
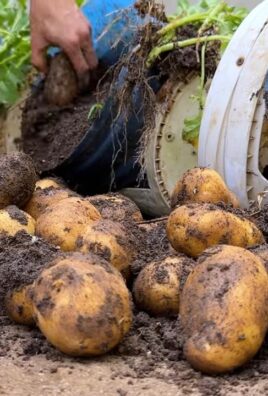
Harvesting Your Carrots
The moment you’ve been waiting for! Carrots are typically ready to harvest 60-80 days after planting, depending on the variety.
* Check for Size: Gently brush away some of the soil around the top of the carrot to check its size.
* Harvest Carefully: To harvest, gently loosen the soil around the carrot and pull it straight up. If the soil is dry, water it beforehand to make it easier to pull the carrots.
* Enjoy Your Harvest: Wash your freshly harvested carrots and enjoy them raw, roasted, or in your favorite recipes!
Choosing the Right Carrot Variety
Selecting the right carrot variety is key to success in bag gardening. Here are a few recommendations:
* ‘Thumbelina’: These are small, round carrots that are perfect for containers. They mature quickly and have a sweet flavor.
* ‘Parisian’: Another round variety that’s well-suited for containers. They’re known for their uniform shape and excellent taste.
* ‘Nantes’: A classic carrot variety with a cylindrical shape and sweet flavor. Choose a shorter Nantes variety for bag gardening.
* ‘Danvers’: A longer, tapered carrot that can be grown in deeper bags.
Tips for Success
Here are a few extra tips to help you succeed with your carrot bag garden:
* Rotate Your Crops: If you’re using the same bags year after year, rotate your crops to prevent soilborne diseases.
* Amend the Soil: Before replanting, amend the soil with compost or other organic matter to replenish nutrients.
* Don’t Overwater: Overwatering can lead to root rot. Let the soil dry out slightly between waterings.
* Be Patient: Carrots take time to grow. Don’t get discouraged if you don’t see results immediately.
Enjoy the Process!
Growing your own carrots in bags is a rewarding experience. It’s a great way to connect with nature, enjoy fresh produce, and learn about gardening. So, get out there, get your hands dirty, and have
Conclusion
So, there you have it! Transforming a simple bag into a thriving carrot patch is not just a gardening hack; it’s a gateway to fresh, homegrown goodness right at your doorstep. We’ve walked you through the process, highlighting the ease, the space-saving benefits, and the sheer joy of nurturing your own food. But why is this bag gardening carrots method a must-try?
Firstly, it democratizes gardening. No sprawling backyard? No problem! A sunny balcony, a patio corner, or even a well-lit porch can become your personal farm. Secondly, it’s incredibly accessible. The materials are readily available and often inexpensive, making it a budget-friendly way to enjoy organic produce. Thirdly, it’s a fantastic learning experience, connecting you directly to the food you eat and fostering a deeper appreciation for the natural world.
Beyond the basic method, there’s plenty of room for experimentation. Consider using different types of bags – burlap sacks for a rustic look, or even repurposed shopping bags (just ensure they’re sturdy and have drainage holes). You can also explore companion planting. Marigolds, for instance, are known to deter pests and can be planted alongside your carrots. Radishes are also a great companion plant, as they germinate quickly and help break up the soil, making it easier for carrot roots to grow.
For those seeking a more advanced challenge, try succession planting. Sow seeds every few weeks to ensure a continuous harvest throughout the growing season. You can also experiment with different carrot varieties. Nantes carrots are known for their sweetness and uniform shape, while Chantenay carrots are shorter and sturdier, making them ideal for container gardening. Rainbow carrots, with their vibrant colors, add a touch of whimsy to your garden and your plate.
Don’t be afraid to get your hands dirty and embrace the learning process. Gardening is an art, not a science, and there’s no one-size-fits-all approach. Observe your plants, adjust your watering schedule based on the weather, and don’t hesitate to troubleshoot any issues that arise. Remember, even experienced gardeners face challenges, and every mistake is an opportunity to learn and grow.
We wholeheartedly encourage you to give this bag gardening carrots technique a try. It’s a rewarding experience that will not only provide you with delicious, homegrown carrots but also connect you to the earth in a meaningful way. And most importantly, we want to hear about your experience! Share your photos, tips, and challenges in the comments below. Let’s create a community of bag gardening enthusiasts and inspire others to embrace the joy of growing their own food. What are you waiting for? Grab a bag, some soil, and some carrot seeds, and let the gardening adventure begin! We can’t wait to see what you grow!
FAQ
What kind of bag is best for growing carrots?
The ideal bag for growing carrots should be sturdy, durable, and provide adequate drainage. Woven polypropylene bags (like those used for animal feed or landscaping materials) are a popular choice because they are strong, breathable, and allow excess water to escape. Burlap sacks offer a more natural and rustic aesthetic but may decompose more quickly. Even heavy-duty plastic shopping bags can be used, but be sure to poke plenty of drainage holes in the bottom. The size of the bag is also important; aim for a bag that is at least 12 inches deep to accommodate the carrot roots.
How do I ensure proper drainage in my bag garden?
Proper drainage is crucial to prevent root rot and ensure healthy carrot growth. Before filling the bag with soil, add a layer of gravel or small stones to the bottom to improve drainage. When using plastic bags, make sure to poke numerous drainage holes in the bottom and sides. Avoid overwatering, and check the soil moisture regularly. If the soil feels soggy, reduce the watering frequency. You can also elevate the bag slightly to allow for better airflow and drainage.
What type of soil should I use for bag gardening carrots?
Carrots thrive in loose, well-draining soil that is rich in organic matter. A good potting mix specifically formulated for vegetables is an excellent choice. You can also create your own mix by combining equal parts of compost, peat moss (or coconut coir), and perlite or vermiculite. Avoid using heavy clay soil, as it can compact and hinder root development. Before planting, amend the soil with a slow-release fertilizer to provide essential nutrients.
How often should I water my bag garden carrots?
The watering frequency will depend on the weather, the type of bag you’re using, and the drainage. Generally, you should water your carrots when the top inch of soil feels dry to the touch. Avoid overwatering, as this can lead to root rot. During hot and dry weather, you may need to water daily. In cooler or wetter conditions, you can reduce the watering frequency. Use a watering can or hose with a gentle spray to avoid disturbing the soil and damaging the seedlings.
How much sunlight do carrots need in a bag garden?
Carrots need at least 6 hours of direct sunlight per day to thrive. Choose a location for your bag garden that receives ample sunlight throughout the day. If you live in a particularly hot climate, you may need to provide some afternoon shade to prevent the soil from drying out too quickly. If you don’t have access to enough natural sunlight, you can supplement with grow lights.
What are some common pests and diseases that affect carrots, and how can I prevent them in my bag garden?
Common pests that affect carrots include carrot rust flies, aphids, and nematodes. Diseases include leaf blight and root rot. To prevent these problems, practice good sanitation by removing any dead or decaying plant matter from the garden. Use insecticidal soap or neem oil to control aphids and other pests. Rotate your crops regularly to prevent the buildup of soilborne diseases. Ensure proper drainage to prevent root rot. Consider using companion planting to deter pests. For example, planting onions or garlic near your carrots can help repel carrot rust flies.
When is the best time to harvest my bag garden carrots?
Carrots are typically ready to harvest 60-80 days after planting, depending on the variety. Check the seed packet for specific maturity dates. You can harvest carrots when they reach the desired size. To harvest, gently loosen the soil around the carrot and pull it out by the greens. If the soil is dry, water it beforehand to make harvesting easier.
Can I reuse the soil from my bag garden for future plantings?
Yes, you can reuse the soil from your bag garden, but it’s important to replenish the nutrients and improve the soil structure. After harvesting your carrots, remove any plant debris and amend the soil with compost, aged manure, or a slow-release fertilizer. You may also want to add some perlite or vermiculite to improve drainage. If you suspect that the soil is contaminated with pests or diseases, you can sterilize it by baking it in the oven or solarizing it in the sun.
What are some other vegetables I can grow in bags besides carrots?
Bag gardening is a versatile method that can be used to grow a wide variety of vegetables, including tomatoes, peppers, lettuce, spinach, radishes, herbs, and even potatoes. The key is to choose vegetables that are well-suited to container gardening and provide them with the appropriate growing conditions.
How do I store my harvested carrots from my bag garden?
To store your harvested carrots, remove the greens and gently brush off any excess soil. Store the carrots in a cool, dark, and humid place, such as the refrigerator. You can wrap them in a damp paper towel or store them in a plastic bag with a few holes for ventilation. Carrots can also be stored in a root cellar or buried in sand. Properly stored carrots can last for several weeks or even months.
Leave a Comment