
Grow angled luffa at home and transform your backyard into a personal spa supply center! Imagine stepping outside and harvesting your own natural sponges – no more trips to the store or wondering about the origins of your loofah. This isn’t just about gardening; it’s about embracing a sustainable, eco-friendly lifestyle, one delicious and exfoliating gourd at a time.
The luffa, also known as the sponge gourd, has a rich history, particularly in Asian cultures where it’s been cultivated for centuries, not only for its fibrous interior but also as a culinary delight when young. From traditional medicine to everyday cleaning, the luffa has proven its versatility. But why buy one when you can grow angled luffa at home and enjoy the freshest, most natural product possible?
Let’s face it, we’re all looking for ways to reduce our environmental footprint and save a little money. Growing your own luffa does both! Plus, it’s incredibly rewarding to nurture a plant from seed to sponge. This DIY project is perfect for anyone who enjoys gardening, crafting, or simply wants to add a unique and sustainable element to their home. In this article, I’ll share my tried-and-true tips and tricks for successfully growing angled luffa, even if you’re a beginner gardener. Get ready to roll up your sleeves and embark on this exciting horticultural adventure!
Grow Angled Luffa at Home: A Comprehensive DIY Guide
Hey there, fellow gardening enthusiasts! Ever dreamt of growing your own natural sponges? Well, angled luffa, also known as Chinese okra or ridge gourd, is your answer! It’s not only a delicious vegetable when young, but also transforms into a fantastic exfoliating sponge when mature. I’ve been growing luffa for years, and I’m excited to share my secrets to help you cultivate these amazing gourds in your own backyard.
Understanding Angled Luffa
Before we dive in, let’s get acquainted with our star plant. Angled luffa ( *Luffa acutangula*) is a vigorous vine that thrives in warm climates. It needs plenty of sunlight, well-drained soil, and a strong support structure to climb on. The fruit is characterized by its prominent ridges, hence the name “angled” luffa.
Phase 1: Starting Your Luffa Journey
This phase focuses on getting your luffa seeds ready for planting and preparing the ideal environment for them to thrive.
Choosing the Right Seeds
* Source Matters: Always opt for seeds from a reputable source. This ensures higher germination rates and healthier plants. I personally prefer buying from local nurseries or online seed suppliers with good reviews.
* Seed Viability: Luffa seeds can remain viable for several years if stored properly (cool, dark, and dry). However, fresher seeds generally germinate better.
* Seed Variety: While *Luffa acutangula* is the most common, there are slight variations in fruit size and shape. Choose a variety that suits your needs and space.
Preparing the Seeds for Germination
Luffa seeds have a tough outer shell, so a little pre-treatment can significantly improve germination rates. Here’s what I do:
1. Scarification (Optional but Recommended): Gently nick the seed coat with a nail file or sandpaper. Be careful not to damage the inner seed. This allows water to penetrate more easily.
2. Soaking: Soak the seeds in lukewarm water for 24-48 hours. This softens the seed coat and kickstarts the germination process. I usually change the water once or twice during this period.
3. Paper Towel Method (My Preferred Method): Place the soaked seeds on a damp paper towel, fold it over, and put it in a plastic bag or container. Keep the paper towel moist but not soggy. Place the bag in a warm location (around 80-85°F or 27-29°C). You should see sprouts within a few days.
Preparing the Soil
Luffa plants are heavy feeders, so rich, well-drained soil is crucial.
* Soil Type: Loamy soil is ideal, but you can amend any soil type to make it suitable.
* Amendments: Mix in plenty of compost, well-rotted manure, or other organic matter to improve drainage, fertility, and water retention. I usually add a generous amount of compost and some bone meal for phosphorus.
* pH Level: Luffa prefers a slightly acidic to neutral pH (6.0-7.0). You can test your soil pH with a soil testing kit and adjust accordingly.
Phase 2: Planting and Nurturing Your Luffa Vines
This phase covers the actual planting process and the essential care your luffa vines will need to flourish.
Starting Seeds Indoors (Recommended for Cooler Climates)
If you live in a region with a short growing season, starting seeds indoors is a great way to get a head start.
1. Timing: Start seeds 6-8 weeks before the last expected frost.
2. Containers: Use biodegradable pots or peat pellets to minimize root disturbance when transplanting.
3. Planting Depth: Plant the sprouted seeds about 1 inch deep.
4. Watering: Keep the soil consistently moist but not waterlogged.
5. Light: Provide ample light, either from a sunny window or a grow light.
6. Hardening Off: Gradually acclimate the seedlings to outdoor conditions before transplanting. This involves exposing them to increasing amounts of sunlight and wind over a period of 7-10 days.
Direct Sowing (Suitable for Warmer Climates)
If you live in a warm climate with a long growing season, you can directly sow the seeds into the ground.
1. Timing: Sow seeds after the last frost when the soil has warmed up to at least 70°F (21°C).
2. Spacing: Plant seeds 1-2 inches deep and space them 12-18 inches apart.
3. Watering: Keep the soil consistently moist until the seedlings emerge.
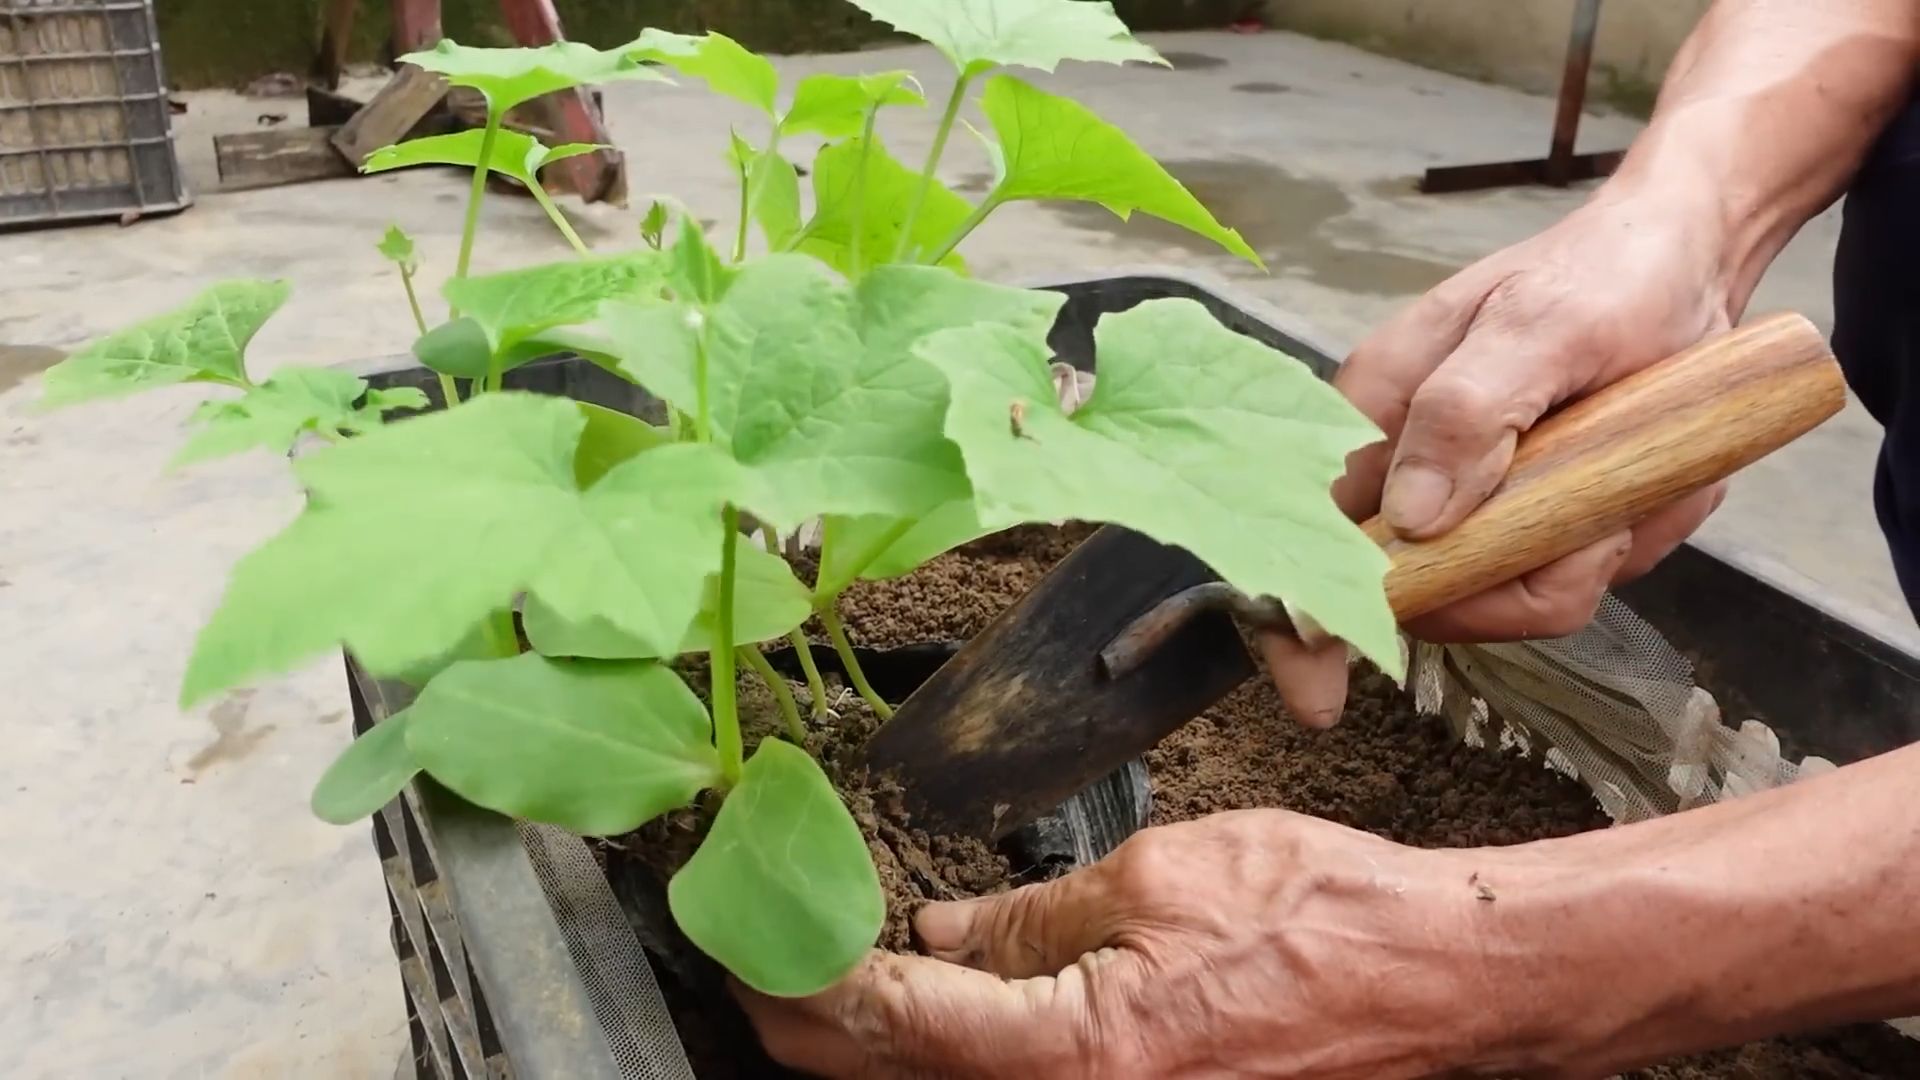
Transplanting Seedlings
Whether you started seeds indoors or purchased seedlings from a nursery, transplanting requires care.
1. Timing: Transplant seedlings after the last frost when the soil has warmed up.
2. Preparation: Dig a hole slightly larger than the root ball.
3. Careful Removal: Gently remove the seedling from its container, being careful not to damage the roots.
4. Planting: Place the seedling in the hole and backfill with soil.
5. Watering: Water thoroughly after transplanting.
6. Mulching: Apply a layer of mulch around the base of the plant to help retain moisture and suppress weeds.
Providing Support
Luffa vines are vigorous climbers and need a strong support structure.
* Trellises: A sturdy trellis is an excellent option. Make sure it’s tall enough to accommodate the vine’s growth.
* Arbors: An arbor can provide both support and shade.
* Fences: A strong fence can also serve as a support structure.
* DIY Structures: Get creative and build your own support structure using bamboo poles, wire mesh, or other materials. I’ve even used old ladders!
Watering and Fertilizing
Consistent watering and fertilization are essential for healthy luffa growth.
* Watering: Water deeply and regularly, especially during hot, dry weather. Luffa plants need plenty of water to produce large fruits.
* Fertilizing: Fertilize every 2-3 weeks with a balanced fertilizer or a fertilizer high in phosphorus and potassium. I like to use compost tea or fish emulsion. Avoid over-fertilizing with nitrogen, as this can promote excessive vine growth at the expense of fruit production.
Pruning and Training
Pruning and training can help improve air circulation and fruit production.
* Pruning: Remove any dead or diseased leaves and stems. You can also prune back the vine to encourage branching and more fruit production.
* Training: Train the vine to climb the support structure by gently guiding the stems and tendrils.
Pest and Disease Control
Luffa plants are generally resistant to pests and diseases, but they can be susceptible to certain problems.
* Common Pests: Aphids, squash bugs, and cucumber beetles can sometimes attack luffa plants.
* Common Diseases: Powdery mildew and fungal diseases can occur in humid conditions.
* Organic Solutions: Use organic pest control methods such as insecticidal soap, neem oil, or diatomaceous earth. For fungal diseases, improve air circulation and apply a fungicide if necessary.
Phase 3: Harvesting and Processing Your Luffa Sponges
This is the most rewarding phase – harvesting the fruits of your labor and transforming them into natural sponges!
Harvesting for Consumption
If you want to eat the luffa as a vegetable, harvest the fruits when they are young and tender, typically around 6-8 inches long. They should be firm and have a smooth skin. You can use them in stir-fries, soups, or stews.
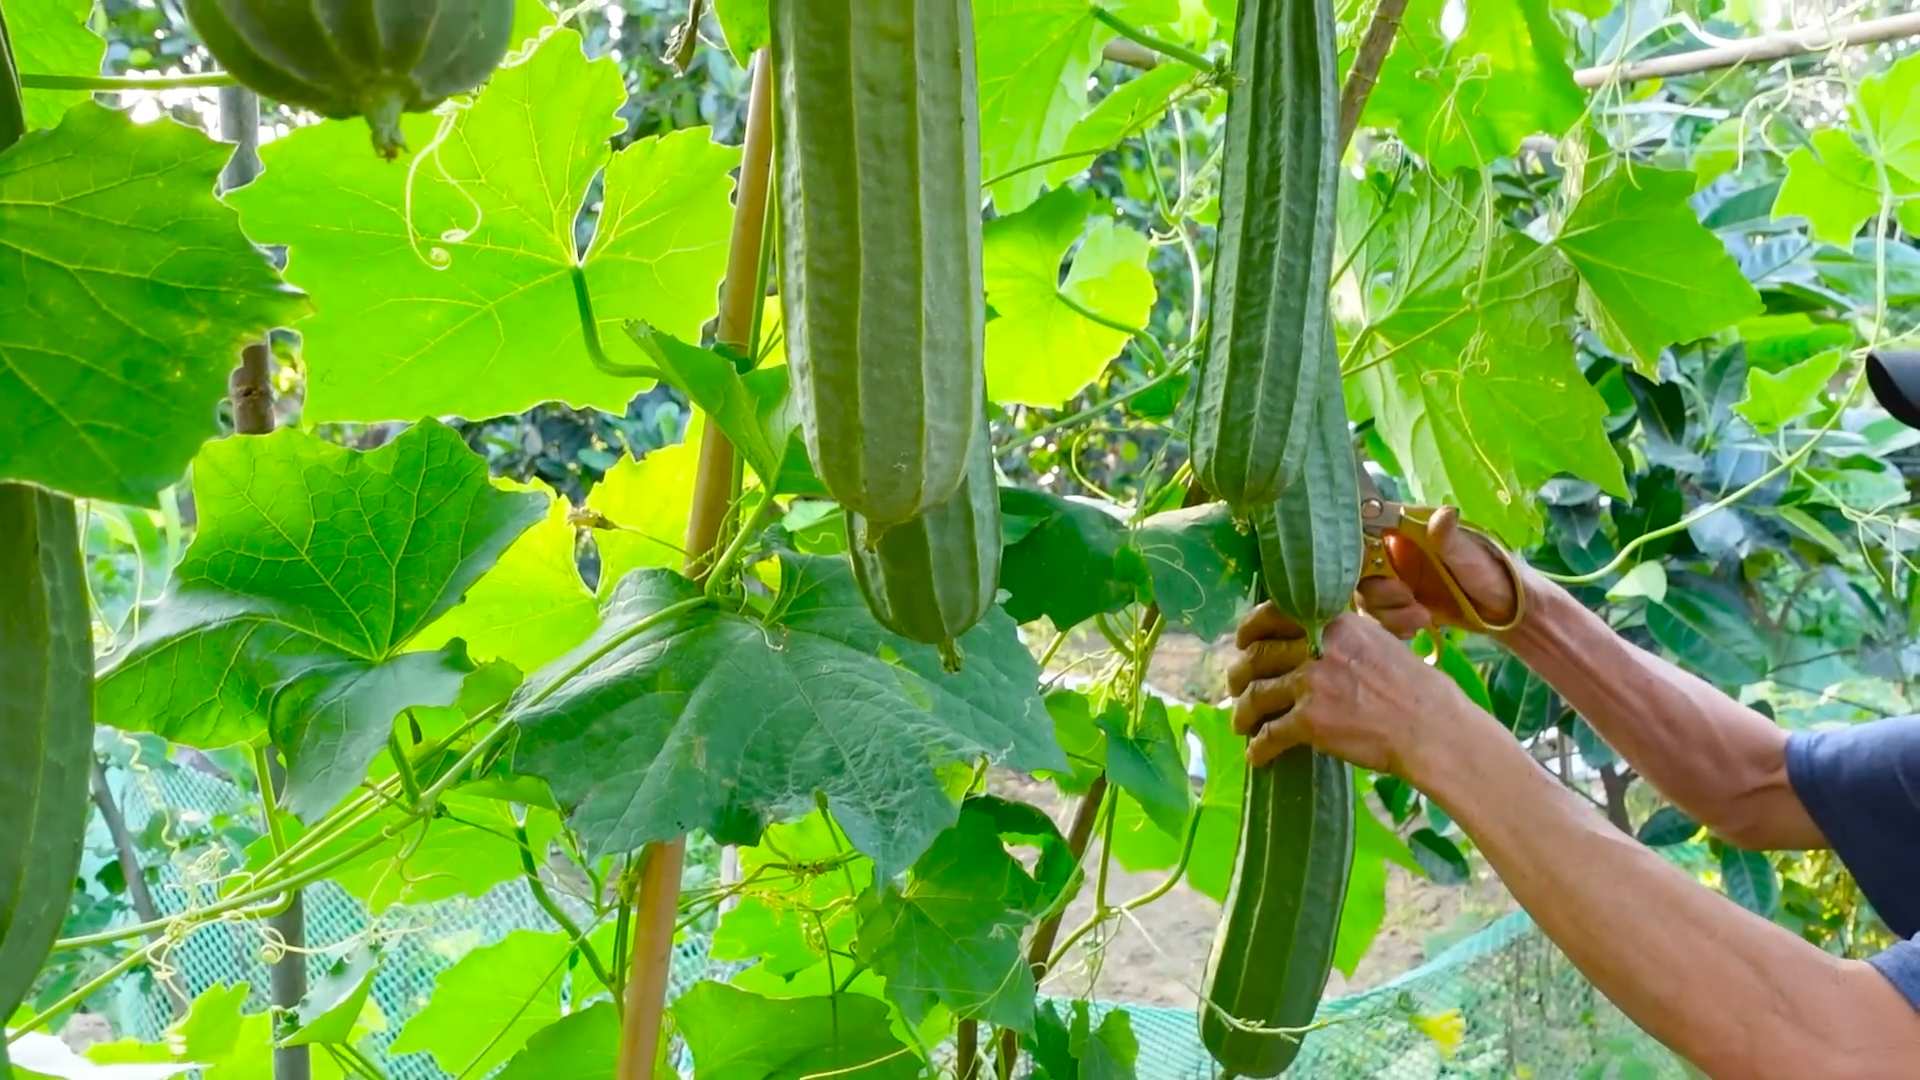
Harvesting for Sponges
To harvest luffa for sponges, wait until the fruits are fully mature and the skin has turned brown and dry. The fruits will feel lightweight and the seeds will rattle inside.
1. Timing: Harvest before the first frost.
2. Cutting: Cut the luffa from the vine, leaving a few inches of stem attached.
Processing the Luffa
This is where the magic happens!
1. Drying (If Necessary): If the luffa is not completely dry, allow it to dry in a well-ventilated area for a few weeks.
2. Removing the Skin: Soak the dried luffa in water for a few minutes to soften the skin. Then, use your hands to peel off the skin. It should come off easily. If it’s stubborn, you can use a knife or vegetable peeler.
3. Removing the Seeds: Shake out the seeds. You can save them for planting next year.
4. Washing: Rinse the luffa thoroughly with water to remove any remaining
Conclusion
So, there you have it! Growing angled luffa at home, specifically training it to grow at an angle, is more than just a gardening experiment; it’s a gateway to a sustainable, rewarding, and frankly, quite fascinating experience. We’ve explored the reasons why this method is superior, the practical steps involved, and the potential challenges you might face. But the benefits far outweigh any perceived difficulty.
Think about it: you’re not just growing a sponge; you’re cultivating a piece of nature, a biodegradable alternative to synthetic products that often end up polluting our planet. You’re reducing your carbon footprint, supporting sustainable practices, and gaining a unique, handcrafted item that you can proudly say you grew yourself. Plus, the angled growth technique maximizes space, promotes even ripening, and results in a more aesthetically pleasing and functional luffa.
But the advantages don’t stop there. Imagine the satisfaction of gifting these homegrown luffas to friends and family, sharing the fruits (or rather, vegetables!) of your labor. Picture yourself using your own angled luffa in the shower, knowing that it’s gentle on your skin and kind to the environment. Envision the conversations sparked by this unusual and eco-conscious creation.
Ready to take your angled luffa growing to the next level? Consider experimenting with different trellising materials. Bamboo stakes, repurposed metal fencing, or even sturdy branches can all be used to create a supportive structure. You can also try interplanting your luffa vines with companion plants like basil or marigolds to deter pests and attract beneficial insects. Another variation is to experiment with different luffa varieties. While angled luffa is the focus here, other types of luffa can also be trained using similar techniques, offering a diverse range of textures and sizes.
Don’t be intimidated by the prospect of training your luffa vines. It’s a process that requires patience and observation, but it’s also incredibly rewarding. Remember to check your plants regularly, adjust the ties as needed, and celebrate the small victories along the way.
We wholeheartedly encourage you to embark on this DIY adventure. It’s a chance to connect with nature, learn new skills, and create something truly special. And most importantly, it’s a step towards a more sustainable and eco-friendly lifestyle.
So, grab your seeds, prepare your garden, and get ready to grow your own angled luffa. We’re confident that you’ll be amazed by the results. And once you’ve harvested your first crop, we’d love to hear about your experience. Share your photos, tips, and stories in the comments below. Let’s create a community of angled luffa enthusiasts and inspire others to embrace this sustainable and rewarding practice. Happy growing!
Frequently Asked Questions (FAQ)
What exactly is an angled luffa, and why should I grow it at an angle?
An angled luffa (also sometimes called Chinese okra or ridge gourd) is a type of vegetable that, when dried, becomes a natural sponge. Growing it at an angle, rather than letting it sprawl on the ground, offers several advantages. It maximizes space in your garden, allowing you to grow more in a smaller area. It promotes better air circulation around the fruit, reducing the risk of fungal diseases. It also encourages more even ripening, resulting in a higher quality luffa sponge. Finally, training the luffa to grow at an angle results in a straighter, more uniform shape, making it more practical and aesthetically pleasing for use as a sponge.
How long does it take to grow an angled luffa from seed to harvest?
The time it takes to grow an angled luffa from seed to harvest can vary depending on your climate and growing conditions. Generally, it takes around 120 to 150 days. You’ll need to start the seeds indoors about 6-8 weeks before the last expected frost. Once the seedlings are strong enough, transplant them outdoors after the danger of frost has passed. Be patient, as luffas require a long growing season and plenty of warmth and sunlight.
What kind of support structure is best for training angled luffa vines?
The best support structure for training angled luffa vines is one that is sturdy, tall enough to accommodate the vine’s growth (at least 6-8 feet), and provides ample surface area for the tendrils to grip. A strong trellis made of wood, metal, or bamboo is ideal. You can also use a fence or even a sturdy pergola. The key is to ensure that the structure is strong enough to support the weight of the mature vines and developing luffas. Remember to position the support structure in a location that receives plenty of sunlight.
How do I actually train the angled luffa vines to grow at an angle?
Training angled luffa vines involves gently guiding the vines along your chosen support structure. As the vines grow, they will naturally produce tendrils that will cling to the trellis. You can help them along by manually attaching the vines to the trellis using soft plant ties or twine. Be careful not to tie the vines too tightly, as this can restrict their growth. Regularly check the vines and adjust the ties as needed to ensure they are growing in the desired direction. The earlier you start training the vines, the easier it will be to maintain their angled growth.
What are some common problems I might encounter when growing angled luffa, and how can I prevent them?
Some common problems you might encounter when growing angled luffa include pests like squash bugs and vine borers, fungal diseases like powdery mildew, and nutrient deficiencies. To prevent these problems, start by choosing a sunny location with well-draining soil. Regularly inspect your plants for signs of pests or disease and take action promptly. Companion planting with herbs like basil or marigolds can help deter pests. Ensure your plants receive adequate water and fertilizer, but avoid overwatering, which can contribute to fungal diseases. Practicing crop rotation can also help prevent soilborne diseases.
How do I know when my angled luffa is ready to harvest?
An angled luffa is ready to harvest when the skin turns brown and dry, and the luffa feels lightweight. You should be able to hear the seeds rattling inside when you shake it. If you’re unsure, you can test a small area of the skin by scratching it with your fingernail. If the skin is easily removed and the fibers underneath are dry and fibrous, it’s ready to harvest.
What’s the best way to process my harvested angled luffa into a usable sponge?
To process your harvested angled luffa into a usable sponge, first soak it in water for several days to soften the skin. Once the skin is soft, you can peel it off by hand. Remove the seeds and any remaining pulp. Rinse the luffa thoroughly and allow it to dry completely in the sun. Once dry, you can cut it into smaller pieces if desired. To soften the luffa further, you can soak it in warm water before use.
Can I eat angled luffa?
Yes, you can eat angled luffa when it is young and tender, before the fibers develop. It can be used in stir-fries, soups, and stews. It has a mild, slightly sweet flavor. However, once the luffa matures and the fibers become tough, it is no longer suitable for eating.
Are there different varieties of angled luffa?
While “angled luffa” generally refers to *Luffa acutangula*, there can be variations in size, shape, and the prominence of the ridges. Some varieties may be more disease-resistant or have a shorter growing season. Check with your local seed supplier for varieties that are well-suited to your climate.
Where can I find seeds for angled luffa?
You can find seeds for angled luffa at most garden centers, nurseries, and online seed retailers. Look for reputable suppliers that offer high-quality seeds. You can also save seeds from your own luffas to plant the following year, but be aware that the resulting plants may not be exactly the same as the parent plant due to cross-pollination.

Leave a Comment