
Grow Angled Luffa at Home and unlock the secrets to cultivating your own natural sponges! Have you ever imagined strolling into your backyard and harvesting a sustainable, eco-friendly cleaning tool? It’s not just a dream; it’s an achievable reality with a little know-how. For generations, luffa, also known as angled gourd, has been a staple in various cultures, from its culinary uses in Asian cuisine to its practical applications as a gentle exfoliant in beauty routines.
But why should you bother growing your own? Well, store-bought sponges are often made from synthetic materials that contribute to plastic waste. By learning how to grow angled luffa at home, you’re not only reducing your environmental footprint but also gaining access to a versatile and completely natural product. Plus, the process itself is incredibly rewarding! Imagine the satisfaction of nurturing a tiny seed into a thriving vine that yields these amazing, multi-purpose gourds.
This DIY guide will walk you through every step, from selecting the right seeds and preparing your garden to harvesting and curing your very own luffa sponges. Get ready to transform your garden into a sustainable source of natural goodness!
Grow Your Own Angled Luffa Sponges: A Beginner’s Guide
Hey there, fellow gardening enthusiasts! Have you ever thought about growing your own sponges? I know, it sounds a little crazy, but it’s totally doable and incredibly rewarding. We’re talking about angled luffa, also known as Chinese okra or ridged gourd. These amazing plants produce fruits that, when dried, transform into fantastic natural sponges. Forget those synthetic scrubbers – let’s get our hands dirty and grow our own!
What You’ll Need
Before we dive in, let’s gather our supplies. This will make the whole process smoother and more enjoyable. Trust me, being prepared is half the battle!
* **Angled Luffa Seeds:** You can find these online or at your local garden center. Make sure they’re from a reputable source to ensure good germination rates.
* **Seed Starting Tray or Small Pots:** These are perfect for getting your seedlings started indoors.
* **Seed Starting Mix:** This is a light, airy soil mix specifically designed for seedlings.
* **Larger Pots (if starting indoors):** You’ll need these to transplant your seedlings into before moving them outdoors. Aim for at least 5-gallon pots.
* **Well-Draining Soil:** Luffa plants need soil that drains well to prevent root rot. A mix of compost, potting soil, and perlite works wonders.
* **Compost or Aged Manure:** This will enrich the soil and provide your plants with essential nutrients.
* **Trellis or Support Structure:** Luffa vines are climbers, so they need something to grow on. A sturdy trellis, fence, or even a pergola will do the trick.
* **Gardening Gloves:** Protect your hands from dirt and potential irritants.
* **Watering Can or Hose:** For keeping your plants hydrated.
* **Pruning Shears or Scissors:** For trimming the vines and harvesting the luffa.
* **Patience:** Growing luffa takes time and effort, but the results are totally worth it!
Starting Your Luffa Seeds
Luffa has a long growing season, so starting your seeds indoors is highly recommended, especially if you live in a cooler climate. This gives them a head start and ensures they have enough time to mature before the first frost.
1. **Soaking the Seeds:** Luffa seeds have a tough outer shell, so soaking them in warm water for 24-48 hours can significantly improve germination rates. I usually put them in a small bowl and change the water once or twice.
2. **Planting the Seeds:** Fill your seed starting tray or small pots with seed starting mix. Make a small hole about 1 inch deep in each cell or pot. Place one or two seeds in each hole and cover them gently with soil.
3. **Watering:** Water the soil thoroughly but gently, making sure not to dislodge the seeds. You want the soil to be moist but not soggy.
4. **Providing Warmth:** Luffa seeds need warmth to germinate. A heat mat can be helpful, but you can also place the tray or pots in a warm spot in your house, like on top of the refrigerator.
5. **Waiting for Germination:** Be patient! Luffa seeds can take anywhere from 7 to 21 days to germinate, depending on the temperature and conditions. Keep the soil consistently moist during this time.
6. **Providing Light:** Once the seedlings emerge, they’ll need plenty of light. Place them under grow lights or in a sunny window. If using a window, rotate the tray or pots regularly to prevent the seedlings from leaning towards the light.
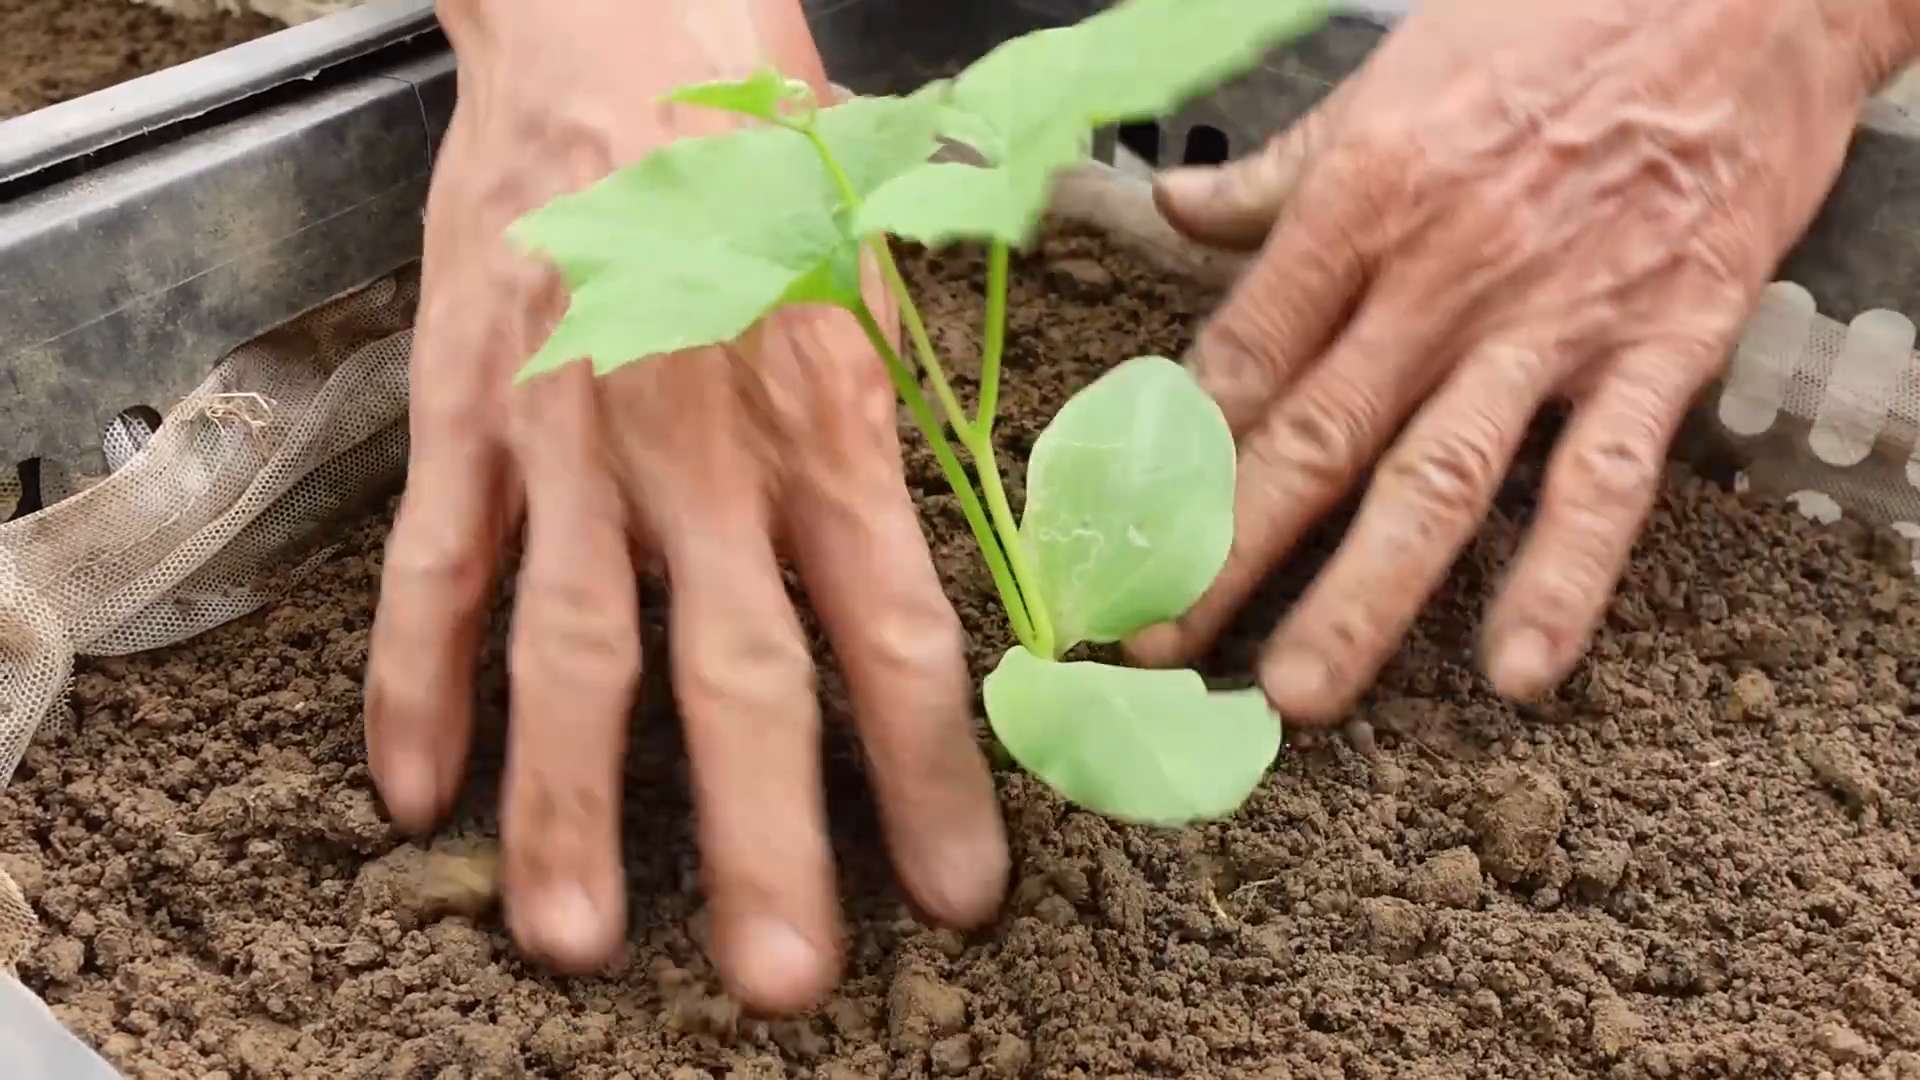
Transplanting Your Luffa Seedlings
Once your seedlings have developed a few sets of true leaves (the leaves that look like miniature versions of the adult leaves), it’s time to transplant them into larger pots or directly into the garden.
1. **Hardening Off:** Before transplanting your seedlings outdoors, you’ll need to harden them off. This means gradually exposing them to outdoor conditions over a period of about a week. Start by placing them in a sheltered spot outdoors for an hour or two each day, gradually increasing the amount of time they spend outside. This will help them adjust to the sun, wind, and temperature changes.
2. **Preparing the Soil:** Choose a sunny spot in your garden with well-draining soil. Amend the soil with compost or aged manure to improve its fertility and drainage. Luffa plants are heavy feeders, so they need plenty of nutrients.
3. **Transplanting:** Dig a hole that’s slightly larger than the root ball of your seedling. Gently remove the seedling from its pot, being careful not to damage the roots. Place the seedling in the hole and backfill with soil. Water thoroughly.
4. **Spacing:** If you’re planting multiple luffa plants, space them about 3-4 feet apart. This will give them enough room to grow and spread out.
5. **Providing Support:** Install your trellis or support structure near the plants. As the vines grow, gently guide them onto the trellis and tie them loosely with twine or plant ties.
Caring for Your Luffa Plants
Now that your luffa plants are in the ground, it’s time to provide them with the care they need to thrive.
1. **Watering:** Luffa plants need consistent watering, especially during hot, dry weather. Water deeply whenever the top inch of soil feels dry to the touch. Avoid overwatering, as this can lead to root rot.
2. **Fertilizing:** Feed your luffa plants regularly with a balanced fertilizer. You can use a liquid fertilizer or a slow-release granular fertilizer. Follow the instructions on the fertilizer package.
3. **Pruning:** Pruning can help improve air circulation and encourage fruit production. Remove any dead or yellowing leaves. You can also prune the vines to control their growth and prevent them from becoming too unruly.
4. **Pest and Disease Control:** Luffa plants are generally resistant to pests and diseases, but they can occasionally be affected by aphids, squash bugs, or powdery mildew. Inspect your plants regularly and take action if you notice any problems. You can use insecticidal soap or neem oil to control pests, and a fungicide to treat powdery mildew.
5. **Pollination:** Luffa plants have separate male and female flowers. The female flowers have a small luffa fruit behind them. Bees and other pollinators are essential for pollination. If you’re not seeing many bees in your garden, you can hand-pollinate the flowers by transferring pollen from the male flowers to the female flowers with a small brush.
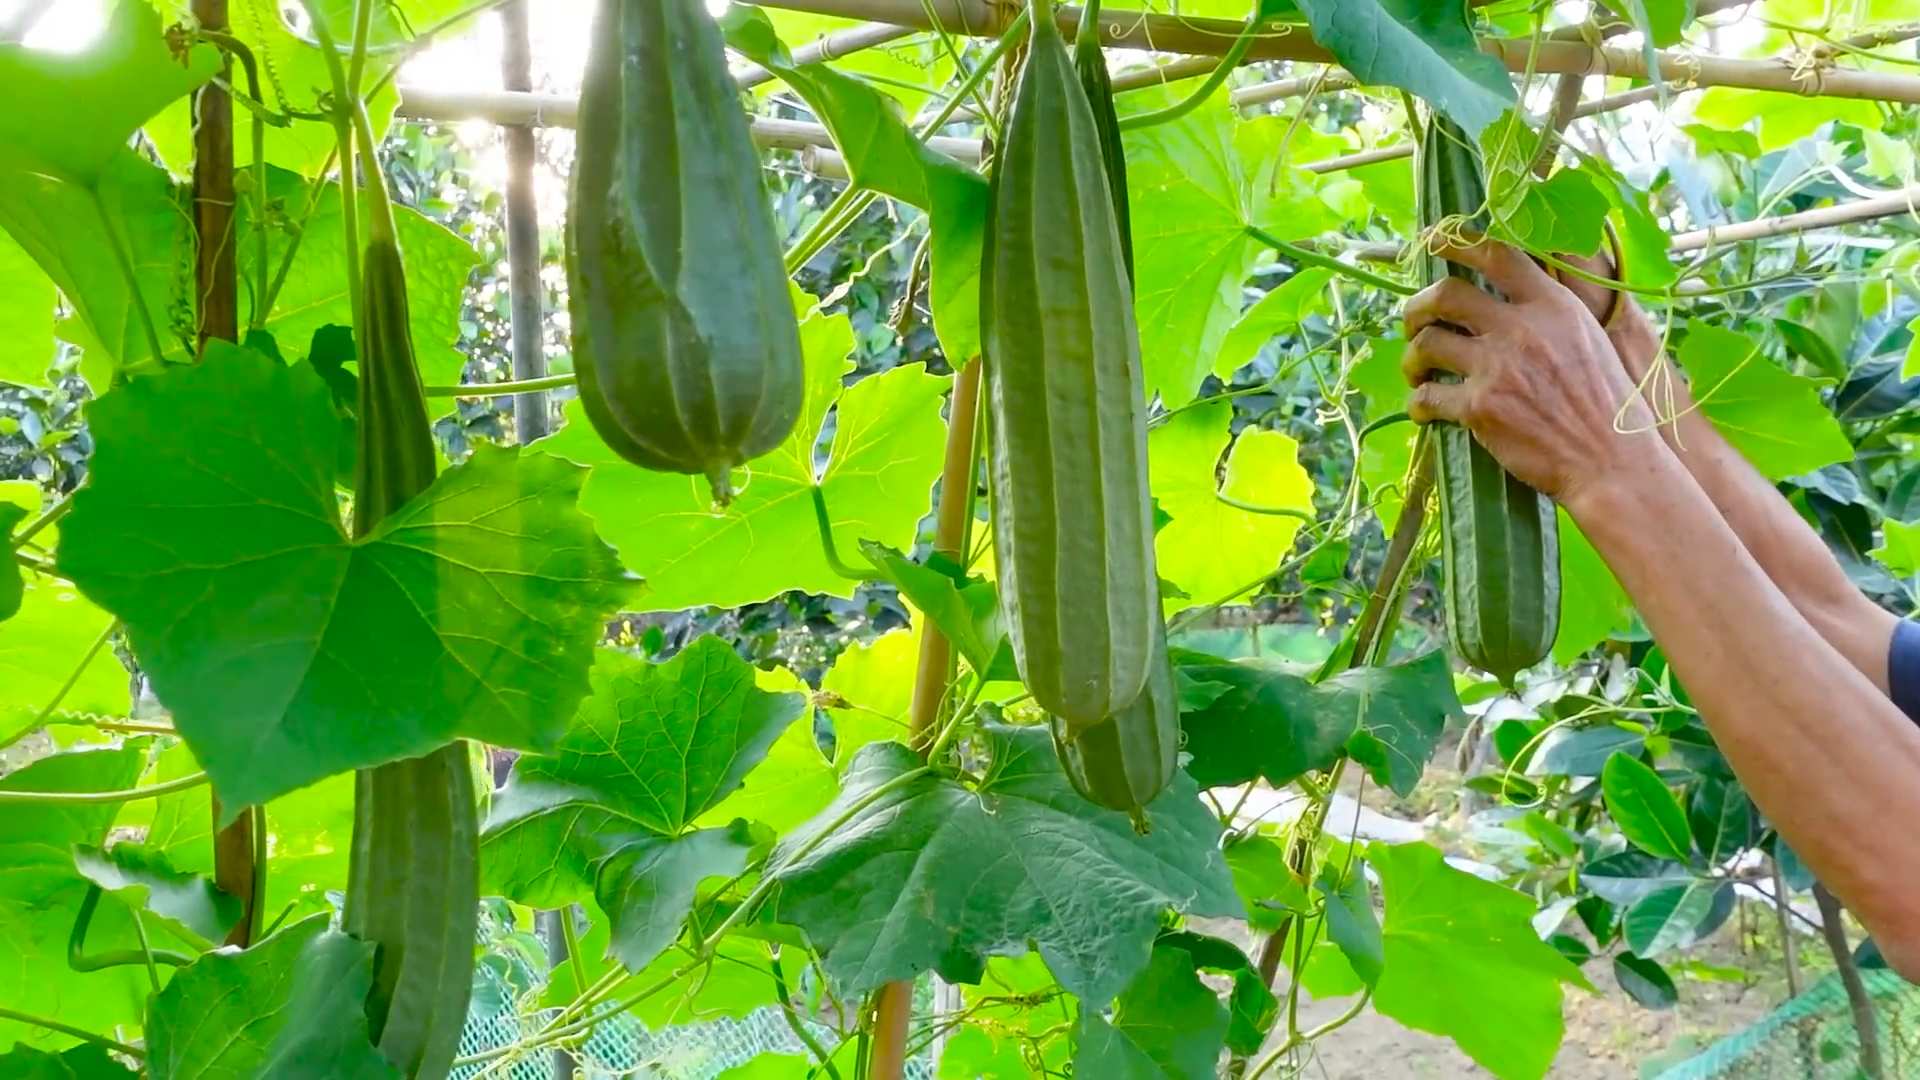
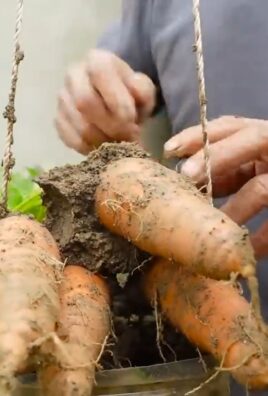
Harvesting Your Luffa Sponges
This is the most exciting part! Harvesting your own luffa sponges is incredibly satisfying.
1. **Knowing When to Harvest:** The best time to harvest luffa is when the fruits are fully mature and the skin has turned brown and dry. The fruits should feel light and hollow. If you wait too long, the fruits will become too fibrous and difficult to process.
2. **Cutting the Luffa:** Use pruning shears or scissors to cut the luffa from the vine. Leave a few inches of stem attached to the fruit.
3. **Peeling the Luffa:** This can be a bit messy, so I recommend doing it outdoors or in a well-ventilated area. You can peel the luffa by hand, but it’s easier to soak it in water for a few days to soften the skin. Once the skin is soft, you can peel it off with your fingers or a vegetable peeler.
4. **Removing the Seeds:** After peeling the luffa, you’ll need to remove the seeds. You can do this by shaking the luffa vigorously or by rinsing it with water. Save the seeds for planting next year!
5. **Washing the Luffa:** Wash the luffa thoroughly with soap and water to remove any remaining pulp or debris.
6. **Drying the Luffa:** Hang the luffa in a well-ventilated area to dry completely. This can take several weeks, depending on the humidity. Make sure the luffa is completely dry before storing it, or it may mold.
7. **Storing the Luffa:** Once the luffa is dry, you can store it in a cool, dry place. You can cut it into smaller pieces for use as sponges.
Using Your Homegrown Luffa Sponges
Now that you have your own homegrown luffa sponges, it’s time to put them to use!
* **Exfoliating Your Skin:** Luffa sponges are great for exfoliating your skin. Use them in the shower or bath to remove dead skin cells and leave your skin feeling smooth and refreshed.
* **Washing Dishes:** Luffa sponges are also great for washing dishes. They’re abrasive enough to remove food particles but gentle enough not to scratch your dishes.
* **Cleaning Your Home:** Luffa sponges can be used to clean a variety of surfaces in your home, from countertops to bathroom tiles.
* **Making Soap:** You can even embed pieces
Conclusion
So, there you have it! Growing your own angled luffa at home is not just a gardening project; it’s an investment in sustainable living, a journey of discovery, and a pathway to creating your own natural, exfoliating sponges. Forget those mass-produced, often chemically treated sponges from the store. Imagine the satisfaction of harvesting your very own, organically grown luffa, knowing exactly where it came from and how it was nurtured.
This DIY trick is a must-try for several compelling reasons. First, it’s incredibly rewarding. Watching a tiny seed transform into a sprawling vine laden with luffa gourds is a truly magical experience. Second, it’s environmentally friendly. By growing your own luffa, you’re reducing your reliance on commercially produced sponges, which often contribute to plastic waste and unsustainable farming practices. Third, it’s cost-effective. Once you have the initial setup, the cost of growing your own luffa is minimal compared to buying sponges regularly. And fourth, the quality is unmatched. Homegrown luffa tends to be more durable and have a more satisfying texture than store-bought varieties.
But the benefits don’t stop there. You can also experiment with different varieties of luffa seeds to find the one that best suits your needs and preferences. Try growing different types of angled luffa, or even explore other luffa species for varying textures and sizes. Consider adding companion plants like marigolds or basil to deter pests and attract pollinators, further enhancing your garden’s ecosystem. You can even save seeds from your best luffa gourds to ensure a continuous supply for years to come.
Furthermore, the uses for your homegrown luffa extend far beyond the bathroom. Use them for scrubbing pots and pans, cleaning your car, or even creating unique crafts and gifts. The possibilities are endless!
We encourage you to embrace this DIY project and experience the joy of growing your own angled luffa. It’s a simple, sustainable, and satisfying way to connect with nature and create something truly special. Don’t be intimidated if you’re a beginner gardener; the steps are straightforward, and the rewards are well worth the effort.
So, grab some seeds, prepare your garden, and get ready to embark on this exciting adventure. And most importantly, don’t forget to share your experiences with us! We’d love to hear about your successes, challenges, and creative uses for your homegrown luffa. Share your photos and stories on social media using #HomegrownLuffa and inspire others to join the movement. Let’s cultivate a community of sustainable gardeners and celebrate the beauty and versatility of the angled luffa.
Frequently Asked Questions (FAQ)
1. How long does it take to grow an angled luffa?
The time it takes to grow an angled luffa from seed to harvest can vary depending on your climate and growing conditions. Generally, it takes around 120 to 150 days from planting the seed to harvesting a mature luffa gourd. Warmer climates with longer growing seasons will typically see faster growth. Be patient and monitor your plants regularly, providing them with the necessary support, water, and nutrients.
2. What are the best growing conditions for angled luffa?
Angled luffa thrives in warm, sunny locations with well-drained soil. They require at least 6-8 hours of direct sunlight per day. The ideal soil pH is between 6.0 and 7.5. Before planting, amend the soil with compost or other organic matter to improve drainage and fertility. Angled luffa also needs a sturdy trellis or support system to climb on, as the vines can grow quite long and heavy. Consistent watering is crucial, especially during hot and dry periods.
3. How do I know when my angled luffa is ready to harvest?
The best time to harvest angled luffa for sponges is when the gourd is fully mature but still green or slightly yellowing. The skin should be firm and the gourd should feel relatively lightweight. You can gently squeeze the gourd to check for firmness. If it feels soft or mushy, it’s likely overripe. If you’re unsure, it’s better to harvest a little early than to wait too long.
4. How do I process the luffa gourd to get the sponge?
Processing the luffa gourd to extract the sponge is a relatively simple process. First, cut the gourd from the vine, leaving a few inches of stem attached. Then, soak the gourd in water for a few days to soften the skin. Once the skin is soft, you can peel it off easily with your hands or a knife. After peeling, remove the seeds and any remaining pulp. Rinse the luffa thoroughly and allow it to dry completely in the sun. Once dry, you can cut it into desired sizes and shapes.
5. Can I eat angled luffa?
Yes, young angled luffa gourds are edible and can be used in various culinary dishes. They have a mild, slightly sweet flavor and a tender texture. You can use them in stir-fries, soups, stews, or even eat them raw in salads. However, it’s important to harvest them when they are young and tender, as the mature gourds become too fibrous for consumption.
6. What are some common problems when growing angled luffa and how can I prevent them?
Some common problems when growing angled luffa include pests like squash bugs and vine borers, as well as diseases like powdery mildew. To prevent these problems, practice good garden hygiene by removing any dead or diseased leaves and debris. Use organic pest control methods like insecticidal soap or neem oil to control pests. Ensure good air circulation around the plants to prevent powdery mildew. You can also choose disease-resistant varieties of angled luffa.
7. Can I grow angled luffa in containers?
Yes, you can grow angled luffa in containers, but you’ll need a large container with good drainage. Choose a container that is at least 20 gallons in size. Use a well-draining potting mix and provide a sturdy trellis or support system for the vines to climb on. Water regularly and fertilize with a balanced fertilizer every few weeks. Keep in mind that container-grown luffa may not produce as many gourds as those grown in the ground.
8. How do I save seeds from my angled luffa for next year?
To save seeds from your angled luffa, allow a few gourds to fully mature on the vine until they turn brown and dry. Once the gourds are completely dry, harvest them and crack them open. Remove the seeds and spread them out on a paper towel to dry completely. Store the dried seeds in an airtight container in a cool, dark, and dry place. These seeds can be used to grow new luffa plants the following year.
9. What are some creative uses for angled luffa besides sponges?
Angled luffa has many creative uses beyond just sponges. You can use them for exfoliating scrubs, bath mats, pot scrubbers, and even as packing material. They can also be used in crafts and DIY projects, such as making luffa soaps, luffa-filled toys for pets, or even luffa art. The possibilities are endless!
10. Is angled luffa sustainable?
Yes, growing angled luffa is a sustainable practice. It reduces your reliance on commercially produced sponges, which often contribute to plastic waste and unsustainable farming practices. By growing your own luffa, you’re creating a natural, biodegradable alternative that is environmentally friendly. Additionally, you can compost the leftover luffa scraps and use them to enrich your garden soil.
Leave a Comment