
Grow black corn at home? Absolutely! Imagine the look on your friends’ faces when you serve up vibrant, almost gothic, corn on the cob at your next barbecue. It’s not just a conversation starter; it’s a delicious and nutritious addition to your garden and table. For centuries, corn has been a staple crop, deeply woven into the cultures of the Americas. But black corn, with its striking color and unique flavor profile, adds a modern twist to this ancient grain.
I know what you’re thinking: “Is it even possible to grow something so exotic in my backyard?” The answer is a resounding YES! This DIY guide will demystify the process, breaking down everything you need to know to successfully cultivate black corn, even if you’re a complete beginner. We’ll cover everything from selecting the right seeds and preparing your soil to harvesting your very own crop of this stunning and surprisingly easy-to-grow variety.
Why should you bother? Well, beyond the sheer novelty, black corn is packed with antioxidants, making it a healthier choice than your average yellow corn. Plus, learning to grow black corn at home is incredibly rewarding. There’s nothing quite like the satisfaction of nurturing a plant from seed to harvest, and this project is a fantastic way to connect with nature, learn new skills, and impress your neighbors all at the same time. So, grab your gardening gloves, and let’s get started!
Schwarzer Maisanbau im eigenen Garten: Eine detaillierte Anleitung
Hallo liebe Gartenfreunde! Habt ihr schon mal von schwarzem Mais gehört? Es ist nicht nur optisch ein Hingucker, sondern auch reich an Antioxidantien und eine tolle Ergänzung für eure Küche. Ich zeige euch heute, wie ihr diesen besonderen Mais ganz einfach selbst anbauen könnt. Keine Angst, es ist gar nicht so schwer, wie es klingt!
Was du für den Anbau von schwarzem Mais brauchst:
* Saatgut: Schwarzer Maissamen (z.B. ‘Black Aztec’ oder ‘Midnight Snack’). Achtet darauf, hochwertiges Saatgut von einem vertrauenswürdigen Anbieter zu beziehen.
* Standort: Ein sonniger Platz im Garten mit mindestens 6-8 Stunden direkter Sonneneinstrahlung pro Tag.
* Boden: Gut durchlässiger, fruchtbarer Boden mit einem pH-Wert zwischen 6,0 und 7,0.
* Kompost oder organischer Dünger: Zur Verbesserung der Bodenqualität und Nährstoffversorgung.
* Gartengeräte: Spaten, Harke, Gießkanne oder Gartenschlauch.
* Mulchmaterial: Stroh, Holzhackschnitzel oder Grasschnitt zur Unkrautbekämpfung und Feuchtigkeitsspeicherung.
* (Optional) Vogelschutznetz: Um die jungen Pflanzen vor Vögeln zu schützen.
* (Optional) Insektizid: Bei Bedarf zur Bekämpfung von Schädlingen. Ich bevorzuge aber natürliche Methoden!
Vorbereitung ist alles: Der Boden
Bevor wir mit dem Pflanzen loslegen, müssen wir den Boden vorbereiten. Das ist super wichtig, damit der Mais gut wachsen kann.
1. Boden lockern: Mit einem Spaten oder einer Grabegabel den Boden gründlich lockern. Am besten bis zu einer Tiefe von etwa 30 cm. So können die Wurzeln später gut eindringen.
2. Unkraut entfernen: Alles Unkraut, Steine und sonstige Fremdkörper aus dem Beet entfernen. Unkraut klaut dem Mais die Nährstoffe!
3. Boden verbessern: Kompost oder organischen Dünger großzügig in den Boden einarbeiten. Das gibt dem Mais einen ordentlichen Nährstoffschub. Ich nehme immer eine ordentliche Schaufel pro Quadratmeter.
4. Boden ebnen: Mit einer Harke den Boden glätten und ebnen. So haben wir eine schöne, gleichmäßige Oberfläche zum Pflanzen.
Aussaat: Der Start ins Maisleben
Jetzt kommt der spannende Teil: Die Aussaat!
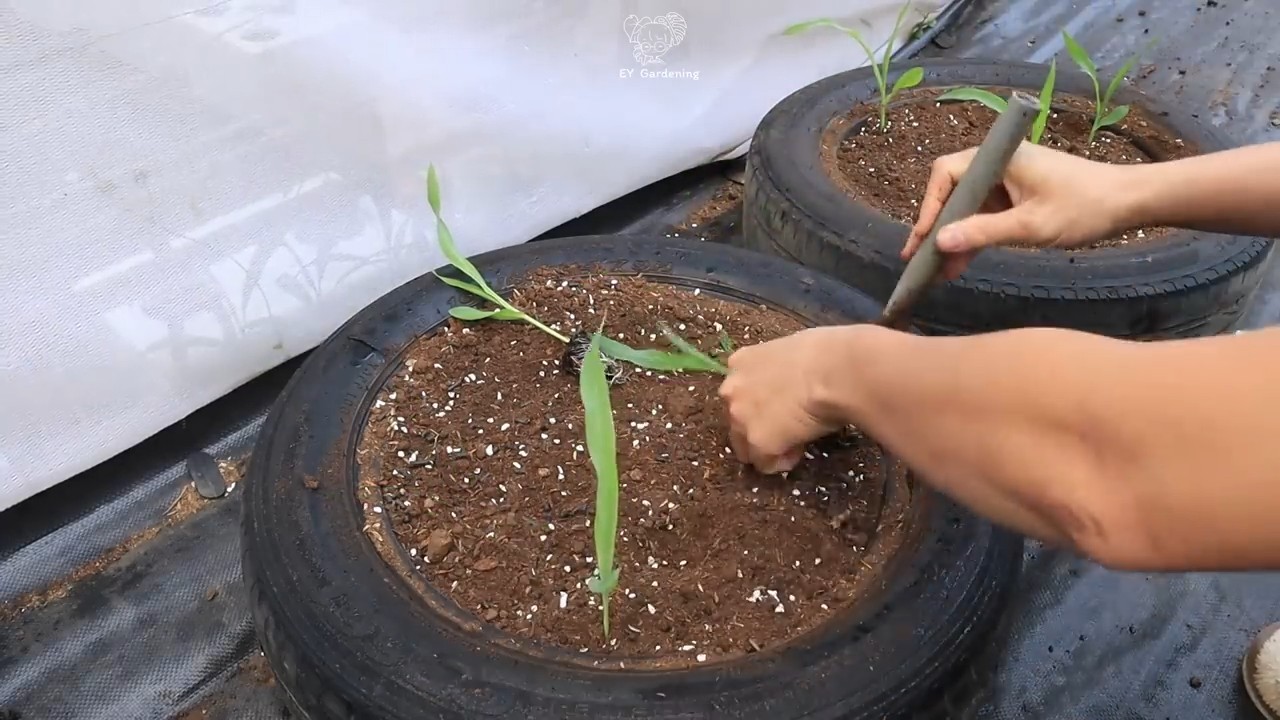
1. Zeitpunkt wählen: Schwarzer Mais wird am besten nach den letzten Frösten ausgesät, wenn der Boden sich auf mindestens 10°C erwärmt hat. Das ist meistens im Mai oder Juni.
2. Reihen ziehen: Mit einer Harke oder einem Stock Reihen im Abstand von etwa 75-90 cm ziehen.
3. Säen: Die Maiskörner in einem Abstand von etwa 20-25 cm in die Reihen legen. Die Körner sollten etwa 2-3 cm tief in der Erde liegen.
4. Bedecken: Die Reihen mit Erde bedecken und leicht andrücken.
5. Gießen: Die frisch gesäten Reihen gründlich gießen. Der Boden sollte gut feucht sein, aber nicht nass.
Wichtig: Mais ist ein Windbestäuber. Das bedeutet, dass er mehrere Reihen braucht, um sich gegenseitig zu bestäuben. Pflanzt den Mais also nicht in einer einzelnen Reihe, sondern in einem Block oder mehreren parallelen Reihen.
Pflege: Damit der Mais prächtig gedeiht
Nach der Aussaat ist vor der Pflege! Damit der Mais gut wächst, braucht er regelmäßige Aufmerksamkeit.
1. Gießen: Den Mais regelmäßig gießen, besonders in trockenen Perioden. Der Boden sollte immer leicht feucht sein. Am besten gießt man früh morgens oder spät abends, um Verdunstungsverluste zu minimieren.
2. Unkraut jäten: Regelmäßig Unkraut zwischen den Maispflanzen entfernen. Unkraut konkurriert mit dem Mais um Nährstoffe und Wasser.
3. Düngen: Etwa 4-6 Wochen nach der Aussaat den Mais mit einem organischen Dünger nachdüngen. Ich verwende gerne Hornspäne oder Komposttee.
4. Mulchen: Den Boden um die Maispflanzen mit Mulchmaterial (Stroh, Holzhackschnitzel, Grasschnitt) bedecken. Das hilft, die Feuchtigkeit im Boden zu halten, Unkraut zu unterdrücken und den Boden zu düngen.
5. Schädlinge und Krankheiten: Den Mais regelmäßig auf Schädlinge und Krankheiten kontrollieren. Bei Bedarf natürliche Insektizide oder Fungizide verwenden. Ich hatte bisher Glück und wenig Probleme damit.
Schutz vor ungebetenen Gästen
Manchmal wollen auch andere an unserem Mais knabbern. Hier ein paar Tipps, wie wir ihn schützen können:
* Vögel: Junge Maispflanzen sind besonders anfällig für Vogelfraß. Ein Vogelschutznetz kann helfen, die Pflanzen zu schützen.
* Schnecken: Schnecken lieben junge Maispflanzen. Schneckenkorn oder natürliche Schneckenbarrieren (z.B. Kaffeesatz) können helfen, die Schnecken fernzuhalten.
* Maiszünsler: Der Maiszünsler ist ein Schädling, der sich in die Maiskolben bohrt. Pheromonfallen können helfen, die Falter anzulocken und zu fangen. Bacillus thuringiensis (Bt) ist ein biologisches Insektizid, das gegen den Maiszünsler eingesetzt werden kann.
Ernte: Die Belohnung für die Mühe
Nach etwa 90-120 Tagen ist es endlich soweit: Die Erntezeit!
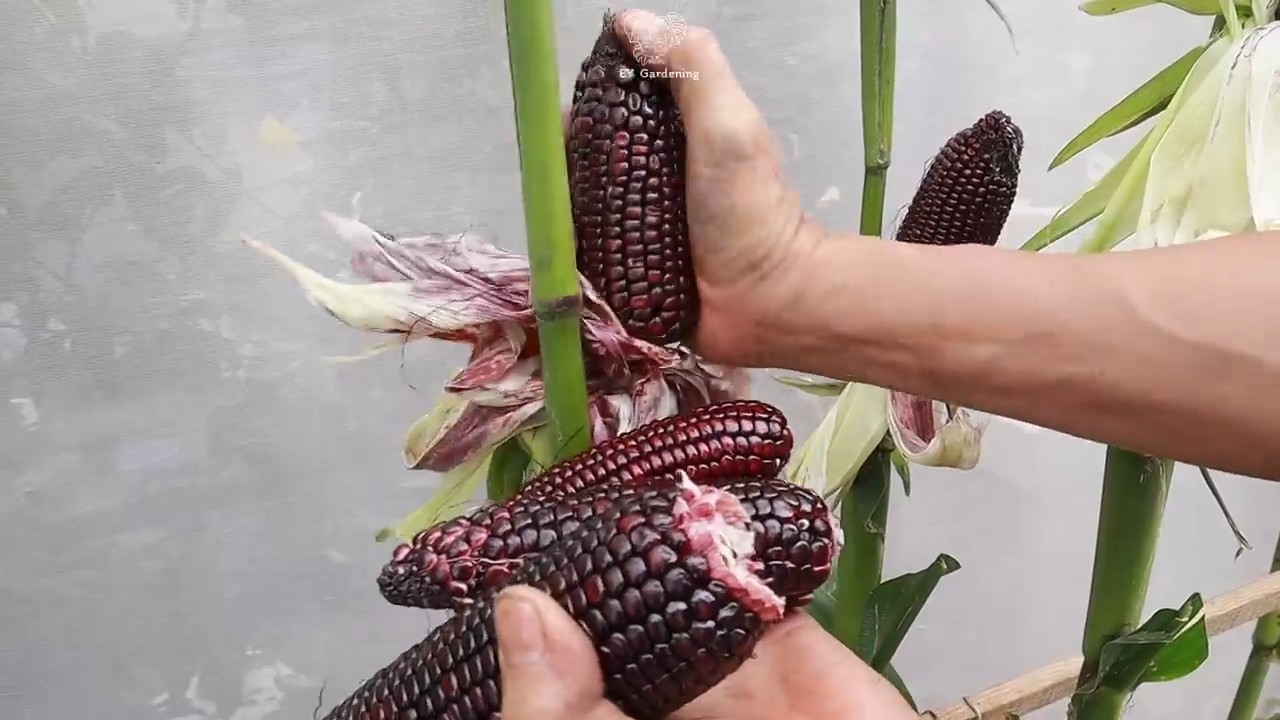
1. Reife erkennen: Die Maiskolben sind reif, wenn die Hüllblätter trocken und braun sind und die Körner prall und fest sind. Wenn man ein Korn mit dem Fingernagel eindrückt, sollte eine milchige Flüssigkeit austreten.
2. Ernten: Die Maiskolben vorsichtig von der Pflanze abdrehen oder abschneiden.
3. Trocknen: Die Maiskolben an einem trockenen, luftigen Ort lagern, um sie vollständig zu trocknen. Das verhindert Schimmelbildung.
4. Verwenden: Den getrockneten Mais kann man für verschiedene Zwecke verwenden:
* Kochen: Die Maiskörner können gekocht und als Beilage oder in Salaten verwendet werden.
* Mahlen: Die Maiskörner können zu Maismehl gemahlen werden, das für Brot, Tortillas oder Polenta verwendet werden kann.
* Popcorn: Einige Sorten von schwarzem Mais eignen sich auch für Popcorn.
* Saatgut: Einen Teil der Körner für die nächste Aussaat aufbewahren.
Weitere Tipps und Tricks
* Fruchtfolge: Mais sollte nicht jedes Jahr am selben Standort angebaut werden. Eine Fruchtfolge mit anderen Pflanzen (z.B. Bohnen, Erbsen, Kürbis) hilft, den Boden gesund zu halten und Schädlinge zu vermeiden.
* Begleitpflanzen: Einige Pflanzen (z.B. Bohnen, Kürbis, Sonnenblumen) können neben Mais angebaut werden, um das Wachstum zu fördern und Schädlinge abzuwehren.
* Experimentieren: Probiert verschiedene Sorten von schwarzem Mais aus, um eure Lieblingssorte zu finden.
* Genießen: Habt Spaß beim Anbau eures eigenen schwarzen Maises und genießt die Ernte!
Ich hoffe, diese Anleitung hilft euch dabei, euren eigenen schwarzen Mais anzubauen. Es ist wirklich ein tolles Gefühl, etwas selbst anzubauen und zu ernten. Viel Erfolg und guten Appetit!
Conclusion
So, there you have it! Growing your own black corn at home isn’t just a quirky gardening project; it’s a gateway to a more vibrant, nutritious, and rewarding culinary experience. We’ve walked you through the process, from selecting the right seeds to nurturing your plants and finally, harvesting those stunning, almost-black kernels.
Why is this a must-try? Because it’s about more than just corn. It’s about connecting with your food source, understanding the journey from seed to table, and enjoying the unparalleled flavor and health benefits of a truly unique ingredient. Store-bought corn, even the best varieties, simply can’t compare to the satisfaction of harvesting something you’ve grown yourself, especially when it’s as visually striking and nutritionally dense as black corn.
Imagine the possibilities! You can use your homegrown black corn to create eye-catching tortillas, adding a dramatic flair to your tacos and quesadillas. Grind it into a unique cornmeal for muffins and breads, infusing them with a subtle sweetness and a boost of antioxidants. Or simply roast the kernels and enjoy them as a healthy and delicious snack.
Variations and Suggestions:
* Experiment with different varieties: While we’ve focused on black corn, there are many other heirloom corn varieties with unique colors and flavors. Try growing blue corn, red corn, or even a multicolored corn for a truly stunning harvest.
* Companion planting: Enhance your corn’s growth by planting beneficial companion plants like beans, squash, and sunflowers. These plants can help improve soil health, deter pests, and provide support for your corn stalks.
* Seed saving: Once you’ve successfully grown your black corn, consider saving some of the seeds for future planting. This will allow you to continue enjoying this unique variety year after year and contribute to the preservation of heirloom seeds.
* Get creative in the kitchen: Don’t be afraid to experiment with different recipes and cooking methods. Black corn can be used in a wide variety of dishes, from savory to sweet.
We understand that gardening can sometimes seem daunting, but growing black corn is a surprisingly accessible project, even for beginners. With a little patience, care, and the right information, you can successfully cultivate your own crop of this extraordinary grain.
We wholeheartedly encourage you to give this DIY trick a try. Not only will you be rewarded with a bountiful harvest of delicious and nutritious black corn, but you’ll also gain a deeper appreciation for the magic of gardening and the power of homegrown food.
And most importantly, we want to hear about your experience! Share your photos, tips, and recipes with us in the comments below. Let’s create a community of black corn enthusiasts and inspire others to embark on this rewarding journey. What are you waiting for? Get those seeds in the ground and prepare to be amazed by the beauty and flavor of homegrown black corn!
Frequently Asked Questions (FAQ)
What exactly *is* black corn, and is it different from regular corn?
Black corn, also known as purple corn or blue corn in some varieties, is a type of corn that gets its deep color from high concentrations of anthocyanins, the same antioxidants that give blueberries and other dark fruits their vibrant hues. While it’s still corn, the nutritional profile is often superior to yellow corn, boasting higher levels of these beneficial antioxidants. The flavor is also subtly different, often described as slightly sweeter and nuttier than regular corn.
Is it difficult to grow black corn compared to other types of corn?
Generally, growing black corn is not significantly more difficult than growing other types of corn. The basic requirements are the same: full sun (at least 6-8 hours per day), well-drained soil, and consistent watering. However, it’s crucial to choose a variety that’s well-suited to your local climate and growing conditions. Some heirloom varieties may be more susceptible to pests or diseases, so research and select accordingly. Starting with high-quality seeds from a reputable source is also essential for success.
What kind of soil is best for growing black corn?
Black corn thrives in well-drained, fertile soil with a slightly acidic to neutral pH (around 6.0 to 7.0). Before planting, amend your soil with compost or other organic matter to improve drainage, fertility, and water retention. If your soil is heavy clay, consider adding sand or perlite to improve drainage. A soil test can help you determine the specific nutrient needs of your soil and guide you in making appropriate amendments.
How much space does black corn need to grow?
Corn plants need adequate space to grow and develop properly. As a general rule, space your corn plants about 8-12 inches apart in rows that are 30-36 inches apart. This spacing allows for good air circulation, which helps prevent fungal diseases, and provides enough room for the plants to access sunlight and nutrients. If you’re growing in a smaller space, such as a raised bed or container, you may need to adjust the spacing slightly, but be sure to provide enough room for the plants to grow without overcrowding.
How often should I water my black corn plants?
Corn plants need consistent moisture, especially during germination and the early stages of growth. Water deeply and regularly, aiming to keep the soil consistently moist but not waterlogged. The frequency of watering will depend on your climate, soil type, and the stage of growth. As a general guideline, water when the top inch of soil feels dry to the touch. During hot, dry weather, you may need to water more frequently.
What are some common pests and diseases that affect black corn, and how can I prevent them?
Common pests that can affect black corn include corn earworms, aphids, and Japanese beetles. Diseases include corn smut, rust, and leaf blight. To prevent pest and disease problems, practice good garden hygiene, such as removing weeds and debris that can harbor pests and diseases. Encourage beneficial insects, such as ladybugs and lacewings, which can help control pest populations. Choose disease-resistant varieties of black corn whenever possible. If you do encounter pest or disease problems, treat them promptly with appropriate organic or chemical controls.
When is the best time to harvest black corn?
The best time to harvest black corn depends on the variety and your intended use. For fresh eating, harvest when the kernels are plump and milky and the silks have turned brown and dry. For drying and grinding into cornmeal, allow the ears to dry on the stalk until the kernels are hard and the husks are completely dry. To test for ripeness, peel back a portion of the husk and puncture a kernel with your fingernail. If the liquid that comes out is milky, the corn is ready to harvest for fresh eating.
Can I grow black corn in containers?
Yes, you can grow black corn in containers, but you’ll need to choose a large container (at least 12-18 inches in diameter) and use a high-quality potting mix. Be sure to provide adequate drainage and water regularly. Container-grown corn may require more frequent fertilization than corn grown in the ground. Also, keep in mind that container-grown corn may not produce as large of ears as corn grown in the ground.
Where can I buy black corn seeds?
Black corn seeds can be purchased from a variety of sources, including online seed companies, local nurseries, and garden centers. Look for reputable suppliers that offer high-quality seeds and provide information about the variety and its growing requirements. Some popular varieties of black corn include ‘Black Aztec’, ‘Cherokee Blue’, and ‘Oaxacan Green’.
Is black corn GMO?
Most varieties of black corn available for home gardeners are not genetically modified (GMO). However, it’s always a good idea to check the seed packet or product description to ensure that the seeds you’re purchasing are non-GMO. Look for seeds that are labeled as “non-GMO” or “heirloom.”
Leave a Comment