
Grow Brussels Sprouts right in your kitchen garden? Absolutely! Imagine stepping outside your back door and harvesting fresh, delicious Brussels sprouts, ready to roast, sauté, or add to your favorite dishes. No more trips to the grocery store for these nutritional powerhouses – you can have them readily available, grown with your own two hands.
For centuries, Brussels sprouts have been a staple in European cuisine, particularly in Belgium, where they are believed to have originated. From humble beginnings, they’ve become a beloved vegetable worldwide, prized for their unique flavor and impressive health benefits. But let’s be honest, growing them can sometimes feel like a daunting task. That’s where these DIY tricks and hacks come in!
I know what you’re thinking: “Brussels sprouts are hard to grow!” And while they can be a bit finicky, I’m here to show you that with a few simple strategies, you can successfully grow Brussels Sprouts even in a small kitchen garden. This article is packed with practical tips and easy-to-follow instructions that will help you overcome common challenges and enjoy a bountiful harvest. Whether you’re a seasoned gardener or just starting out, these DIY hacks will empower you to cultivate your own delicious Brussels sprouts and impress your friends and family with your green thumb. Let’s get started!
Growing Brussels Sprouts in Your Kitchen Garden: A DIY Guide
Hey there, fellow gardening enthusiasts! I’m so excited to share my experience with growing Brussels sprouts right in my kitchen garden. It’s surprisingly rewarding, and nothing beats the taste of fresh, homegrown sprouts. This guide will walk you through every step, from choosing the right variety to harvesting your delicious bounty. Let’s get started!
Choosing the Right Brussels Sprouts Variety
Before we dive into the nitty-gritty, let’s talk varieties. Not all Brussels sprouts are created equal, and choosing the right one for your climate and space is crucial.
* Consider your climate: Some varieties are better suited for warmer climates, while others thrive in cooler conditions.
* Think about space: Brussels sprouts plants can get quite large, so if you’re short on space, look for compact varieties.
* Days to maturity: This is the number of days from planting to harvest. Choose a variety that fits your growing season.
Some popular varieties include:
* ‘Long Island Improved’: A classic, reliable variety that produces medium-sized sprouts.
* ‘Jade Cross’: A hybrid variety known for its high yields and disease resistance.
* ‘Redarling’: A beautiful red-purple variety with a slightly sweeter flavor.
* ‘Dwarf Rosny’: A compact variety perfect for smaller gardens or containers.
I personally love ‘Jade Cross’ because it’s super productive and relatively easy to grow.
Preparing Your Kitchen Garden for Brussels Sprouts
Brussels sprouts need a sunny spot and well-drained soil. Here’s how to get your garden ready:
* Sunlight: Aim for at least 6 hours of direct sunlight per day.
* Soil: Brussels sprouts prefer slightly acidic soil with a pH of 6.0 to 7.0.
* Soil Preparation: Amend your soil with compost or well-rotted manure to improve drainage and fertility.
* Spacing: Give your plants plenty of room to grow. Space them about 18-24 inches apart.
Step-by-Step Planting Guide
Now for the fun part – planting! You can start Brussels sprouts from seed indoors or purchase seedlings from a local nursery. I usually start mine indoors to get a head start on the growing season.
1. Starting Seeds Indoors (Optional):
* Timing: Start seeds 6-8 weeks before the last expected frost.
* Containers: Use seed trays or small pots filled with seed-starting mix.
* Sowing: Sow seeds about 1/2 inch deep.
* Watering: Keep the soil consistently moist but not waterlogged.
* Light: Provide plenty of light, either from a sunny window or a grow light.
* Hardening Off: Gradually acclimate the seedlings to outdoor conditions before transplanting. This involves exposing them to increasing amounts of sunlight and wind over a period of 7-10 days.
2. Transplanting Seedlings (or Planting Seedlings Directly):
* Timing: Transplant seedlings after the last expected frost, when the soil has warmed up.
* Hole Preparation: Dig holes that are slightly larger than the root balls of the seedlings.
* Planting: Gently remove the seedlings from their containers and place them in the holes.
* Spacing: Space the plants 18-24 inches apart.
* Backfilling: Fill the holes with soil and gently firm around the base of the plants.
* Watering: Water thoroughly after planting.
3. Direct Sowing (If you choose not to start indoors):
* Timing: Sow seeds directly into the garden after the last expected frost.
* Depth: Sow seeds about 1/2 inch deep.
* Spacing: Sow seeds about 2-3 inches apart.
* Thinning: Once the seedlings emerge, thin them to 18-24 inches apart.
* Watering: Keep the soil consistently moist until the seedlings are established.
Caring for Your Brussels Sprouts Plants
Once your Brussels sprouts are planted, it’s important to provide them with the care they need to thrive.
* Watering: Water regularly, especially during dry periods. Brussels sprouts need consistent moisture to produce plump, juicy sprouts. Aim for about 1-1.5 inches of water per week.
* Fertilizing: Fertilize every 2-3 weeks with a balanced fertilizer. I like to use a liquid fertilizer diluted to half strength.
* Weeding: Keep the area around your plants free of weeds. Weeds compete with Brussels sprouts for nutrients and water.
* Mulching: Apply a layer of mulch around the plants to help retain moisture, suppress weeds, and regulate soil temperature.
* Pest Control: Keep an eye out for pests like aphids, cabbage worms, and cabbage loopers. Handpick them off the plants or use an organic insecticide like neem oil or insecticidal soap.
* Supporting the Plants: As the plants grow taller and the sprouts develop, they may need support to prevent them from falling over. You can use stakes or cages to provide support.
Dealing with Common Pests and Diseases
Unfortunately, Brussels sprouts are susceptible to a few pests and diseases. Here’s how to deal with them:
* Aphids: These tiny insects suck sap from the plants, causing them to weaken and distort. Spray them with a strong stream of water or use insecticidal soap.
* Cabbage Worms and Cabbage Loopers: These caterpillars chew holes in the leaves and sprouts. Handpick them off the plants or use Bacillus thuringiensis (Bt), a natural insecticide.
* Clubroot: This fungal disease causes the roots to swell and distort, stunting the plant’s growth. Prevent clubroot by planting resistant varieties and maintaining a soil pH of 7.0 or higher.
* Downy Mildew: This fungal disease causes yellow spots on the leaves, followed by a grayish-white mold. Improve air circulation around the plants and avoid overhead watering.
I’ve found that regular inspection and early intervention are key to preventing serious pest and disease problems.
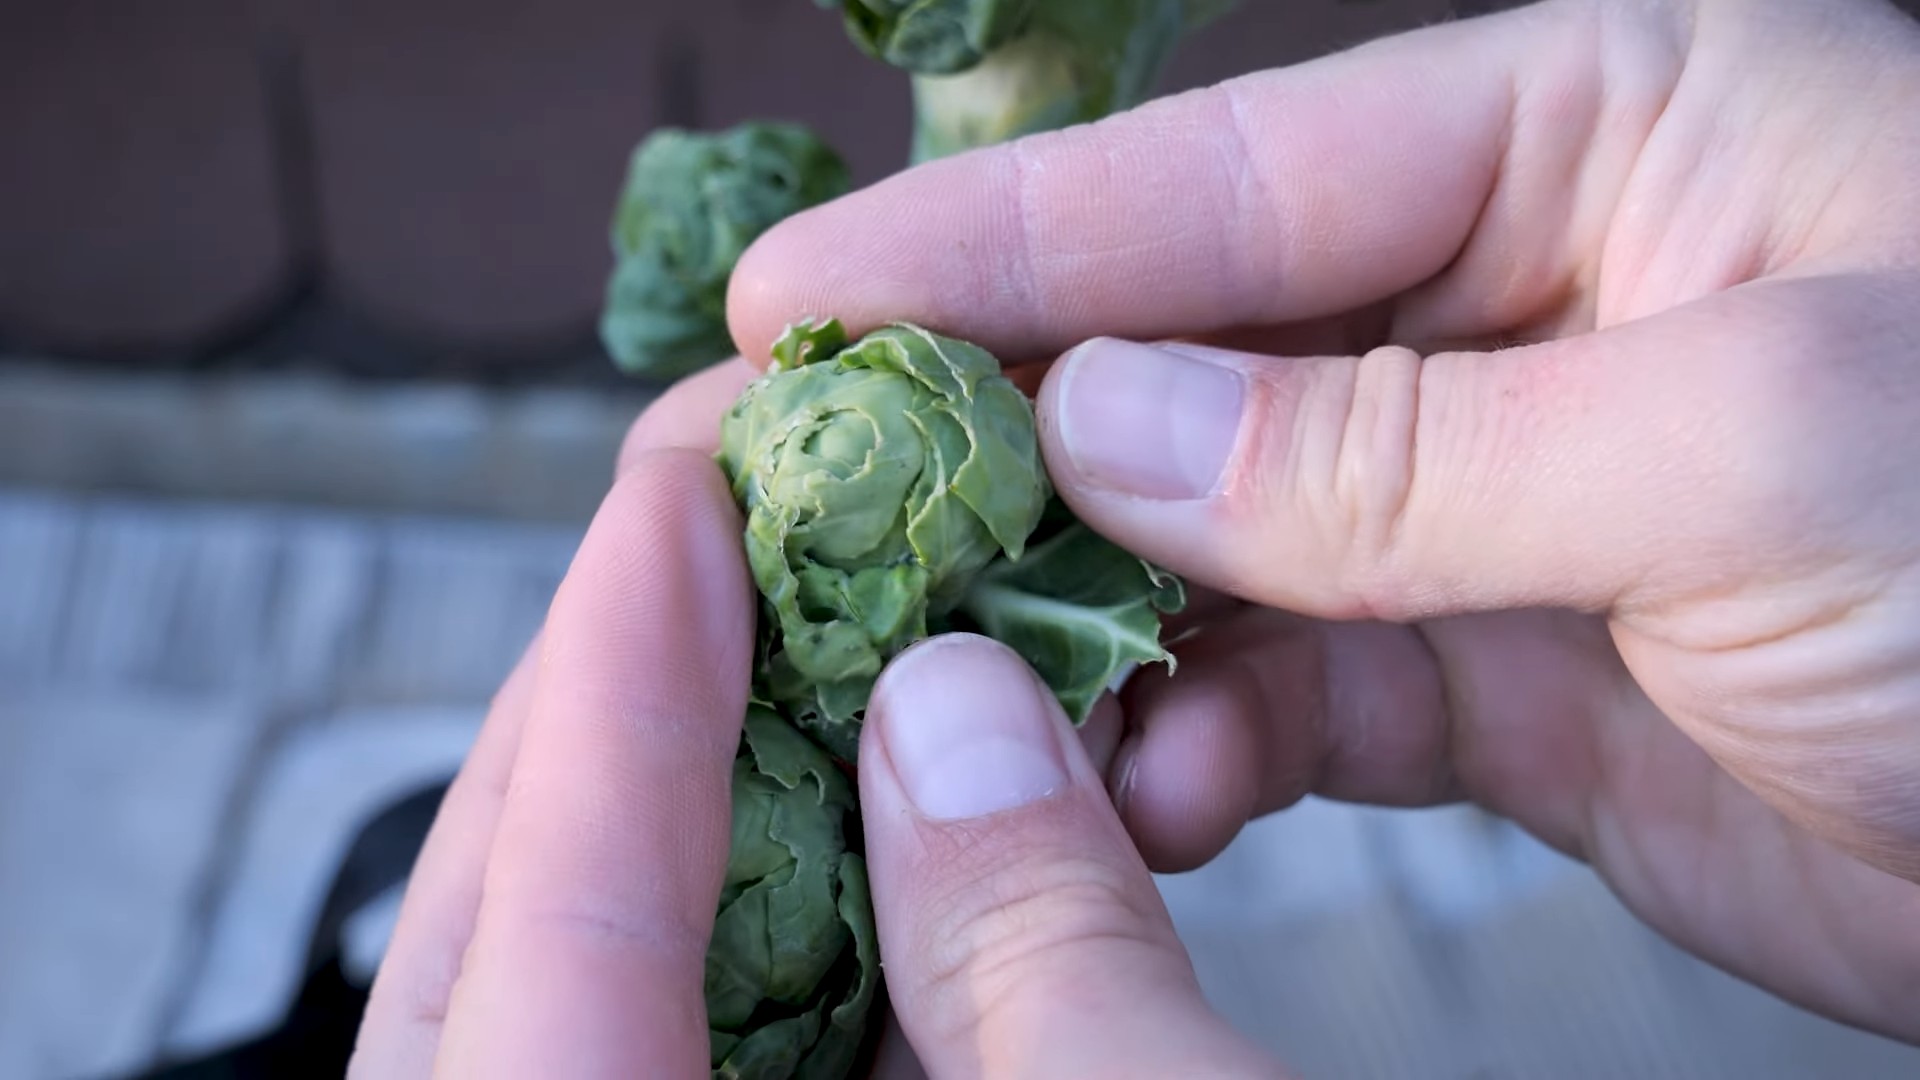
Harvesting Your Brussels Sprouts
Harvesting Brussels sprouts is the most rewarding part of the process!
* Timing: Harvest sprouts when they are firm, green, and about 1-2 inches in diameter. The sprouts at the bottom of the plant will mature first.
* Technique: Twist or snap off the sprouts from the stem, starting at the bottom.
* Continued Harvest: Continue harvesting sprouts as they mature, working your way up the stem.
* Frost: Brussels sprouts actually taste better after a light frost! The frost converts some of the starches into sugars, making them sweeter.
I usually start harvesting my Brussels sprouts in late fall or early winter. There’s nothing quite like a warm Brussels sprouts dish on a cold winter evening.
Tips for Growing the Best Brussels Sprouts
Here are a few extra tips to help you grow the best Brussels sprouts possible:
* Pinch off the top of the plant: About a month before the first expected frost, pinch off the top of the plant to encourage the sprouts to mature more quickly.
* Rotate your crops: Avoid planting Brussels sprouts in the same spot year after year. Crop rotation helps to prevent soilborne diseases.
* Provide consistent moisture: Brussels sprouts need consistent moisture to produce plump, juicy sprouts.
* Be patient: Brussels sprouts take a long time to mature, so don’t get discouraged if you don’t see results right away.
Storing Your Harvested Brussels Sprouts
Once you’ve harvested your Brussels sprouts, you’ll want to store them properly to keep them fresh.
* Refrigeration: Store unwashed Brussels sprouts in a plastic bag in the refrigerator for up to 1-2 weeks.
* Freezing: To freeze Brussels sprouts, blanch them in boiling water for 3-5 minutes, then plunge them into ice water to stop the cooking process. Drain them well and store them in freezer bags for up to 12 months.
I usually freeze a big batch of Brussels sprouts so I can enjoy them throughout the winter.
Delicious Ways to Enjoy Your Homegrown Brussels Sprouts
Now that you have a bounty of fresh Brussels sprouts, it’s time to get cooking! Here are a few of my favorite ways to enjoy them:
* Roasted Brussels Sprouts: Toss Brussels sprouts with olive oil, salt, and pepper, and roast them in a hot oven until they are tender and slightly caramelized.
* Sautéed Brussels Sprouts: Sauté Brussels sprouts with bacon, garlic, and balsamic vinegar for a flavorful side dish.
* Brussels Sprouts Salad: Shred Brussels sprouts and toss them

Conclusion
So, there you have it! Growing Brussels sprouts in your own kitchen garden is not only achievable but also incredibly rewarding. We’ve walked you through the process, from selecting the right seeds to nurturing your sprouts to a bountiful harvest. But why should you take the plunge and dedicate a little space to these miniature cabbages?
Firstly, the taste. Forget the bland, often bitter Brussels sprouts you might have encountered in the past. Homegrown sprouts, picked fresh from your kitchen garden, offer a sweetness and nutty flavor that is simply unmatched. You control the growing conditions, ensuring optimal flavor development.
Secondly, the satisfaction. There’s something deeply gratifying about nurturing a plant from seed to table. Watching those tiny sprouts develop into plump, delicious vegetables is a testament to your green thumb and a source of immense pride. Plus, you know exactly what’s gone into your food – no pesticides, no hidden ingredients, just pure, homegrown goodness.
Thirdly, the convenience. Imagine needing Brussels sprouts for a recipe and simply stepping outside your kitchen door to harvest exactly what you need. No more last-minute trips to the grocery store or settling for less-than-perfect produce. Your kitchen garden becomes a readily available source of fresh, healthy vegetables.
And finally, the health benefits. Brussels sprouts are packed with vitamins, minerals, and antioxidants. Growing your own ensures you’re getting the freshest, most nutrient-rich sprouts possible. You’re investing in your health and well-being with every sprout you harvest.
But the beauty of growing your own is the opportunity for experimentation. Consider these variations to personalize your Brussels sprouts kitchen garden:
* Try different varieties: Explore heirloom varieties like ‘Long Island Improved’ or ‘Redarling’ for unique flavors and colors.
* Companion planting: Plant herbs like rosemary or thyme alongside your Brussels sprouts to deter pests and enhance flavor. Marigolds are also excellent companions.
* Succession planting: Plant seeds every few weeks to ensure a continuous harvest throughout the growing season.
* Container gardening: If you’re short on space, grow Brussels sprouts in large containers on your patio or balcony.
Don’t be intimidated by the prospect of growing your own vegetables. Brussels sprouts, while requiring some attention, are relatively easy to cultivate, especially with the guidance provided in this article. The key is to start small, be patient, and learn from your experiences.
We wholeheartedly encourage you to give this DIY trick a try. Transform a corner of your kitchen garden into a Brussels sprouts haven and experience the joy of harvesting your own fresh, delicious vegetables. We’re confident you’ll be amazed by the results.
And most importantly, we want to hear about your journey! Share your experiences, successes, and challenges in the comments below. Let us know what varieties you tried, what companion plants worked best, and any tips or tricks you discovered along the way. Together, we can create a community of passionate home gardeners, sharing knowledge and inspiring others to embrace the joys of growing their own food. So, get planting and let the Brussels sprouts adventure begin!
Frequently Asked Questions (FAQ)
1. How much space do Brussels sprouts need to grow?
Brussels sprouts require a fair amount of space to thrive. Ideally, you should space plants about 18-24 inches apart in rows that are 24-36 inches apart. This allows for adequate air circulation and sunlight penetration, which are crucial for healthy growth and sprout development. If you’re growing in containers, choose pots that are at least 12 inches in diameter and depth per plant. Remember, overcrowding can lead to smaller sprouts and increased susceptibility to diseases.
2. What kind of soil is best for growing Brussels sprouts?
Brussels sprouts prefer well-drained, fertile soil with a pH between 6.0 and 7.5. Amend your soil with compost or well-rotted manure before planting to improve drainage and nutrient content. Brussels sprouts are heavy feeders, so a soil rich in organic matter is essential for optimal growth. Consider adding a slow-release fertilizer at planting time to provide a steady supply of nutrients throughout the growing season. A soil test can help determine if your soil is lacking any essential nutrients.
3. How often should I water my Brussels sprouts plants?
Consistent watering is crucial for healthy Brussels sprouts growth. Water deeply and regularly, especially during dry periods. Aim to keep the soil consistently moist but not waterlogged. A good rule of thumb is to water when the top inch of soil feels dry to the touch. Mulching around the plants can help retain moisture and suppress weeds. Avoid overhead watering, as this can increase the risk of fungal diseases. Drip irrigation is an excellent option for delivering water directly to the roots.
4. What are some common pests and diseases that affect Brussels sprouts?
Brussels sprouts are susceptible to several pests and diseases, including cabbage worms, aphids, flea beetles, clubroot, and downy mildew. Regularly inspect your plants for signs of infestation or disease. Use organic pest control methods, such as handpicking pests, using insecticidal soap, or introducing beneficial insects like ladybugs. To prevent diseases, ensure good air circulation, avoid overhead watering, and practice crop rotation. If you encounter a severe infestation or disease outbreak, consult with your local agricultural extension office for advice on appropriate treatment options.
5. When is the best time to harvest Brussels sprouts?
Brussels sprouts are typically ready for harvest in the fall or early winter, after they have been exposed to a few light frosts. The sprouts should be firm, green, and about 1-2 inches in diameter. Start harvesting from the bottom of the plant, working your way upwards. Twist or snap off the sprouts from the stem. You can continue harvesting sprouts as they mature, or you can harvest the entire plant at once. Brussels sprouts taste best after a frost, as the cold temperatures help to sweeten them.
6. Can I grow Brussels sprouts in containers?
Yes, you can absolutely grow Brussels sprouts in containers, especially if you have limited garden space. Choose large containers that are at least 12 inches in diameter and depth per plant. Use a high-quality potting mix that is well-draining and rich in organic matter. Ensure the containers have drainage holes to prevent waterlogging. Place the containers in a sunny location that receives at least 6 hours of sunlight per day. Water regularly and fertilize as needed. Container-grown Brussels sprouts may require more frequent watering and fertilization than those grown in the ground.
7. How do I encourage Brussels sprouts to form tight, compact sprouts?
Several factors contribute to the formation of tight, compact Brussels sprouts. Adequate sunlight, proper spacing, consistent watering, and sufficient nutrients are all essential. Pinching off the top of the plant (the terminal bud) about a month before harvest can also encourage the sprouts to mature and tighten up. This redirects the plant’s energy towards sprout development. Avoid over-fertilizing with nitrogen, as this can promote leafy growth at the expense of sprout formation.
8. What are some good companion plants for Brussels sprouts?
Companion planting can help deter pests, attract beneficial insects, and improve the overall health of your Brussels sprouts. Good companion plants include herbs like rosemary, thyme, and sage, which can repel cabbage moths. Marigolds are also excellent companions, as they deter nematodes and other soil pests. Other beneficial companion plants include nasturtiums, dill, and chamomile. Avoid planting Brussels sprouts near other members of the cabbage family, such as broccoli, cauliflower, and kale, as they can attract the same pests and diseases.
9. How do I store harvested Brussels sprouts?
Freshly harvested Brussels sprouts can be stored in the refrigerator for up to a week. Store them unwashed in a plastic bag or container. For longer storage, you can freeze Brussels sprouts. Blanch them in boiling water for 3-5 minutes, then transfer them to an ice bath to stop the cooking process. Drain well and freeze in a single layer on a baking sheet. Once frozen, transfer the sprouts to a freezer bag or container. Frozen Brussels sprouts can be stored for up to 12 months.
10. My Brussels sprouts are bitter. What can I do?
Bitterness in Brussels sprouts can be caused by several factors, including overmaturity, insufficient watering, and high temperatures. Harvesting sprouts after a frost can help to reduce bitterness, as the cold temperatures convert starches into sugars. Ensure your plants are receiving adequate water, especially during dry periods. Avoid harvesting sprouts that are too large or have started to yellow. Cooking methods can also affect bitterness. Roasting or sautéing Brussels sprouts can help to caramelize the sugars and reduce bitterness. Adding a touch of sweetness, such as maple syrup or balsamic vinegar, can also help to balance the flavors.
Leave a Comment