
Grow Cauliflower and Broccoli like a pro, even if you’ve never held a trowel before! Ever dreamt of harvesting your own crisp cauliflower florets and vibrant broccoli heads, fresh from your backyard? I know I have! It’s more than just a gardening goal; it’s about connecting with nature, enjoying healthier meals, and experiencing the satisfaction of nurturing life from seed to table.
For centuries, these cruciferous vegetables have been staples in diets worldwide. Broccoli, believed to have originated in Italy, and cauliflower, with its possible origins in the Eastern Mediterranean, have been cultivated and enjoyed for their nutritional benefits and delicious flavors. Think of the Roman emperors feasting on early versions of broccoli – now, you can grow your own royal feast!
But let’s be honest, sometimes growing these beauties can feel a bit daunting. Pests, diseases, and unpredictable weather can throw a wrench in your plans. That’s where these DIY tricks and hacks come in! I’m going to share some simple, effective, and budget-friendly methods to help you grow cauliflower and broccoli successfully, regardless of your gardening experience. These tips will help you combat common problems, maximize your yield, and enjoy a bountiful harvest. Get ready to transform your garden into a thriving patch of green goodness!

Kopfkohl und Brokkoli selbst anbauen: Ein umfassender DIY-Leitfaden
Hallo Gartenfreunde! Ich freue mich riesig, euch heute durch den Anbau von Kopfkohl und Brokkoli zu führen. Es ist wirklich befriedigend, sein eigenes Gemüse anzubauen, und mit ein paar Tipps und Tricks könnt ihr eine reiche Ernte erzielen. Lasst uns loslegen!
Vorbereitung ist alles: Die Grundlagen für eine erfolgreiche Ernte
Bevor wir uns ins Beet stürzen, müssen wir sicherstellen, dass wir alles vorbereitet haben. Hier ist eine Checkliste:
* Saatgut oder Jungpflanzen: Ihr könnt entweder mit Saatgut beginnen oder Jungpflanzen kaufen. Jungpflanzen sind einfacher, aber Saatgut ist günstiger und bietet mehr Sortenvielfalt.
* Geeigneter Standort: Kopfkohl und Brokkoli lieben die Sonne! Wählt einen Standort, der mindestens 6 Stunden direkte Sonneneinstrahlung pro Tag erhält.
* Gut durchlässiger, nährstoffreicher Boden: Der Boden sollte locker und gut durchlässig sein, damit sich keine Staunässe bildet. Eine gute Drainage ist entscheidend.
* Kompost oder organischer Dünger: Um den Boden mit Nährstoffen anzureichern, solltet ihr Kompost oder organischen Dünger einarbeiten.
* Gießkanne oder Gartenschlauch: Regelmäßiges Gießen ist wichtig, besonders während der Wachstumsphase.
* Werkzeuge: Spaten, Harke, Pflanzkelle und eventuell ein Unkrautstecher.
* Schutz vor Schädlingen: Kohlweißlinge und andere Schädlinge können eure Pflanzen befallen. Denkt über Schutzmaßnahmen wie Netze oder biologische Schädlingsbekämpfung nach.
Schritt-für-Schritt-Anleitung: Vom Samen zur Ernte
Hier ist eine detaillierte Anleitung, die euch durch den gesamten Prozess führt:
1. Saatgut vorziehen (optional)
Wenn ihr mit Saatgut beginnt, solltet ihr es etwa 6-8 Wochen vor dem letzten Frost im Haus vorziehen.
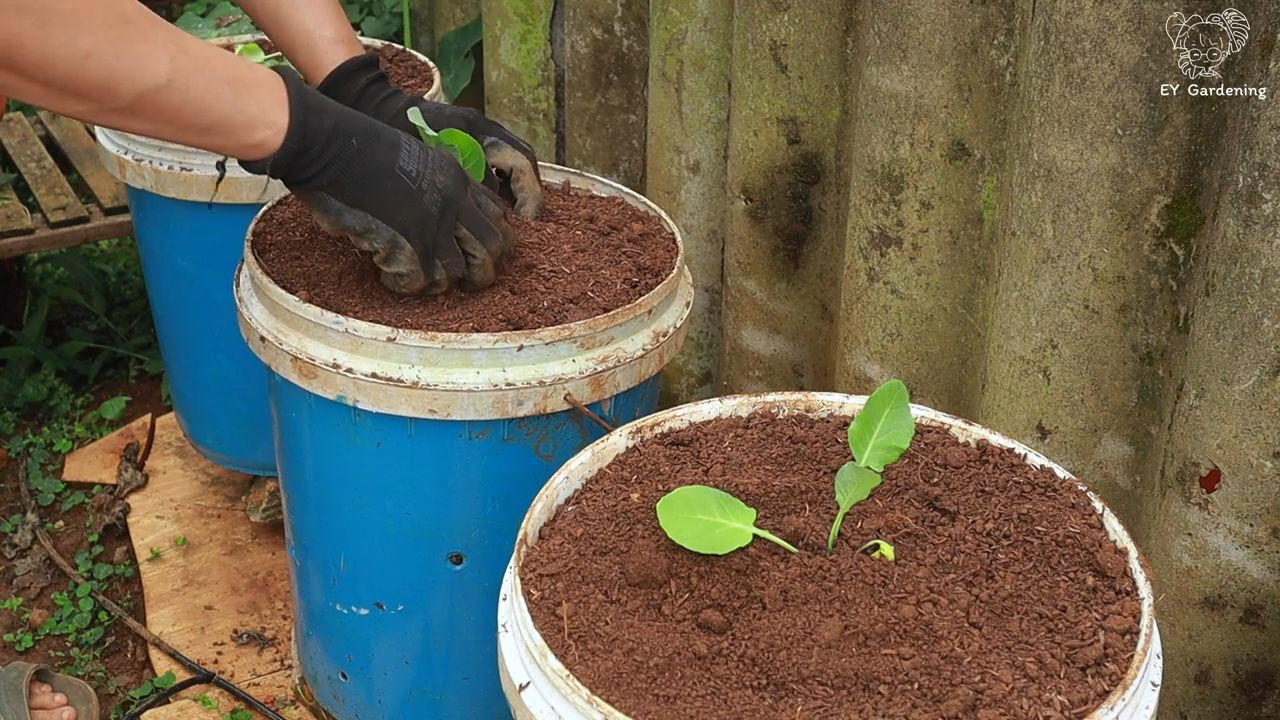
1. Aussaatgefäße vorbereiten: Füllt kleine Töpfe oder Anzuchtschalen mit Anzuchterde.
2. Samen aussäen: Legt 2-3 Samen pro Topf etwa 1 cm tief in die Erde.
3. Gießen: Befeuchtet die Erde vorsichtig mit einer Sprühflasche.
4. Warm und hell stellen: Stellt die Töpfe an einen warmen und hellen Ort, z.B. auf eine Fensterbank oder unter eine Pflanzenlampe.
5. Feucht halten: Haltet die Erde feucht, aber nicht nass.
6. Pikieren: Sobald die Sämlinge 2-3 echte Blätter haben, könnt ihr sie in größere Töpfe pikieren. Wählt den kräftigsten Sämling pro Topf aus.
2. Boden vorbereiten
Egal, ob ihr Jungpflanzen setzt oder selbst gezogene Sämlinge verpflanzt, die Bodenvorbereitung ist entscheidend.
1. Boden lockern: Lockert den Boden mit einem Spaten oder einer Grabegabel auf.
2. Unkraut entfernen: Entfernt sorgfältig alle Unkräuter und Steine.
3. Kompost einarbeiten: Arbeitet reichlich Kompost oder organischen Dünger in den Boden ein. Das verbessert die Bodenstruktur und versorgt die Pflanzen mit Nährstoffen.
4. Boden ebnen: Ebnet den Boden mit einer Harke, um eine gleichmäßige Oberfläche zu schaffen.
3. Pflanzen setzen oder verpflanzen
Jetzt kommt der spannende Teil: das Pflanzen!
1. Pflanzabstand beachten: Kopfkohl benötigt einen Abstand von etwa 45-60 cm zwischen den Pflanzen, Brokkoli etwa 40-50 cm.
2. Pflanzlöcher graben: Grabt Löcher, die groß genug sind, um die Wurzelballen der Pflanzen aufzunehmen.
3. Pflanzen einsetzen: Setzt die Pflanzen vorsichtig in die Löcher und achtet darauf, dass der Wurzelballen mit der Bodenoberfläche abschließt.
4. Löcher füllen: Füllt die Löcher mit Erde und drückt sie leicht an.
5. Gießen: Gießt die Pflanzen gründlich an.
4. Pflege und Bewässerung
Regelmäßige Pflege ist wichtig, um gesunde Pflanzen und eine reiche Ernte zu gewährleisten.
1. Regelmäßig gießen: Gießt die Pflanzen regelmäßig, besonders während trockener Perioden. Der Boden sollte immer leicht feucht sein.
2. Mulchen: Mulcht den Boden um die Pflanzen herum mit Stroh, Holzhackschnitzeln oder Grasschnitt. Das hilft, die Feuchtigkeit im Boden zu halten, Unkraut zu unterdrücken und den Boden zu düngen.
3. Düngen: Düngt die Pflanzen alle 2-3 Wochen mit einem organischen Dünger oder Komposttee.
4. Unkraut jäten: Entfernt regelmäßig Unkraut, um die Konkurrenz um Nährstoffe und Wasser zu minimieren.
5. Schädlingsbekämpfung: Kontrolliert die Pflanzen regelmäßig auf Schädlinge wie Kohlweißlinge, Blattläuse oder Schnecken. Setzt bei Bedarf biologische Schädlingsbekämpfungsmittel ein oder deckt die Pflanzen mit Netzen ab.
5. Erntezeit
Die Erntezeit hängt von der Sorte und den Wachstumsbedingungen ab.
1. Kopfkohl ernten: Kopfkohl ist erntereif, wenn der Kopf fest und kompakt ist. Schneidet den Kopf mit einem scharfen Messer ab.
2. Brokkoli ernten: Brokkoli ist erntereif, wenn die Röschen fest und geschlossen sind. Schneidet den Haupttrieb mit einem scharfen Messer ab. Nach der Ernte des Haupttriebs bilden sich oft Seitentriebe, die ihr ebenfalls ernten könnt.
Zusätzliche Tipps und Tricks für eine erfolgreiche Ernte
Hier sind noch ein paar zusätzliche Tipps, die euch helfen können, eure Ernte zu optimieren:
* Fruchtfolge beachten: Baut Kopfkohl und Brokkoli nicht jedes Jahr am selben Standort an. Eine Fruchtfolge hilft, Krankheiten und Schädlinge zu vermeiden.
* Boden testen: Lasst euren Boden testen, um den pH-Wert und den Nährstoffgehalt zu bestimmen. So könnt ihr den Boden gezielt verbessern.
* Sortenwahl: Wählt Sorten, die für euer Klima und eure Bodenbedingungen geeignet sind.
* Schutz vor Frost: Bei drohendem Frost könnt ihr die Pflanzen mit Vlies oder Folie abdecken.
* Kohlhernie vorbeugen: Kohlhernie ist eine Pilzkrankheit, die Kopfkohl und Brokkoli befallen kann. Um Kohlhernie vorzubeugen, solltet ihr den Boden kalken und eine Fruchtfolge einhalten.
* Regelmäßige Kontrolle: Kontrolliert eure Pflanzen regelmäßig auf Anzeichen von Krankheiten oder Schädlingen. Je früher ihr Probleme erkennt, desto einfacher ist es, sie zu beheben.
Häufige Probleme und Lösungen
Auch beim Anbau von Kopfkohl und Brokkoli können Probleme auftreten. Hier sind einige häufige Probleme und wie ihr sie lösen könnt:
* Kohlweißlinge: Die Raupen des Kohlweißlings fressen Löcher in die Blätter. Ihr könnt die Raupen absammeln, die Pflanzen mit Netzen abdecken oder biologische Schädlingsbekämpfungsmittel einsetzen.
* Blattläuse: Blattläuse saugen Pflanzensaft und können die Pflanzen schwächen. Ihr könnt die Blattläuse mit einem Wasserstrahl abspritzen, mit Schmierseife behandeln oder Marienkäferlarven einsetzen.
* Schnecken: Schnecken fressen an den Blättern und können ganze Pflanzen vernichten. Ihr könnt Schneckenkorn streuen, Schneckenzäune aufstellen oder die Schnecken absammeln.
* Kohlhernie: Kohlhernie ist eine Pilzkrankheit, die die Wurzeln befällt. Um Kohlhernie vorzubeugen, solltet ihr den Boden kalken und eine Fruchtfolge einhalten. Befallene Pflanzen sollten entfernt und vernichtet werden.
* Falscher Mehltau: Falscher Mehltau ist eine Pilzkrankheit, die sich durch gelbliche Flecken auf den Blättern äußert. Ihr könnt die Pflanzen mit einem Fungiz
Conclusion
So, there you have it! Mastering the art of growing cauliflower and broccoli at home is not only achievable but also incredibly rewarding. From selecting the right varieties to nurturing them through their various growth stages, you’ve gained the knowledge to cultivate your own thriving patch of these nutritious and delicious vegetables.
Why is this DIY approach a must-try? Because it puts you in complete control. You know exactly what goes into your food, avoiding harmful pesticides and ensuring the freshest possible produce. Store-bought cauliflower and broccoli simply can’t compare to the vibrant flavor and satisfying crunch of homegrown vegetables picked at their peak ripeness. Plus, the sheer joy of harvesting something you’ve nurtured from a tiny seed is an experience that’s hard to beat.
But the journey doesn’t end here! Feel free to experiment with different varieties of cauliflower and broccoli to discover your personal favorites. Try growing purple cauliflower for a visually stunning addition to your meals, or explore Romanesco broccoli for its unique fractal pattern and delicate flavor. Consider companion planting to deter pests naturally and improve the overall health of your garden. Marigolds, for example, are known to repel many common garden pests, while herbs like rosemary and thyme can enhance the flavor of your vegetables.
Don’t be afraid to adapt the techniques we’ve discussed to suit your specific climate and growing conditions. If you live in a warmer region, providing shade during the hottest part of the day can prevent bolting. In cooler climates, starting your seeds indoors can give your plants a head start. The key is to observe your plants closely and adjust your care accordingly.
Growing cauliflower and broccoli is a learning process, and there will inevitably be challenges along the way. But with patience, persistence, and a little bit of experimentation, you’ll be well on your way to enjoying a bountiful harvest of homegrown goodness.
We wholeheartedly encourage you to give this DIY project a try. Imagine the satisfaction of serving a meal featuring cauliflower and broccoli that you grew yourself! It’s a conversation starter, a source of pride, and a testament to your green thumb.
And most importantly, we want to hear about your experiences! Share your successes, your challenges, and any tips or tricks you’ve discovered along the way. Post photos of your thriving cauliflower and broccoli plants on social media using #HomegrownCauliflowerBroccoli. Let’s create a community of passionate gardeners who are dedicated to growing their own healthy and delicious food. Your insights could inspire others to embark on their own gardening adventures. So, grab your seeds, get your hands dirty, and let’s grow some amazing cauliflower and broccoli together! Remember, the best cauliflower and broccoli is the one you grow yourself!
Frequently Asked Questions (FAQ)
What are the best cauliflower and broccoli varieties to grow for beginners?
For beginners, some of the easiest and most reliable cauliflower varieties to grow include ‘Snowball Y Improved’, ‘Early White Hybrid’, and ‘Cheddar’. These varieties are known for their disease resistance and relatively short growing season. For broccoli, ‘Waltham 29’, ‘Packman’, and ‘DiCicco’ are excellent choices. They are also relatively easy to grow and produce good yields. These varieties are also more tolerant of common beginner mistakes.
How much space do cauliflower and broccoli plants need?
Cauliflower and broccoli plants need ample space to grow and develop properly. Generally, you should space cauliflower plants about 18-24 inches apart in rows that are 30-36 inches apart. Broccoli plants can be spaced slightly closer, around 18 inches apart in rows that are 24-30 inches apart. Proper spacing allows for adequate air circulation, which helps prevent fungal diseases, and ensures that each plant has enough access to sunlight and nutrients. Overcrowding can lead to smaller heads and increased susceptibility to pests and diseases.
What are the most common pests and diseases that affect cauliflower and broccoli, and how can I prevent them?
Common pests that affect cauliflower and broccoli include cabbage worms, aphids, flea beetles, and cabbage root maggots. Diseases include clubroot, black rot, and downy mildew. To prevent these problems, practice crop rotation, use row covers to protect plants from pests, and choose disease-resistant varieties. Regularly inspect your plants for signs of pests or diseases and take action promptly. For cabbage worms, handpicking them off the plants or using Bacillus thuringiensis (Bt) is effective. For aphids, a strong spray of water or insecticidal soap can help. To prevent clubroot, ensure your soil is well-drained and has a pH of 6.5-7.0.
How often should I water my cauliflower and broccoli plants?
Cauliflower and broccoli plants need consistent moisture to thrive. Water deeply and regularly, especially during dry periods. Aim to keep the soil consistently moist but not waterlogged. A good rule of thumb is to water when the top inch of soil feels dry to the touch. Mulching around the plants can help retain moisture and suppress weeds. Avoid overhead watering, as this can promote fungal diseases. Instead, water at the base of the plants.
When is the best time to harvest cauliflower and broccoli?
Cauliflower is ready to harvest when the head is firm, compact, and has reached its desired size (usually 6-8 inches in diameter). The head should be white or the color of the variety you are growing. Broccoli is ready to harvest when the flower buds are tight and green. If the buds start to open and show yellow flowers, it’s time to harvest immediately. Cut the main head of broccoli with a sharp knife, leaving several inches of stem. Side shoots will often develop after the main head is harvested, providing you with additional broccoli over several weeks.
Can I grow cauliflower and broccoli in containers?
Yes, you can grow cauliflower and broccoli in containers, but you’ll need to choose a large container (at least 5 gallons) with good drainage. Use a high-quality potting mix and ensure the plants receive at least 6 hours of sunlight per day. Container-grown plants may need more frequent watering and fertilization than those grown in the ground. Choose compact varieties that are well-suited for container gardening.
What kind of fertilizer should I use for cauliflower and broccoli?
Cauliflower and broccoli are heavy feeders and benefit from regular fertilization. Before planting, amend the soil with compost or well-rotted manure. During the growing season, fertilize every 2-3 weeks with a balanced fertilizer (e.g., 10-10-10) or a fertilizer specifically formulated for vegetables. Follow the instructions on the fertilizer package. You can also use organic fertilizers such as fish emulsion or seaweed extract.
How do I prevent cauliflower from turning yellow?
Cauliflower heads can turn yellow if they are exposed to too much sunlight. To prevent this, blanch the heads by tying the outer leaves together over the developing head when it reaches about 3 inches in diameter. This will protect the head from the sun and keep it white. Some self-blanching varieties have leaves that naturally curl inward to protect the head.
What do I do if my cauliflower or broccoli plant bolts (flowers prematurely)?
Bolting is usually caused by stress, such as extreme temperatures or inconsistent watering. Once a plant bolts, the head will become loose and bitter. Unfortunately, there’s not much you can do to reverse bolting. You can still harvest the head, but it may not taste as good. To prevent bolting, choose bolt-resistant varieties, provide consistent watering, and protect plants from extreme temperatures.
Can I save seeds from my cauliflower and broccoli plants?
Saving seeds from cauliflower and broccoli can be challenging because they are cross-pollinating plants. This means that they can easily cross with other members of the Brassica family, such as cabbage, kale, and Brussels sprouts. If you want to save true-to-type seeds, you’ll need to isolate your plants from other Brassicas or hand-pollinate them. However, even with these precautions, there’s no guarantee that the seeds will produce plants that are exactly like the parent plant. For beginners, it’s often easier to purchase seeds from a reputable source.


Leave a Comment