
Grow Cauliflower at Home: Your Guide to a Bountiful Harvest
Growing cauliflower at home might seem daunting, but I’m here to tell you it’s easier than you think! This guide is packed with simple, effective Grow Cauliflower at Home tricks and DIY solutions that will transform your garden into a cauliflower paradise. Forget expensive grocery store prices and enjoy the unparalleled taste and freshness of homegrown cauliflower.
For centuries, cauliflower has held a place of honor in gardens around the world, prized not only for its delicious flavor but also for its nutritional value. From ancient Roman times to modern-day kitchen gardens, cultivating this versatile vegetable has been a source of pride and sustenance. But let’s be honest, sometimes the process can feel a bit overwhelming. That’s why I’ve compiled these Grow Cauliflower at Home tips – to demystify the process and empower you to successfully grow your own beautiful, healthy heads of cauliflower.
Why Grow Your Own Cauliflower?
There’s nothing quite like the satisfaction of harvesting your own cauliflower. Beyond the delicious reward, growing your own offers several key advantages. You control the quality of your produce, ensuring it’s free from pesticides and other harmful chemicals. You also get to enjoy the freshest, most flavorful cauliflower imaginable, picked at its peak ripeness. Plus, it’s a rewarding experience for the whole family, especially kids who can get involved in the planting and harvesting process. So, let’s get started on your journey to successfully growing cauliflower at home!
Growing Your Own Cauliflower: A Step-by-Step Guide
I love the taste of fresh cauliflower, but grocery store prices can be a bit steep. That’s why I decided to try growing my own! It’s surprisingly easy, and the reward of harvesting your own head of cauliflower is incredibly satisfying. This guide will walk you through the entire process, from seed to harvest.
Phase 1: Planning and Preparation
- Choose your cauliflower variety: Research different cauliflower varieties to find one that suits your climate and growing season. Consider factors like size, color (white, purple, orange), and days to maturity. Early varieties are great for shorter seasons.
- Select a suitable location: Cauliflower needs at least six hours of sunlight per day. Choose a spot in your garden that receives ample sun, preferably with some afternoon shade in hotter climates. Good soil drainage is crucial; cauliflower doesn’t like wet feet.
- Prepare the soil: Cauliflower thrives in loose, fertile soil rich in organic matter. Amend your soil with compost or well-rotted manure several weeks before planting. A soil test can help determine if you need to add any additional nutrients.
- Gather your supplies: You’ll need cauliflower seeds (or seedlings), seed starting mix (if starting from seed), gardening gloves, a trowel or hand cultivator, a watering can, and possibly some row covers or netting for pest protection.
Phase 2: Starting Your Cauliflower Plants
- Start seeds indoors (optional): For an earlier harvest, start your cauliflower seeds indoors 6-8 weeks before the last expected frost. Use seed starting mix and sow seeds about ¼ inch deep. Keep the soil consistently moist but not soggy. Place the seed tray in a warm, sunny location.
- Harden off seedlings: Once seedlings have developed several true leaves, gradually acclimate them to outdoor conditions before transplanting. This process, called hardening off, involves gradually exposing the seedlings to more sunlight and wind over a period of a week or two.
- Direct sow (alternative method): Alternatively, you can direct sow cauliflower seeds outdoors after the last frost. Sow seeds about ¼ inch deep and 18-24 inches apart. Thin seedlings to one plant per location once they’ve established themselves.
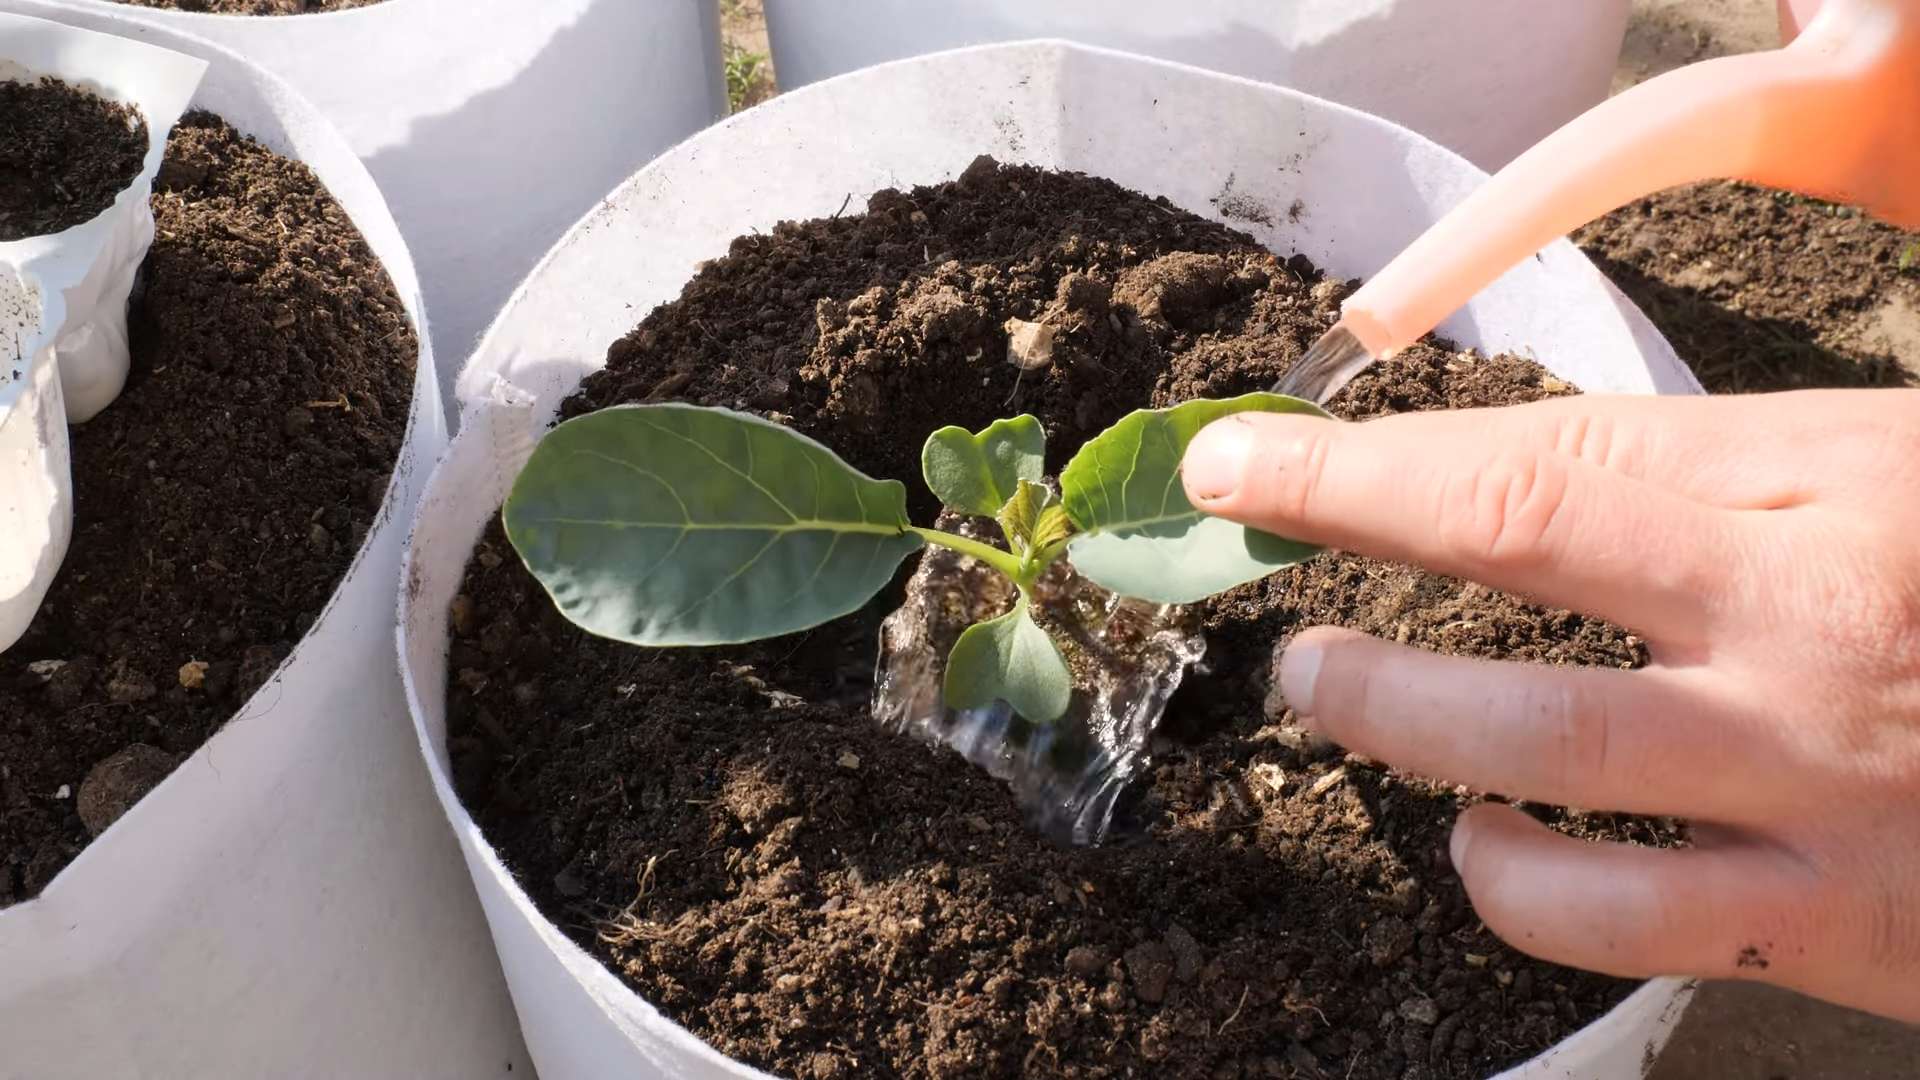
Phase 3: Transplanting and Ongoing Care
- Transplant seedlings: Once the danger of frost has passed and the soil has warmed, transplant your seedlings outdoors. Dig holes slightly larger than the root ball and gently place the seedlings in the ground. Water thoroughly after transplanting.
- Water regularly: Cauliflower needs consistent moisture, especially during dry periods. Water deeply and regularly, aiming for about 1 inch of water per week. Mulching around the plants helps retain soil moisture and suppress weeds.
- Fertilize as needed: Side-dress your cauliflower plants with a balanced fertilizer about 3-4 weeks after transplanting. Follow the instructions on the fertilizer package for application rates.
- Weed regularly: Keep the area around your cauliflower plants free of weeds to prevent competition for nutrients and water. Regular weeding also helps improve air circulation, reducing the risk of fungal diseases.
- Pest and disease control: Monitor your plants regularly for pests such as aphids, cabbage worms, and slugs. Use appropriate pest control methods, such as handpicking pests, using insecticidal soap, or introducing beneficial insects. Good air circulation and proper watering can help prevent fungal diseases.
- Blanching (crucial step): This is a key step for producing high-quality cauliflower heads. About 3-4 weeks before harvest, begin blanching the developing heads. This involves tying the leaves together loosely over the developing curd to protect it from the sun. This prevents the curd from turning green and bitter.
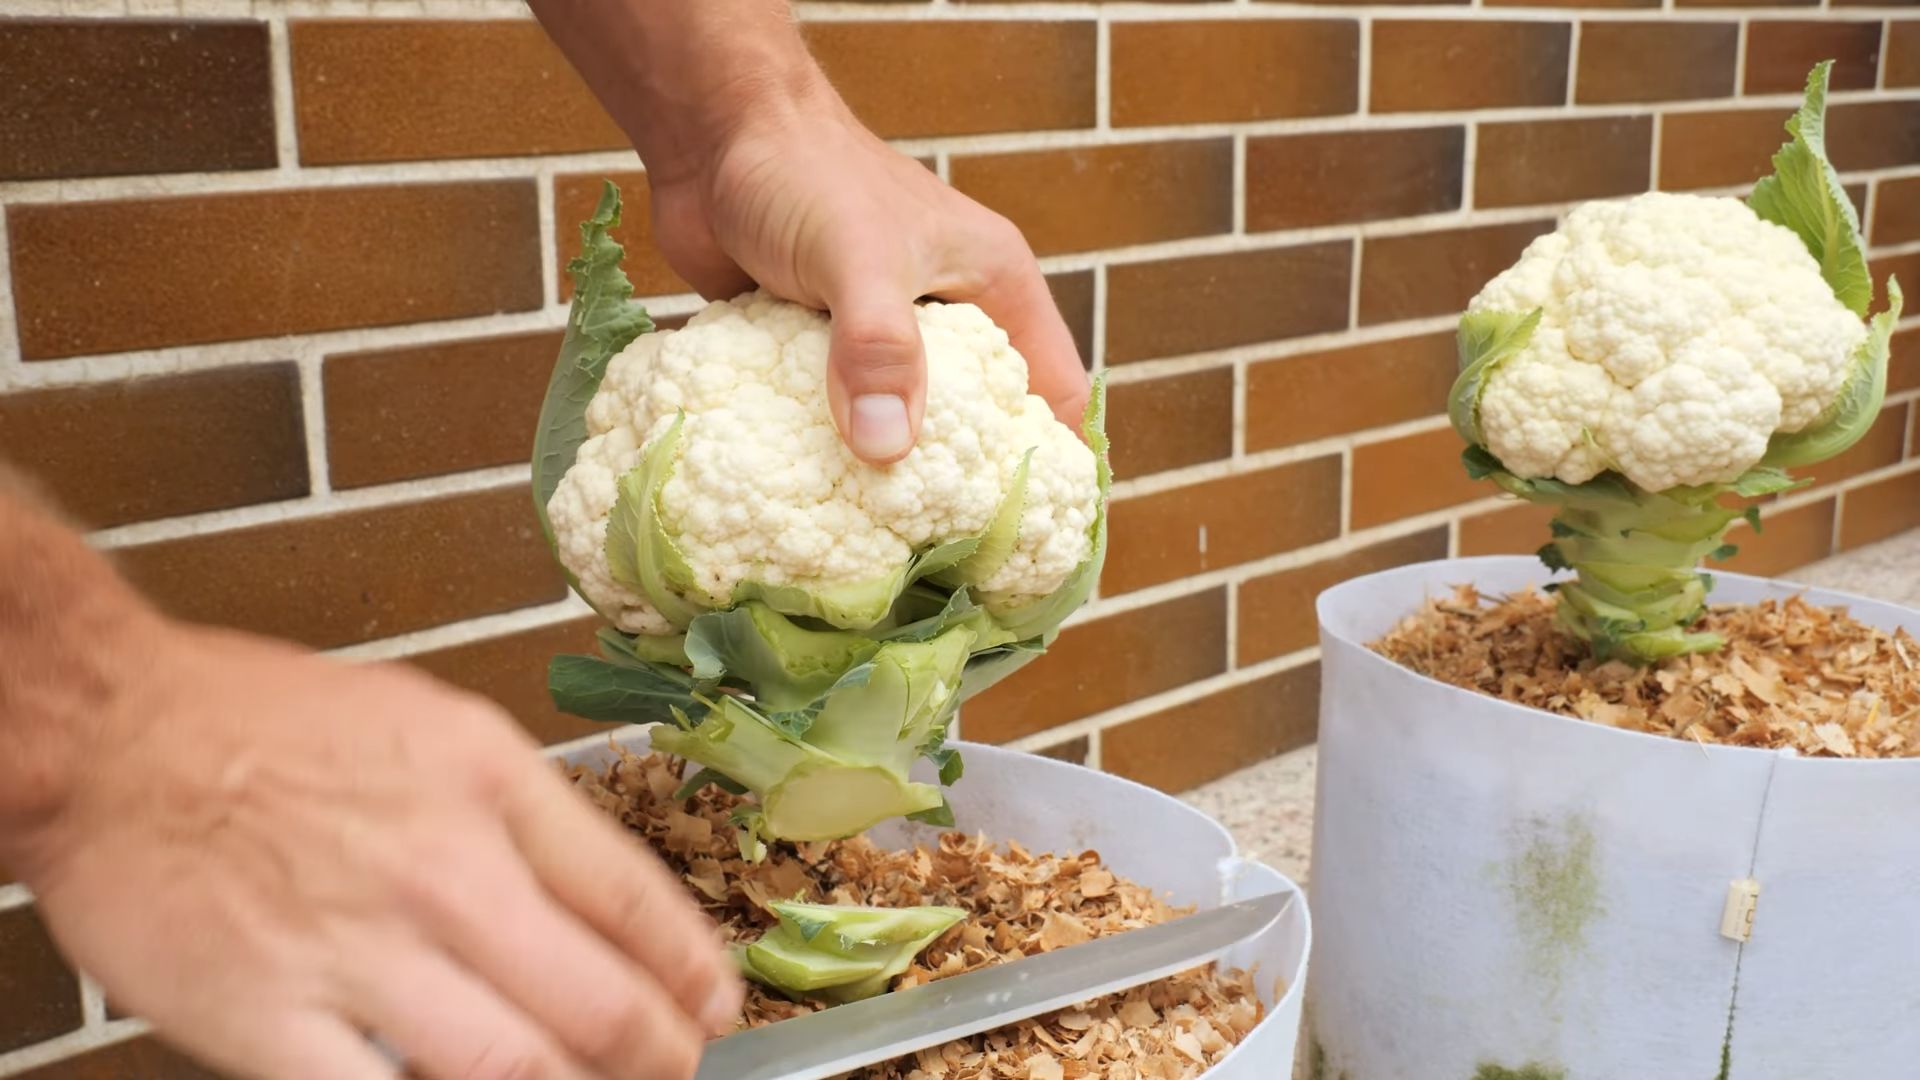
Phase 4: Harvesting and Storage
- Harvesting: Cauliflower is ready for harvest when the curd is firm, compact, and the size specified on the seed packet. Use a sharp knife to cut the head from the stalk, leaving about 2 inches of stem attached.
- Storage: Store harvested cauliflower in the refrigerator in a plastic bag. It will keep for about a week. You can also freeze cauliflower for longer storage. Cut the cauliflower into florets, blanch them briefly in boiling water, and then freeze them in airtight containers or freezer bags.
- Troubleshooting: If your cauliflower heads are small or loose, it could be due to insufficient watering, nutrient deficiencies, or pest damage. If your plants are bolting (going to seed prematurely), it’s likely due to heat stress or long days. Consider planting an early variety or providing some afternoon shade.
Tips for Success
- Choose the right time to plant: Check your local frost dates to determine the best time to plant cauliflower. It needs cool weather to thrive.
- Provide consistent care: Regular watering, weeding, and fertilization are essential for healthy cauliflower growth.
- Don’t forget the blanching: This step is crucial for producing a high-quality, white cauliflower head.
- Experiment with different varieties: Try growing different colors and sizes of cauliflower to find your favorites.
- Enjoy the fruits (or vegetables!) of your labor: There’s nothing quite like the taste of homegrown cauliflower!
Conclusion
So there you have it! Growing your own cauliflower at home is not only incredibly rewarding but also surprisingly achievable. This DIY trick, far from being a daunting task, opens up a world of fresh, flavorful cauliflower, free from pesticides and tailored to your taste. The satisfaction of harvesting your own homegrown cauliflower, knowing exactly how it was nurtured from seed to plate, is unparalleled. You’ll be amazed at the superior taste and texture compared to store-bought cauliflower. This method empowers you to control the entire growing process, ensuring a consistently high-quality harvest. Beyond the delicious results, growing your own cauliflower connects you to the natural world and fosters a deeper appreciation for the food you consume. It’s a sustainable choice, reducing your carbon footprint and contributing to a healthier lifestyle. Don’t just take our word for it – experience the joy of homegrown cauliflower for yourself!
This simple yet effective DIY method allows you to bypass the complexities of commercial farming, resulting in a superior product. You’ll be able to experiment with different varieties, tailoring your cauliflower to your culinary preferences. Imagine the possibilities: vibrant purple cauliflower for a stunning visual impact, or a smaller, more compact variety perfect for space-conscious gardens. The possibilities are endless!
We encourage you to try this DIY cauliflower growing method and share your experiences with us. Post your photos on social media using #HomegrownCauliflower and tag us! We’d love to see your flourishing plants and delicious harvests. Let’s build a community of home gardeners, sharing tips, tricks, and the joy of growing our own food. Remember, even a small space, like a balcony or window box, can be transformed into a thriving cauliflower patch. So, what are you waiting for? Embrace the challenge, reap the rewards, and embark on your cauliflower growing adventure today! You might be surprised at how easy and fulfilling it is to grow your own cauliflower at home. It’s a journey that will enrich your culinary experiences and deepen your connection with nature.
Frequently Asked Questions
What type of soil is best for growing cauliflower?
Cauliflower thrives in loose, well-draining soil rich in organic matter. Amend heavy clay soils with compost or other organic materials to improve drainage and aeration. A slightly acidic soil pH (between 6.0 and 6.8) is ideal. Before planting, test your soil’s pH using a home soil testing kit and adjust accordingly. Well-drained soil prevents root rot, a common problem for cauliflower.
How much sunlight does cauliflower need?
Cauliflower requires at least six to eight hours of direct sunlight per day. Choose a sunny location in your garden or find a sunny spot on your balcony or patio. Insufficient sunlight can lead to poor growth and reduced yields. If you have limited sunlight, consider using grow lights to supplement natural sunlight, especially during the early stages of growth.
When is the best time to plant cauliflower?
The best time to plant cauliflower depends on your climate. In cooler climates, start seeds indoors six to eight weeks before the last expected frost. In warmer climates, you can direct sow seeds after the last frost or start seedlings indoors a few weeks earlier. Check your local frost dates to determine the optimal planting time for your region. Remember that cauliflower prefers cool weather and will bolt (go to seed) in hot temperatures.
How often should I water my cauliflower?
Water your cauliflower regularly, keeping the soil consistently moist but not waterlogged. Aim for about one inch of water per week, either from rainfall or supplemental irrigation. During hot, dry periods, you may need to water more frequently. Mulching around the plants helps retain soil moisture and suppress weeds. Overwatering can lead to root rot, while underwatering can stunt growth.
What are some common cauliflower pests and diseases?
Common cauliflower pests include aphids, cabbage worms, and slugs. Monitor your plants regularly for signs of infestation and take appropriate action. Organic pest control methods, such as insecticidal soap or neem oil, are effective against many common pests. Diseases such as black rot and clubroot can also affect cauliflower. Practicing crop rotation and ensuring good soil drainage can help prevent these diseases. Choosing disease-resistant varieties can also minimize the risk of infection.
Can I grow cauliflower in containers?
Yes, you can successfully grow cauliflower in containers. Choose large containers (at least 12 inches in diameter) to allow for adequate root development. Use a well-draining potting mix and ensure the containers receive at least six to eight hours of sunlight per day. Container-grown cauliflower may require more frequent watering than plants grown in the ground.
What should I do with my harvested cauliflower?
Once your cauliflower heads are mature and firm, harvest them by cutting the head from the stalk with a sharp knife. Store harvested cauliflower in the refrigerator in a plastic bag for up to a week. You can also freeze cauliflower for longer storage. Blanch the cauliflower florets before freezing to maintain their quality and prevent enzymatic browning. Enjoy your homegrown cauliflower in a variety of dishes! From creamy soups to flavorful stir-fries, the possibilities are endless.


Leave a Comment