
Grow Dragon Beans and unlock a world of vibrant color and delicious flavor right in your own backyard! Have you ever dreamed of cultivating something truly extraordinary? Something that not only tastes amazing but also adds a touch of magic to your garden? Well, get ready to turn that dream into reality with these simple, yet effective, DIY tricks for growing your very own Dragon Beans.
Dragon Beans, also known as Asparagus Beans or Yardlong Beans, have a rich history rooted in Southeast Asia, where they’ve been a culinary staple for centuries. These fascinating legumes aren’t just a food source; they’re a symbol of abundance and prosperity in many cultures. Imagine bringing that same sense of richness and vitality to your own home garden!
But why should you bother with these DIY tricks? Because growing Dragon Beans can be a little tricky! They need specific conditions to thrive, and without the right knowledge, you might end up with disappointing results. That’s where I come in! I’m here to share my tried-and-true methods for ensuring a bountiful harvest. From choosing the perfect location to creating a supportive trellis system, I’ll guide you through every step of the process. Plus, I’ll reveal some clever hacks to protect your precious beans from pests and diseases. So, let’s embark on this exciting gardening adventure together and grow Dragon Beans that will be the envy of all your neighbors!
Drachenbohnen selbst anbauen: Eine umfassende DIY-Anleitung
Hallo liebe Gartenfreunde! Habt ihr schon mal von Drachenbohnen gehört? Diese faszinierenden Pflanzen, auch bekannt als Spargelbohnen oder Meterbohnen, sind nicht nur unglaublich lecker, sondern auch ein echter Hingucker in jedem Garten. Ihre langen, schlanken Schoten können bis zu einem Meter lang werden – daher der Name! Ich zeige euch heute, wie ihr diese exotischen Schönheiten ganz einfach selbst anbauen könnt. Keine Angst, es ist einfacher als ihr denkt!
Was sind Drachenbohnen und warum sollte man sie anbauen?
Drachenbohnen (Vigna unguiculata subsp. sesquipedalis) sind eine Unterart der Augenbohne und stammen ursprünglich aus Asien. Sie sind nicht nur optisch beeindruckend, sondern auch reich an Vitaminen und Mineralstoffen. Außerdem sind sie relativ pflegeleicht und bringen einen hohen Ertrag.
Warum Drachenbohnen anbauen?
* Hoher Ertrag: Eine einzige Pflanze kann eine beeindruckende Menge an Bohnen produzieren.
* Gesund und lecker: Drachenbohnen sind reich an Vitaminen, Mineralstoffen und Ballaststoffen.
* Dekorativ: Ihre langen, hängenden Schoten sind ein echter Blickfang im Garten.
* Einfache Anzucht: Mit den richtigen Tipps und Tricks gelingt der Anbau auch Anfängern.
* Lange Erntezeit: Bei guter Pflege könnt ihr über mehrere Wochen hinweg ernten.
Vorbereitung ist alles: Was ihr für den Anbau benötigt
Bevor wir loslegen, solltet ihr sicherstellen, dass ihr alles Notwendige zur Hand habt. Hier ist eine Liste der Dinge, die ihr für den Anbau von Drachenbohnen benötigt:
* Drachenbohnensamen: Diese bekommt ihr im Fachhandel, online oder vielleicht sogar von einem netten Nachbarn. Achtet auf eine gute Qualität der Samen.
* Anzuchttöpfe oder -schalen: Für die Voranzucht im Haus.
* Anzuchterde: Spezielle Erde für die Anzucht, die nährstoffarm und locker ist.
* Gartenerde: Für das Beet oder den Kübel, in dem die Bohnen später wachsen sollen.
* Kompost oder organischer Dünger: Zur Verbesserung der Bodenqualität.
* Pflanzstäbe oder Rankhilfe: Drachenbohnen sind Kletterpflanzen und benötigen eine Unterstützung.
* Gießkanne oder Gartenschlauch: Zum regelmäßigen Gießen.
* Gartengeräte: Spaten, Harke, eventuell eine kleine Schaufel.
* Ein sonniger Standort: Drachenbohnen lieben die Sonne!
Schritt-für-Schritt-Anleitung: So gelingt der Anbau
Jetzt geht es ans Eingemachte! Ich zeige euch, wie ihr Drachenbohnen erfolgreich anbauen könnt. Wir beginnen mit der Voranzucht im Haus und gehen dann zur Auspflanzung ins Freie über.
Phase 1: Die Voranzucht im Haus (optional)
Die Voranzucht im Haus ist zwar optional, aber sie hat einige Vorteile. Ihr könnt die Pflanzen früher ins Freie bringen und habt so eine längere Erntezeit. Außerdem schützt ihr die jungen Pflanzen vor Schnecken und anderen Schädlingen.
1. Samen vorbereiten: Legt die Drachenbohnensamen für etwa 12-24 Stunden in lauwarmes Wasser. Das beschleunigt die Keimung.
2. Anzuchttöpfe befüllen: Füllt die Anzuchttöpfe oder -schalen mit Anzuchterde. Drückt die Erde leicht an.
3. Samen aussäen: Legt pro Topf 2-3 Samen etwa 2-3 cm tief in die Erde. Bedeckt die Samen mit Erde und gießt sie vorsichtig an.
4. Warm und hell stellen: Stellt die Anzuchttöpfe an einen warmen und hellen Ort. Eine Temperatur von 20-25°C ist ideal.
5. Feucht halten: Haltet die Erde gleichmäßig feucht, aber nicht nass. Vermeidet Staunässe.
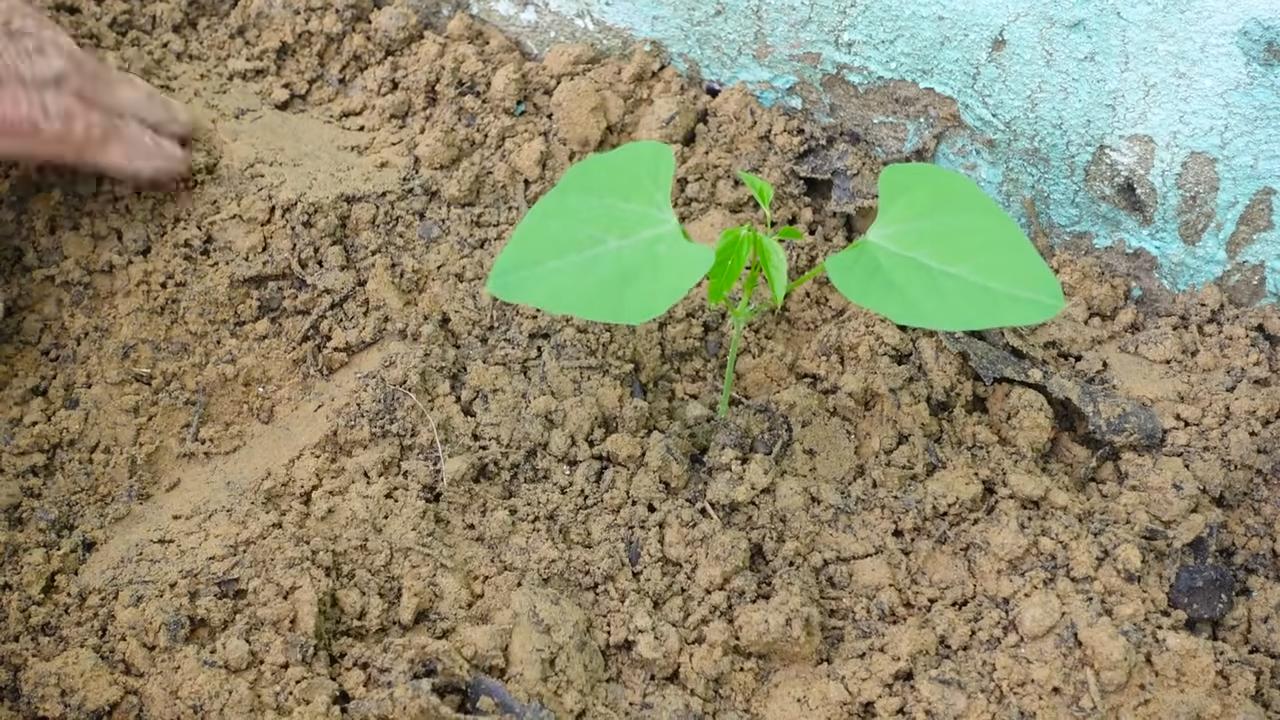
6. Keimung abwarten: Nach etwa 1-2 Wochen sollten die ersten Keimlinge zu sehen sein.
7. Vereinzeln: Wenn die Keimlinge groß genug sind (etwa 5-10 cm), könnt ihr sie vereinzeln. Lasst pro Topf nur die stärkste Pflanze stehen.
Phase 2: Die Auspflanzung ins Freie
Sobald die Temperaturen steigen und keine Frostgefahr mehr besteht (meist ab Mitte Mai), können die Drachenbohnen ins Freie gepflanzt werden.
1. Standort vorbereiten: Wählt einen sonnigen Standort mit gut durchlässigem Boden. Lockert den Boden auf und entfernt Unkraut.
2. Boden verbessern: Mischt Kompost oder organischen Dünger unter die Erde, um die Bodenqualität zu verbessern.
3. Pflanzlöcher ausheben: Grabt Pflanzlöcher im Abstand von etwa 30-40 cm.
4. Pflanzen einsetzen: Setzt die vorgezogenen Pflanzen vorsichtig in die Pflanzlöcher. Achtet darauf, dass der Wurzelballen nicht beschädigt wird.
5. Angießen: Gießt die Pflanzen nach dem Einsetzen gründlich an.
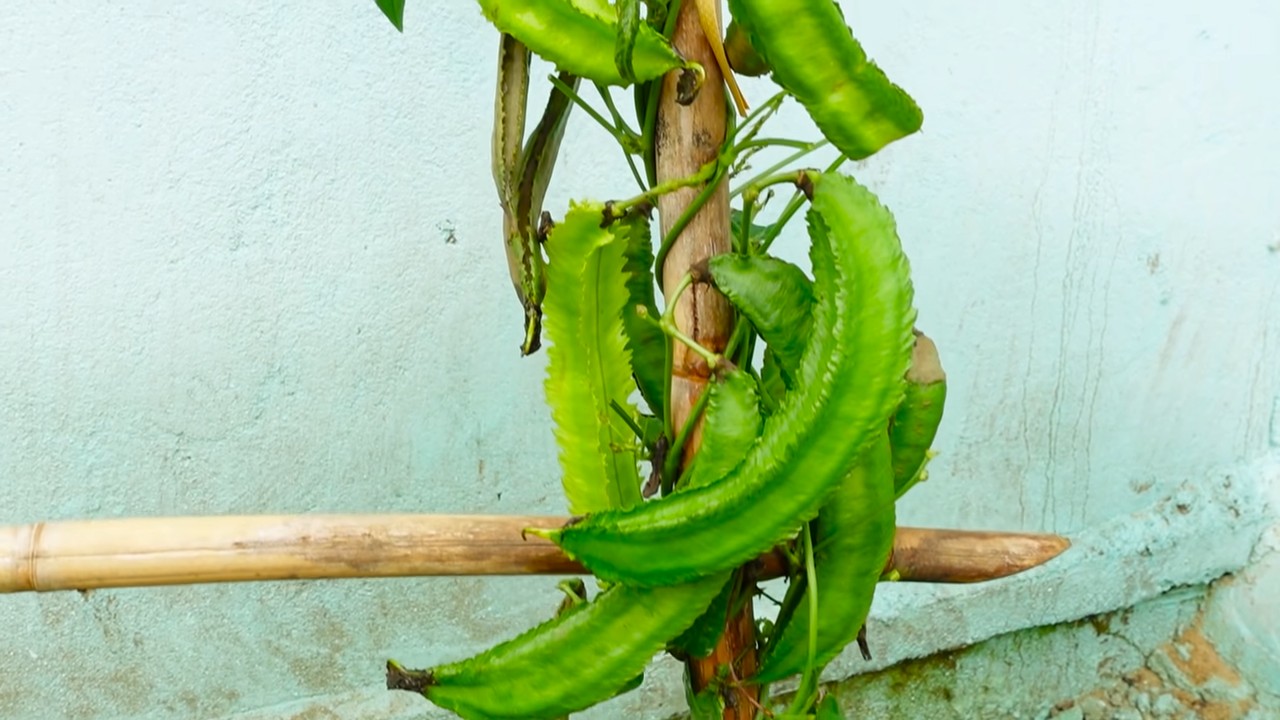
6. Rankhilfe anbringen: Drachenbohnen sind Kletterpflanzen und benötigen eine Rankhilfe. Ihr könnt Pflanzstäbe, ein Rankgitter oder ein Seil verwenden. Achtet darauf, dass die Rankhilfe stabil ist und den Pflanzen genügend Halt bietet.
Phase 3: Direktsaat im Freien (Alternative zur Voranzucht)
Wenn ihr keine Zeit oder Lust auf die Voranzucht habt, könnt ihr die Drachenbohnen auch direkt ins Freie säen. Wartet aber unbedingt, bis keine Frostgefahr mehr besteht und der Boden sich erwärmt hat.
1. Boden vorbereiten: Wie bei der Auspflanzung von vorgezogenen Pflanzen, lockert den Boden auf, entfernt Unkraut und mischt Kompost oder organischen Dünger unter die Erde.
2. Saatrillen ziehen: Zieht Saatrillen im Abstand von etwa 30-40 cm.
3. Samen aussäen: Legt die Drachenbohnensamen in einem Abstand von etwa 5-10 cm in die Saatrillen. Bedeckt die Samen mit Erde und drückt sie leicht an.
4. Angießen: Gießt die Saatrillen nach dem Aussäen gründlich an.
5. Feucht halten: Haltet die Erde gleichmäßig feucht, bis die Samen keimen.
6. Vereinzeln: Wenn die Keimlinge groß genug sind, könnt ihr sie vereinzeln. Lasst pro Pflanze etwa 30-40 cm Platz.
7. Rankhilfe anbringen: Wie bei der Auspflanzung von vorgezogenen Pflanzen, benötigt ihr auch bei der Direktsaat eine Rankhilfe.
Pflege der Drachenbohnen: So bleiben sie gesund und ertragreich
Damit eure Drachenbohnen prächtig gedeihen und einen hohen Ertrag bringen, ist eine regelmäßige Pflege wichtig. Hier sind einige Tipps, die ihr beachten solltet:
* Gießen: Drachenbohnen benötigen regelmäßig Wasser, besonders während der Blütezeit und der Fruchtbildung. Gießt am besten morgens oder abends, um Verdunstung zu vermeiden. Vermeidet Staunässe.
* Düngen: Düngt die Pflanzen regelmäßig mit Kompost, organischem Dünger oder einem speziellen Gemüsedünger. Achtet auf die Dosierungshinweise.
* Unkraut entfernen: Haltet das Beet oder den Kübel unkrautfrei, damit die Drachenbohnen genügend Nährstoffe und Licht bekommen.
* Rankhilfe kontrollieren: Überprüft regelmäßig, ob die Rankhilfe stabil ist und die Pflanzen ausreichend Halt bietet.
* Schädlinge und Krankheiten: Achtet auf Anzeichen von Schädlingen oder Krankheiten. Bei Bedarf könnt ihr biologische Pflanzenschutzmittel einsetzen. Schnecken können besonders bei jungen Pflanzen ein Problem sein.
* Ausgeizen: Entfernt regelmäßig Seitentriebe, um die Bildung von Blüten und Früchten zu fördern.
Die Ernte: Wann und wie ihr die Drachenbohnen erntet
Die Erntezeit der Drachenbohnen beginnt in der Regel etwa 2-3 Monate nach der
Conclusion
So, there you have it! Growing dragon beans isn’t just a gardening project; it’s an adventure in flavor, a visual spectacle, and a rewarding experience that connects you directly to the source of your food. We’ve walked you through the simple steps to cultivate these magnificent legumes, and now it’s your turn to bring the magic to your own garden.
Why is this DIY trick a must-try? Because store-bought dragon beans simply can’t compare to the vibrant freshness and unique flavor you’ll achieve when you grow your own. You control the growing conditions, ensuring they are free from unwanted chemicals and harvested at their peak ripeness. Plus, the sheer joy of watching these beans climb and flourish is an unparalleled reward for any gardener, beginner or experienced.
But the fun doesn’t stop there! Feel free to experiment with different varieties of dragon beans. Some boast more vibrant purple streaks, while others offer a slightly sweeter flavor profile. You can also explore different trellising methods to create stunning vertical displays in your garden. Consider companion planting with herbs like basil or rosemary to deter pests and enhance the flavor of your beans. For a spicier kick, try interplanting with chili peppers.
And don’t forget about the culinary possibilities! Dragon beans are incredibly versatile in the kitchen. Sauté them with garlic and olive oil for a simple yet elegant side dish. Add them to stir-fries for a burst of color and texture. Blanch and freeze them for later use, ensuring you can enjoy the fruits (or rather, the beans) of your labor throughout the year. You can even use the dried beans in hearty winter stews.
We are confident that once you experience the satisfaction of growing your own dragon beans, you’ll be hooked. It’s a sustainable, delicious, and visually stunning addition to any garden. So, grab your seeds, prepare your soil, and get ready to embark on this exciting gardening journey.
We wholeheartedly encourage you to try this DIY trick and share your experiences with us! Post photos of your dragon bean plants on social media using #GrowDragonBeans and tag us so we can admire your green thumb. Let us know what varieties you’re growing, what culinary creations you’re whipping up, and any tips or tricks you’ve discovered along the way. Together, we can create a thriving community of dragon bean enthusiasts! Happy gardening!
Frequently Asked Questions (FAQ)
What exactly are dragon beans, and why should I grow them?
Dragon beans, also known as borlotti beans or cranberry beans, are a type of shelling bean prized for their beautiful appearance and delicious flavor. They are characterized by their creamy white pods streaked with vibrant red or purple markings, resembling the scales of a dragon. Growing them yourself offers several advantages:
* **Superior Freshness and Flavor:** Homegrown dragon beans are far fresher and more flavorful than those you find in the store. You can harvest them at their peak ripeness, ensuring the best possible taste.
* **Control Over Growing Conditions:** You have complete control over the growing environment, allowing you to avoid harmful pesticides and herbicides.
* **Unique Visual Appeal:** Dragon bean plants are incredibly attractive, adding a touch of beauty and whimsy to your garden.
* **Sustainable Gardening:** Growing your own food reduces your carbon footprint and promotes sustainable living.
* **Culinary Versatility:** Dragon beans can be used in a wide variety of dishes, from simple side dishes to hearty stews.
How much space do I need to grow dragon beans?
Dragon beans are climbing plants, so they require vertical support. A trellis, fence, or even a sturdy teepee structure will work well. The amount of space you need depends on the number of plants you want to grow. As a general guideline, allow at least 6 inches between plants and 2-3 feet between rows. A 4×4 foot trellis can comfortably support 4-6 dragon bean plants.
What kind of soil is best for growing dragon beans?
Dragon beans thrive in well-drained soil that is rich in organic matter. Before planting, amend your soil with compost or well-rotted manure to improve its fertility and drainage. A slightly acidic to neutral soil pH (around 6.0 to 7.0) is ideal.
How often should I water my dragon bean plants?
Water your dragon bean plants regularly, especially during hot, dry weather. Aim to keep the soil consistently moist but not waterlogged. Water deeply at the base of the plants, avoiding wetting the foliage, which can increase the risk of fungal diseases. Mulching around the plants can help retain moisture and suppress weeds.
When is the best time to harvest dragon beans?
Dragon beans are typically ready to harvest about 60-70 days after planting. The pods should be plump and well-filled, with the characteristic red or purple streaks. You can harvest them as shelling beans, removing the beans from the pods and using them fresh, or you can allow the pods to dry on the vine and harvest them as dried beans for later use.
Are there any common pests or diseases that affect dragon beans?
Like other bean varieties, dragon beans can be susceptible to certain pests and diseases. Common pests include aphids, bean beetles, and spider mites. Diseases include bean rust, powdery mildew, and anthracnose. To prevent these problems, practice good garden hygiene, such as removing plant debris and weeds. You can also use organic pest control methods, such as insecticidal soap or neem oil. Ensure good air circulation around the plants to minimize the risk of fungal diseases.
Can I grow dragon beans in containers?
Yes, you can grow dragon beans in containers, but you’ll need to choose a large container (at least 12 inches in diameter) and provide adequate support for the climbing vines. Use a well-draining potting mix and water regularly. Container-grown dragon beans may require more frequent fertilization than those grown in the ground.
How do I store dragon beans?
Freshly shelled dragon beans can be stored in the refrigerator for up to a week. For longer storage, you can blanch them and freeze them for several months. Dried dragon beans should be stored in an airtight container in a cool, dry place.
Can I save seeds from my dragon bean plants?
Yes, you can save seeds from your dragon bean plants, but keep in mind that beans are self-pollinating but cross-pollination can occur. To ensure that the seeds are true to type, choose healthy, disease-free plants and allow the pods to dry completely on the vine. Once the pods are dry and brittle, shell the beans and store them in an airtight container in a cool, dry place.
What are some delicious ways to cook with dragon beans?
Dragon beans are incredibly versatile in the kitchen. Here are a few ideas:
* **Sautéed with Garlic and Olive Oil:** A simple yet elegant side dish.
* **Added to Stir-Fries:** For a burst of color and texture.
* **In Soups and Stews:** For a hearty and flavorful meal.
* **As a Salad Ingredient:** Cooked and chilled, they add a creamy texture to salads.
* **Mashed:** Similar to mashed potatoes, they can be seasoned with herbs and spices.
* **Dragon Bean Dip:** Pureed with garlic, lemon juice, and tahini for a healthy and delicious dip.
Don’t be afraid to experiment and discover your own favorite ways to enjoy these delicious and beautiful beans! Remember, growing your own dragon beans is a rewarding experience that brings you closer to nature and provides you with fresh, flavorful ingredients for your culinary creations.


Leave a Comment