
Grow More Watermelons this year than you ever thought possible! Imagine biting into a juicy, sweet, homegrown watermelon, the taste of summer bursting in your mouth. Sounds idyllic, right? But what if your watermelon dreams have been consistently dashed by small yields and disappointing harvests? Don’t worry, I’ve been there! For generations, watermelons have been a symbol of summer abundance, from ancient Egyptian paintings depicting them as offerings to the dead, to their prominent place in modern-day picnics and celebrations.
The good news is, you don’t need to be a seasoned farmer to enjoy a bumper crop. Many people struggle with getting their watermelon plants to produce as much fruit as they’d like. That’s why I’m sharing some simple, yet incredibly effective, DIY tricks and hacks that will help you grow more watermelons and maximize your harvest. These aren’t complicated techniques requiring expensive equipment; they’re practical tips you can implement right now to see a noticeable difference. Get ready to transform your watermelon patch into a thriving oasis of sweet, juicy goodness!
Wassermelonen-Anbau: So erntest du eine reiche Ernte!
Hey Leute, ich liebe Wassermelonen! Und was gibt es Besseres, als sie selbst anzubauen? Es ist gar nicht so schwer, wie man denkt, und mit ein paar Tricks und Kniffen kannst du eine riesige Ernte einfahren. Ich zeige dir, wie ich das mache!
Die Grundlagen: Was Wassermelonen lieben
Bevor wir loslegen, müssen wir verstehen, was Wassermelonen zum Wachsen brauchen. Sie sind kleine Diven, aber wenn man ihre Bedürfnisse kennt, belohnen sie dich mit saftigen Früchten.
* Sonne, Sonne, Sonne: Wassermelonen brauchen mindestens 6-8 Stunden direkte Sonneneinstrahlung pro Tag. Je mehr, desto besser!
* Warme Temperaturen: Sie sind Frostbeulen. Die Bodentemperatur sollte mindestens 21°C betragen, bevor du sie pflanzt. Ideal sind 24-35°C.
* Gut durchlässiger Boden: Wassermelonen mögen keinen nassen Füße. Der Boden sollte locker und gut durchlässig sein. Sandiger Lehmboden ist perfekt.
* Reichhaltiger Boden: Sie sind Vielfraße! Der Boden sollte reich an organischen Stoffen sein. Kompost ist dein bester Freund.
* Ausreichend Wasser: Wassermelonen brauchen viel Wasser, besonders während der Fruchtbildung. Aber Vorsicht vor Staunässe!
* Platz, Platz, Platz: Wassermelonenpflanzen brauchen viel Platz, um sich auszubreiten. Plane genügend Raum ein.
Schritt-für-Schritt-Anleitung: Vom Samen zur saftigen Frucht
Okay, jetzt geht’s ans Eingemachte! Hier ist meine bewährte Methode, um Wassermelonen erfolgreich anzubauen:
Phase 1: Die Vorbereitung (ca. 6-8 Wochen vor dem letzten Frost)
1. Samen vorziehen (optional, aber empfohlen): Ich ziehe meine Wassermelonensamen gerne im Haus vor, um ihnen einen Vorsprung zu verschaffen. Das geht so:
* Fülle kleine Anzuchttöpfe (ca. 8-10 cm Durchmesser) mit Anzuchterde.
* Lege 2-3 Samen pro Topf ca. 2 cm tief in die Erde.
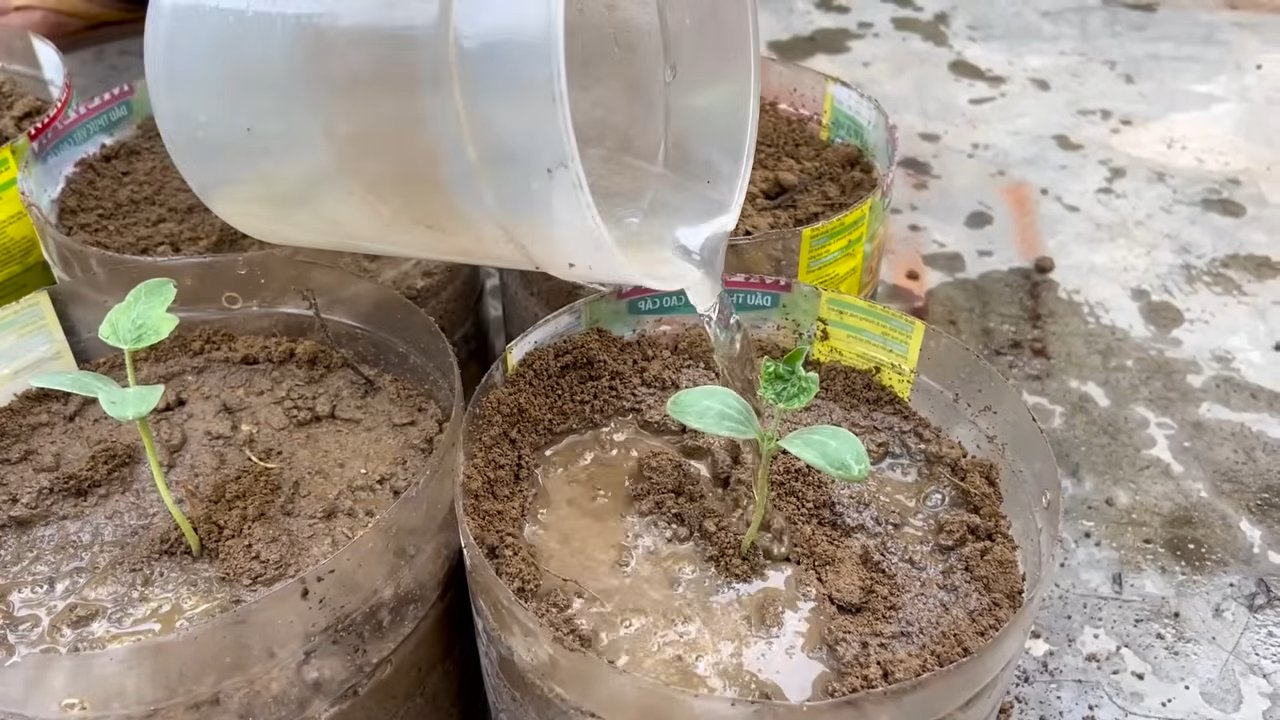
* Gieße die Erde vorsichtig an, sodass sie feucht, aber nicht nass ist.
* Stelle die Töpfe an einen warmen, hellen Ort (z.B. auf eine Fensterbank oder unter eine Pflanzenlampe).
* Halte die Erde feucht, aber vermeide Staunässe.
* Die Samen sollten innerhalb von 7-10 Tagen keimen.
* Sobald die Sämlinge ein paar Blätter haben, kannst du den schwächsten Sämling pro Topf entfernen.
2. Boden vorbereiten: Während die Samen keimen, kannst du den Boden im Garten vorbereiten.
* Wähle einen sonnigen Standort mit gut durchlässigem Boden.
* Entferne Unkraut und Steine.
* Lockere den Boden mit einer Grabegabel oder einem Spaten auf.
* Arbeite reichlich Kompost oder gut verrotteten Mist in den Boden ein. Das verbessert die Bodenstruktur und versorgt die Pflanzen mit Nährstoffen.
* Teste den pH-Wert des Bodens. Wassermelonen bevorzugen einen pH-Wert zwischen 6,0 und 6,8. Bei Bedarf kannst du den pH-Wert mit Kalk (bei zu saurem Boden) oder Schwefel (bei zu alkalischem Boden) anpassen.
3. Rankhilfe vorbereiten (optional): Wassermelonen können auch an Rankhilfen gezogen werden, um Platz zu sparen und die Früchte vor Bodenkontakt zu schützen. Wenn du das möchtest, installiere jetzt die Rankhilfe (z.B. ein stabiles Gitter oder ein Spalier).
Phase 2: Das Auspflanzen (nach dem letzten Frost)
1. Abhärten: Bevor du die Sämlinge ins Freie pflanzt, musst du sie abhärten. Das bedeutet, dass du sie langsam an die Bedingungen im Freien gewöhnst.
* Stelle die Töpfe tagsüber für ein paar Stunden ins Freie (an einen geschützten Ort).
* Verlängere die Zeit im Freien jeden Tag um ein paar Stunden.
* Nach etwa einer Woche können die Sämlinge den ganzen Tag draußen bleiben.
2. Auspflanzen: Sobald keine Frostgefahr mehr besteht und die Bodentemperatur mindestens 21°C beträgt, kannst du die Sämlinge auspflanzen.
* Grabe Löcher, die etwas größer sind als die Anzuchttöpfe.
* Setze die Sämlinge vorsichtig in die Löcher.
* Fülle die Löcher mit Erde auf und drücke sie leicht an.
* Gieße die Pflanzen gründlich an.
* Achte auf ausreichend Abstand zwischen den Pflanzen. Je nach Sorte benötigen Wassermelonen 90-180 cm Platz pro Pflanze.
3. Mulchen: Mulche den Boden um die Pflanzen herum mit Stroh, Holzhackschnitzeln oder anderem organischen Material. Das hilft, die Feuchtigkeit im Boden zu halten, Unkraut zu unterdrücken und die Bodentemperatur zu regulieren.
Phase 3: Die Pflege (während der Wachstumsperiode)
1. Gießen: Wassermelonen brauchen viel Wasser, besonders während der Fruchtbildung. Gieße die Pflanzen regelmäßig, aber vermeide Staunässe. Am besten gießt du früh morgens, damit die Blätter tagsüber abtrocknen können.
2. Düngen: Dünge die Pflanzen alle 2-3 Wochen mit einem ausgewogenen Dünger. Achte darauf, dass der Dünger reich an Kalium ist, da Kalium für die Fruchtbildung wichtig ist. Ich verwende gerne organischen Flüssigdünger.
3. Unkraut jäten: Halte den Bereich um die Pflanzen herum unkrautfrei. Unkraut konkurriert mit den Wassermelonen um Wasser und Nährstoffe.
4. Bestäubung: Wassermelonen sind auf die Bestäubung durch Bienen und andere Insekten angewiesen. Wenn du wenig Bienen in deinem Garten hast, kannst du die Blüten auch von Hand bestäuben. Das geht so:
* Identifiziere die männlichen und weiblichen Blüten. Männliche Blüten haben einen dünnen Stiel, während weibliche Blüten einen kleinen Fruchtansatz direkt unter der Blüte haben.
* Nimm einen weichen Pinsel und sammle Pollen von einer männlichen Blüte.
* Übertrage den Pollen auf die Narbe einer weiblichen Blüte.
* Wiederhole den Vorgang für alle weiblichen Blüten.
5. Früchte schützen (optional): Wenn die Früchte größer werden, kannst du sie mit Stroh oder Holzbrettern vor Bodenkontakt schützen. Das verhindert Fäulnis und Schäden durch Schädlinge. Du kannst die Früchte auch drehen, damit sie gleichmäßig Sonne bekommen.
6. Schädlinge und Krankheiten bekämpfen: Achte auf Schädlinge wie Blattläuse, Gurkenkäfer und Spinnmilben. Bekämpfe sie bei Bedarf mit natürlichen Mitteln wie Neemöl oder Insektizidseife. Achte auch auf Krankheiten wie Mehltau und Fusariumwelke. Sorge für gute Belüftung und vermeide Staunässe, um Krankheiten vorzubeugen.
Phase 4: Die Ernte (ca. 80-100 Tage nach dem Auspflanzen)
1. Reife erkennen: Die Reife einer Wassermelone zu erkennen, ist nicht immer einfach, aber hier sind ein paar Anzeichen:
* Die Stelle, an der die Melone auf dem Boden liegt (der “Bauch”), wird gelb oder cremefarben.
* Die Ranke, die mit der Melone verbunden ist, wird braun und trocken.
* Wenn du auf die Melone klopfst, sollte sie hohl klingen.
* Die Schale der Melone wird stumpf und verliert ihren Glanz.
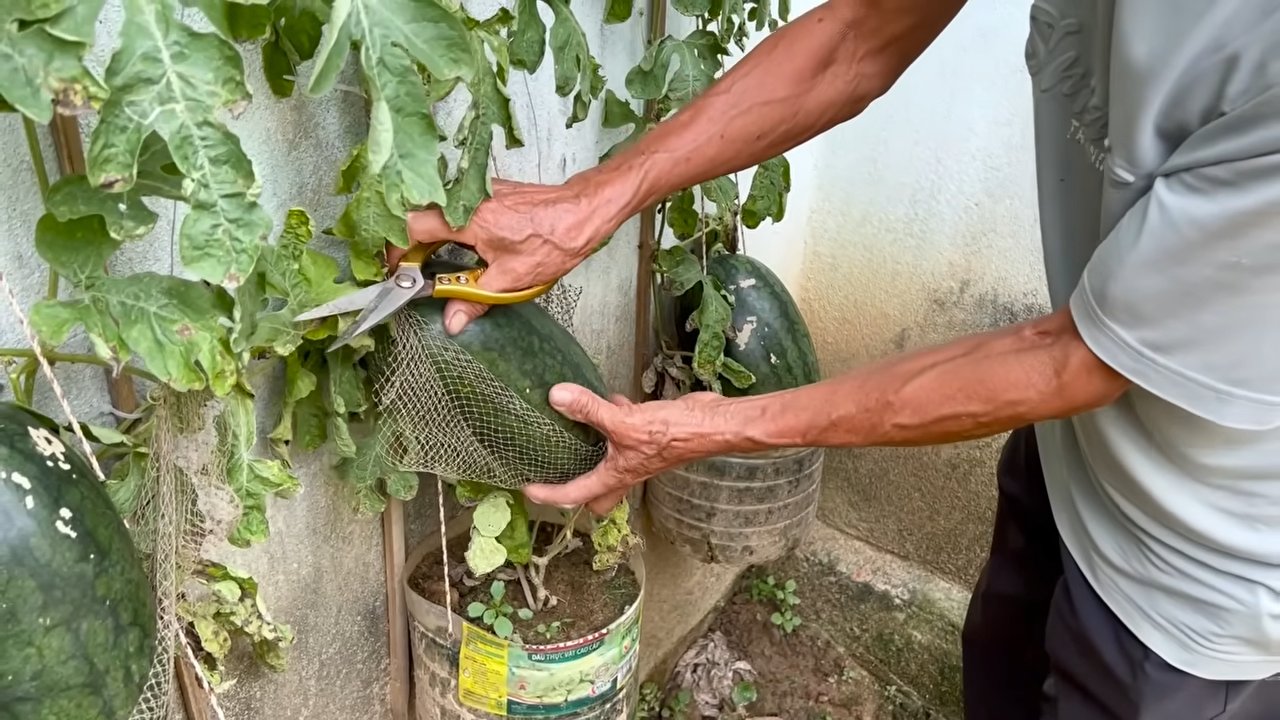
2. Ernten: Schneide die Melone mit einem scharfen Messer oder einer Gartenschere von der Ranke ab. Lasse dabei ein paar Zentimeter Stiel an der Melone.
3. Genießen: Schneide die Melone auf und genieße den süßen, saftigen Geschmack!
Conclusion
So, there you have it! Mastering the art of growing more watermelons isn’t about magic; it’s about understanding the plant’s needs and implementing a few strategic techniques. From hand-pollination to strategic pruning and soil enrichment, each step contributes to a more abundant and sweeter harvest. This isn’t just about getting *a* watermelon; it’s about transforming your garden into a watermelon wonderland, bursting with juicy, refreshing fruit.
Why is this DIY trick a must-try? Because it empowers you to take control of your watermelon yield. You’re no longer at the mercy of unpredictable weather or insufficient pollination. You become the architect of your own watermelon success story. Imagine the satisfaction of biting into a perfectly ripe, homegrown watermelon, knowing you played a direct role in its creation. That’s a feeling you can’t buy at the grocery store.
But don’t stop there! Experiment with different varieties of watermelons. Try growing smaller, personal-sized watermelons alongside the larger, classic types. Consider companion planting with herbs like basil or marigolds to deter pests naturally. Explore different mulching techniques to conserve moisture and suppress weeds. The possibilities are endless!
And remember, growing watermelons is a journey, not a destination. There will be successes and setbacks along the way. Don’t be discouraged if your first attempt isn’t perfect. Learn from your mistakes, adapt your approach, and keep experimenting. The more you understand your plants and your garden, the better you’ll become at coaxing those delicious watermelons from the vine.
We are confident that with these tips, you’ll be well on your way to a bumper crop of watermelons. We encourage you to try these DIY tricks and share your experiences with us! Post photos of your watermelons on social media using #GrowMoreWatermelons and tell us what worked best for you. What challenges did you face? What unexpected discoveries did you make? Your insights can help other gardeners achieve their watermelon dreams. Let’s build a community of watermelon enthusiasts, sharing knowledge and celebrating the joy of homegrown goodness. So, grab your gardening gloves, get your hands dirty, and prepare to be amazed by the abundance you can create. Happy growing!
Frequently Asked Questions (FAQ)
Q: How do I know when my watermelon is ripe?
A: Determining watermelon ripeness can be tricky, but here are a few key indicators:
* **The Ground Spot:** Look for the “ground spot,” the area where the watermelon rests on the ground. When ripe, this spot should be a creamy yellow or even orange color, not white or pale green.
* **The Tendril:** The tendril closest to the watermelon stem should be brown and dry. This indicates that the watermelon has stopped growing and is likely ripe.
* **The Thump Test:** Give the watermelon a gentle thump. A ripe watermelon will sound hollow and deep, while an unripe one will sound dull and solid. This takes some practice to master, so don’t be discouraged if you don’t get it right away.
* **The Skin:** The skin should be slightly dull and waxy, not shiny.
Q: My watermelon vines are flowering, but I’m not getting any fruit. What’s wrong?
A: This is a common problem, and the most likely culprit is insufficient pollination. Watermelons have separate male and female flowers, and both need to be pollinated for fruit to develop. Here are a few things to consider:
* **Pollinators:** Are there enough bees and other pollinators in your garden? Consider planting flowers that attract pollinators, such as lavender, sunflowers, and zinnias. Avoid using pesticides that can harm pollinators.
* **Hand-Pollination:** If you suspect a lack of pollinators, try hand-pollinating your watermelon flowers. Use a small paintbrush to transfer pollen from the male flowers (which have a long, thin stem) to the female flowers (which have a small, immature watermelon at the base). Do this in the morning, when the pollen is most viable.
* **Weather:** Cold or rainy weather can inhibit pollinator activity. If the weather is consistently bad, hand-pollination is even more crucial.
Q: How often should I water my watermelons?
A: Watermelons need consistent moisture, especially during fruit development. Water deeply and regularly, aiming for about 1-2 inches of water per week. Avoid overhead watering, as this can promote fungal diseases. Drip irrigation or soaker hoses are ideal. Reduce watering as the watermelons approach ripeness to concentrate the sugars and improve flavor.
Q: What kind of fertilizer should I use for watermelons?
A: Watermelons are heavy feeders and benefit from regular fertilization. Before planting, amend your soil with compost or well-rotted manure. During the growing season, use a balanced fertilizer (e.g., 10-10-10) every 2-3 weeks. Once the watermelons start to develop, switch to a fertilizer higher in potassium (K) to promote fruit development and sweetness. Avoid over-fertilizing with nitrogen (N), as this can lead to excessive vine growth at the expense of fruit production.
Q: My watermelon leaves are turning yellow. What could be causing this?
A: Yellowing leaves can indicate several problems:
* **Nutrient Deficiency:** A lack of nitrogen, magnesium, or iron can cause yellowing leaves. Test your soil and amend it accordingly.
* **Overwatering:** Soggy soil can suffocate the roots and lead to yellowing leaves. Ensure your soil has good drainage.
* **Pests or Diseases:** Aphids, squash bugs, and fungal diseases can also cause yellowing leaves. Inspect your plants carefully and treat any infestations or diseases promptly.
* **Natural Aging:** As the watermelon plant matures, some of the older leaves may naturally turn yellow and die off. This is normal and not a cause for concern.
Q: Can I grow watermelons in containers?
A: Yes, you can grow watermelons in containers, but you’ll need a large container (at least 20 gallons) and a dwarf or bush variety of watermelon. Ensure the container has good drainage and use a high-quality potting mix. Water and fertilize regularly, and provide support for the vines as needed. Container-grown watermelons may not be as large as those grown in the ground, but they can still be delicious and rewarding.
Q: How can I protect my watermelons from pests and diseases?
A: Prevention is key when it comes to pests and diseases. Here are a few tips:
* **Choose Disease-Resistant Varieties:** Select watermelon varieties that are known to be resistant to common diseases in your area.
* **Practice Crop Rotation:** Avoid planting watermelons in the same spot year after year.
* **Maintain Good Air Circulation:** Space your plants adequately to allow for good air circulation, which helps prevent fungal diseases.
* **Remove Weeds and Debris:** Keep your garden free of weeds and debris, which can harbor pests and diseases.
* **Inspect Plants Regularly:** Check your plants regularly for signs of pests or diseases and take action promptly.
* **Use Organic Pest Control Methods:** Consider using organic pest control methods, such as insecticidal soap or neem oil, to control pests.
Q: How do I prevent my watermelons from rotting on the vine?
A: Blossom-end rot, a common problem in watermelons, is caused by a calcium deficiency. Here’s how to prevent it:
* **Ensure Adequate Calcium:** Test your soil and amend it with lime or gypsum if it’s deficient in calcium.
* **Water Consistently:** Inconsistent watering can also contribute to blossom-end rot. Water deeply and regularly, especially during fruit development.
* **Avoid Over-Fertilizing with Nitrogen:** Excessive nitrogen can interfere with calcium uptake.
* **Mulch Around Plants:** Mulching helps retain moisture and regulate soil temperature, which can also help prevent blossom-end rot.
By following these tips and tricks, you’ll be well on your way to growing more watermelons than you ever thought possible. Remember to adapt these techniques to your specific growing conditions and don’t be afraid to experiment. Happy gardening!
Leave a Comment