
Grow Mung Bean Sprouts Easily, right in your own kitchen! Forget those expensive, pre-packaged sprouts from the grocery store. I’m going to show you a super simple, cost-effective, and frankly, much more satisfying way to cultivate these nutritional powerhouses yourself.
Sprouting, in general, has a rich history, dating back thousands of years. Cultures across the globe, particularly in Asia, have long recognized the incredible health benefits and resourcefulness of sprouting seeds and beans. Think about it – a small handful of dried beans can transform into a vibrant, vitamin-packed harvest in just a few days! It’s a testament to nature’s ingenuity and our ability to harness it.
But why should *you* learn to grow mung bean sprouts easily? Well, for starters, they’re incredibly versatile. Toss them in salads, stir-fries, sandwiches, or even add them to your smoothies for a boost of vitamins and minerals. More importantly, store-bought sprouts can sometimes be risky due to potential contamination. When you grow them at home, you have complete control over the process, ensuring freshness and safety. Plus, let’s be honest, there’s something incredibly rewarding about nurturing your own food from seed to sprout. So, are you ready to ditch the store-bought stuff and embark on this easy and rewarding home gardening adventure with me? Let’s get sprouting!
Grow Your Own Crunchy Mung Bean Sprouts at Home!
Hey there, fellow sprout enthusiast! Are you ready to ditch the store-bought sprouts and embark on a super easy, super rewarding DIY adventure? I’m going to show you how to grow your own delicious and crunchy mung bean sprouts right in your kitchen. Trust me, it’s simpler than you think, and the fresh, homegrown taste is unbeatable! Plus, you’ll know exactly where your food is coming from. Let’s get sprouting!
What You’ll Need: The Essential Sprout-Growing Toolkit
Before we dive in, let’s gather our supplies. You probably already have most of these items in your kitchen!
* Mung Beans: Obviously! You can find these at most grocery stores, Asian markets, or online. Make sure they’re specifically labeled for sprouting, as some beans are treated and won’t sprout properly. Start with about 1/4 to 1/2 cup of dry beans – they’ll expand a lot!
* A Wide-Mouth Jar: A quart-sized mason jar works perfectly. The wide mouth makes it easy to rinse and drain the sprouts.
* Sprouting Lid or Cheesecloth and Rubber Band: You need something to cover the jar that allows for drainage and airflow. A sprouting lid is ideal, but cheesecloth secured with a rubber band works just as well.
* Water: Clean, filtered water is best.
* A Dark Place: Sprouts need darkness to grow long and white. A cupboard, drawer, or even a covered bowl will do the trick.
* A Bowl or Tray: To angle the jar for proper drainage.
The Sprouting Process: Step-by-Step Instructions
Alright, let’s get down to the nitty-gritty. Here’s how to grow your own mung bean sprouts:
1. Rinse the Beans: Pour your mung beans into the jar and cover them with plenty of cool water. Swirl them around to remove any debris or broken beans. Drain the water completely. This initial rinse is crucial for removing any surface impurities.
2. Soak the Beans: Add fresh, cool water to the jar, ensuring the beans are fully submerged. Mung beans need to soak for about 8-12 hours to kickstart the sprouting process. I usually soak them overnight. This allows them to absorb enough moisture to germinate.
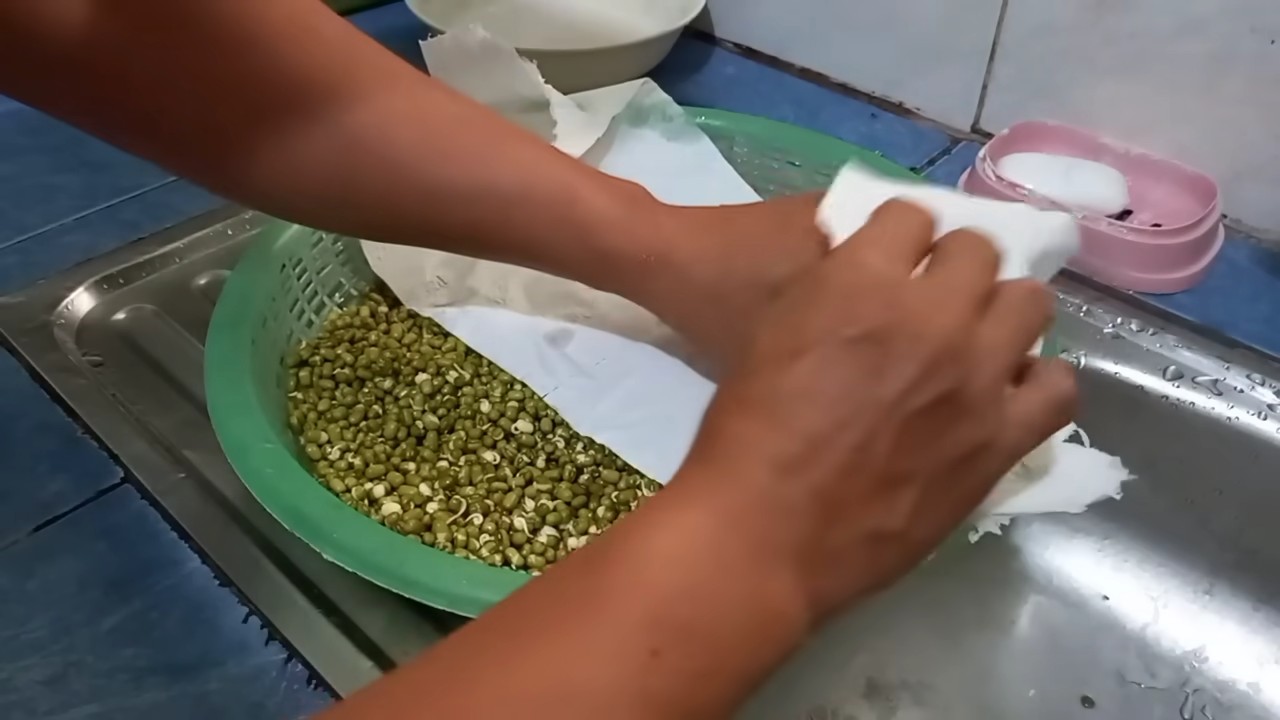
3. Drain and Rinse Again: After soaking, drain the water completely using your sprouting lid or cheesecloth. Rinse the beans thoroughly with fresh water. This is super important to prevent mold and bacteria growth.
4. Darkness is Key: Place the jar upside down at an angle in your bowl or tray. This allows any excess water to drain out. Now, put the jar in your dark cupboard or drawer. Remember, darkness encourages the sprouts to grow long and white.
5. Rinse and Drain (Twice a Day!): This is the most important step! You need to rinse and drain your sprouts twice a day – once in the morning and once in the evening. This keeps them hydrated and prevents them from drying out or getting moldy. Use cool, fresh water each time.
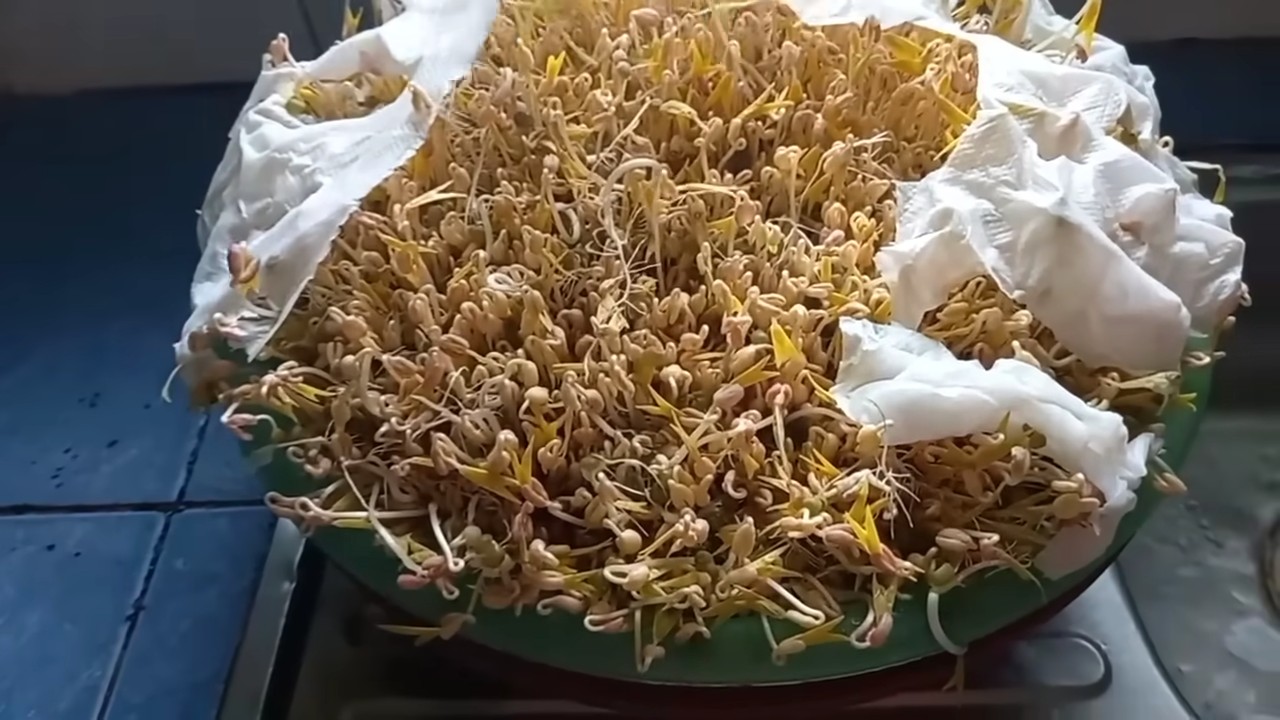
6. Observe and Enjoy the Magic: After a day or two, you’ll start to see tiny tails emerging from the beans. That’s the magic happening! Continue rinsing and draining twice a day.
7. Harvest Time: Your sprouts are ready to harvest in about 3-5 days, depending on your preference. I like mine when they’re about 2-3 inches long. They should be nice and crunchy.
8. Final Rinse and De-Hull (Optional): Before eating, give your sprouts a final rinse. You can also remove the hulls (the bean skins) if you prefer. This is optional, but some people find the hulls a bit bitter. To remove them, simply fill the jar with water and gently agitate the sprouts. The hulls will float to the top, and you can skim them off.
9. Storage: Store your freshly grown mung bean sprouts in an airtight container in the refrigerator. They’ll stay fresh for about a week.
Troubleshooting: Common Sprout-Growing Issues and How to Fix Them
Even with the best intentions, sometimes things can go a little sideways. Here are some common problems you might encounter and how to solve them:
* Mold: Mold is the enemy! If you see any fuzzy, discolored growth (usually white, gray, or black), it’s mold. Unfortunately, you’ll need to discard the entire batch. To prevent mold, make sure you’re rinsing and draining your sprouts thoroughly twice a day. Good airflow is also crucial.
* Rotting Smell: A foul smell indicates that your sprouts are rotting. This is usually caused by insufficient rinsing or poor drainage. Again, you’ll need to discard the batch and start over.
* Slow Growth: If your sprouts are growing slowly, it could be due to temperature. Mung beans prefer a temperature of around 70-75°F (21-24°C). If your kitchen is too cold, try moving the jar to a warmer location.
* Dry Sprouts: If your sprouts look dry and shriveled, you’re not rinsing them enough. Increase the frequency of rinsing to three times a day.
* Bitter Taste: A bitter taste can be caused by the hulls. Try removing them before eating.
Beyond the Basics: Tips and Tricks for Sprout-Growing Success
Here are a few extra tips to help you become a sprout-growing pro:
* Use Good Quality Beans: As I mentioned earlier, make sure you’re using beans specifically labeled for sprouting. Old or damaged beans may not sprout properly.
* Experiment with Different Beans: Once you’ve mastered mung bean sprouts, try growing other types of sprouts, such as alfalfa, radish, or broccoli sprouts. Each type has its own unique flavor and nutritional benefits.
* Don’t Overcrowd the Jar: Using too many beans can lead to overcrowding and poor airflow, increasing the risk of mold. Start with a smaller amount and adjust as needed.
* Keep it Clean: Always use clean jars, lids, and water to prevent contamination.
* Enjoy Your Sprouts! Add your homegrown mung bean sprouts to salads, sandwiches, stir-fries, or soups. They’re a delicious and nutritious addition to any meal!
How to Use Your Freshly Grown Mung Bean Sprouts
Now that you’ve got a jar full of crunchy, delicious mung bean sprouts, let’s talk about how to use them! They’re incredibly versatile and can add a fresh, vibrant touch to a variety of dishes.
* Salads: Mung bean sprouts are a fantastic addition to salads. They add a satisfying crunch and a mild, slightly sweet flavor. Try them in Asian-inspired salads with sesame dressing or in a simple green salad with vinaigrette.
* Sandwiches and Wraps: Add a handful of sprouts to your sandwiches or wraps for extra texture and nutrients. They pair well with avocado, hummus, and other veggies.
* Stir-Fries: Mung bean sprouts are a classic ingredient in stir-fries. Add them towards the end of cooking to retain their crunch. They’re especially delicious in Asian-inspired stir-fries with soy sauce, ginger, and garlic.
* Soups: Sprinkle sprouts on top of soups just before serving for a fresh, crunchy garnish. They’re particularly good with Asian noodle soups like pho or ramen.
* Spring Rolls: Mung bean sprouts are a staple ingredient in fresh spring rolls. They add a refreshing crunch and a subtle sweetness.
* Juices and Smoothies: For a nutritional boost, you can even add a small handful of sprouts to your juices or smoothies. They’ll add extra vitamins and minerals.
Why Grow Your Own Mung Bean Sprouts? The Benefits are Endless!
Growing your own mung bean sprouts isn’t just a fun project; it’s also a healthy and sustainable choice. Here are some of the benefits:
* Freshness: Homegrown sprouts are incredibly fresh and flavorful. You can harvest them at their peak of ripeness and enjoy them immediately.
* Cost-Effective: Growing your own sprouts is much cheaper than buying them from the store. A small bag of mung beans can yield a large quantity of sprouts.
* Nutritional Value: Sprouts are packed with vitamins, minerals, and enzymes. They’re a great source of protein, fiber, and antioxidants.
* Sustainability: Growing your own sprouts reduces your carbon footprint by eliminating the need for transportation and packaging.
* Control Over Ingredients: When you grow your own sprouts, you know exactly what you’re eating. You can avoid pesticides and other harmful chemicals.
* It’s Fun! Growing your own sprouts is a rewarding and educational experience. It’s a great way to connect with nature and learn about the life cycle of plants.
So, what are you
Conclusion
So, there you have it! Growing your own mung bean sprouts at home is not only incredibly easy and cost-effective, but it also provides you with a fresh, nutritious ingredient that you can add to a wide variety of dishes. Forget those limp, flavorless sprouts from the grocery store – with this simple DIY trick, you’ll have crisp, vibrant sprouts bursting with flavor in just a few days.
Why is this a must-try? Because it puts you in control. You know exactly what’s going into your food, avoiding any unwanted additives or preservatives. Plus, the satisfaction of nurturing something from seed to sprout is surprisingly rewarding. It’s a small act of self-sufficiency that can make a big difference in your diet and your connection to the food you eat.
But the best part? The possibilities are endless! Once you’ve mastered the basic technique, feel free to experiment. Try different types of beans, like adzuki or lentil sprouts, to discover your favorite flavor profiles. You can also adjust the sprouting time to achieve your desired level of crunchiness. Some people prefer shorter sprouts, while others like them longer and more developed.
Consider adding a touch of flavor during the rinsing process. A splash of lemon juice or a pinch of sea salt can subtly enhance the taste of your sprouts. You can even infuse the water with herbs like cilantro or mint for a unique and refreshing twist.
And don’t limit yourself to just eating them raw! Mung bean sprouts are delicious in stir-fries, salads, sandwiches, and even soups. They add a delightful crunch and a boost of nutrients to any meal. Think of them as a versatile ingredient that can elevate your cooking to the next level.
We’ve shown you how to grow mung bean sprouts easily, now it’s your turn to give it a try! We’re confident that you’ll be amazed at how simple and rewarding this process is. So, gather your supplies, follow our instructions, and get ready to enjoy the freshest, most flavorful sprouts you’ve ever tasted.
Don’t be shy – share your experiences with us! We’d love to hear about your successes, your challenges, and any variations you’ve tried. Post your photos and stories in the comments section below. Let’s build a community of sprout enthusiasts and inspire others to embrace the joy of growing their own food. Happy sprouting!
Frequently Asked Questions (FAQ)
1. What kind of mung beans should I use?
The best mung beans for sprouting are whole, dried mung beans specifically intended for culinary use. Avoid using beans that are old, damaged, or treated with chemicals, as these may not sprout properly. Look for beans that are bright green and uniform in size. You can typically find them in the international aisle of your grocery store, Asian markets, or online retailers specializing in dried beans and legumes. Organic mung beans are a great option if you prefer to avoid pesticides.
2. How long does it take for mung beans to sprout?
Typically, mung beans will sprout in 3 to 5 days. The exact time will depend on factors such as the temperature and humidity of your environment. Warmer temperatures generally speed up the sprouting process, while cooler temperatures may slow it down. It’s important to keep the beans consistently moist and well-drained to ensure optimal sprouting. Check them daily and rinse them regularly to prevent mold growth.
3. What if my mung beans don’t sprout?
There are several reasons why your mung beans might not sprout. First, ensure that your beans are fresh and viable. Old or damaged beans may have a lower germination rate. Second, make sure you are providing adequate moisture. The beans should be consistently damp but not waterlogged. Third, check the temperature. Extremely hot or cold temperatures can inhibit sprouting. Finally, ensure that the beans are not exposed to direct sunlight, which can also hinder the process. If you’ve addressed all these factors and your beans still aren’t sprouting, try starting with a fresh batch of beans.
4. How do I prevent mold from growing on my mung bean sprouts?
Preventing mold growth is crucial for successful sprouting. The key is to maintain good hygiene and ventilation. Rinse the beans thoroughly at least twice a day with fresh, clean water. Ensure that the container you’re using has adequate drainage to prevent water from pooling at the bottom. Avoid overcrowding the beans, as this can restrict airflow and increase the risk of mold. If you notice any signs of mold, such as a fuzzy white or gray growth, discard the entire batch immediately.
5. How do I store mung bean sprouts?
Once your mung bean sprouts have reached your desired length, you can store them in the refrigerator to slow down the sprouting process. Rinse them thoroughly and pat them dry with a clean towel. Store them in an airtight container lined with a paper towel to absorb excess moisture. They should keep for up to a week in the refrigerator. Check them regularly for any signs of spoilage and discard them if they become slimy or develop an off odor.
6. Can I eat the roots of mung bean sprouts?
Yes, the roots of mung bean sprouts are perfectly edible. They are a natural part of the sprout and contain valuable nutrients. Some people prefer to trim the roots before eating, but this is purely a matter of personal preference. The roots add a slightly crunchy texture to the sprouts.
7. Are there any health benefits to eating mung bean sprouts?
Yes, mung bean sprouts are packed with nutrients and offer numerous health benefits. They are a good source of protein, fiber, vitamins (especially vitamin C and vitamin K), and minerals (such as iron and potassium). They are also low in calories and fat. Eating mung bean sprouts can help boost your immune system, improve digestion, and promote overall health and well-being.
8. Can I sprout other types of beans using the same method?
Yes, you can use a similar method to sprout other types of beans and legumes, such as adzuki beans, lentils, chickpeas, and alfalfa seeds. However, the sprouting time may vary depending on the type of bean. It’s important to research the specific requirements for each type of bean to ensure optimal sprouting. Some beans may require soaking for a longer period or different rinsing schedules.
9. Is it safe to eat raw mung bean sprouts?
While mung bean sprouts are generally safe to eat raw, it’s important to take precautions to minimize the risk of foodborne illness. Thoroughly rinse the sprouts before eating to remove any dirt or bacteria. If you are pregnant, elderly, or have a weakened immune system, it’s recommended to cook the sprouts before consuming them to kill any potential pathogens.
10. Can I grow mung bean sprouts without a sprouting jar?
Yes, you can grow mung bean sprouts without a sprouting jar. You can use a colander lined with cheesecloth or a clean kitchen towel. Simply place the soaked beans in the colander, cover them with another layer of cheesecloth or towel, and rinse them regularly. Ensure that the colander is placed in a bowl to catch any excess water. You can also use a plastic container with drainage holes. The key is to provide adequate moisture and drainage while protecting the beans from direct sunlight.


Leave a Comment