
Grow mushrooms at home? Absolutely! Imagine harvesting fresh, flavorful mushrooms right from your own kitchen – it’s easier than you think, and incredibly rewarding. For centuries, cultivating fungi has been a practice steeped in tradition, from ancient Chinese medicinal practices to the sophisticated truffle farms of Europe. But you don’t need to be a seasoned mycologist to enjoy the delights of homegrown mushrooms.
In this DIY guide, I’m going to share some simple, yet effective, tricks and hacks that will empower you to grow mushrooms at home, even if you have limited space or experience. Forget expensive grocery store prices and questionable freshness! We’ll explore cost-effective methods, readily available materials, and step-by-step instructions to get you started on your mushroom-growing journey.
Why should you try this? Because fresh mushrooms elevate any dish, and knowing you grew them yourself adds a special touch. Plus, it’s a fascinating and educational hobby that connects you with the natural world. So, let’s dive in and unlock the secrets to successful home mushroom cultivation!
Grow Your Own Gourmet Mushrooms at Home: A Beginner’s Guide
Hey there, fellow fungi fanatics! Ever dreamed of harvesting your own delicious mushrooms right in your kitchen? Well, dream no more! Growing mushrooms at home is surprisingly easier than you might think, and I’m here to guide you through the process. We’ll focus on growing oyster mushrooms, as they are one of the easiest and most rewarding varieties for beginners. Get ready to impress your friends and family with your homegrown culinary creations!
What You’ll Need: The Mushroom Growing Shopping List
Before we dive in, let’s gather our supplies. Don’t worry, you probably have some of these items already!
* Oyster Mushroom Spawn: This is the “seed” of your mushrooms. You can purchase it online or at a local gardening supply store. Make sure it’s a reputable source to ensure healthy spawn.
* Substrate: This is what your mushrooms will grow on. Straw is an excellent and readily available option. You can also use coffee grounds, hardwood sawdust, or even cardboard. For this guide, we’ll focus on straw.
* Large Container: A bucket, plastic tub, or even a large bag will work. Just make sure it’s clean and can hold your substrate.
* Large Pot or Tub for Pasteurization: This needs to be big enough to submerge your straw.
* Thermometer: To monitor the temperature of the water during pasteurization.
* Spray Bottle: For misting your mushrooms.
* Gloves: To keep things sanitary.
* Optional: A humidity tent (a large clear plastic bag) to help maintain humidity.
Phase 1: Preparing the Substrate (Straw Pasteurization)
The key to successful mushroom growing is a clean and properly prepared substrate. Pasteurization eliminates competing organisms that could hinder mushroom growth.
1. Chop the Straw: Using scissors or garden shears, chop the straw into smaller pieces, about 2-4 inches long. This increases the surface area for the mushroom mycelium to colonize. I find this step makes a huge difference in how quickly the mushrooms grow.
2. Soak the Straw: Place the chopped straw in your large pot or tub and cover it with water. Make sure all the straw is submerged. Let it soak for at least 2-4 hours. This helps hydrate the straw, which is crucial for mushroom growth.
3. Pasteurize the Straw: This is the most important step! Heat the water with the straw to a temperature of 160-180°F (71-82°C). Maintain this temperature for 60-90 minutes. Use your thermometer to monitor the temperature closely. This process kills off unwanted bacteria and fungi that could compete with your oyster mushrooms. Don’t boil the straw! Boiling can damage the straw and make it less suitable for mushroom growth.
4. Drain and Cool the Straw: Carefully drain the hot water from the straw. Let the straw cool down to room temperature. This is important because the hot straw can kill the mushroom spawn. You can spread the straw out on a clean surface to speed up the cooling process. Make sure the straw is still moist but not dripping wet. Squeeze a handful of straw; it should feel damp but not release a lot of water.
Phase 2: Inoculating the Substrate (Mixing Spawn and Straw)
Now comes the fun part – introducing the mushroom spawn to the prepared straw!
1. Clean Your Container: Thoroughly clean your chosen container with soap and water. This helps prevent contamination.
2. Layer the Straw and Spawn: In your container, create alternating layers of straw and mushroom spawn. Start with a layer of straw, then sprinkle a generous amount of spawn over it. Repeat this process until you’ve used all the straw and spawn. The general rule of thumb is to use about 5-10% spawn by weight of the wet straw. I usually aim for somewhere in the middle.
3. Mix Thoroughly: Gently mix the straw and spawn together to ensure even distribution. This helps the mycelium colonize the entire substrate.
4. Pack Lightly: Don’t pack the straw too tightly. The mycelium needs air to breathe. A light packing will provide the necessary support without suffocating the mycelium.
Phase 3: Incubation (Letting the Mycelium Grow)
This is where patience comes in. The mycelium needs time to colonize the straw.
1. Find a Suitable Location: Place your container in a dark, humid, and well-ventilated location. A basement, closet, or spare room works well. The ideal temperature for oyster mushroom colonization is between 65-75°F (18-24°C).
2. Maintain Humidity: Oyster mushrooms need high humidity to thrive. If your environment is dry, you can use a humidity tent (a large clear plastic bag) to cover the container. Make sure to leave some openings for ventilation. You can also mist the inside of the bag with water regularly. I usually mist mine once or twice a day, depending on how dry the air is.
3. Monitor Colonization: Check your container regularly for signs of colonization. You should start to see white, fuzzy growth (the mycelium) spreading throughout the straw. This process usually takes 2-3 weeks.
4. Be Patient: Don’t disturb the container too much during this phase. Let the mycelium do its thing!
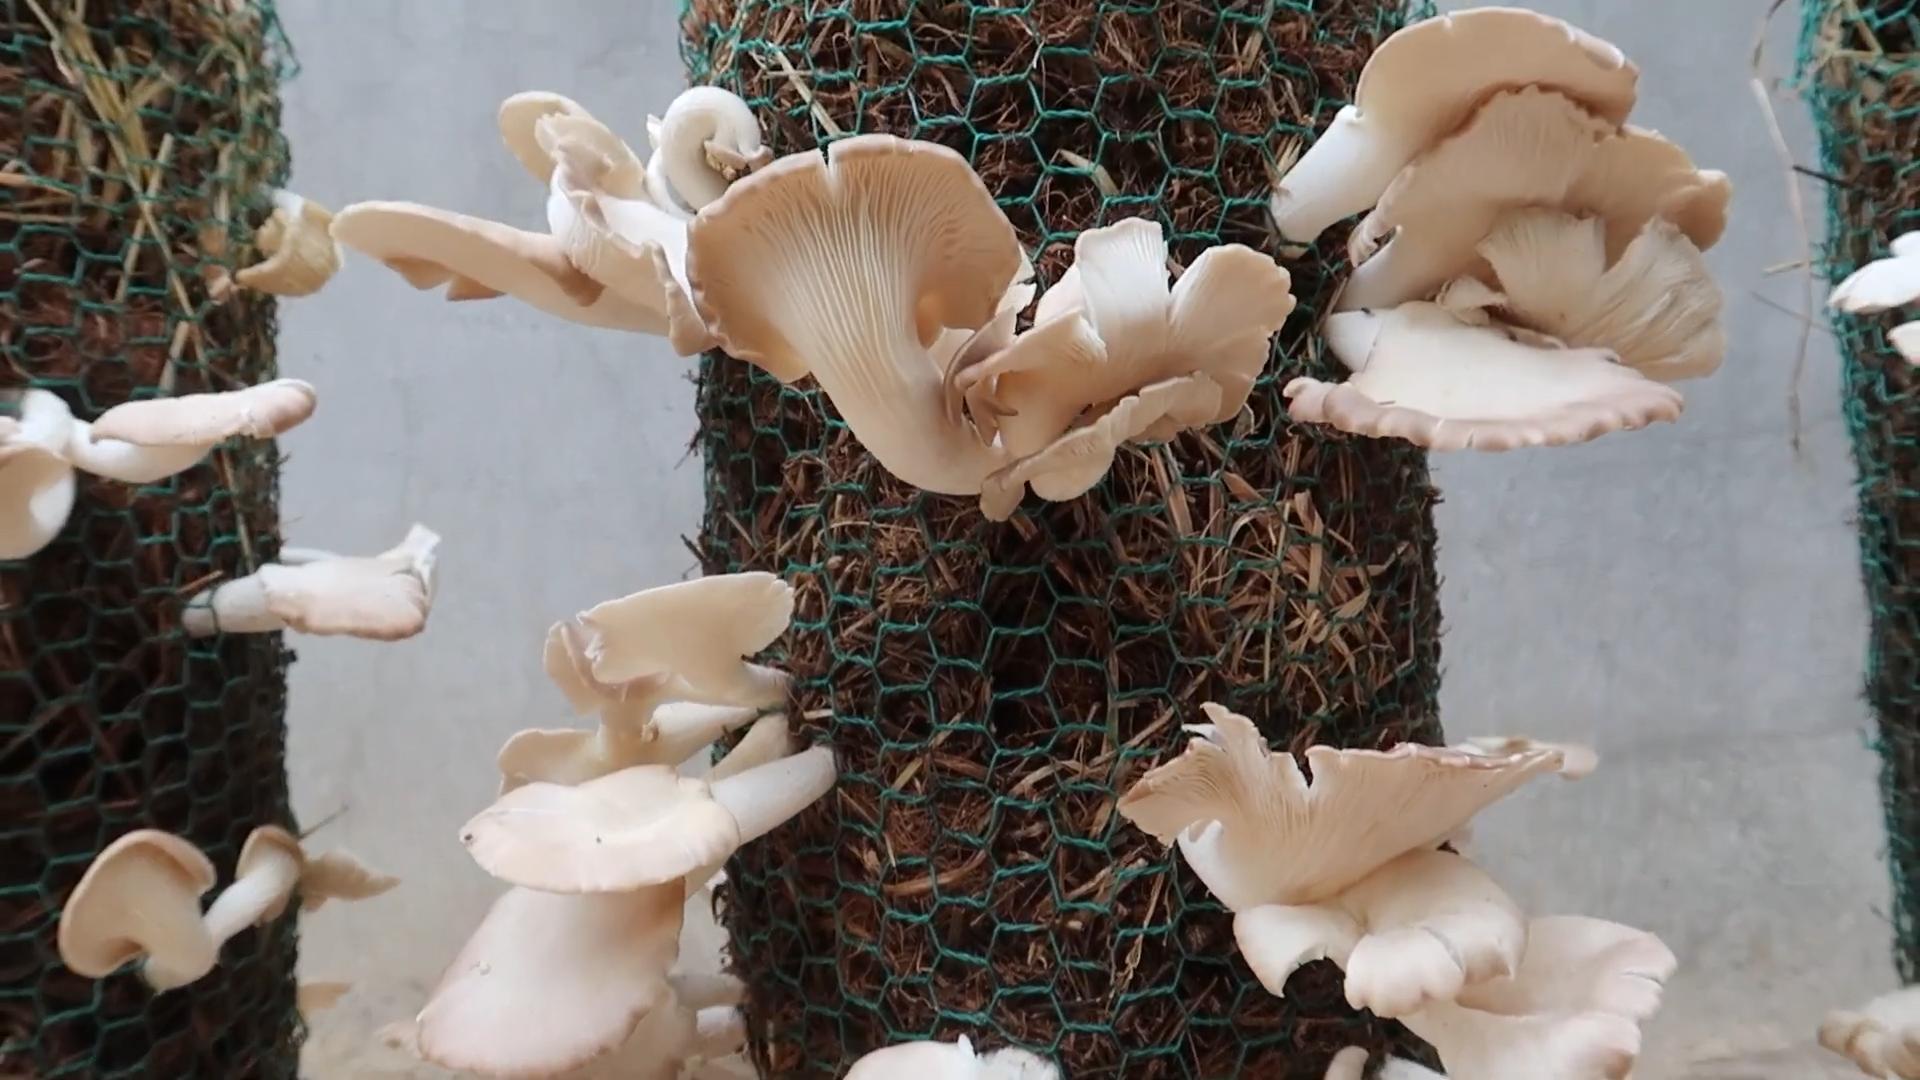
Phase 4: Fruiting (Harvesting Your Mushrooms)
The moment you’ve been waiting for!
1. Introduce Light and Fresh Air: Once the straw is fully colonized (covered in white mycelium), it’s time to introduce light and fresh air to trigger fruiting. Move your container to a location with indirect light. Direct sunlight can dry out the mushrooms.
2. Increase Humidity: Continue to maintain high humidity by misting the container regularly. You can also use a humidity tent.
3. Monitor for Pinning: Keep an eye out for small mushroom “pins” forming on the surface of the straw. These are the baby mushrooms!
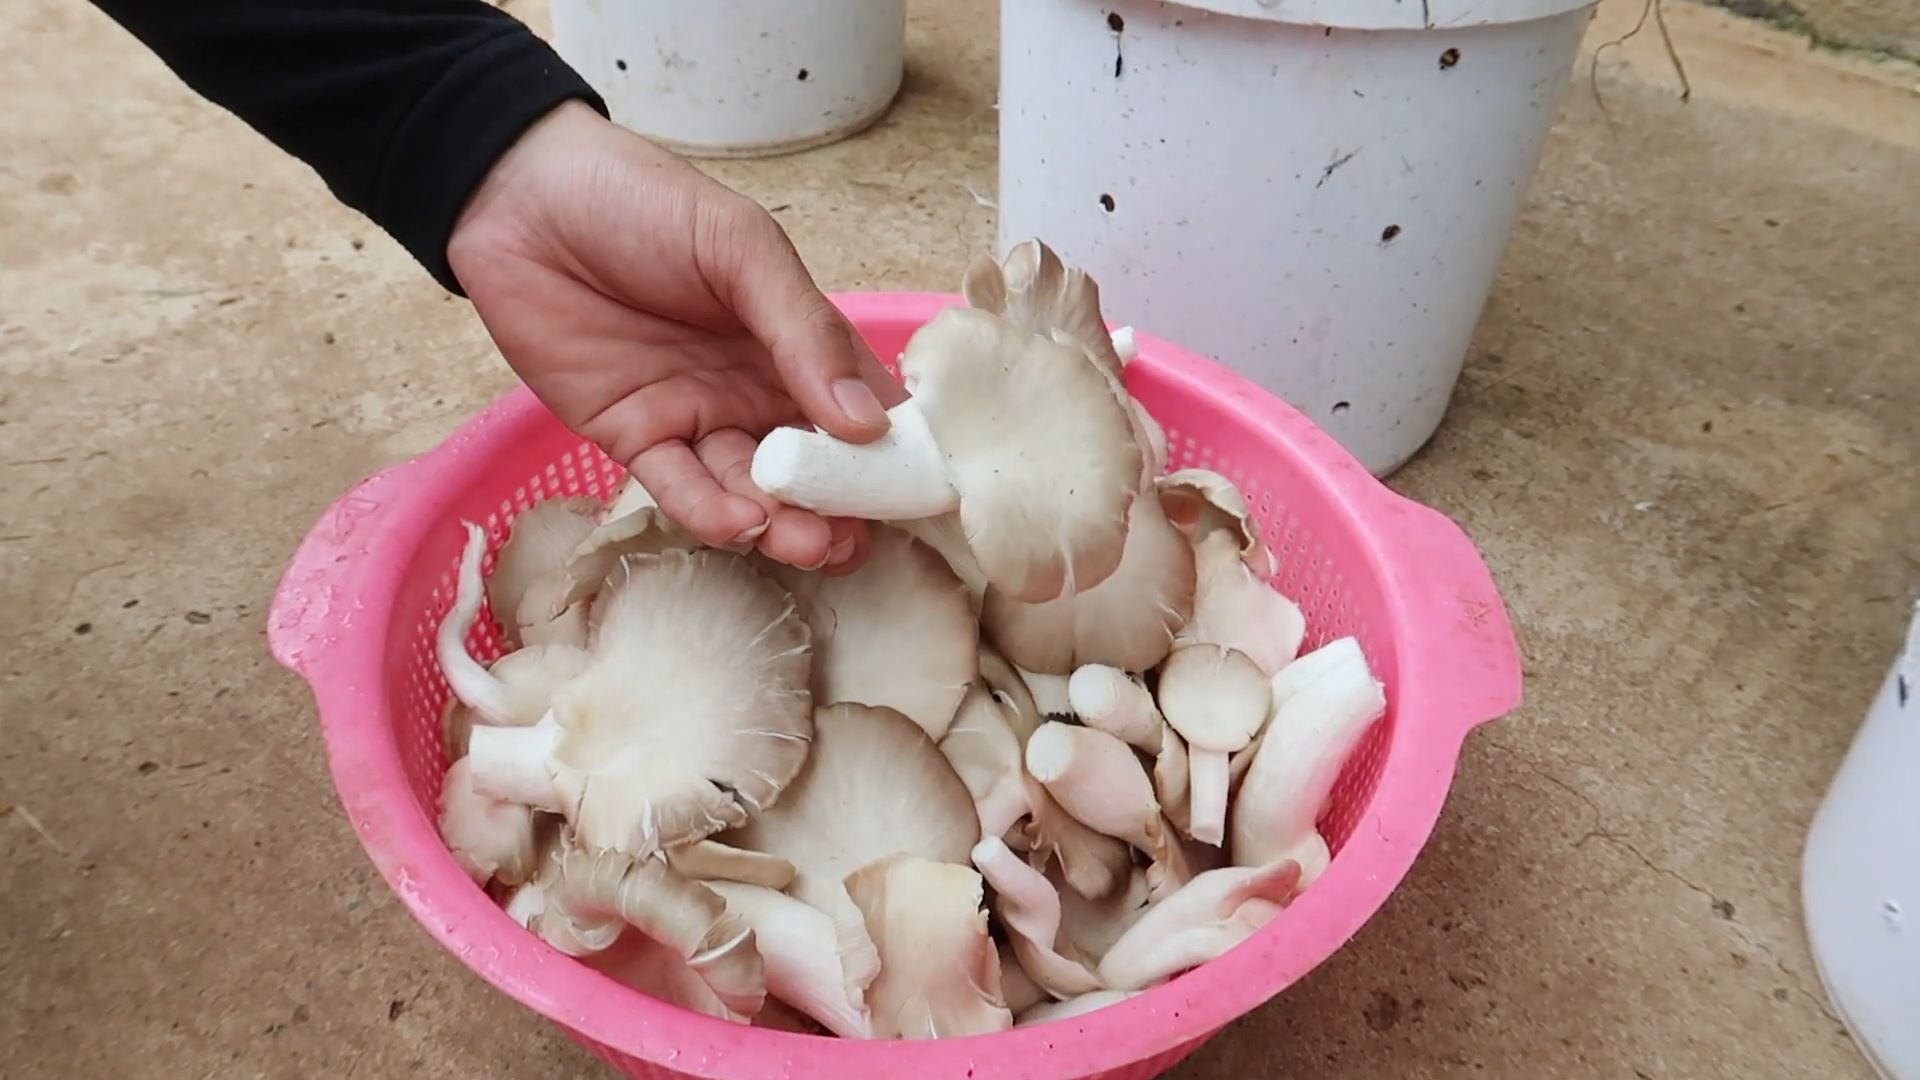
4. Harvest Your Mushrooms: Once the mushrooms have reached a desirable size (usually within a few days of pinning), it’s time to harvest! Gently twist or cut the mushrooms off the substrate at the base of the stem. Don’t pull them off! Pulling can damage the mycelium and prevent future flushes.
5. Enjoy Your Harvest! Cook your freshly harvested oyster mushrooms and enjoy the fruits (or fungi!) of your labor!
Phase 5: Subsequent Flushes (More Mushrooms!)
Oyster mushrooms can produce multiple flushes (harvests) from the same substrate.
1. Maintain Humidity and Fresh Air: After harvesting the first flush, continue to maintain high humidity and provide fresh air.
2. Wait for New Pins: It may take a week or two for new pins to form.
3. Repeat Harvesting: Harvest the subsequent flushes as they mature.
4. Substrate Depletion: Eventually, the substrate will become depleted of nutrients and stop producing mushrooms. At this point, you can compost the spent substrate and start a new batch.
Troubleshooting: Common Issues and Solutions
* Contamination: If you see green, black, or other colored molds growing on your substrate, it’s likely contaminated. Unfortunately, you’ll need to discard the contaminated substrate to prevent the spread of mold. Proper pasteurization is key to preventing contamination.
* Slow Colonization: Slow colonization can be caused by low temperatures, low humidity, or poor-quality spawn. Make sure your environment is within the ideal temperature range and that you’re maintaining high humidity. If you suspect the spawn is the issue, try purchasing spawn from a different source.
* No Pinning: Lack of pinning can be caused by insufficient light, low humidity, or poor ventilation. Make sure you’re providing adequate light and humidity, and that your container has good airflow.
* Dry Mushrooms: Dry mushrooms are a sign of low humidity. Increase the frequency of misting or use a humidity tent.
Tips and Tricks for Success
* Start Small: Begin with a small batch to get the hang of the process.
* Use High-Quality Spawn: Invest in good-quality spawn from a reputable source.
* Maintain Hygiene: Cleanliness is crucial to prevent contamination.
* Be Patient: Mushroom growing takes time and patience. Don’t get discouraged if you don’t see results immediately.
* Experiment: Try different substrates and growing conditions to find what works best for you.
* Join a Mushroom Growing Community: Connect with other mushroom growers online or in your local area to share tips and advice.
Growing your own oyster mushrooms is a rewarding and educational experience. With a little patience and attention to detail, you can enjoy fresh, delicious mushrooms right from your own home. Happy growing!
Conclusion
So, there you have it! Mastering the art of growing mushrooms at home is not just a fun project; it’s a gateway to a world of culinary delights, sustainable living, and a deeper connection with nature. We’ve walked you through the process, demystifying what might seem like a complex undertaking. From selecting the right substrate to maintaining optimal humidity, every step is designed to empower you to cultivate your own delicious fungi.
Why is this DIY trick a must-try? Because it puts you in control. You know exactly what goes into your food, avoiding the pesticides and preservatives that can sometimes lurk in commercially grown mushrooms. Plus, the satisfaction of harvesting your own crop, knowing you nurtured it from start to finish, is simply unparalleled. Imagine the pride you’ll feel serving a dish featuring mushrooms you grew yourself!
But the benefits extend beyond the personal. Growing mushrooms at home is an environmentally friendly practice. You can utilize recycled materials like coffee grounds and cardboard as substrate, reducing waste and contributing to a more sustainable lifestyle. It’s a small step that can make a big difference.
Now, let’s talk about variations. While we’ve focused on a beginner-friendly method, the world of mushroom cultivation is vast and exciting. Once you’ve mastered the basics, you can experiment with different mushroom varieties. Try growing oyster mushrooms in a bucket, shiitake mushrooms on logs, or even explore the fascinating world of medicinal mushrooms like reishi. Each variety offers unique flavors, textures, and health benefits.
Another exciting variation is experimenting with different substrates. While coffee grounds and straw are excellent starting points, you can also try using wood chips, sawdust, or even agricultural waste products. Just be sure to research the specific substrate requirements of the mushroom variety you’re growing.
Don’t be afraid to get creative with your growing environment. While a dark, humid space is generally ideal, you can adapt your setup to suit your specific needs and resources. A repurposed closet, a basement corner, or even a shaded outdoor area can all be transformed into a thriving mushroom farm.
Ultimately, the key to successful mushroom cultivation is patience and observation. Pay close attention to your mushrooms, monitor their growth, and adjust your techniques as needed. Don’t be discouraged by setbacks; even experienced growers encounter challenges. The important thing is to learn from your mistakes and keep experimenting.
We wholeheartedly encourage you to embark on this rewarding journey of growing mushrooms at home. It’s a skill that will enrich your life in countless ways, from enhancing your culinary creations to fostering a deeper appreciation for the natural world.
So, grab your supplies, follow our guide, and get ready to harvest your own delicious mushrooms. And most importantly, share your experience with us! We’d love to hear about your successes, your challenges, and your unique variations. Post photos of your mushroom farms, share your favorite recipes, and connect with other mushroom enthusiasts. Together, we can cultivate a community of passionate growers and spread the joy of homegrown fungi. Let’s get growing!
Frequently Asked Questions (FAQ)
What are the easiest types of mushrooms to grow at home for beginners?
Oyster mushrooms are generally considered the easiest for beginners due to their rapid growth, tolerance of various substrates, and relatively simple cultivation requirements. They are also quite forgiving of minor environmental fluctuations. Shiitake mushrooms are another good option, although they typically require a longer cultivation period and a more specific substrate (hardwood logs). Button mushrooms, while widely consumed, are more challenging to grow at home and are not recommended for beginners.
What kind of space do I need to grow mushrooms at home?
The space required depends on the scale of your operation. For a small, hobby-level grow, a dark, humid corner of a basement, closet, or even a shaded outdoor area can suffice. The key is to maintain consistent temperature and humidity levels. A dedicated grow tent can be helpful for controlling these factors, especially in less-than-ideal environments. The size of the space will also depend on the number of mushroom blocks or logs you plan to cultivate.
What is the best substrate for growing mushrooms?
The best substrate depends on the type of mushroom you’re growing. Oyster mushrooms thrive on a variety of substrates, including straw, coffee grounds, cardboard, and even paper waste. Shiitake mushrooms prefer hardwood logs, such as oak or maple. Button mushrooms require a more complex composted substrate. Research the specific substrate requirements of your chosen mushroom variety for optimal results.
How do I maintain the correct humidity levels for mushroom growth?
Maintaining adequate humidity is crucial for mushroom development. You can increase humidity by misting the growing area with water several times a day. A humidity monitor (hygrometer) can help you track the humidity levels. Enclosing the growing area in a plastic bag or container can also help retain moisture. For larger setups, a humidifier may be necessary. Aim for humidity levels between 80% and 90% for most mushroom varieties.
How long does it take to grow mushrooms at home?
The time it takes to grow mushrooms varies depending on the variety and the cultivation method. Oyster mushrooms can often be harvested within a few weeks of inoculation. Shiitake mushrooms grown on logs may take several months to a year to produce their first flush. Button mushrooms typically take several weeks to months to mature. Patience is key!
How do I know when my mushrooms are ready to harvest?
The signs of maturity vary depending on the mushroom variety. Oyster mushrooms are typically ready to harvest when the caps have fully expanded and the edges are still slightly curled downwards. Shiitake mushrooms are ready when the caps have flattened out and the gills are visible. Button mushrooms are harvested when the caps are still closed and the gills are pink.
What are some common problems I might encounter when growing mushrooms at home, and how can I fix them?
Common problems include contamination, insufficient humidity, and pest infestations. Contamination can be prevented by sterilizing your substrate and maintaining a clean growing environment. Insufficient humidity can be addressed by misting more frequently or using a humidifier. Pest infestations can be controlled by using organic pest control methods and maintaining good hygiene.
Can I use spent coffee grounds to grow mushrooms?
Yes, spent coffee grounds are an excellent substrate for growing certain types of mushrooms, particularly oyster mushrooms. Coffee grounds are rich in nutrients and have already been pasteurized during the brewing process, reducing the risk of contamination. Be sure to use fresh coffee grounds and mix them with other substrates like straw or sawdust for best results.
Is growing mushrooms at home safe?
Yes, growing edible mushrooms at home is generally safe, as long as you properly identify the mushroom species you are cultivating. Only consume mushrooms that you are 100% certain are edible. Avoid growing wild mushrooms, as many are poisonous. Always wash your hands thoroughly after handling mushrooms and their substrate.
Where can I find mushroom spawn or cultures?
Mushroom spawn and cultures can be purchased from reputable online retailers, specialty mushroom farms, and some garden centers. Be sure to choose a reliable supplier to ensure the quality and viability of your spawn. Look for spawn that is certified organic or produced using sustainable practices.

Leave a Comment