
Grow Peppers at Home – imagine plucking a vibrant, sun-ripened pepper straight from your own garden, ready to spice up your next meal! Forget those bland, store-bought peppers; with a few simple tricks, you can cultivate a thriving pepper patch right in your backyard, balcony, or even on a sunny windowsill.
For centuries, peppers have been cherished across cultures, not just for their fiery flavor, but also for their nutritional benefits and ornamental appeal. From the ancient civilizations of South America, where peppers were first cultivated, to the bustling spice markets of Asia, these colorful fruits have added zest to cuisines and gardens worldwide. Now, it’s your turn to join this rich history!
Why should you learn to grow peppers at home? Well, besides the sheer satisfaction of nurturing your own food, you’ll have access to fresher, tastier peppers, free from harmful pesticides. Plus, it’s a fantastic way to connect with nature, relieve stress, and add a splash of color to your living space. In this article, I’m going to share some easy-to-follow DIY tricks and hacks that will help you transform your green thumb dreams into a pepper-filled reality. Get ready to unleash your inner gardener and enjoy the delicious rewards!

Growing Peppers at Home: A Beginner’s Guide
Hey there, fellow gardening enthusiasts! I’m so excited to share my tried-and-true method for growing peppers right in your own backyard (or even on your balcony!). Peppers are such a rewarding crop – they’re vibrant, flavorful, and surprisingly easy to cultivate once you get the hang of it. This guide will walk you through every step, from choosing the right seeds to harvesting your delicious peppers. Let’s get started!
Choosing Your Pepper Varieties
Before we dive into the nitty-gritty, let’s talk about pepper varieties. The world of peppers is vast and exciting, ranging from sweet bell peppers to fiery habaneros. Here’s a quick rundown to help you choose:
* **Sweet Peppers:** These are your bell peppers (red, yellow, orange, green), banana peppers, and pimientos. They’re mild and perfect for salads, stuffing, and roasting.
* **Mildly Spicy Peppers:** Think jalapeños, poblanos, and Anaheim peppers. They offer a gentle kick and are great for adding flavor to Mexican dishes and salsas.
* **Hot Peppers:** Now we’re talking! This category includes serranos, cayenne peppers, and Thai chilies. Use these sparingly if you’re sensitive to heat.
* **Super-Hot Peppers:** Proceed with caution! Ghost peppers, habaneros, and Scotch bonnets are not for the faint of heart. They pack a serious punch and should be handled with care.
Consider your climate and growing space when choosing your varieties. Some peppers thrive in warmer climates, while others are more tolerant of cooler temperatures. Also, think about how you plan to use your peppers – do you want them for cooking, pickling, or making hot sauce?
Starting Your Pepper Seeds
I always recommend starting your pepper seeds indoors, especially if you live in a region with a shorter growing season. This gives your plants a head start and ensures a bountiful harvest.
1. **Gather Your Supplies:** You’ll need:
* Pepper seeds (of course!)
* Seed starting trays or small pots
* Seed starting mix (a light, well-draining soil)
* A spray bottle filled with water
* A heat mat (optional, but highly recommended)
* A grow light (also optional, but beneficial)
* A clear plastic dome or plastic wrap
2. **Sow Your Seeds:**
* Moisten the seed starting mix with water. It should be damp but not soggy.
* Fill your seed starting trays or pots with the moistened mix.
* Make a small indentation (about 1/4 inch deep) in the center of each cell or pot.
* Place 2-3 pepper seeds in each indentation. This increases your chances of germination.
* Gently cover the seeds with the seed starting mix.
* Lightly mist the surface with water.
3. **Create a Warm and Humid Environment:**
* Place the seed starting trays or pots on a heat mat (if using). Peppers love warmth!
* Cover the trays or pots with a clear plastic dome or plastic wrap to create a humid environment. This helps the seeds germinate.
4. **Provide Light:**
* If you’re using a grow light, position it a few inches above the seed starting trays or pots.
* If you’re not using a grow light, place the trays or pots in a warm, sunny location.
5. **Monitor and Water:**
* Check the seed starting mix daily and mist with water as needed to keep it moist.
* Remove the plastic dome or plastic wrap for a few hours each day to allow for air circulation. This helps prevent fungal diseases.
6. **Wait for Germination:**
* Pepper seeds can take anywhere from 7 to 21 days to germinate, depending on the variety and temperature. Be patient!
7. **Thin Seedlings:**
* Once the seedlings have emerged and have a few sets of true leaves (the leaves that look like miniature pepper leaves), thin them out by snipping off the weaker seedlings at the soil line. Leave only the strongest seedling in each cell or pot.
Transplanting Your Pepper Seedlings
Once your pepper seedlings are about 6-8 inches tall and the weather has warmed up (nighttime temperatures consistently above 50°F), it’s time to transplant them outdoors.
1. **Harden Off Your Seedlings:** This is a crucial step to acclimate your seedlings to the outdoor environment.
* Start by placing the seedlings outdoors in a sheltered location for a few hours each day.
* Gradually increase the amount of time they spend outdoors each day, exposing them to more sunlight and wind.
* After about a week, your seedlings should be ready to be transplanted into the garden.
2. **Prepare Your Garden Bed:**
* Choose a sunny location with well-draining soil. Peppers need at least 6-8 hours of sunlight per day.
* Amend the soil with compost or other organic matter to improve its fertility and drainage.
* Space the pepper plants about 18-24 inches apart, depending on the variety. Larger varieties will need more space.
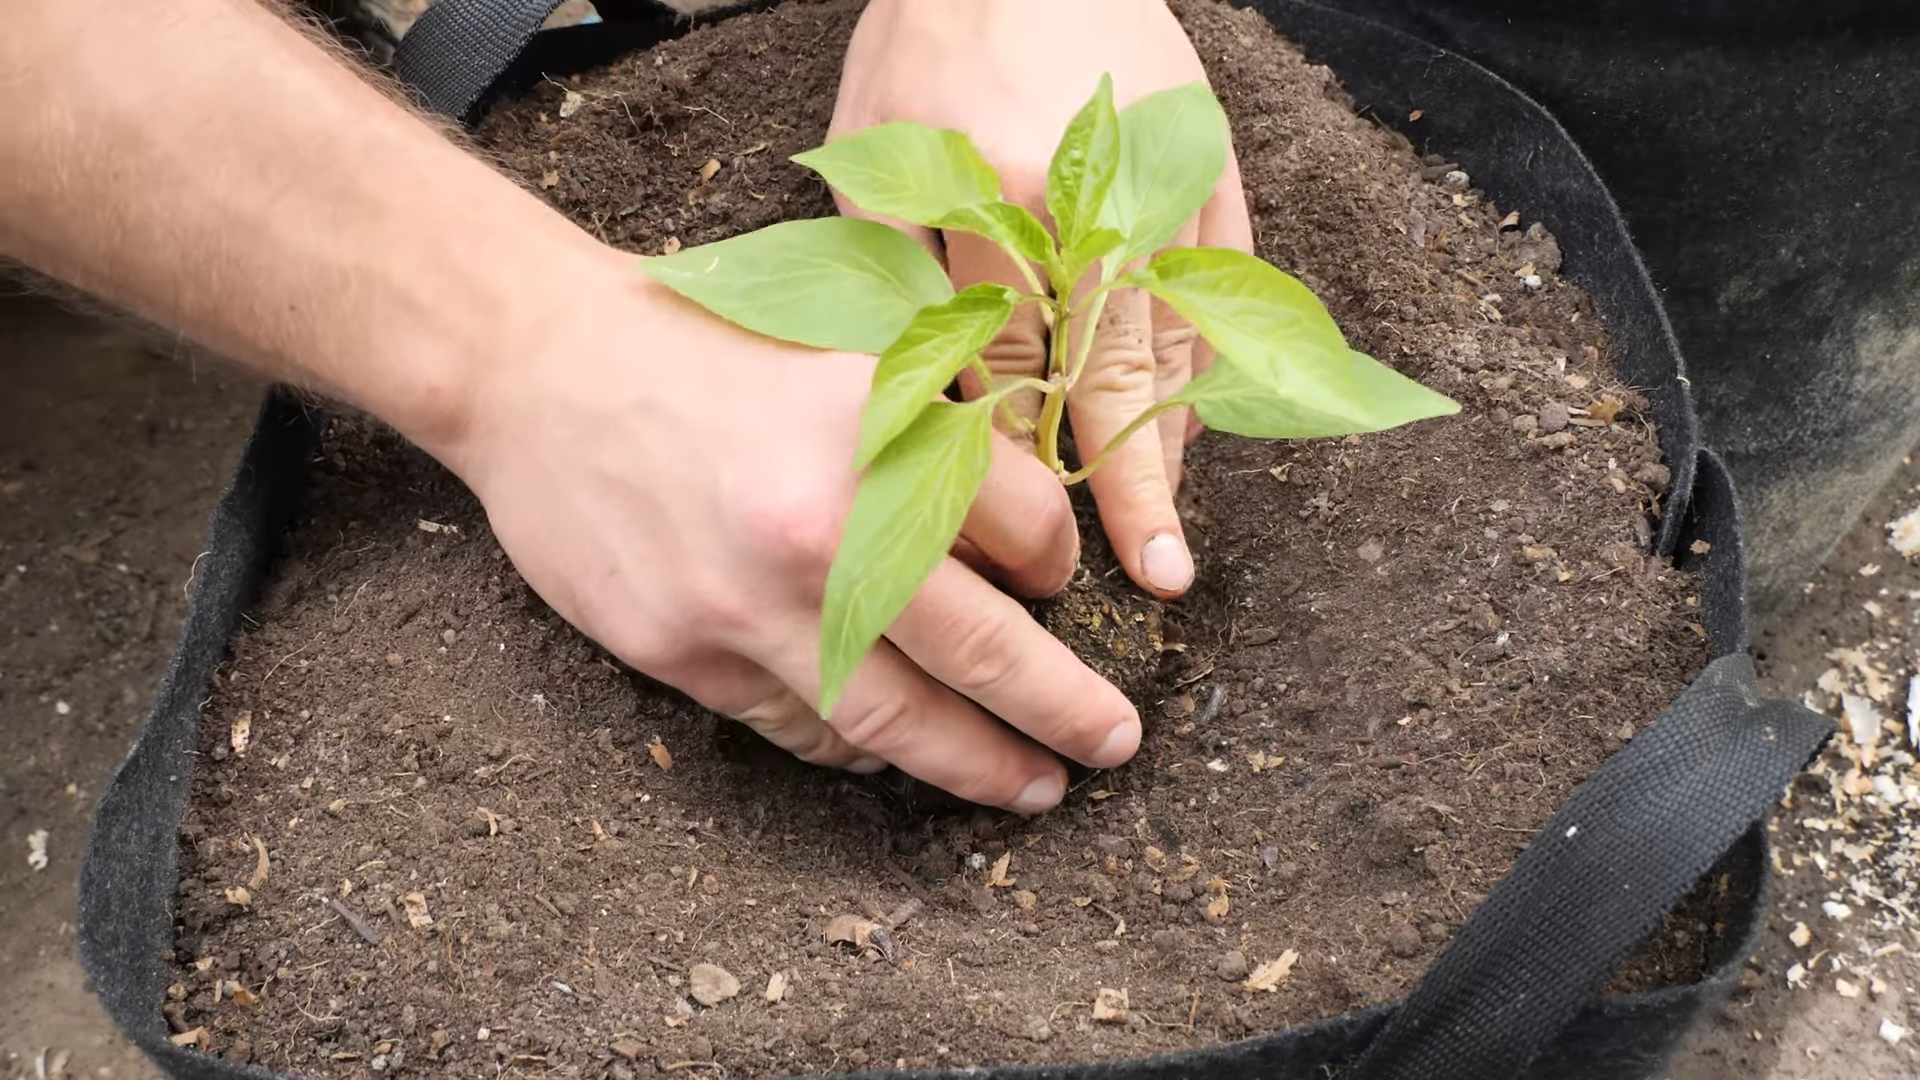
3. **Transplant Your Seedlings:**
* Dig a hole that is slightly larger than the root ball of the seedling.
* Gently remove the seedling from its pot or cell.
* Place the seedling in the hole and backfill with soil.
* Water thoroughly.
4. **Mulch Around Your Plants:**
* Apply a layer of mulch (such as straw, wood chips, or shredded leaves) around the base of the plants to help retain moisture, suppress weeds, and regulate soil temperature.
Caring for Your Pepper Plants
Now that your pepper plants are in the ground, it’s time to provide them with the care they need to thrive.
1. **Watering:**
* Water your pepper plants regularly, especially during hot, dry weather.
* Aim to keep the soil consistently moist but not waterlogged.
* Water at the base of the plants to avoid wetting the foliage, which can lead to fungal diseases.
2. **Fertilizing:**
* Fertilize your pepper plants every 2-3 weeks with a balanced fertilizer.
* Look for a fertilizer that is specifically formulated for vegetables.
* Follow the instructions on the fertilizer package.
3. **Pruning:**
* Pruning is not essential for pepper plants, but it can help improve air circulation and encourage bushier growth.
* Remove any yellowing or dead leaves.
* You can also pinch off the tips of the branches to encourage more branching.
4. **Pest and Disease Control:**
* Keep an eye out for common pepper pests, such as aphids, flea beetles, and spider mites.
* Treat infestations with insecticidal soap or neem oil.
* Prevent fungal diseases by providing good air circulation and avoiding overhead watering.
* If you notice any signs of disease, remove the affected leaves or plants immediately.
5. **Support:**
* Taller pepper varieties may need support to prevent them from falling over.
* Use stakes or cages to support the plants as they grow.
Harvesting Your Peppers
The moment you’ve been waiting for! Harvesting your peppers is the most rewarding part of the process.
1. **When to Harvest:**
* The timing of the harvest depends on the pepper variety and your personal preference.
* Sweet peppers can be harvested when they are fully colored and firm.
* Hot peppers can be harvested when they are fully colored and have reached their desired level of heat.
2. **How to Harvest:**
* Use a sharp knife or scissors to cut the peppers from the plant.
* Leave a small stem attached to the pepper.
3. **Enjoy Your Harvest!**
* Use your fresh peppers in your favorite recipes.
* Store them in the refrigerator for up to a week.
* You can also freeze, dry, or pickle your peppers for longer storage.
Remember to wear gloves when handling hot peppers, as the oils can irritate your skin.
And there you have it! You’re now equipped with the knowledge and skills to grow your own delicious peppers at home. Happy gardening!
Conclusion
So, there you have it! Mastering the art of growing peppers at home is not only achievable but also incredibly rewarding. We’ve walked you through the essential steps, from selecting the right seeds to nurturing your plants to a bountiful harvest. But why should you bother with all this effort when you can simply buy peppers at the store? The answer lies in the unparalleled freshness, the vibrant flavors, and the sheer satisfaction of cultivating your own food.
Think about biting into a sun-ripened bell pepper, bursting with sweetness and a crispness you just can’t find in store-bought varieties. Imagine the spicy kick of a homegrown jalapeno, adding a fiery depth to your favorite dishes. These are the experiences that make growing peppers at home so worthwhile.
Beyond the taste, there’s also the environmental benefit. By growing your own peppers, you’re reducing your carbon footprint by eliminating the need for transportation and packaging. You’re also gaining control over the growing process, ensuring that your peppers are free from harmful pesticides and chemicals.
But the best part about growing peppers at home is the endless possibilities for experimentation. Feel like adding a touch of heat to your garden? Try growing habaneros or scotch bonnets. Prefer something milder? Bell peppers and banana peppers are excellent choices. You can even experiment with different colors and varieties to create a visually stunning and flavorful garden.
Consider these variations to elevate your pepper-growing game:
* **Hydroponic Peppers:** For those with limited space or a desire for a more controlled environment, hydroponic pepper growing can be a fantastic option. This method involves growing peppers in nutrient-rich water solutions without soil, allowing for faster growth and higher yields.
* **Container Gardening:** If you don’t have a traditional garden, don’t worry! Peppers thrive in containers, making them perfect for patios, balconies, and even indoor spaces. Just be sure to choose a pot that’s large enough to accommodate the plant’s root system and provide adequate drainage.
* **Companion Planting:** Enhance your pepper plants’ growth and deter pests by planting them alongside beneficial companions. Basil, marigolds, and carrots are all excellent choices for companion planting with peppers.
* **Fermenting Your Harvest:** Once you’ve harvested your bounty of peppers, consider preserving them through fermentation. Fermented peppers are not only delicious but also packed with probiotics, which are beneficial for gut health.
Growing peppers at home is more than just a hobby; it’s a journey of discovery, a connection to nature, and a celebration of flavor. So, grab your seeds, get your hands dirty, and embark on this exciting adventure. We’re confident that you’ll be amazed by the results.
We encourage you to try this DIY trick and share your experiences with us! Post photos of your pepper plants, share your favorite recipes, and let us know what you’ve learned along the way. Together, we can create a community of passionate pepper growers and inspire others to discover the joys of homegrown goodness. Happy growing!
Frequently Asked Questions (FAQ)
What are the easiest types of peppers to grow for beginners?
For beginners, bell peppers, banana peppers, and jalapenos are generally considered the easiest to grow. They are relatively low-maintenance and produce a good yield. Bell peppers are mild and versatile, banana peppers offer a slightly sweet flavor, and jalapenos provide a moderate level of heat. These varieties are also widely available as seeds or starter plants.
How much sunlight do pepper plants need?
Pepper plants require at least 6-8 hours of direct sunlight per day to thrive. Insufficient sunlight can lead to leggy growth, reduced flowering, and smaller fruit. If you’re growing peppers indoors, supplement with grow lights to ensure they receive adequate light.
What type of soil is best for growing peppers?
Peppers prefer well-draining, fertile soil with a slightly acidic pH (around 6.0-6.8). Amend your soil with compost or other organic matter to improve drainage and nutrient content. Avoid heavy clay soils, as they can become waterlogged and hinder root growth.
How often should I water my pepper plants?
Water your pepper plants deeply and regularly, especially during hot, dry weather. Allow the top inch of soil to dry out between waterings to prevent overwatering, which can lead to root rot. Mulching around the base of the plants can help retain moisture and suppress weeds.
When should I start pepper seeds indoors?
Start pepper seeds indoors 6-8 weeks before the last expected frost in your area. This will give the seedlings a head start and allow them to mature before transplanting them outdoors. Use a seed-starting mix and provide warmth and light to encourage germination.
How do I transplant pepper seedlings outdoors?
Harden off your pepper seedlings by gradually exposing them to outdoor conditions for a week or two before transplanting. Choose a sunny location with well-drained soil. Space the plants 18-24 inches apart to allow for adequate air circulation. Water thoroughly after transplanting.
What are some common pests and diseases that affect pepper plants?
Common pests that affect pepper plants include aphids, spider mites, and whiteflies. Diseases include blossom-end rot, fungal leaf spots, and viral infections. Monitor your plants regularly for signs of pests or diseases and take appropriate action, such as using insecticidal soap or fungicide.
How do I prevent blossom-end rot in peppers?
Blossom-end rot is caused by a calcium deficiency in the developing fruit. To prevent it, ensure that your soil is rich in calcium and that your plants receive consistent watering. You can also add calcium supplements to the soil or spray the plants with a calcium solution.
When should I harvest my peppers?
The timing of harvest depends on the variety of pepper and your desired level of ripeness. Bell peppers are typically harvested when they are fully colored and firm to the touch. Jalapenos can be harvested when they are green or allowed to ripen to red for a spicier flavor.
Can I grow peppers in containers?
Yes, peppers thrive in containers, making them perfect for small spaces. Choose a pot that is at least 12 inches in diameter and provide well-draining soil. Water regularly and fertilize as needed.
How do I fertilize my pepper plants?
Fertilize your pepper plants every 2-3 weeks with a balanced fertilizer or a fertilizer specifically formulated for vegetables. Avoid over-fertilizing, as this can lead to excessive foliage growth and reduced fruit production.
What are some good companion plants for peppers?
Good companion plants for peppers include basil, marigolds, carrots, and onions. Basil helps repel pests, marigolds attract beneficial insects, carrots improve soil drainage, and onions deter certain pests.
How do I overwinter my pepper plants?
In colder climates, you can overwinter your pepper plants indoors. Prune the plants back to about 6 inches and repot them in fresh soil. Place them in a sunny location and water sparingly. They may not produce fruit during the winter, but they will be ready to grow again in the spring.
Can I save seeds from my homegrown peppers?
Yes, you can save seeds from your homegrown peppers, but be aware that hybrid varieties may not produce true-to-type offspring. To save seeds, allow the peppers to fully ripen on the plant and then extract the seeds. Dry the seeds thoroughly before storing them in an airtight container in a cool, dark place.
Leave a Comment