
Grow Strawberries from Seeds: Your Guide to a Sweet DIY Harvest
Growing strawberries from seeds might seem daunting, but trust me, it’s a surprisingly rewarding experience! I’ve always loved the taste of freshly picked strawberries, that juicy burst of sweetness, but the cost of store-bought berries can add up quickly. That’s why I decided to take matters into my own hands and learn how to grow strawberries from seeds. This journey led me down a path of fascinating discoveries, from understanding the delicate germination process to mastering the art of nurturing these little plants into bountiful berry producers.
Historically, strawberries have held a special place in many cultures, symbolizing prosperity and love. From ancient Roman feasts to modern-day desserts, these vibrant fruits have delighted generations. But beyond their cultural significance, there’s a deep satisfaction in cultivating your own food. It connects you to the earth, allows you to control the quality of your produce, and offers a unique sense of accomplishment.
Why Grow Your Own Strawberries?
This DIY approach to growing strawberries from seeds isn’t just about saving money; it’s about taking control of your food source and enjoying the freshest, most flavorful strawberries imaginable. Imagine biting into a sun-ripened berry, knowing you nurtured it from a tiny seed to its juicy perfection. It’s a truly magical experience!
In this article, I’ll share my tried-and-true techniques for growing strawberries from seeds, covering everything from seed selection and sowing to transplanting and harvesting. Get ready to embark on a sweet adventure and discover the joy of growing your own delicious strawberries!
Growing Strawberries from Seeds: A Complete DIY Guide
Growing strawberries from seed might seem daunting, but trust me, it’s incredibly rewarding! This guide will walk you through the entire process, from seed selection to your first juicy harvest. Get ready to enjoy homegrown strawberries!
Phase 1: Seed Starting – Preparing for Success
- Choose the right seeds: Select high-quality strawberry seeds from a reputable supplier. Look for varieties known for their success from seed, as some cultivars are better propagated through runners.
- Timing is key: Start seeds indoors 6-8 weeks before the last expected frost in your area. This allows ample time for seedlings to develop before transplanting outdoors.
- Gather your supplies: You’ll need seed starting mix (not garden soil!), small seed trays or pots, a humidity dome or plastic wrap, a spray bottle, and a warm, sunny location.
Phase 2: Sowing the Seeds
- Prepare the seed starting mix: Gently moisten the seed starting mix. It should be damp but not soggy. Squeezing a handful should not release water.
- Fill your containers: Fill your seed trays or pots with the moistened seed starting mix, leaving about ½ inch of space at the top.
- Sow the seeds: Strawberry seeds are tiny! Don’t bury them deeply. Simply sprinkle them on the surface of the mix. You can lightly press them into the soil, but don’t cover them with soil.
- Lightly mist with water: Use a spray bottle to gently mist the seeds with water. Avoid using a forceful stream, which could dislodge the seeds.
- Cover the containers: Cover the trays or pots with a humidity dome or plastic wrap to maintain moisture and warmth. This helps create a mini-greenhouse effect.
- Place in a warm location: Place the containers in a warm location with indirect sunlight. A temperature between 70-75°F (21-24°C) is ideal.
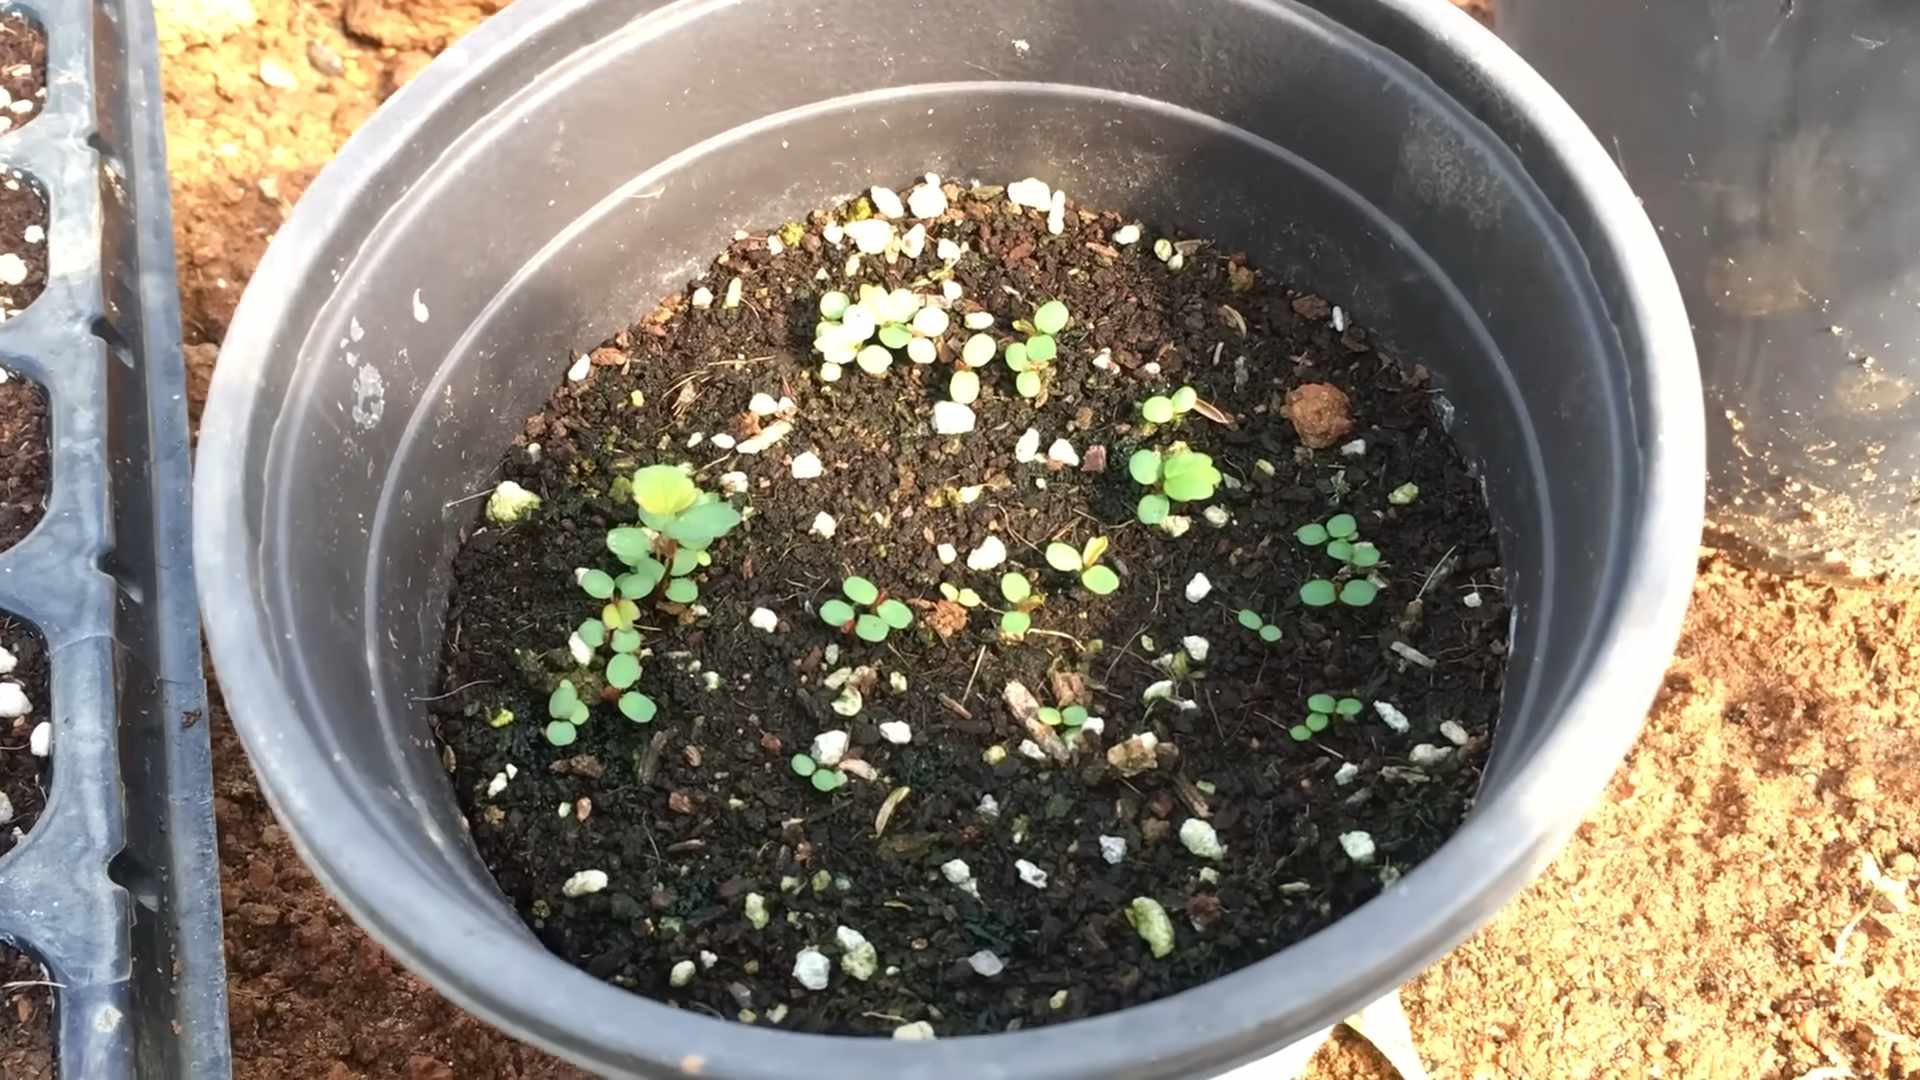
Phase 3: Germination and Seedling Care
- Monitor moisture levels: Check the moisture level daily. Mist the soil surface as needed to keep it consistently moist, but not waterlogged. Condensation on the inside of the humidity dome or plastic wrap is a good sign.
- Germination time: Germination can take 2-4 weeks, sometimes longer. Be patient! Don’t get discouraged if you don’t see seedlings immediately.
- Remove the cover: Once the seedlings emerge, gradually remove the humidity dome or plastic wrap to allow for better air circulation. Start by removing it for a few hours each day, then increase the time until it’s removed completely.
- Provide adequate light: As the seedlings grow, ensure they receive plenty of sunlight. A sunny windowsill is ideal. You may need to supplement with grow lights, especially during winter months, to ensure they get at least 12-14 hours of light per day.
- Thinning seedlings: Once the seedlings have a few true leaves (the leaves that are different from the seed leaves), thin them out to give each seedling enough space to grow. Gently remove the weaker seedlings, leaving the strongest ones.
- Watering: Water the seedlings regularly, keeping the soil consistently moist but not waterlogged. Allow the top inch of soil to dry slightly between waterings.
- Fertilizing: Once the seedlings have several true leaves, start fertilizing them with a diluted liquid fertilizer specifically formulated for seedlings. Follow the instructions on the fertilizer label carefully.
Phase 4: Transplanting Outdoors
- Hardening off: Before transplanting outdoors, gradually acclimate the seedlings to outdoor conditions. This process, called hardening off, helps them adjust to the changes in temperature, sunlight, and wind. Start by placing them outdoors for a few hours each day, gradually increasing the time over a week or two.
- Prepare the soil: Choose a location that receives at least 6-8 hours of sunlight per day. Amend the soil with compost or other organic matter to improve drainage and fertility. Strawberries prefer well-drained soil.
- Planting: Dig holes slightly larger than the root balls of the seedlings. Gently remove the seedlings from their containers, being careful not to damage the roots. Plant them at the same depth they were growing in their containers. Space the plants 12-18 inches apart, depending on the variety.
- Water thoroughly: Water the newly transplanted seedlings thoroughly to help them settle into their new home.
- Mulching: Apply a layer of mulch around the plants to help retain moisture, suppress weeds, and regulate soil temperature.
Phase 5: Ongoing Care and Harvesting
- Watering: Water regularly, especially during dry periods. Aim to keep the soil consistently moist but not waterlogged.
- Fertilizing: Continue fertilizing throughout the growing season, following the instructions on the fertilizer label. A balanced fertilizer is ideal.
- Weed control: Regularly remove weeds to prevent competition for nutrients and water.
- Pest and disease control: Monitor the plants for pests and diseases. Take appropriate action if necessary, using organic methods whenever possible.
- Choose the right seeds: Select high-quality strawberry seeds from a reputable supplier. Look for varieties known for their success from seed, as some cultivars are better propagated through runners.
- Timing is key: Start seeds indoors 6-8 weeks before the last expected frost in your area. This allows ample time for seedlings to develop before transplanting outdoors.
- Gather your supplies: You’ll need seed starting mix (not garden soil!), small seed trays or pots, a humidity dome or plastic wrap, a spray bottle, and a warm, sunny location.
- Prepare the seed starting mix: Gently moisten the seed starting mix. It should be damp but not soggy. Squeezing a handful should not release water.
- Fill your containers: Fill your seed trays or pots with the moistened seed starting mix, leaving about ½ inch of space at the top.
- Sow the seeds: Strawberry seeds are tiny! Don’t bury them deeply. Simply sprinkle them on the surface of the mix. You can lightly press them into the soil, but don’t cover them with soil.
- Lightly mist with water: Use a spray bottle to gently mist the seeds with water. Avoid using a forceful stream, which could dislodge the seeds.
- Cover the containers: Cover the trays or pots with a humidity dome or plastic wrap to maintain moisture and warmth. This helps create a mini-greenhouse effect.
- Place in a warm location: Place the containers in a warm location with indirect sunlight. A temperature between 70-75°F (21-24°C) is ideal.
- Monitor moisture levels: Check the moisture level daily. Mist the soil surface as needed to keep it consistently moist, but not waterlogged. Condensation on the inside of the humidity dome or plastic wrap is a good sign.
- Germination time: Germination can take 2-4 weeks, sometimes longer. Be patient! Don’t get discouraged if you don’t see seedlings immediately.
- Remove the cover: Once the seedlings emerge, gradually remove the humidity dome or plastic wrap to allow for better air circulation. Start by removing it for a few hours each day, then increase the time until it’s removed completely.
- Provide adequate light: As the seedlings grow, ensure they receive plenty of sunlight. A sunny windowsill is ideal. You may need to supplement with grow lights, especially during winter months, to ensure they get at least 12-14 hours of light per day.
- Thinning seedlings: Once the seedlings have a few true leaves (the leaves that are different from the seed leaves), thin them out to give each seedling enough space to grow. Gently remove the weaker seedlings, leaving the strongest ones.
- Watering: Water the seedlings regularly, keeping the soil consistently moist but not waterlogged. Allow the top inch of soil to dry slightly between waterings.
- Fertilizing: Once the seedlings have several true leaves, start fertilizing them with a diluted liquid fertilizer specifically formulated for seedlings. Follow the instructions on the fertilizer label carefully.
- Hardening off: Before transplanting outdoors, gradually acclimate the seedlings to outdoor conditions. This process, called hardening off, helps them adjust to the changes in temperature, sunlight, and wind. Start by placing them outdoors for a few hours each day, gradually increasing the time over a week or two.
- Prepare the soil: Choose a location that receives at least 6-8 hours of sunlight per day. Amend the soil with compost or other organic matter to improve drainage and fertility. Strawberries prefer well-drained soil.
- Planting: Dig holes slightly larger than the root balls of the seedlings. Gently remove the seedlings from their containers, being careful not to damage the roots. Plant them at the same depth they were growing in their containers. Space the plants 12-18 inches apart, depending on the variety.
- Water thoroughly: Water the newly transplanted seedlings thoroughly to help them settle into their new home.
- Mulching: Apply a layer of mulch around the plants to help retain moisture, suppress weeds, and regulate soil temperature.
- Watering: Water regularly, especially during dry periods. Aim to keep the soil consistently moist but not waterlogged.
- Fertilizing: Continue fertilizing throughout the growing season, following the instructions on the fertilizer label. A balanced fertilizer is ideal.
- Weed control: Regularly remove weeds to prevent competition for nutrients and water.
- Pest and disease control: Monitor the plants for pests and diseases. Take appropriate action if necessary, using organic methods whenever possible.
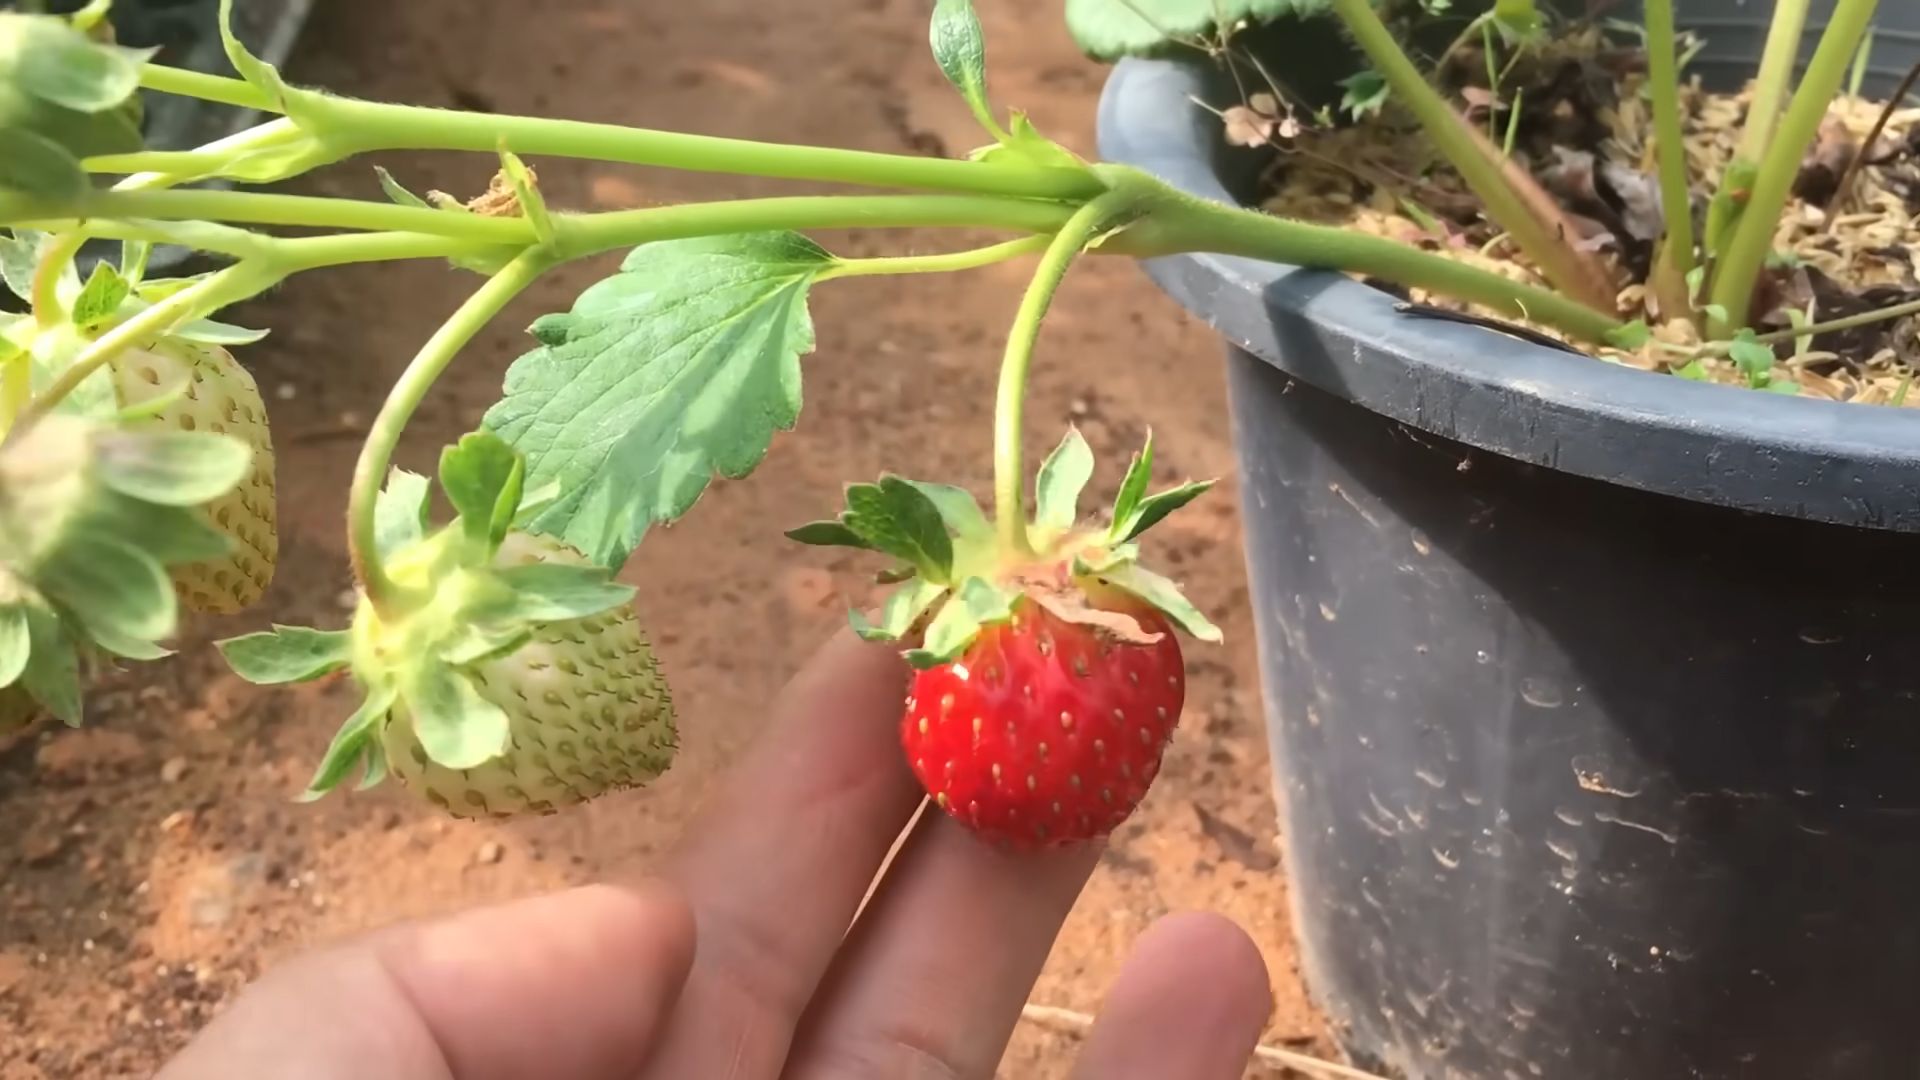
- Harvesting: Strawberries are typically ready for harvest in late spring or early summer. Harvest when they are fully ripe and have a deep red color. Gently pull the berries from the plant, leaving the green cap attached.
- Winter care: In colder climates, protect the plants from frost during winter. You can cover them with mulch or other protective material.
Growing strawberries from seed might seem daunting, but trust me, it’s incredibly rewarding! This guide will walk you through the entire process, from seed selection to your first juicy harvest. Get ready to enjoy homegrown strawberries!
Phase 1: Seed Starting – Preparing for Success
Phase 2: Sowing the Seeds
Phase 3: Germination and Seedling Care
Phase 4: Transplanting Outdoors
Phase 5: Ongoing Care and Harvesting
Important Note:
Patience is key when growing strawberries from seed. It takes time and effort, but the taste of homegrown strawberries is well worth it!
Conclusion
So there you have it – a complete guide to growing strawberries from seeds! This DIY method offers a rewarding experience for gardeners of all levels, from seasoned pros to enthusiastic beginners. Growing strawberries from seeds allows you to cultivate a wider variety of strawberry plants than you might find at your local nursery, giving you access to unique flavors and colors. It’s also incredibly cost-effective, as a single packet of seeds can yield a substantial number of plants. Beyond the financial benefits, the process itself is deeply satisfying. Watching those tiny seeds germinate and develop into healthy, fruiting plants is a truly magical experience. The sense of accomplishment you feel when you harvest your first homegrown strawberries, knowing you nurtured them from seed to fruit, is unparalleled. This method is a fantastic way to connect with nature and enjoy the freshest, most flavorful strawberries imaginable. Don’t be intimidated by the process; with a little patience and care, you’ll be enjoying the fruits of your labor in no time. This DIY approach to growing strawberries is a must-try for anyone who appreciates fresh, homegrown produce and the satisfaction of nurturing life from a tiny seed.
You can experiment with different varieties of strawberry seeds to discover your favorites. Consider trying alpine strawberries for their compact size and continuous fruiting, or everbearing varieties for a longer harvest season. You can also explore different growing mediums, such as coco coir or a well-draining soil mix, to find what works best for your climate and conditions. Furthermore, consider supplementing your seedlings with a balanced fertilizer once they have a few true leaves to encourage robust growth and abundant fruit production. Don’t be afraid to get creative and adapt the techniques to suit your specific needs and preferences. The beauty of this method lies in its adaptability.
We strongly encourage you to try this method of growing strawberries from seeds and share your experience with us! Post pictures of your thriving strawberry plants and delicious harvests on social media using #GrowStrawberriesFromSeeds. We’d love to see your progress and hear about your successes (and even your challenges – learning from mistakes is part of the fun!). Join our online community of fellow strawberry enthusiasts and share your tips and tricks. Let’s inspire each other to cultivate our green thumbs and enjoy the bounty of homegrown strawberries. Remember, the journey is just as rewarding as the destination. Happy growing!
Frequently Asked Questions
What type of soil is best for growing strawberries from seeds?
Strawberries thrive in well-draining soil that is rich in organic matter. A slightly acidic pH (around 6.0-6.5) is ideal. You can amend your soil with compost or peat moss to improve drainage and fertility. Avoid heavy clay soils, as they can retain too much moisture and lead to root rot.
How much sunlight do strawberry seedlings need?
Strawberry seedlings need at least 6-8 hours of direct sunlight per day to grow properly. Choose a location in your garden or on your balcony that receives ample sunlight. If you’re growing them indoors, use grow lights to supplement natural sunlight.
When is the best time to start strawberry seeds indoors?
The best time to start strawberry seeds indoors is 6-8 weeks before the last expected frost in your area. This allows the seedlings to develop a strong root system before being transplanted outdoors.
How often should I water my strawberry seedlings?
Keep the soil consistently moist but not waterlogged. Water thoroughly when the top inch of soil feels dry to the touch. Avoid overhead watering, which can lead to fungal diseases. Water at the base of the plants to keep the foliage dry.
What are some common problems encountered when growing strawberries from seeds?
Some common problems include damping-off (a fungal disease that affects seedlings), insufficient sunlight, and improper watering. Ensure good air circulation to prevent fungal diseases, provide ample sunlight, and maintain consistent moisture levels to avoid these issues. Also, be vigilant for pests like slugs and snails, which can damage young plants.
How long does it take for strawberry seeds to germinate?
Strawberry seeds can take anywhere from 2 to 4 weeks to germinate, sometimes even longer depending on the variety and growing conditions. Be patient and maintain consistent moisture and warmth.
Can I grow strawberries from seeds in containers?
Absolutely! Containers are a great option for growing strawberries, especially if you have limited space. Choose containers that are at least 6 inches deep and have drainage holes. Ensure the containers receive adequate sunlight.
What should I do if my strawberry seedlings are leggy?
Leggy seedlings are often a sign of insufficient light. Move your seedlings closer to a light source or increase the duration of grow light exposure. You can also gently pinch back the top growth to encourage bushier growth.
When can I expect to harvest my homegrown strawberries?
The time it takes to harvest strawberries from seed depends on the variety and growing conditions. Generally, you can expect to harvest your first strawberries 8-12 months after sowing the seeds. Some everbearing varieties may produce fruit sooner.
What are the benefits of growing strawberries from seeds compared to buying plants?
Growing strawberries from seeds offers several advantages: it’s more cost-effective, allows you to choose from a wider variety of cultivars, and provides a deeply satisfying gardening experience. It also allows for better control over the growing environment and the potential to develop stronger, more resilient plants.
Leave a Comment