
Grow wheatgrass with water? Absolutely! Forget fancy equipment and complicated setups. I’m going to show you how to cultivate this nutritional powerhouse using just water and a few simple supplies. It’s easier than you think, and the rewards are well worth the minimal effort.
Wheatgrass has a fascinating history, dating back to ancient Egypt and Mesopotamia, where it was revered for its health benefits. While not always grown solely with water, its potent properties have been recognized for centuries. Today, we’re bringing this ancient grain into the modern home, making it accessible to everyone, regardless of their gardening experience.
Why should you bother learning to grow wheatgrass with water? Well, for starters, it’s a fantastic way to boost your nutrient intake. Wheatgrass is packed with vitamins, minerals, and antioxidants. Plus, growing your own means you know exactly what you’re getting – no pesticides or hidden additives. In today’s world, where we’re all striving for healthier lifestyles, this simple DIY project can make a significant difference. It’s also a fantastic way to add a touch of green to your home, especially during those long winter months. So, let’s dive in and discover the secrets to successful water-grown wheatgrass!
Weizengras Anbauen Nur Mit Wasser: Ein Einfacher DIY-Leitfaden
Hey Leute! Habt ihr schon mal von Weizengras gehört? Es ist vollgepackt mit Nährstoffen und super einfach zu Hause anzubauen, sogar nur mit Wasser! Ich zeige euch heute, wie ihr das ganz easy hinbekommt. Keine Erde, kein Stress! Los geht’s!
Was du brauchst:
* Weizensamen (am besten speziell für Weizengras, gibt’s im Bioladen oder online)
* Ein großes Einmachglas oder eine Schale
* Ein Sieb oder ein Stück Gaze/Nylonstrumpf
* Ein Gummiband
* Wasser (gefiltert ist super, aber Leitungswasser geht auch)
* Eine Sprühflasche (optional, aber hilfreich)
* Ein dunkler Ort (z.B. ein Schrank oder eine Schublade)
* Ein heller Ort (ohne direkte Sonneneinstrahlung)
Warum Weizengras Anbauen?
Bevor wir loslegen, kurz warum ich so begeistert von Weizengras bin: Es ist ein echtes Superfood! Es enthält Vitamine, Mineralien, Enzyme und Chlorophyll. Viele Leute trinken Weizengrassaft, um ihr Immunsystem zu stärken, ihren Körper zu entgiften und sich einfach fitter zu fühlen. Und das Beste: Es ist viel günstiger, es selbst anzubauen, als es fertig zu kaufen!
Die Anleitung: Schritt für Schritt zum Grünen Glück
Der ganze Prozess lässt sich in drei Hauptphasen einteilen: Einweichen, Keimen und Wachsen. Keine Sorge, es ist wirklich nicht schwer!
Phase 1: Das Einweichen der Samen
1. Samen vorbereiten: Nehmt eure Weizensamen und gebt sie in das Einmachglas oder die Schale. Ich nehme meistens so ca. 1-2 Tassen Samen, je nachdem wie viel Weizengras ich am Ende haben möchte. Denkt daran, dass die Samen beim Einweichen aufquellen, also nicht zu voll machen!
2. Wasser hinzufügen: Füllt das Glas oder die Schale mit reichlich Wasser. Die Samen sollten komplett bedeckt sein. Ich verwende immer gefiltertes Wasser, aber Leitungswasser tut’s auch.
3. Einweichen lassen: Lasst die Samen jetzt für 8-12 Stunden einweichen. Ich mache das meistens über Nacht, dann kann ich am nächsten Morgen direkt weitermachen. Während des Einweichens nehmen die Samen Wasser auf und beginnen, sich auf die Keimung vorzubereiten.
4. Wasser abgießen: Nach dem Einweichen gießt ihr das Wasser ab. Hier kommt das Sieb oder die Gaze ins Spiel. Legt das Sieb über das Glas oder befestigt die Gaze mit dem Gummiband. So könnt ihr das Wasser abgießen, ohne dass die Samen verloren gehen.
5. Samen spülen: Spült die Samen gründlich mit frischem Wasser ab. Das entfernt eventuelle Rückstände und hält sie sauber.
Phase 2: Die Keimung
1. Dunkelheit ist Trumpf: Gebt die abgetropften Samen zurück in das Glas oder die Schale. Jetzt kommt der dunkle Ort ins Spiel. Die Samen keimen am besten im Dunkeln. Stellt das Glas oder die Schale also in einen Schrank, eine Schublade oder einen anderen dunklen Ort.
2. Regelmäßig spülen: Das ist der wichtigste Teil! Spült die Samen 2-3 Mal täglich mit frischem Wasser ab. Das verhindert, dass sie austrocknen oder schimmeln. Nach dem Spülen müsst ihr das Wasser immer gut abgießen.
3. Beobachten und Geduld haben: Nach ein paar Tagen (meistens 2-3) solltet ihr sehen, wie die ersten kleinen Wurzeln und Sprossen aus den Samen kommen. Das ist ein gutes Zeichen! Das bedeutet, dass die Keimung erfolgreich ist.
4. Weiter spülen: Spült die Samen weiterhin 2-3 Mal täglich, bis die Sprossen ca. 1-2 cm lang sind.
Phase 3: Das Wachsen
1. Licht ins Dunkel bringen: Sobald die Sprossen ca. 1-2 cm lang sind, könnt ihr sie aus dem Dunkeln holen. Stellt das Glas oder die Schale an einen hellen Ort, aber ohne direkte Sonneneinstrahlung. Direkte Sonne kann die zarten Sprossen verbrennen.
2. Weiter spülen: Auch jetzt müsst ihr die Sprossen weiterhin 2-3 Mal täglich spülen. Achtet darauf, dass sie immer feucht bleiben, aber nicht im Wasser stehen.
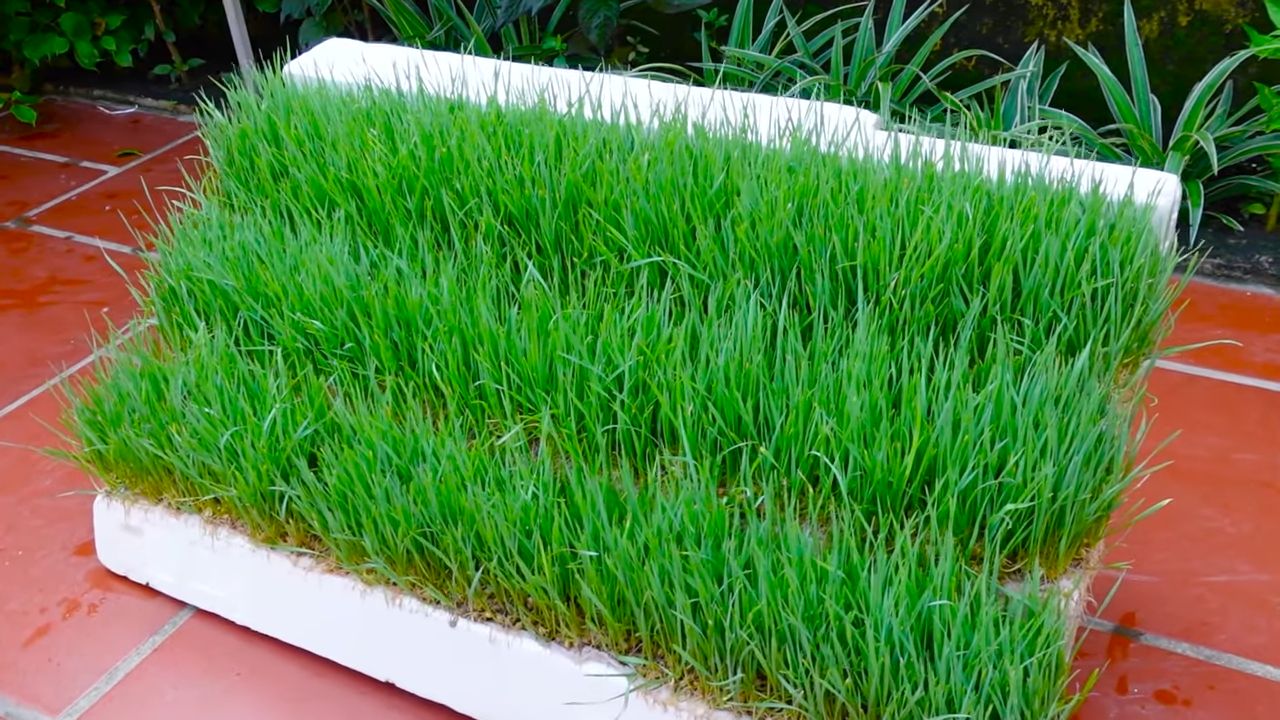
3. Wachsen lassen: Jetzt heißt es einfach abwarten und zusehen, wie das Weizengras wächst. Es wird schnell größer und grüner.
4. Optional: Sprühen: Wenn ihr eine Sprühflasche habt, könnt ihr die Sprossen zusätzlich 1-2 Mal täglich mit Wasser besprühen. Das hilft, die Luftfeuchtigkeit zu erhöhen und das Wachstum zu fördern.
5. Ernten: Nach ca. 7-10 Tagen ist das Weizengras erntereif. Es sollte dann ca. 10-15 cm hoch sein.
Die Ernte und Weiterverarbeitung
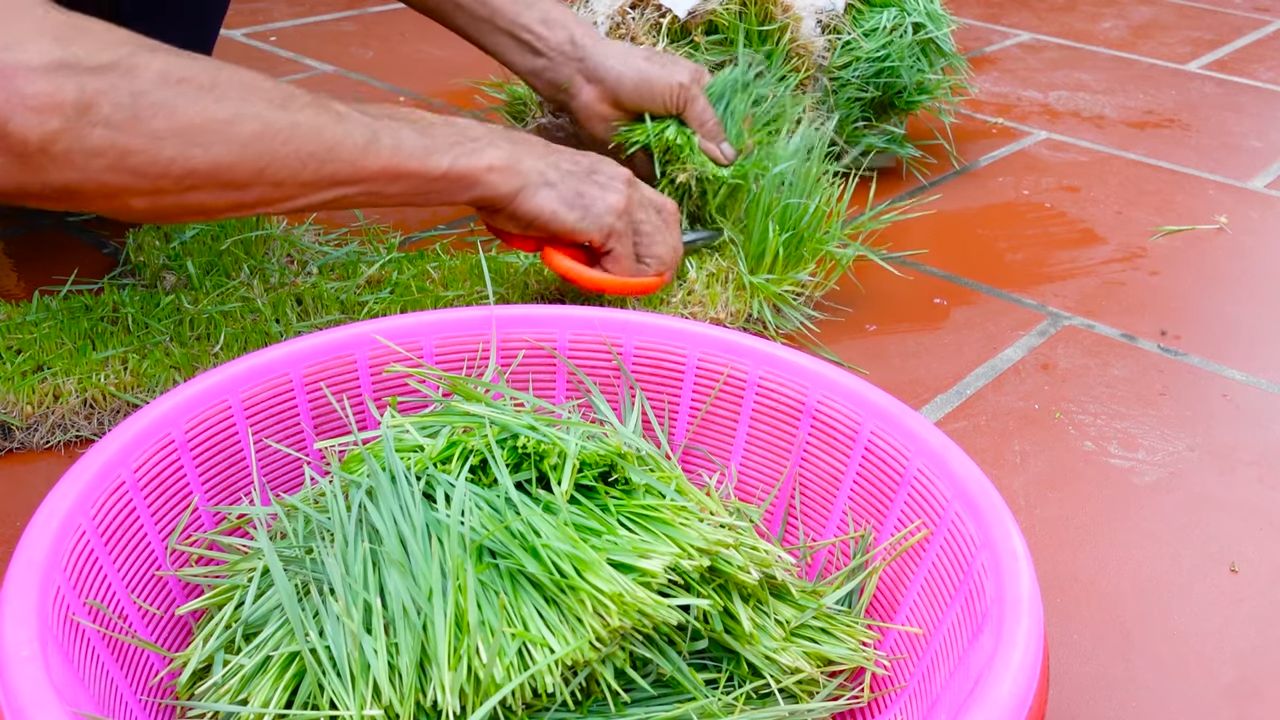
1. Ernten: Schneidet das Weizengras mit einer Schere oder einem Messer kurz über der Wurzel ab. Ich schneide immer nur so viel ab, wie ich gerade brauche, damit der Rest frisch bleibt.
2. Verarbeiten: Das geerntete Weizengras könnt ihr direkt verwenden. Am beliebtesten ist es, es zu entsaften und den Saft zu trinken. Ihr könnt es aber auch in Smoothies mischen oder als Dekoration für Salate verwenden.
3. Reste entsorgen: Die Wurzeln und die restlichen Samen könnt ihr kompostieren oder einfach in den Biomüll werfen.
Tipps und Tricks für den Weizengras-Anbau
* Sauberkeit ist wichtig: Achtet darauf, dass alle Utensilien sauber sind, um Schimmelbildung zu vermeiden.
* Gute Belüftung: Sorgt für eine gute Belüftung, um Staunässe zu verhindern.
* Nicht zu viele Samen: Verwendet nicht zu viele Samen auf einmal, da sie sonst zu dicht liegen und schimmeln können.
* Regelmäßig spülen: Das regelmäßige Spülen ist das A und O für den Erfolg.
* Geduld haben: Weizengras braucht Zeit zum Wachsen. Seid geduldig und lasst euch nicht entmutigen, wenn es nicht sofort klappt.
* Verschiedene Sorten ausprobieren: Es gibt verschiedene Weizensorten, die sich für den Anbau von Weizengras eignen. Probiert verschiedene Sorten aus, um herauszufinden, welche euch am besten gefällt.
* Schimmel vermeiden: Wenn ihr Schimmel entdeckt, solltet ihr die betroffenen Samen sofort entfernen und die restlichen Samen gründlich spülen.
* Weizengras-Saft richtig lagern: Weizengras-Saft ist sehr empfindlich und sollte am besten sofort getrunken werden. Wenn ihr ihn aufbewahren müsst, solltet ihr ihn in einem luftdichten Behälter im Kühlschrank lagern und innerhalb von 24 Stunden verbrauchen.
* Weizengras als Dünger: Das verbrauchte Weizengras kann auch als Dünger für eure anderen Pflanzen verwendet werden.
Häufige Probleme und Lösungen
* Schimmelbildung: Schimmelbildung ist das häufigste Problem beim Weizengras-Anbau. Sie wird meistens durch mangelnde Belüftung oder zu viel Feuchtigkeit verursacht. Um Schimmelbildung zu vermeiden, solltet ihr die Samen regelmäßig spülen, für eine gute Belüftung sorgen und nicht zu viele Samen auf einmal verwenden.
* Austrocknung: Wenn die Samen austrocknen, keimen sie nicht richtig. Um Austrocknung zu vermeiden, solltet ihr die Samen regelmäßig spülen und gegebenenfalls mit einer Sprühflasche befeuchten.
* Langsames Wachstum: Langsames Wachstum kann verschiedene Ursachen haben, z.B. zu wenig Licht, zu wenig Wasser oder zu niedrige Temperaturen. Um das Wachstum zu fördern, solltet ihr das Weizengras an einen hellen Ort stellen, regelmäßig spülen und für eine angenehme Temperatur sorgen.
Fazit
Ich hoffe, diese Anleitung hat euch geholfen, Weizengras zu Hause anzubauen. Es ist wirklich einfacher als man denkt und es lohnt sich! Probiert es aus und
Conclusion
So, there you have it! Growing your own wheatgrass with just water is not only incredibly simple, but it’s also a rewarding experience that brings a touch of vibrant green into your home and a boost of fresh nutrients into your diet. Forget expensive store-bought wheatgrass shots – with minimal effort and just a few readily available supplies, you can cultivate your own thriving patch of this superfood.
Why is this DIY trick a must-try? Because it empowers you to take control of your health and well-being. You know exactly what’s going into your wheatgrass – no hidden pesticides or questionable growing practices. Plus, the satisfaction of nurturing something from seed to harvest is truly unparalleled. It’s a fantastic project for individuals, families, and even classrooms, teaching valuable lessons about plant life and healthy eating.
Beyond the basic method, there’s plenty of room for experimentation. Try using different types of containers – shallow trays, repurposed plastic containers, or even terracotta pots. You can also explore different varieties of wheatgrass seeds to see which one you prefer. Some people like to add a thin layer of soil or compost to their growing medium for added nutrients, although it’s not strictly necessary when growing with just water. Consider experimenting with the amount of light your wheatgrass receives. While indirect sunlight is ideal, you might find that your wheatgrass thrives in slightly brighter or dimmer conditions depending on your environment.
Don’t be afraid to get creative! You can even use your homegrown wheatgrass to create unique and healthy recipes. Add it to smoothies, juices, or even salads for a nutritional boost. You can also dehydrate it and grind it into a powder for longer-term storage and use.
We wholeheartedly encourage you to give this DIY wheatgrass growing method a try. It’s an affordable, sustainable, and incredibly rewarding way to incorporate more greens into your life. Once you’ve experienced the joy of harvesting your own fresh wheatgrass, you’ll never go back to buying it from the store.
And most importantly, we want to hear about your experience! Share your photos, tips, and tricks in the comments below. Let us know what worked for you, what challenges you faced, and any variations you tried. Together, we can create a community of wheatgrass enthusiasts and inspire others to embrace the power of homegrown goodness. So, grab some wheatgrass seeds, some water, and get growing! You’ll be amazed at how easy it is to cultivate your own little patch of green goodness. This simple method of growing wheatgrass with water is a game changer.
Frequently Asked Questions (FAQ)
What kind of wheatgrass seeds should I use?
The most common type of wheatgrass seed is hard red winter wheat. It’s readily available online and at most health food stores. Look for organic, untreated seeds to ensure you’re getting the purest and healthiest product. Avoid seeds that are labeled for animal feed, as they may not be suitable for human consumption. Spelt and kamut are also types of wheat that can be grown as wheatgrass. Experiment to see which you prefer.
How much wheatgrass seed should I use?
A good rule of thumb is to use about 1/4 to 1/2 cup of wheatgrass seeds per 10×10 inch tray. You want to create a dense layer of seeds, but not so dense that they’re overcrowded and can’t sprout properly. Adjust the amount of seed depending on the size of your container.
How long does it take for wheatgrass to grow?
Typically, wheatgrass takes about 7-10 days to grow to a harvestable height. The first few days are spent soaking and sprouting the seeds. After that, the wheatgrass will grow rapidly, reaching a height of 4-7 inches within a week. The exact time will depend on factors such as temperature, humidity, and light.
How often should I water the wheatgrass?
Keep the wheatgrass seeds consistently moist, but not waterlogged. During the soaking and sprouting phase, you’ll need to rinse the seeds with fresh water 2-3 times per day. Once the seeds have sprouted and are growing in a tray, water them once or twice a day, depending on the humidity and temperature. The goal is to keep the growing medium moist, but not soggy. Overwatering can lead to mold growth.
What kind of light does wheatgrass need?
Wheatgrass thrives in indirect sunlight. Avoid placing it in direct sunlight, as this can scorch the leaves. A bright, sunny windowsill is ideal, but you can also grow wheatgrass under fluorescent lights. If you’re growing wheatgrass indoors, you may need to supplement with artificial light, especially during the winter months.
How do I harvest wheatgrass?
Harvest wheatgrass when it’s about 4-7 inches tall. Use scissors or a sharp knife to cut the grass just above the roots. It’s best to harvest wheatgrass in the morning, before the sun gets too hot. You can harvest the wheatgrass multiple times from the same tray, but the subsequent harvests will be less vigorous.
How do I store wheatgrass?
Freshly harvested wheatgrass is best used immediately. However, you can store it in the refrigerator for up to a week. Wrap the wheatgrass in a damp paper towel and place it in a plastic bag. You can also freeze wheatgrass for longer-term storage. To freeze wheatgrass, chop it into small pieces and place it in freezer bags.
What if mold grows on my wheatgrass?
Mold growth is a common problem when growing wheatgrass. To prevent mold, make sure to rinse the seeds thoroughly and provide good air circulation. If you see mold, remove the affected areas immediately. You can also try spraying the wheatgrass with a diluted solution of hydrogen peroxide. If the mold is widespread, it’s best to discard the entire tray and start over.
Can I use tap water to grow wheatgrass?
It’s best to use filtered or purified water to grow wheatgrass. Tap water can contain chlorine and other chemicals that can inhibit growth. If you must use tap water, let it sit out for 24 hours to allow the chlorine to evaporate.
Is wheatgrass safe for everyone to consume?
While wheatgrass is generally safe for most people, some individuals may experience side effects such as nausea, diarrhea, or headaches. These side effects are usually mild and temporary. If you have any concerns, consult with your doctor before consuming wheatgrass. People with wheat allergies or celiac disease should avoid wheatgrass.
Can I compost the leftover roots and seeds after harvesting?
Yes, absolutely! The leftover roots and unsprouted seeds make excellent additions to your compost pile. They are rich in nutrients and will help to enrich your compost. This makes growing wheatgrass with water an even more sustainable and eco-friendly activity.
What are the benefits of drinking wheatgrass juice?
Wheatgrass is packed with vitamins, minerals, and antioxidants. It’s a good source of chlorophyll, which is believed to have detoxifying and anti-inflammatory properties. Some people believe that wheatgrass can boost energy levels, improve digestion, and strengthen the immune system. While more research is needed to confirm these claims, many people find that drinking wheatgrass juice is a beneficial addition to their diet.

Leave a Comment