
Grow Yardlong Beans, and prepare to be amazed! Imagine harvesting beans that are literally a yard long – it’s not just a gardening feat, it’s a conversation starter! For centuries, these impressive legumes, also known as asparagus beans or Chinese long beans, have been a staple in Asian cuisine, bringing a unique texture and subtly sweet flavor to dishes. But you don’t have to travel to Asia to enjoy them; you can easily cultivate these fascinating plants right in your own backyard.
I know what you’re thinking: “Yardlong beans? That sounds complicated!” But trust me, it’s not. This DIY guide is packed with simple, effective tricks and hacks to help you grow yardlong beans successfully, even if you’re a beginner gardener. We’ll cover everything from choosing the right seeds and preparing your soil to providing the necessary support and warding off pests.
Why bother with yardlong beans? Well, besides their impressive length and delicious taste, they’re incredibly productive, offering a bountiful harvest from a relatively small space. Plus, growing your own food is incredibly rewarding, connecting you to nature and providing fresh, healthy produce for your family. So, let’s ditch the store-bought veggies and embark on this exciting gardening adventure together! Get ready to impress your friends and family with your homegrown, yard-long masterpieces!
Growing Yardlong Beans: A DIY Guide to a Bountiful Harvest
Okay, so you want to grow yardlong beans? Awesome! These guys are super fun, incredibly productive, and a total conversation starter. I’ve been growing them for a few years now, and I’m excited to share my tips and tricks for a successful harvest. Get ready for some seriously long beans!
What You’ll Need:
Before we dive in, let’s gather everything you’ll need. Trust me, having everything ready beforehand makes the whole process much smoother.
* Yardlong Bean Seeds: Obviously! Choose a variety that suits your climate. ‘Red Noodle’ and ‘Chinese Red Noodle’ are popular choices, but there are others.
* Well-Draining Soil: Yardlong beans aren’t fans of soggy feet. Amend your soil with compost or other organic matter to improve drainage.
* Trellis or Support Structure: These beans are climbers! They need something to grab onto. A trellis, fence, or even a sturdy teepee will work. Aim for at least 6-8 feet tall.
* Gardening Gloves: Protect those hands!
* Hand Trowel or Shovel: For planting.
* Watering Can or Hose: To keep your beans hydrated.
* Fertilizer (Optional): A balanced fertilizer or compost tea can give your beans a boost.
* Mulch (Optional): Helps retain moisture and suppress weeds.
* Patience: Growing anything takes time and a little bit of love!
Getting Started: Planting Your Yardlong Beans
This is where the magic begins! Let’s get those seeds in the ground.
1. Choose the Right Time: Yardlong beans are warm-weather lovers. Wait until the danger of frost has passed and the soil has warmed up to at least 65°F (18°C). I usually plant mine a couple of weeks after my last expected frost.
2. Prepare the Soil: If you haven’t already, amend your soil with compost or other organic matter. This will improve drainage and provide essential nutrients. Loosen the soil to a depth of about 6-8 inches.
3. Soak the Seeds (Optional): Soaking the seeds in water for 12-24 hours before planting can help speed up germination. I usually do this, but it’s not strictly necessary.
4. Plant the Seeds: Sow the seeds directly into the ground, about 1 inch deep and 4-6 inches apart. If you’re planting in rows, space the rows about 2-3 feet apart.
5. Water Gently: Water the soil gently after planting, making sure not to wash away the seeds.
6. Mark the Spot: It’s easy to forget where you planted things! Use plant markers to label your rows or individual plants.
Building Your Trellis: Giving Your Beans Something to Climb
Yardlong beans are vigorous climbers, so a sturdy trellis is essential. Here’s how I build mine:
1. Choose Your Location: Select a sunny spot in your garden for your trellis. Make sure it’s easily accessible for harvesting.
2. Gather Your Materials: You can use a variety of materials for your trellis, such as bamboo poles, wooden stakes, metal fencing, or even sturdy branches. I often use a combination of bamboo and twine.
3. Construct the Trellis: There are many different ways to build a trellis. Here are a few ideas:
* Teepee Trellis: Drive three or four poles into the ground, forming a teepee shape. Tie the tops of the poles together with twine.
* A-Frame Trellis: Drive two poles into the ground at an angle, leaning towards each other. Connect the tops of the poles with a horizontal crossbar.
* Fence Trellis: Use an existing fence or build a simple fence using wooden stakes and wire mesh.
4. Ensure Stability: Make sure your trellis is sturdy enough to support the weight of the growing beans. You may need to reinforce it with additional stakes or supports.
5. Add Climbing Aids: If your trellis doesn’t have enough natural climbing surfaces, add some twine or wire to help the beans grab on.
Caring for Your Yardlong Beans: Keeping Them Happy and Healthy
Now that your beans are planted and your trellis is built, it’s time to focus on care. Here’s what you need to do to keep your yardlong beans thriving:
1. Water Regularly: Yardlong beans need consistent moisture, especially during hot, dry weather. Water deeply whenever the top inch of soil feels dry. Avoid overwatering, which can lead to root rot.
2. Fertilize (Optional): If your soil is poor, you can fertilize your beans every few weeks with a balanced fertilizer or compost tea. Be careful not to over-fertilize, as this can lead to excessive foliage growth and fewer beans.
3. Weed Regularly: Keep the area around your beans free of weeds. Weeds compete with your beans for water and nutrients.
4. Mulch (Optional): Apply a layer of mulch around your beans to help retain moisture, suppress weeds, and regulate soil temperature.
5. Train the Vines: As your beans grow, gently guide the vines up the trellis. They may need a little help getting started.
6. Watch for Pests and Diseases: Keep an eye out for common bean pests, such as aphids, bean beetles, and spider mites. Treat infestations promptly with insecticidal soap or other appropriate methods. Also, watch for diseases like powdery mildew and bean rust. Ensure good air circulation to prevent fungal diseases.
Harvesting Your Yardlong Beans: The Moment You’ve Been Waiting For!
This is the best part! Harvesting your own yardlong beans is incredibly rewarding.
1. Know When to Harvest: Yardlong beans are typically ready to harvest about 60-80 days after planting. The beans should be long and slender, but still tender. They should snap easily when bent. Don’t let them get too thick or tough.
2. Harvest Regularly: Harvest your beans regularly to encourage continued production. The more you pick, the more they’ll grow!
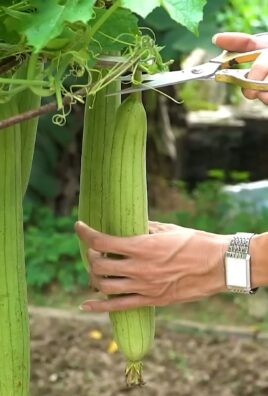
3. Use Scissors or Pruning Shears: Use scissors or pruning shears to cut the beans from the vine. This will prevent you from damaging the plant.
4. Handle with Care: Yardlong beans are delicate, so handle them with care.
5. Enjoy Your Harvest: Yardlong beans can be eaten raw, steamed, stir-fried, or added to soups and stews. They have a slightly sweet and nutty flavor.
Troubleshooting: Common Problems and Solutions
Even with the best care, you might encounter some problems along the way. Here are a few common issues and how to address them:
* Poor Germination: If your seeds aren’t germinating, make sure the soil is warm enough and that you’re not overwatering. You can also try starting the seeds indoors in seed trays.
* Yellowing Leaves: Yellowing leaves can be a sign of nutrient deficiency or overwatering. Check the soil moisture and consider fertilizing with a balanced fertilizer.
* Pest Infestations: If you notice pests on your beans, treat them promptly with insecticidal soap or other appropriate methods.
* Disease Problems: Ensure good air circulation to prevent fungal diseases. If you notice signs of disease, remove affected leaves and treat with a fungicide if necessary.
* Lack of Bean Production: If your beans aren’t producing, it could be due to a lack of pollination, poor soil, or too much shade. Make sure your beans are getting enough sunlight and that the soil is fertile. You can also try hand-pollinating the flowers.
Extra Tips for a Supercharged Harvest:
Here are a few extra tips I’ve learned over the years that can really boost your yardlong bean harvest:
* Succession Planting: Plant a new batch of seeds every few weeks to extend your harvest season.
* Companion Planting: Plant yardlong beans with beneficial companion plants, such as basil, marigolds, and rosemary. These plants can help deter pests and attract pollinators.
* Water in the Morning: Water your beans in the morning to allow the foliage to dry before nightfall. This will help prevent fungal diseases.
* Use a Soaker Hose: A soaker hose is a great way to water your beans deeply and efficiently.
* Save Your Seeds: Save seeds from your best-performing plants to grow next year.
Growing yardlong beans is a fun and rewarding experience. With a little bit of care and attention, you can enjoy a bountiful harvest of these delicious and unique beans. Happy gardening!
Conclusion
So, there you have it! Growing your own yardlong beans isn’t just about adding a unique and impressive vegetable to your garden; it’s about embracing a rewarding and sustainable practice that connects you to your food source. The satisfaction of harvesting those incredibly long, tender beans after nurturing them from seed is truly unparalleled.
This DIY approach to growing yardlong beans offers a multitude of benefits. You control the quality of the soil, ensuring it’s free from harmful chemicals and rich in the nutrients your beans need to thrive. You also reduce your carbon footprint by eliminating the transportation involved in purchasing commercially grown produce. Plus, let’s be honest, the sheer novelty of showing off your homegrown, extra-long beans is a conversation starter in itself!
But the beauty of gardening lies in its adaptability. Feel free to experiment with different varieties of yardlong beans. Some are known for their vibrant colors, ranging from deep green to reddish-purple, adding visual appeal to your garden and your plate. Consider companion planting to further enhance your yield and protect your beans from pests. Marigolds, for example, are excellent at deterring nematodes, while basil can repel aphids.
If you’re short on space, don’t let that deter you. Yardlong beans are perfectly suited for container gardening. Just ensure you choose a large pot (at least 12 inches in diameter) and provide a sturdy trellis or support structure for the vines to climb. You can even grow them vertically on a balcony or patio, maximizing your limited space.
For those living in cooler climates, starting your seeds indoors a few weeks before the last expected frost can give your yardlong beans a head start. This will allow them to establish strong roots before being transplanted outdoors, increasing their chances of success. Remember to harden them off gradually by exposing them to outdoor conditions for increasing periods each day before planting them in their final location.
And speaking of location, remember that yardlong beans are sun-loving plants. Choose a spot in your garden that receives at least six hours of direct sunlight each day. This will ensure optimal growth and abundant bean production.
Don’t be afraid to get creative with your culinary creations once you’ve harvested your bounty. Yardlong beans are incredibly versatile and can be used in a wide range of dishes. Stir-fries, salads, soups, and stews are all excellent options. You can even pickle them for a tangy and flavorful treat.
Ultimately, the key to successful yardlong bean cultivation lies in consistent care and attention. Regularly water your plants, especially during dry spells, and provide them with adequate support. Keep an eye out for pests and diseases, and take prompt action to address any issues that arise.
So, what are you waiting for? Grab some seeds, prepare your soil, and embark on your own yardlong bean growing adventure. We’re confident that you’ll be amazed by the results. And most importantly, don’t forget to share your experiences with us! We’d love to hear about your successes, your challenges, and your favorite ways to enjoy your homegrown yardlong beans. Share your photos and stories on social media using #YardlongBeanDIY and let’s inspire others to discover the joys of growing their own food. This **yardlong bean** growing experience is one you won’t regret!
FAQ
What are yardlong beans, and why should I grow them?
Yardlong beans, also known as asparagus beans or Chinese long beans, are a type of legume characterized by their exceptionally long pods, often reaching lengths of up to three feet. They offer a unique and delicious flavor, similar to green beans but with a slightly more intense and nutty taste. Growing them yourself allows you to enjoy fresh, organic produce, control the growing conditions, and experience the satisfaction of harvesting your own food. Plus, their impressive length makes them a fun and interesting addition to any garden.
How much sun do yardlong beans need?
Yardlong beans thrive in full sun, requiring at least six hours of direct sunlight per day. Insufficient sunlight can lead to stunted growth, reduced bean production, and increased susceptibility to pests and diseases. Choose a location in your garden that receives ample sunlight throughout the day. If you’re growing them in containers, ensure you place them in a sunny spot.
What type of soil is best for growing yardlong beans?
Yardlong beans prefer well-draining soil that is rich in organic matter. Amend your soil with compost or well-rotted manure before planting to improve its fertility and drainage. A slightly acidic to neutral soil pH (around 6.0 to 7.0) is ideal. Avoid heavy clay soils, as they can become waterlogged and hinder root development.
How often should I water my yardlong beans?
Water your yardlong beans regularly, especially during dry spells. Aim to keep the soil consistently moist but not waterlogged. Water deeply at the base of the plants, avoiding wetting the foliage, which can increase the risk of fungal diseases. Mulching around the plants can help retain moisture and suppress weed growth.
Do yardlong beans need a trellis or support structure?
Yes, yardlong beans are climbing plants and require a trellis or other support structure to grow vertically. This not only provides support for the heavy vines but also improves air circulation and reduces the risk of diseases. You can use a variety of materials for your trellis, such as bamboo poles, wooden stakes, or metal fencing. Ensure the trellis is sturdy enough to support the weight of the mature plants and their abundant bean production.
When is the best time to plant yardlong beans?
Yardlong beans are warm-season crops and should be planted after the last expected frost. The soil temperature should be at least 65°F (18°C) for optimal germination. In cooler climates, you can start your seeds indoors a few weeks before the last frost and transplant them outdoors once the weather warms up.
How long does it take for yardlong beans to mature?
Yardlong beans typically take 60 to 80 days to mature after planting. You can start harvesting the beans when they reach their desired length, usually around 18 to 24 inches. Harvest regularly to encourage continued production.
What are some common pests and diseases that affect yardlong beans?
Common pests that can affect yardlong beans include aphids, bean beetles, and spider mites. Diseases include fungal infections like powdery mildew and rust. Regularly inspect your plants for signs of pests or diseases and take appropriate action, such as using insecticidal soap or fungicide. Companion planting with beneficial herbs and flowers can also help deter pests and diseases.
Can I grow yardlong beans in containers?
Yes, yardlong beans can be successfully grown in containers. Choose a large pot (at least 12 inches in diameter) with good drainage. Use a well-draining potting mix and provide a sturdy trellis or support structure for the vines to climb. Water regularly and fertilize as needed.
How do I harvest yardlong beans?
Harvest yardlong beans when they are young and tender, typically around 18 to 24 inches long. Use scissors or pruning shears to cut the beans from the vine, leaving a short stem attached. Harvest regularly to encourage continued production. Overripe beans can become tough and stringy.
How do I store yardlong beans?
Freshly harvested yardlong beans can be stored in the refrigerator for up to a week. Place them in a plastic bag or container to prevent them from drying out. You can also freeze yardlong beans for longer storage. Blanch them in boiling water for a few minutes, then cool them in ice water before freezing.
Are there different varieties of yardlong beans?
Yes, there are several varieties of yardlong beans available, each with its own unique characteristics. Some varieties have green pods, while others have reddish-purple pods. Some are more heat-tolerant than others. Experiment with different varieties to find the ones that grow best in your climate and suit your taste preferences.
What are some ways to cook yardlong beans?
Yardlong beans are incredibly versatile and can be used in a wide range of dishes. They are delicious stir-fried, steamed, boiled, or grilled. They can also be added to soups, stews, and salads. Their slightly nutty flavor pairs well with a variety of seasonings and sauces.
Can I save seeds from my yardlong beans?
Yes, you can save seeds from your yardlong beans for future planting. Allow some of the beans to mature fully on the vine until they are dry and brown. Remove the seeds from the pods and store them in a cool, dry place. Be aware that saved seeds may not always produce plants that are identical to the parent plant, especially if the plants were cross-pollinated with other varieties.
Leave a Comment