
Grow Yardlong Beans DIY: Unleash Your Inner Gardener!
Have you ever dreamed of harvesting beans so long they practically touch the ground? Well, dream no more! This DIY guide is your ticket to cultivating your very own bountiful crop of yardlong beans. Forget those pricey grocery store beans – we’re about to embark on a fun and rewarding journey to grow these fascinating legumes right in your backyard.
Yardlong beans, also known as asparagus beans or Chinese long beans, aren’t just a novelty; they’re a delicious and nutritious addition to any meal. Originating in Southeast Asia, these beans have been a staple in Asian cuisine for centuries, gracing stir-fries, salads, and countless other dishes. They’re not only tasty but also packed with vitamins and minerals, making them a healthy choice for you and your family.
But why should you bother with a DIY approach? Because growing your own yardlong beans is incredibly satisfying! Plus, you’ll have access to fresher, more flavorful beans than you can typically find in stores. And let’s be honest, there’s something truly special about nurturing a plant from seed to harvest. In this article, I’ll share my favorite tips and tricks to help you grow yardlong beans successfully, even if you’re a beginner gardener. Get ready to roll up your sleeves and discover the joy of homegrown goodness!
DIY Guide: Growing Yardlong Beans Like a Pro!
Hey there, fellow gardening enthusiasts! Today, I’m super excited to share my secrets for growing those ridiculously long and delicious yardlong beans. Trust me, it’s easier than you think, and the bragging rights are totally worth it! Get ready to impress your neighbors with your bean-growing prowess.
Choosing the Right Variety and Location
Before we get our hands dirty, let’s talk about picking the perfect yardlong bean variety and finding the ideal spot in your garden.
* Variety Selection: There are several yardlong bean varieties available, each with slightly different characteristics. Some popular choices include ‘Red Noodle,’ ‘Chinese Red Noodle,’ and ‘Orient Wonder.’ I personally love ‘Red Noodle’ for its vibrant color and excellent flavor. Consider your local climate and growing season when making your selection.
* Sunlight is Key: Yardlong beans are sun-worshippers! They need at least 6-8 hours of direct sunlight each day to thrive. Choose a location in your garden that gets plenty of sunshine throughout the day.
* Soil Matters: These beans prefer well-draining soil that is rich in organic matter. Amend your soil with compost or well-rotted manure before planting to improve its fertility and drainage. A slightly acidic to neutral pH (around 6.0-7.0) is ideal.
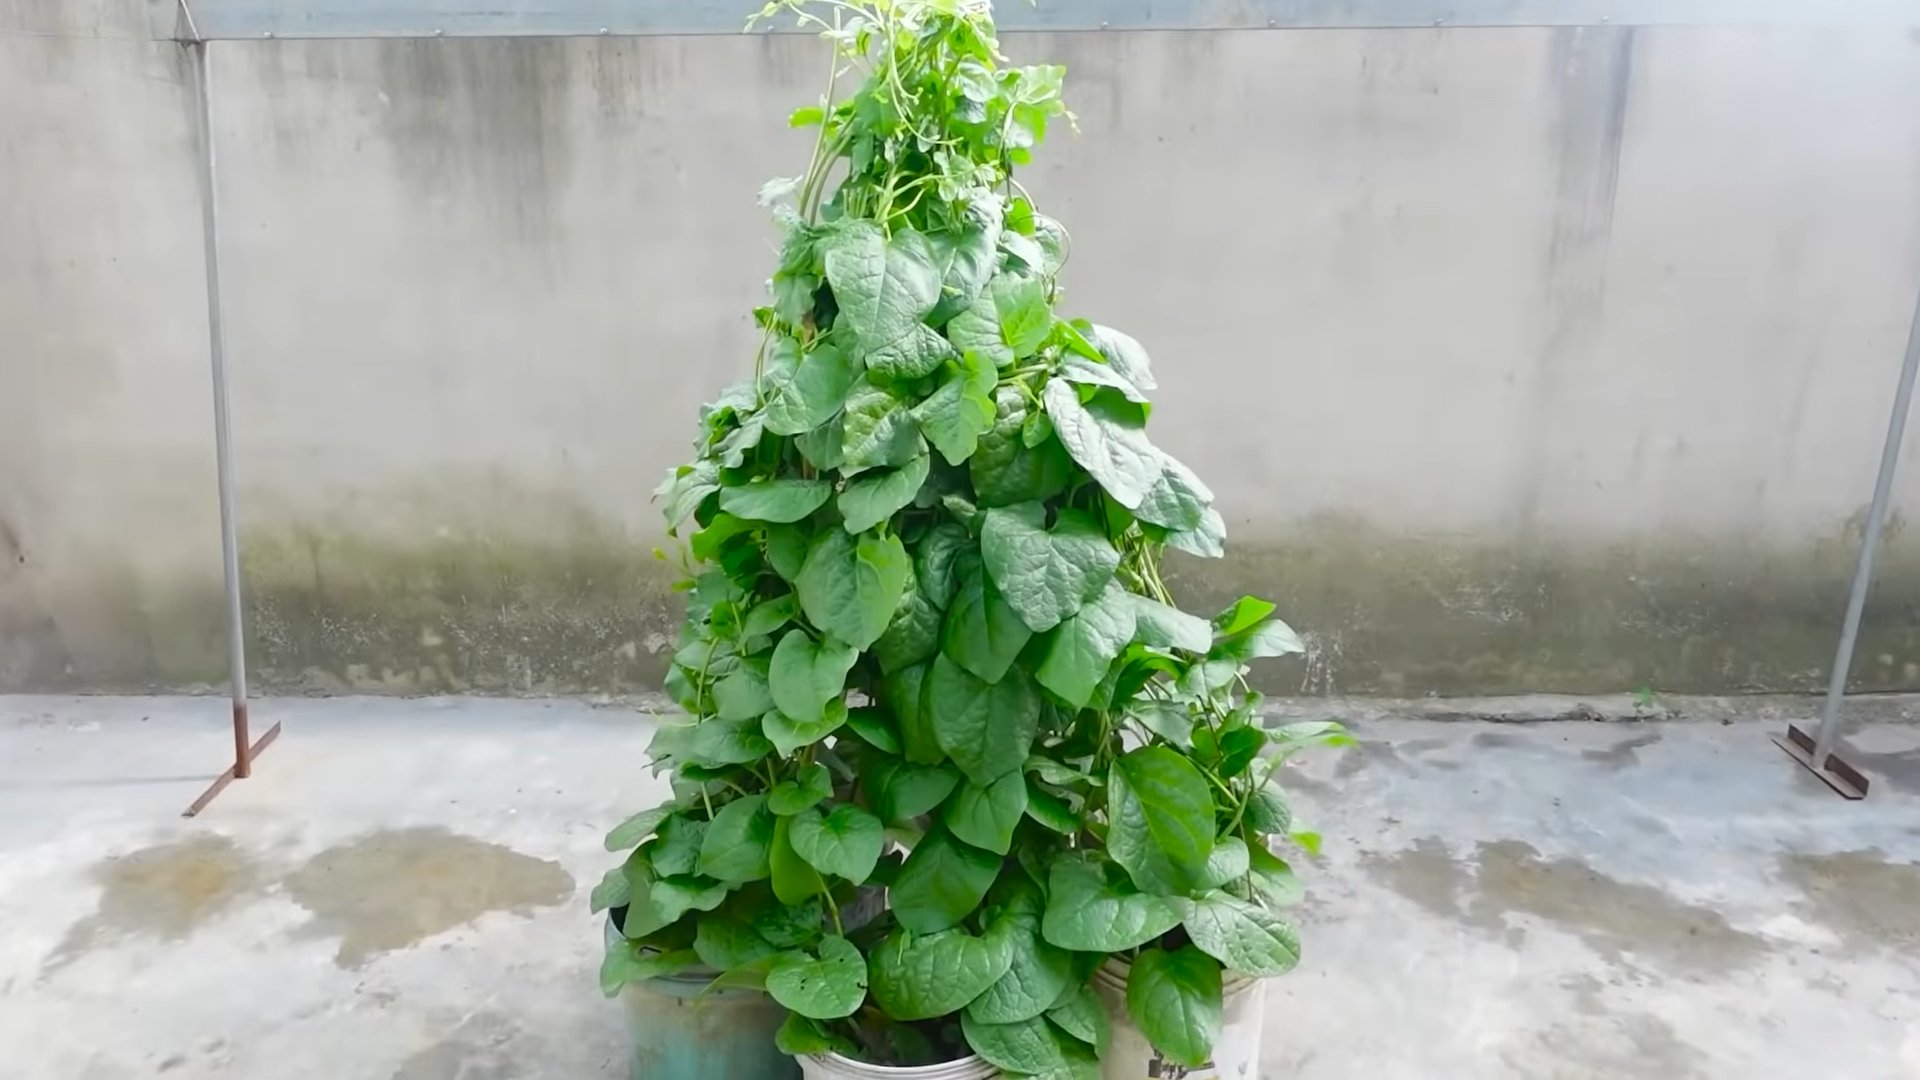
* Support System: Yardlong beans are climbers, so you’ll need to provide them with a sturdy trellis, fence, or other support structure. They can grow quite tall, so make sure your support is at least 6-8 feet high. I’ve used everything from bamboo poles to repurposed metal fencing with great success.
Step-by-Step Planting Guide
Alright, let’s get down to the nitty-gritty of planting those yardlong beans!
1. Prepare the Soil: Start by loosening the soil in your chosen planting area. Remove any weeds, rocks, or debris. Incorporate compost or well-rotted manure into the soil to improve its fertility and drainage. I usually dig down about a foot and mix in a generous amount of compost.
2. Sow the Seeds: You can either direct sow the seeds in the garden or start them indoors. I prefer direct sowing because it’s less work and the plants tend to be stronger. Sow the seeds about 1 inch deep and 2-3 inches apart. If you’re planting in rows, space the rows about 2-3 feet apart.
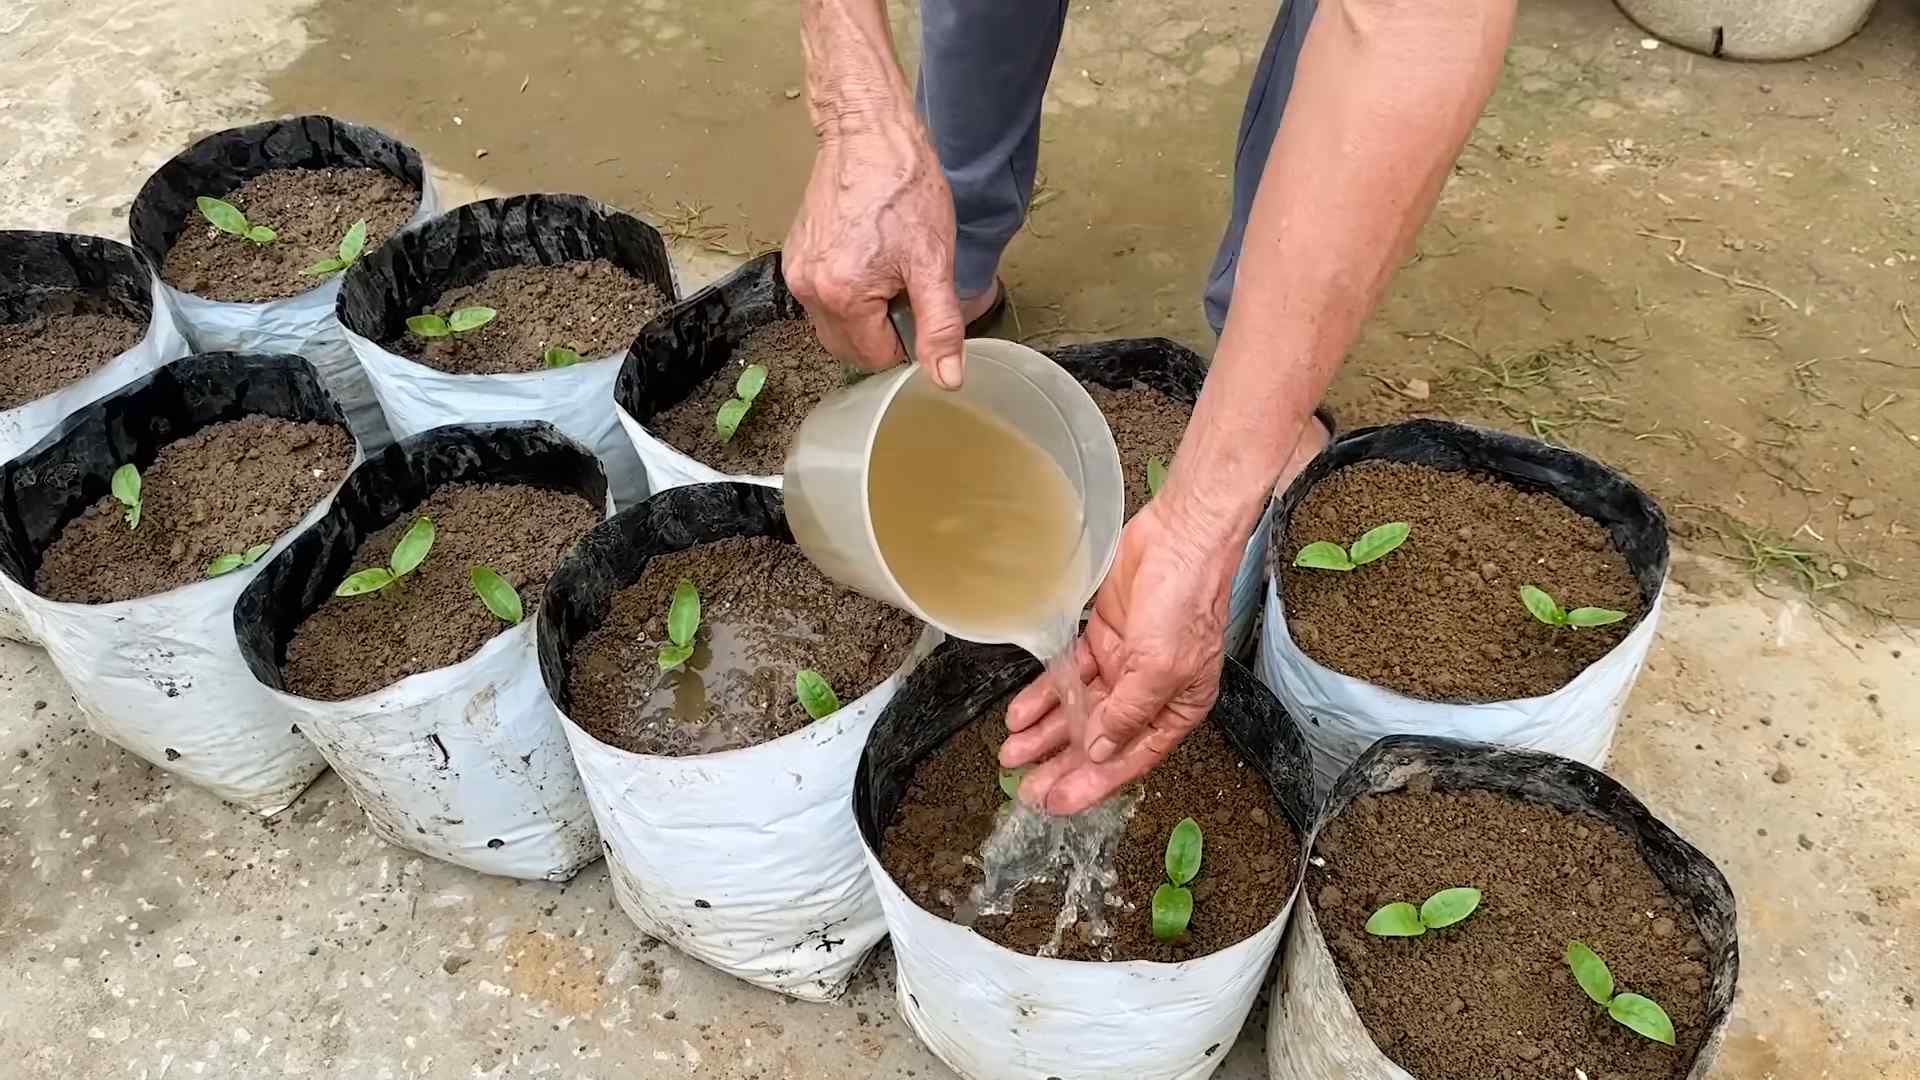
3. Water Gently: After planting, water the seeds gently to moisten the soil. Avoid overwatering, as this can cause the seeds to rot. I like to use a watering can with a gentle shower setting to avoid disturbing the seeds.
4. Provide Support: Once the seedlings emerge and start to climb, provide them with a trellis or other support structure. Gently guide the vines onto the support and tie them loosely with twine if needed. I find that they usually find their way up on their own, but a little encouragement never hurts.
5. Thin Seedlings (If Necessary): If you planted the seeds too close together, thin the seedlings to about 6-8 inches apart once they have a few sets of true leaves. This will give them enough space to grow and prevent overcrowding. I know it’s hard to thin out plants, but it’s essential for healthy growth!
Watering and Fertilizing
Proper watering and fertilization are crucial for healthy yardlong bean growth and abundant harvests.
* Watering: Water your yardlong beans regularly, especially during hot, dry weather. Keep the soil consistently moist, but avoid overwatering. I usually water deeply once or twice a week, depending on the weather. A good rule of thumb is to water when the top inch of soil feels dry to the touch.
* Fertilizing: Yardlong beans are heavy feeders, so they benefit from regular fertilization. Use a balanced fertilizer (e.g., 10-10-10) or a fertilizer specifically formulated for beans. Apply the fertilizer according to the package directions. I also like to side-dress the plants with compost or well-rotted manure every few weeks to provide them with extra nutrients.
* Mulching: Apply a layer of mulch around the base of the plants to help retain moisture, suppress weeds, and regulate soil temperature. I use straw, wood chips, or shredded leaves as mulch.
Pest and Disease Management
Like all plants, yardlong beans can be susceptible to pests and diseases. Here’s how to keep them healthy and pest-free:
* Common Pests: Aphids, bean beetles, and spider mites are common pests that can attack yardlong beans. Inspect your plants regularly for signs of infestation. If you find pests, you can try spraying them with insecticidal soap or neem oil. I prefer to use organic pest control methods whenever possible.
* Disease Prevention: To prevent diseases, make sure your plants have good air circulation and avoid overwatering. Remove any diseased leaves or stems promptly. You can also spray your plants with a fungicide if necessary.
* Companion Planting: Planting certain herbs and flowers near your yardlong beans can help deter pests and attract beneficial insects. Some good companion plants for yardlong beans include basil, marigolds, and nasturtiums. I always plant marigolds around my vegetable garden to keep the pests away.
Harvesting Your Bounty
The moment you’ve been waiting for – harvesting those amazing yardlong beans!
* Harvest Time: Yardlong beans are typically ready to harvest about 60-80 days after planting. The beans should be long and slender, but still tender. They should snap easily when bent.
* Harvesting Technique: Use scissors or pruning shears to cut the beans from the vine. Avoid pulling them off, as this can damage the plant. Harvest the beans regularly to encourage continued production. I usually harvest every few days during peak season.
* Enjoy Your Harvest: Yardlong beans are delicious cooked in stir-fries, soups, and stews. They can also be steamed, grilled, or eaten raw in salads. Store them in the refrigerator for up to a week. I love stir-frying them with garlic and soy sauce – so simple and delicious!
Troubleshooting Common Problems
Even with the best care, you might encounter some problems while growing yardlong beans. Here are some common issues and how to fix them:
* Poor Germination: If your seeds aren’t germinating, make sure the soil is warm enough and that you’re not overwatering. You can also try soaking the seeds in water for 24 hours before planting to improve germination rates.
* Yellowing Leaves: Yellowing leaves can be a sign of nutrient deficiency, overwatering, or disease. Check the soil moisture and nutrient levels. If necessary, fertilize the plants or improve drainage.
* Lack of Flowers or Beans: If your plants are growing well but not producing flowers or beans, it could be due to insufficient sunlight, poor pollination, or excessive nitrogen fertilization. Make sure your plants are getting enough sunlight and avoid over-fertilizing with nitrogen. You can also try hand-pollinating the flowers to improve bean production.
* Pest Infestations: As mentioned earlier, aphids, bean beetles, and spider mites can be a problem. Monitor your plants regularly and take action promptly if you see any signs of infestation.
Extra Tips for Success
Here are a few extra tips to help you grow the best yardlong beans ever:
* Succession Planting: To extend your harvest season, sow new seeds every few weeks. This will ensure a continuous supply of fresh beans throughout the summer.
* Saving Seeds: If you want to save seeds from your yardlong beans for next year, allow a few pods to mature completely on the vine. Once the pods are dry and brown, harvest the seeds and store them in a cool, dry place.
* Experiment with Different Varieties: Don’t be afraid to try different yardlong bean varieties to see which ones grow best in your area and which ones you like the most.
* Enjoy the Process: Gardening should be fun! Don’t get discouraged if you encounter some challenges along the way. Just keep learning and experimenting, and you’ll be rewarded with a bountiful harvest of delicious yardlong beans.
Growing yardlong beans is a rewarding experience that anyone can enjoy. With a little bit of planning and effort, you can have a thriving bean patch that produces an abundance of these unique and delicious vegetables. Happy gardening!
Conclusion
So, there you have it! Growing yardlong beans at home isn’t just a gardening project; it’s an adventure in flavor, a testament to self-sufficiency, and a surprisingly rewarding experience. We’ve walked you through the process, from selecting the right seeds to providing the necessary support for these vigorous climbers. But why should you actually dedicate your time and energy to this endeavor?
The answer lies in the unparalleled freshness and flavor you simply can’t replicate with store-bought beans. Imagine stepping into your backyard, snipping off a handful of vibrant, crisp yardlong beans, and adding them directly to your stir-fry or salad. The difference in taste is remarkable – a sweetness and tenderness that will elevate your culinary creations. Plus, you know exactly where your food is coming from and how it was grown, free from pesticides and long-distance transportation.
Beyond the taste, growing your own yardlong beans is a fantastic way to connect with nature, learn about the growing process, and enjoy the therapeutic benefits of gardening. It’s a project that can involve the whole family, teaching children about where their food comes from and fostering a love for the environment.
But the beauty of this DIY project lies in its adaptability. Feel free to experiment with different varieties of yardlong beans. Some are known for their exceptional flavor, while others boast unique colors or textures. You can also adjust the growing conditions to suit your specific climate and space. If you live in a cooler region, consider starting your seeds indoors to give them a head start. If you have limited space, vertical gardening techniques, such as using trellises or containers, can be incredibly effective.
Consider companion planting to further enhance your yardlong bean growing experience. Planting basil or marigolds nearby can help deter pests and attract beneficial insects. You can also intercrop with other vegetables, such as carrots or radishes, to maximize space utilization.
And don’t forget about the flowers! Yardlong bean plants produce beautiful, delicate blooms that attract pollinators to your garden. These pollinators will not only help your beans thrive but also benefit other plants in your yard.
Growing yardlong beans is more than just a gardening project; it’s a lifestyle choice. It’s about embracing sustainability, connecting with nature, and enjoying the fruits (or rather, the beans) of your labor.
We wholeheartedly encourage you to give this DIY trick a try. It’s easier than you might think, and the rewards are well worth the effort. Once you’ve harvested your first batch of homegrown yardlong beans, we’d love to hear about your experience! Share your photos, tips, and recipes with us in the comments below. Let’s build a community of yardlong bean enthusiasts and inspire others to embark on this rewarding gardening journey. Happy growing!
Frequently Asked Questions (FAQ)
What are yardlong beans, and why should I grow them?
Yardlong beans (Vigna unguiculata subsp. sesquipedalis), also known as asparagus beans or Chinese long beans, are a legume characterized by their exceptionally long pods, often reaching lengths of up to three feet. They offer a unique flavor profile, a delightful crisp texture, and are packed with nutrients like vitamins A and C, fiber, and folate. Growing them yourself ensures you have access to the freshest, most flavorful beans possible, free from pesticides and the environmental impact of long-distance transportation. Plus, they are a beautiful and productive addition to any garden.
When is the best time to plant yardlong beans?
Yardlong beans are warm-season crops and thrive in temperatures between 70°F and 85°F (21°C and 29°C). The ideal time to plant them is after the last frost, when the soil has warmed up to at least 65°F (18°C). In most regions, this is typically in late spring or early summer. If you live in a cooler climate, you can start seeds indoors 4-6 weeks before the last expected frost and transplant them outdoors once the weather warms up.
How much sunlight do yardlong beans need?
Yardlong beans require at least 6-8 hours of direct sunlight per day to thrive. Choose a planting location that receives ample sunlight throughout the day. Insufficient sunlight can lead to stunted growth, reduced yields, and increased susceptibility to pests and diseases.
What kind of soil is best for growing yardlong beans?
Yardlong beans prefer well-drained, fertile soil with a pH between 6.0 and 7.0. Amend the soil with compost or other organic matter to improve drainage, fertility, and water retention. Avoid planting in heavy clay soil, as this can lead to root rot. If your soil is compacted, consider adding sand or perlite to improve drainage.
Do yardlong beans need a trellis or other support?
Yes, yardlong beans are climbing plants and require a trellis, fence, or other support structure to grow properly. The vines can grow quite long, so choose a sturdy support that can handle the weight of the mature plants. A trellis that is 6-8 feet tall is ideal. You can also use bamboo stakes, netting, or even a sturdy fence.
How often should I water yardlong beans?
Water yardlong beans regularly, especially during hot, dry weather. Aim to keep the soil consistently moist but not waterlogged. Water deeply at the base of the plants, avoiding wetting the foliage, which can increase the risk of fungal diseases. Mulching around the plants can help retain moisture and suppress weeds.
What are some common pests and diseases that affect yardlong beans?
Common pests that can affect yardlong beans include aphids, bean beetles, and spider mites. Diseases include powdery mildew, bean rust, and anthracnose. Regularly inspect your plants for signs of pests or diseases and take appropriate action. Organic pest control methods, such as insecticidal soap or neem oil, can be effective for controlling many pests. Ensure good air circulation around the plants to help prevent fungal diseases.
How do I harvest yardlong beans?
Yardlong beans are typically ready to harvest about 60-80 days after planting. Harvest the beans when they are young, tender, and about 12-18 inches long. Use scissors or pruning shears to cut the beans from the vine, leaving a short stem attached. Regular harvesting encourages continued production.
Can I save seeds from my yardlong beans?
Yes, you can save seeds from your yardlong beans for future planting. Allow some of the pods to mature completely on the vine until they are dry and brown. Remove the seeds from the pods and store them in a cool, dry place. Be aware that if you grow multiple varieties of yardlong beans, cross-pollination can occur, so the seeds may not produce plants that are true to type.
What are some ways to cook and eat yardlong beans?
Yardlong beans are incredibly versatile and can be used in a variety of dishes. They are delicious stir-fried, steamed, grilled, or added to soups and stews. They can also be eaten raw in salads, although some people may find them slightly bitter. Popular recipes include stir-fried yardlong beans with garlic and ginger, yardlong bean salad with sesame dressing, and yardlong bean curry. Experiment with different flavors and cooking methods to find your favorite way to enjoy these delicious beans.

Leave a Comment