
Growing baby carrots at home might seem like a task best left to professional farmers, but I’m here to tell you that with a few simple tricks and a little DIY spirit, you can enjoy these sweet, crunchy treats straight from your own backyard! Forget those pre-packaged bags from the grocery store – imagine the satisfaction of harvesting your own perfectly petite carrots.
Carrots, in general, have a rich history, dating back thousands of years. Originally cultivated for their aromatic leaves and seeds, the vibrant orange root we know and love today is a relatively modern development. But the desire to cultivate our own food, to connect with the earth and nurture life, is an ancient and universal human impulse. And that’s where the magic of DIY gardening comes in!
Why should you bother with this particular DIY project? Well, for starters, homegrown baby carrots taste infinitely better than store-bought ones. They’re sweeter, crisper, and bursting with flavor. Plus, you control everything that goes into their growth, ensuring they’re free from harmful pesticides and chemicals. More importantly, growing baby carrots at home is incredibly rewarding. It’s a fun and educational activity for the whole family, and it’s a great way to reduce your carbon footprint and enjoy fresh, healthy produce. So, let’s dive in and discover the secrets to cultivating your own miniature carrot crop!
Growing Baby Carrots at Home: A Beginner’s Guide
Okay, so you want to grow baby carrots at home? Awesome! It’s surprisingly easy and incredibly rewarding. Forget those bland, pre-packaged baby carrots from the store. Homegrown baby carrots are sweeter, crisper, and bursting with flavor. Plus, you get the satisfaction of knowing you grew them yourself! This guide will walk you through everything you need to know, from choosing the right seeds to harvesting your tiny treasures.
Choosing the Right Carrot Variety
Not all carrots are created equal, especially when you’re aiming for those adorable baby-sized ones. Some varieties are naturally smaller and mature quickly, making them perfect for this project.
* ‘Thumbelina’: These are round, almost golf-ball shaped carrots, and they’re super cute and quick to mature.
* ‘Paris Market’: Similar to Thumbelina, these are round and sweet.
* ‘Little Finger’: As the name suggests, these are small and slender, perfect for snacking.
* ‘Short n Sweet’: Another good option for shorter, sweeter carrots.
* ‘Amsterdam Forcing’: A classic choice for early harvests and smaller carrots.
I personally love ‘Thumbelina’ because they’re so unique and fun to grow, but any of these varieties will work great.
Preparing Your Growing Space
Carrots need loose, well-drained soil to thrive. Rocky or compacted soil will result in stunted, misshapen carrots, and nobody wants that!
* Sunlight: Carrots need at least 6 hours of sunlight per day. Choose a sunny spot in your garden or on your balcony.
* Soil: This is crucial! Carrots need loose, sandy soil. Amend heavy clay soil with plenty of compost, sand, and well-rotted manure. Remove any rocks, stones, or debris that could impede root growth.
* Container (if using): Choose a container that’s at least 6-8 inches deep. A wider container is better than a narrow one, as it gives the carrots more room to spread out. Make sure your container has drainage holes!
* pH: Carrots prefer a soil pH between 6.0 and 6.8. You can test your soil pH with a home testing kit or send a sample to your local agricultural extension office.
Step-by-Step Soil Preparation:
1. Clear the Area: Remove any weeds, grass, or other vegetation from the area where you plan to plant your carrots.
2. Loosen the Soil: Use a garden fork or tiller to loosen the soil to a depth of at least 8 inches.
3. Amend the Soil: Mix in plenty of compost, sand, and well-rotted manure. The exact amount will depend on the type of soil you have. For heavy clay soil, you might need to add a significant amount of amendments. A good starting point is to add about 1/3 compost, 1/3 sand, and 1/3 existing soil.
4. Remove Rocks and Debris: Carefully remove any rocks, stones, or other debris that you find in the soil.
5. Rake Smooth: Rake the soil smooth to create a level planting surface.
6. Water Thoroughly: Water the soil thoroughly before planting. This will help to settle the soil and provide moisture for the seeds.
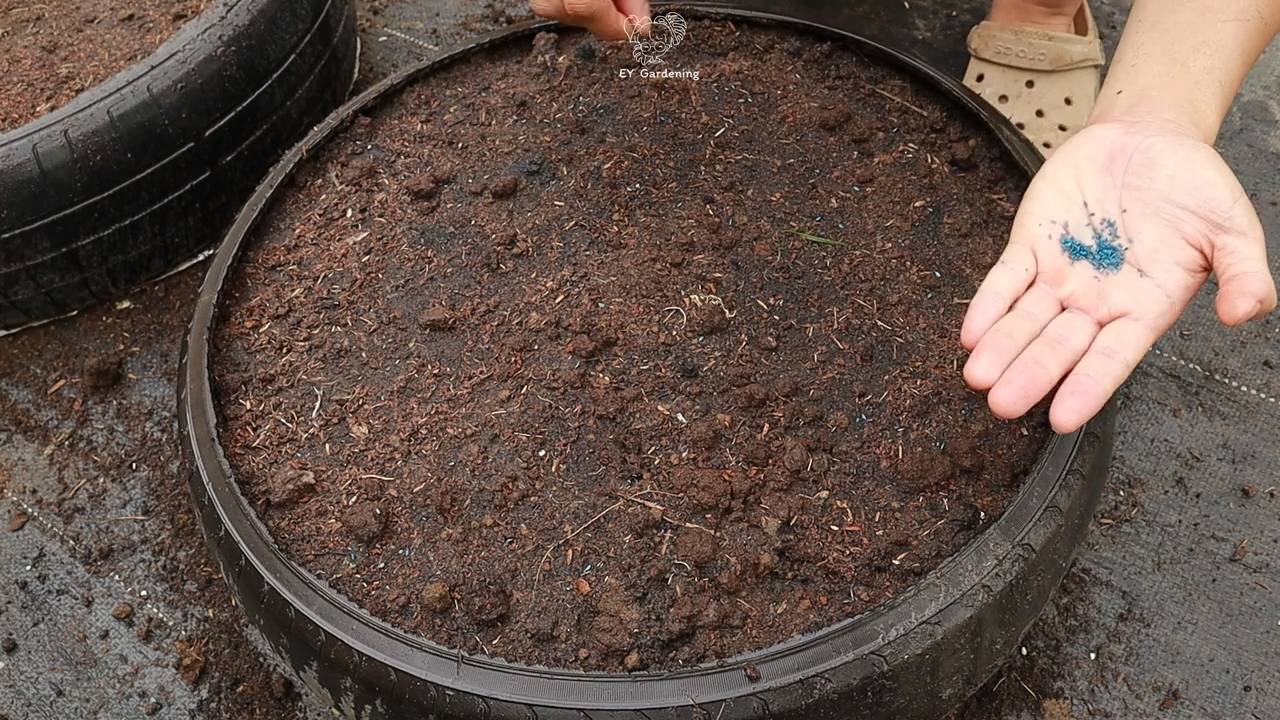
Planting Your Carrot Seeds
Carrot seeds are tiny, so planting them can be a bit tricky. But don’t worry, I’ll walk you through it.
* Timing: Plant carrot seeds in early spring or late summer. Carrots prefer cooler temperatures. In warmer climates, you can plant them in the fall for a winter harvest. Check your local frost dates to determine the best time to plant in your area.
* Spacing: Sow seeds about 1/4 inch deep and 1/2 inch apart. You can use a seed drill or simply sprinkle the seeds along a row.
* Thinning: This is important! Once the seedlings emerge, thin them to about 1-2 inches apart. This will give the carrots enough room to grow. Don’t be afraid to thin them aggressively – it’s better to have fewer, larger carrots than a crowded bunch of small ones.
* Watering: Keep the soil consistently moist, but not waterlogged. Water gently to avoid washing away the seeds.
Detailed Planting Instructions:
1. Create Rows: Use a garden trowel or your finger to create shallow rows in the prepared soil, about 1/4 inch deep and 1/2 inch apart.
2. Sow the Seeds: Carefully sprinkle the carrot seeds along the rows. Try to space them as evenly as possible.
3. Cover the Seeds: Gently cover the seeds with a thin layer of soil.
4. Water Gently: Water the soil gently with a watering can or hose with a gentle spray nozzle. Avoid washing away the seeds.
5. Mark the Rows: Label the rows with the carrot variety and planting date. This will help you keep track of your plantings.
Caring for Your Carrot Plants
Once your carrot seeds have sprouted, it’s time to provide them with the care they need to thrive.
* Watering: Water regularly, especially during dry periods. Carrots need consistent moisture to develop properly.
* Weeding: Keep the area around your carrot plants free of weeds. Weeds compete with carrots for nutrients and water.
* Fertilizing: Carrots don’t need a lot of fertilizer, but a light feeding of a balanced fertilizer can help them grow. Avoid fertilizers that are high in nitrogen, as this can promote leafy growth at the expense of root development.
* Pest Control: Carrots can be susceptible to certain pests, such as carrot rust flies and nematodes. Use row covers to protect your plants from pests. You can also use organic pest control methods, such as neem oil or insecticidal soap.
Tips for Successful Carrot Care:
1. Consistent Watering: Water deeply and regularly, especially during hot, dry weather. Aim for about 1 inch of water per week.
2. Careful Weeding: Weed regularly to prevent weeds from competing with your carrots for nutrients and water. Be careful not to disturb the carrot roots when weeding.
3. Light Fertilizing: Apply a light feeding of a balanced fertilizer every few weeks. Avoid over-fertilizing, as this can lead to leafy growth and poor root development.
4. Monitor for Pests: Check your plants regularly for signs of pests or diseases. Take action promptly to prevent problems from spreading.
5. Mulching: Apply a layer of mulch around your carrot plants to help retain moisture, suppress weeds, and regulate soil temperature.
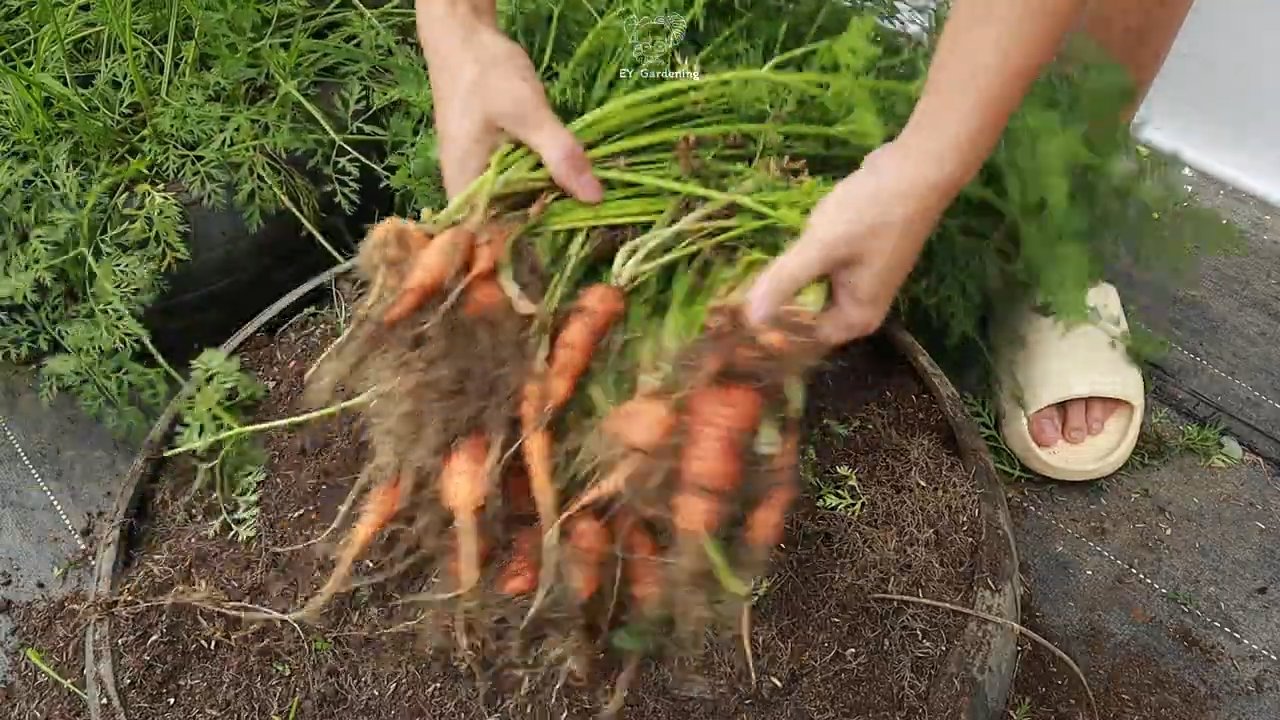
Harvesting Your Baby Carrots
This is the best part! Baby carrots are typically ready to harvest in 50-70 days, depending on the variety.
* When to Harvest: You can start harvesting baby carrots when they’re about 1/2 inch in diameter. Don’t wait too long, or they’ll lose their sweetness and become tough.
* How to Harvest: Gently loosen the soil around the carrots with a garden fork or trowel. Then, carefully pull the carrots out of the ground.
* Storage: Store harvested carrots in the refrigerator in a plastic bag or container. They’ll keep for several weeks.
Harvesting Techniques:
1. Check for Size: Gently brush away the soil around the base of the carrot to check its size. If it’s about 1/2 inch in diameter, it’s ready to harvest.
2. Loosen the Soil: Use a garden fork or trowel to loosen the soil around the carrot. Be careful not to damage the carrot.
3. Pull Gently: Grasp the carrot by the base of the leaves and gently pull it out of the ground. If the carrot is difficult to pull, loosen the soil further.
4. Wash and Store: Wash the harvested carrots thoroughly with water. Store them in the refrigerator in a plastic bag or container.
Troubleshooting Common Problems
Even with the best care, you might encounter some problems when growing baby carrots. Here are a few common issues and how to address them:
* Poor Germination: Carrot seeds can be slow to germinate. Make sure the soil is consistently moist and the temperature is warm enough. You can also try soaking the seeds in water for a few hours before planting.
* Forked or Misshapen Carrots: This is usually caused by rocky or compacted soil. Make sure to prepare the soil properly before planting.
* Carrot Rust Flies: These pests can damage carrot roots. Use row covers to protect your plants.
* Nematodes: These microscopic worms can also damage carrot roots. Rotate your crops to prevent nematode infestations.
Addressing Specific Issues:
1. Poor Germination:
Conclusion
So, there you have it! Growing baby carrots at home is not only achievable but also incredibly rewarding. Forget those pre-packaged, often bland, supermarket versions. Imagine biting into a sweet, crisp, and perfectly sized baby carrot that you nurtured from seed to harvest. The difference in flavor and texture is truly remarkable, and the satisfaction of knowing exactly where your food comes from is unparalleled.
This DIY trick is a must-try for several reasons. First, it’s a fantastic way to introduce children to the joys of gardening and healthy eating. They can participate in every step of the process, from planting the seeds to pulling up the mature carrots. Second, it’s a cost-effective way to enjoy fresh produce, especially if you’re a regular consumer of baby carrots. Third, it allows you to control the growing environment, ensuring that your carrots are free from harmful pesticides and chemicals. Finally, and perhaps most importantly, it’s a fun and engaging project that can bring a touch of nature and freshness to your home.
Don’t be afraid to experiment with different varieties of carrot seeds. Nantes and Chantenay types are particularly well-suited for growing baby carrots. You can also try planting them in succession, sowing a new batch of seeds every few weeks, to ensure a continuous harvest throughout the growing season. Consider adding companion plants like radishes or lettuce to your carrot patch. These fast-growing vegetables can help to deter pests and improve soil conditions. For those with limited space, container gardening is an excellent option. A large pot or raised bed filled with well-draining soil will provide ample room for your baby carrots to thrive.
We’ve covered the basics, but the real magic happens when you get your hands dirty. We wholeheartedly encourage you to give this DIY trick a try. Start small, be patient, and don’t be discouraged if your first attempt isn’t perfect. Gardening is a learning process, and every mistake is an opportunity to improve.
Once you’ve harvested your first batch of homegrown baby carrots, we’d love to hear about your experience. Share your tips, tricks, and photos with us in the comments below. Let’s create a community of passionate gardeners who are dedicated to growing their own delicious and nutritious food. Happy gardening!
Frequently Asked Questions (FAQ)
What kind of soil is best for growing baby carrots?
Baby carrots thrive in loose, well-draining soil that is rich in organic matter. Avoid heavy clay soils, as they can restrict root growth and result in misshapen carrots. Amend your soil with compost or well-rotted manure to improve drainage and fertility. A slightly acidic soil pH of 6.0 to 6.8 is ideal. Before planting, make sure to remove any rocks or debris that could hinder root development.
How often should I water my baby carrots?
Consistent moisture is crucial for growing healthy baby carrots. Water deeply and regularly, especially during dry periods. Aim to keep the soil consistently moist but not waterlogged. Overwatering can lead to root rot, while underwatering can cause the carrots to become stunted and tough. A good rule of thumb is to water when the top inch of soil feels dry to the touch. Consider using a soaker hose or drip irrigation system to deliver water directly to the roots.
How much sunlight do baby carrots need?
Baby carrots require at least six hours of direct sunlight per day to grow properly. Choose a sunny location in your garden or on your patio for your carrot patch. If you live in a hot climate, provide some afternoon shade to prevent the soil from drying out too quickly. Insufficient sunlight can result in spindly plants and poor root development.
When is the best time to plant baby carrots?
The best time to plant baby carrots depends on your climate. In cooler regions, you can plant them in early spring, as soon as the soil is workable. In warmer regions, you can plant them in late summer or early fall for a winter harvest. Avoid planting during the hottest months of the year, as high temperatures can inhibit germination and growth. Check your local planting calendar for specific recommendations based on your region.
How long does it take for baby carrots to mature?
Baby carrots typically take 50 to 70 days to mature, depending on the variety and growing conditions. You can start harvesting them when they reach the desired size, usually around 3 to 4 inches long. To check for ripeness, gently loosen the soil around the base of the carrot and pull one up to inspect its size and color. If it’s ready, you can harvest the rest of the carrots.
What are some common pests and diseases that affect baby carrots?
Some common pests that can affect baby carrots include carrot rust flies, aphids, and nematodes. Diseases such as leaf blight and root rot can also be a problem. To prevent pest and disease problems, practice good garden hygiene, such as removing weeds and debris, and rotate your crops regularly. You can also use organic pest control methods, such as insecticidal soap or neem oil, to control pests. Ensure proper soil drainage to prevent root rot.
Can I grow baby carrots in containers?
Yes, you can definitely grow baby carrots in containers. Choose a large pot or raised bed that is at least 12 inches deep to allow for root development. Fill the container with well-draining potting mix and follow the same planting and care instructions as you would for growing carrots in the ground. Container gardening is a great option for those with limited space or poor soil conditions.
How do I thin baby carrot seedlings?
Thinning is essential for ensuring that your baby carrots have enough space to grow. Once the seedlings emerge, thin them to about 1 to 2 inches apart. Gently pull out the weaker seedlings, being careful not to disturb the roots of the remaining plants. Thinning allows the carrots to develop properly and prevents overcrowding.
How do I store harvested baby carrots?
To store harvested baby carrots, remove the green tops and wash the carrots thoroughly. Pat them dry and store them in a plastic bag or container in the refrigerator. They should last for several weeks. You can also freeze baby carrots for longer storage. Blanch them in boiling water for a few minutes, then transfer them to an ice bath to stop the cooking process. Drain them well and store them in freezer bags.
What are some creative ways to use homegrown baby carrots?
Homegrown baby carrots are incredibly versatile and can be used in a variety of dishes. Enjoy them raw as a healthy snack, dip them in hummus or ranch dressing, or add them to salads. You can also roast them with herbs and spices, steam them as a side dish, or use them in soups and stews. Get creative and experiment with different recipes to showcase the delicious flavor of your homegrown baby carrots.

Leave a Comment