
Grow potatoes easily, even if you think you don’t have a green thumb! Have you ever dreamed of harvesting your own homegrown potatoes, bursting with flavor and freshness, right from your backyard (or even your balcony)? Imagine the satisfaction of serving a meal made with potatoes you nurtured from tiny seed potatoes to plump, delicious spuds. This isn’t just a pipe dream; it’s an achievable reality with a few simple DIY tricks and hacks.
Potatoes have been a staple food for centuries, with a rich history dating back to the Inca civilization in South America. They’ve nourished communities and fueled economies, becoming a symbol of resilience and resourcefulness. Today, the desire to connect with our food sources and embrace sustainable living is stronger than ever. That’s where these DIY potato-growing tricks come in.
Let’s face it, buying potatoes from the store can be expensive, and you never truly know where they came from or what they’ve been treated with. But with these easy-to-follow methods, you can grow potatoes easily and organically, ensuring a healthy and delicious harvest for you and your family. I’m going to share some of my favorite tips and tricks that will help you maximize your yield, even in small spaces. Get ready to roll up your sleeves and discover the joy of growing your own potatoes!
Grow Potatoes in a Bag: A Beginner’s Guide
Hey there, fellow gardening enthusiasts! Ever dreamed of harvesting your own homegrown potatoes but thought you didn’t have the space? Well, I’m here to tell you that you absolutely can, even if you only have a balcony or a small patio! This method, growing potatoes in a bag, is super easy, incredibly rewarding, and perfect for beginners. Let’s get started!
What You’ll Need
Before we dive in, let’s gather our supplies. This is a pretty low-cost project, which is always a win in my book!
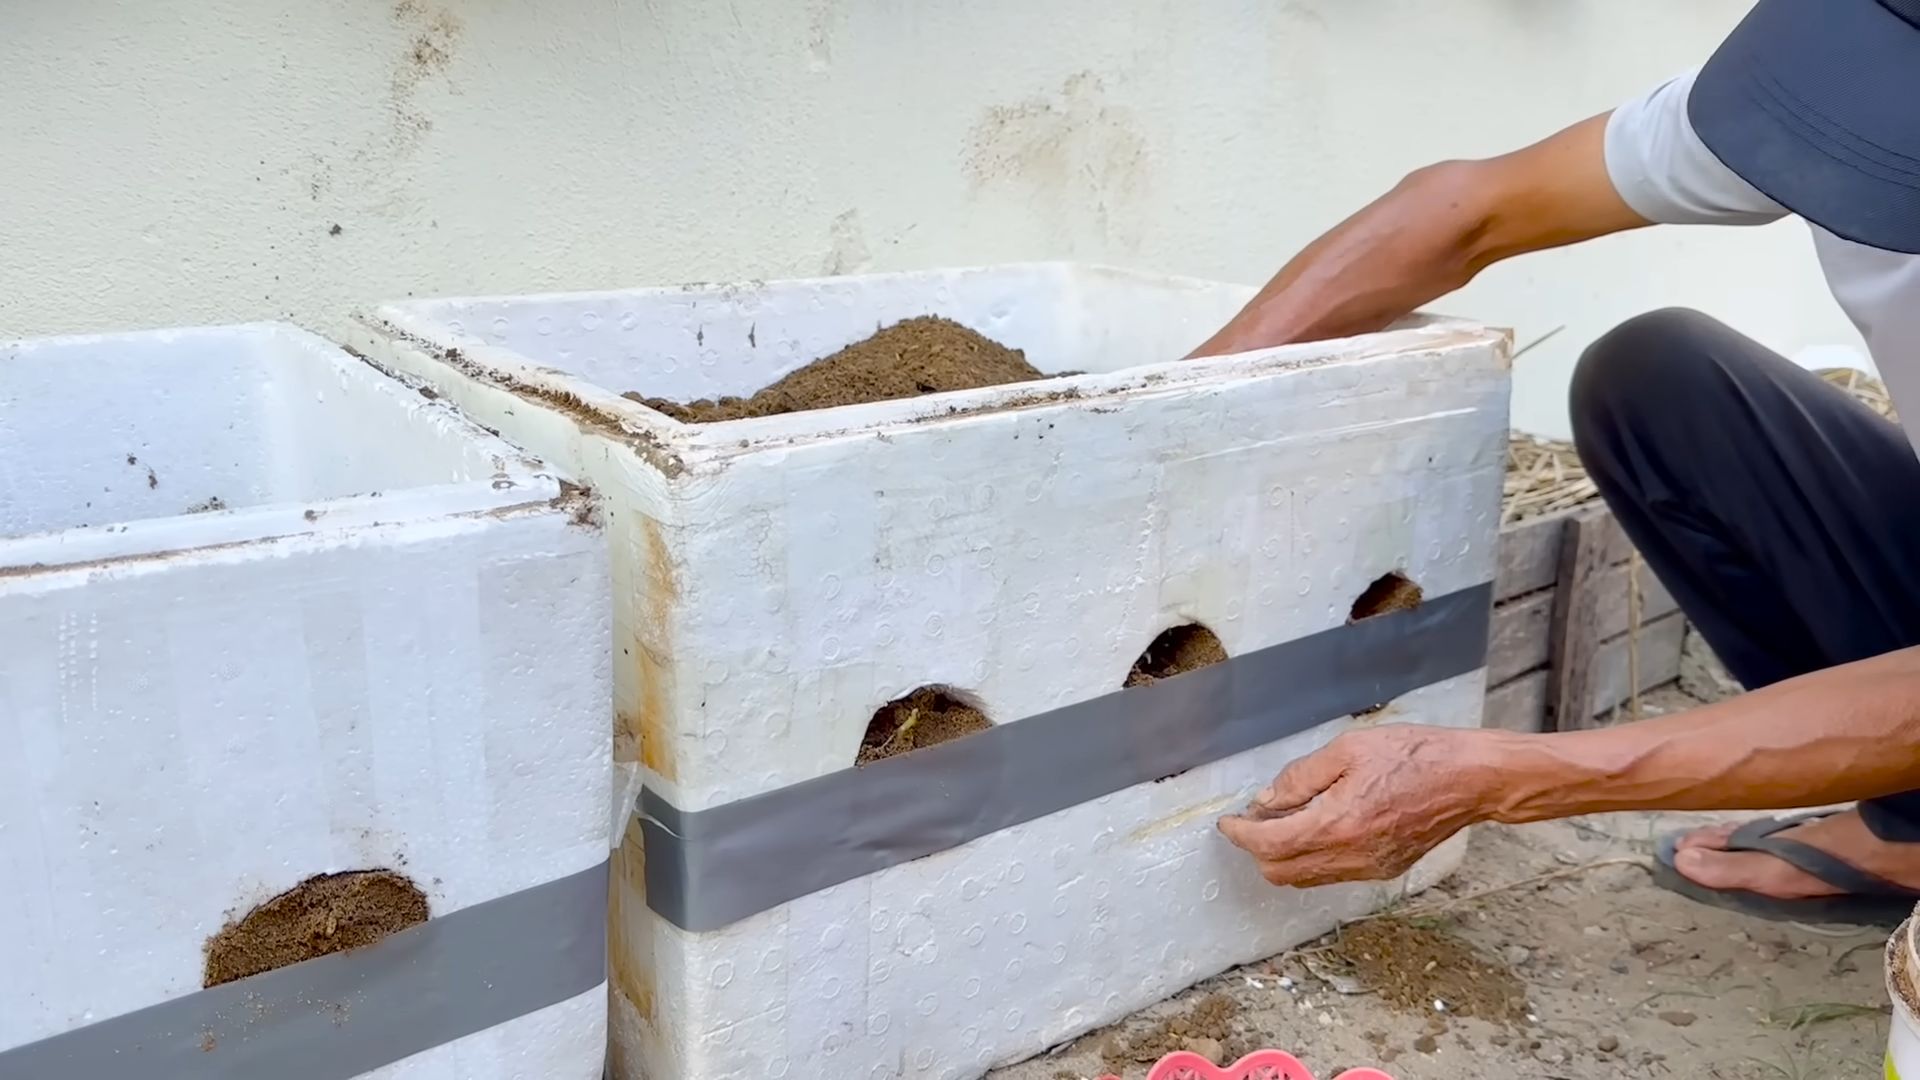
* A Large Bag: Think big! A heavy-duty gardening bag, a burlap sack, or even a sturdy trash bag (dark colored is best) will work. Aim for something at least 2 feet wide and 2-3 feet tall. The bigger, the better, as it allows for more potato growth.
* Seed Potatoes: These aren’t just any potatoes from the grocery store. Seed potatoes are specifically grown for planting and are certified disease-free. You can find them at your local garden center or online. Choose a variety you love to eat! I personally love Yukon Gold for their creamy texture.
* Potting Mix: A good quality potting mix is crucial. Avoid using garden soil directly, as it can be too heavy and compact. Look for a mix that’s well-draining and contains compost or other organic matter.
* Water: Essential for life, obviously!
* Sunlight: Potatoes need at least 6-8 hours of sunlight per day. Choose a sunny spot for your bag.
* Optional: Fertilizer formulated for vegetables. This can give your potatoes an extra boost, but it’s not strictly necessary.
Preparing Your Bag
Okay, let’s get our hands dirty! This part is all about setting the stage for potato success.
1. Choose Your Location: Find a sunny spot that gets at least 6-8 hours of direct sunlight each day. Remember, once the bag is filled, it will be heavy, so choose a spot where you can leave it for the entire growing season.
2. Prepare the Bag: If you’re using a plastic trash bag, poke several drainage holes in the bottom. This is super important to prevent waterlogging, which can rot your potatoes. If you’re using a burlap sack or gardening bag, drainage is usually less of a concern.
3. Add the Initial Soil Layer: Fold down the top of the bag a few times to create a sturdy cuff. This will make it easier to add soil and water later. Add about 4-6 inches of potting mix to the bottom of the bag. This will be the initial planting bed for your seed potatoes.
Planting Your Seed Potatoes
Now for the fun part – planting! This is where the magic begins.
1. Prepare the Seed Potatoes: A few days before planting, you might notice small “eyes” sprouting on your seed potatoes. This is a good sign! If your seed potatoes are large (bigger than an egg), you can cut them into smaller pieces, making sure each piece has at least one or two eyes. Let the cut pieces sit for a day or two to callous over. This helps prevent rot. If your seed potatoes are small, you can plant them whole.
2. Plant the Potatoes: Place the seed potatoes on top of the soil layer, with the eyes facing upwards. Space them evenly, about 8-10 inches apart. If you’re only planting one or two seed potatoes, place them in the center of the bag.
3. Cover with Soil: Cover the seed potatoes with another 4-6 inches of potting mix. Gently water the soil until it’s moist but not soggy.
The “Hilling” Process: Encouraging More Potatoes
This is the key to maximizing your potato harvest! “Hilling” simply means adding more soil as the potato plants grow. This encourages the plant to produce more potatoes along the buried stem.
1. Wait for Sprouts: In a week or two, you should see green sprouts emerging from the soil. This is exciting!
2. Add More Soil: Once the sprouts are about 6-8 inches tall, it’s time to “hill.” Add another 4-6 inches of potting mix to the bag, burying the stems, leaving only the top few leaves exposed.
3. Repeat the Process: Continue this process every couple of weeks as the plants grow taller. Each time, add more soil, burying the stems and leaving only the top leaves exposed. Keep adding soil until you reach the top of the bag.
4. Water Regularly: Keep the soil consistently moist, but not waterlogged. Check the soil moisture by sticking your finger into the soil. If it feels dry an inch or two below the surface, it’s time to water.
Caring for Your Potato Plants
Now that your potatoes are planted and growing, here’s how to keep them happy and healthy.
1. Watering: As mentioned before, consistent moisture is key. Water deeply whenever the soil feels dry. Avoid overwatering, as this can lead to rot.
2. Fertilizing (Optional): If you want to give your potatoes an extra boost, you can fertilize them every few weeks with a fertilizer formulated for vegetables. Follow the instructions on the fertilizer package.
3. Pest Control: Keep an eye out for pests like aphids or potato beetles. If you spot any, you can try hand-picking them off or using an organic insecticide.
4. Sunlight: Make sure your potato plants continue to receive at least 6-8 hours of sunlight per day.
5. Support (Optional): As the plants grow taller, they may start to flop over. You can provide support by staking them or using a tomato cage.
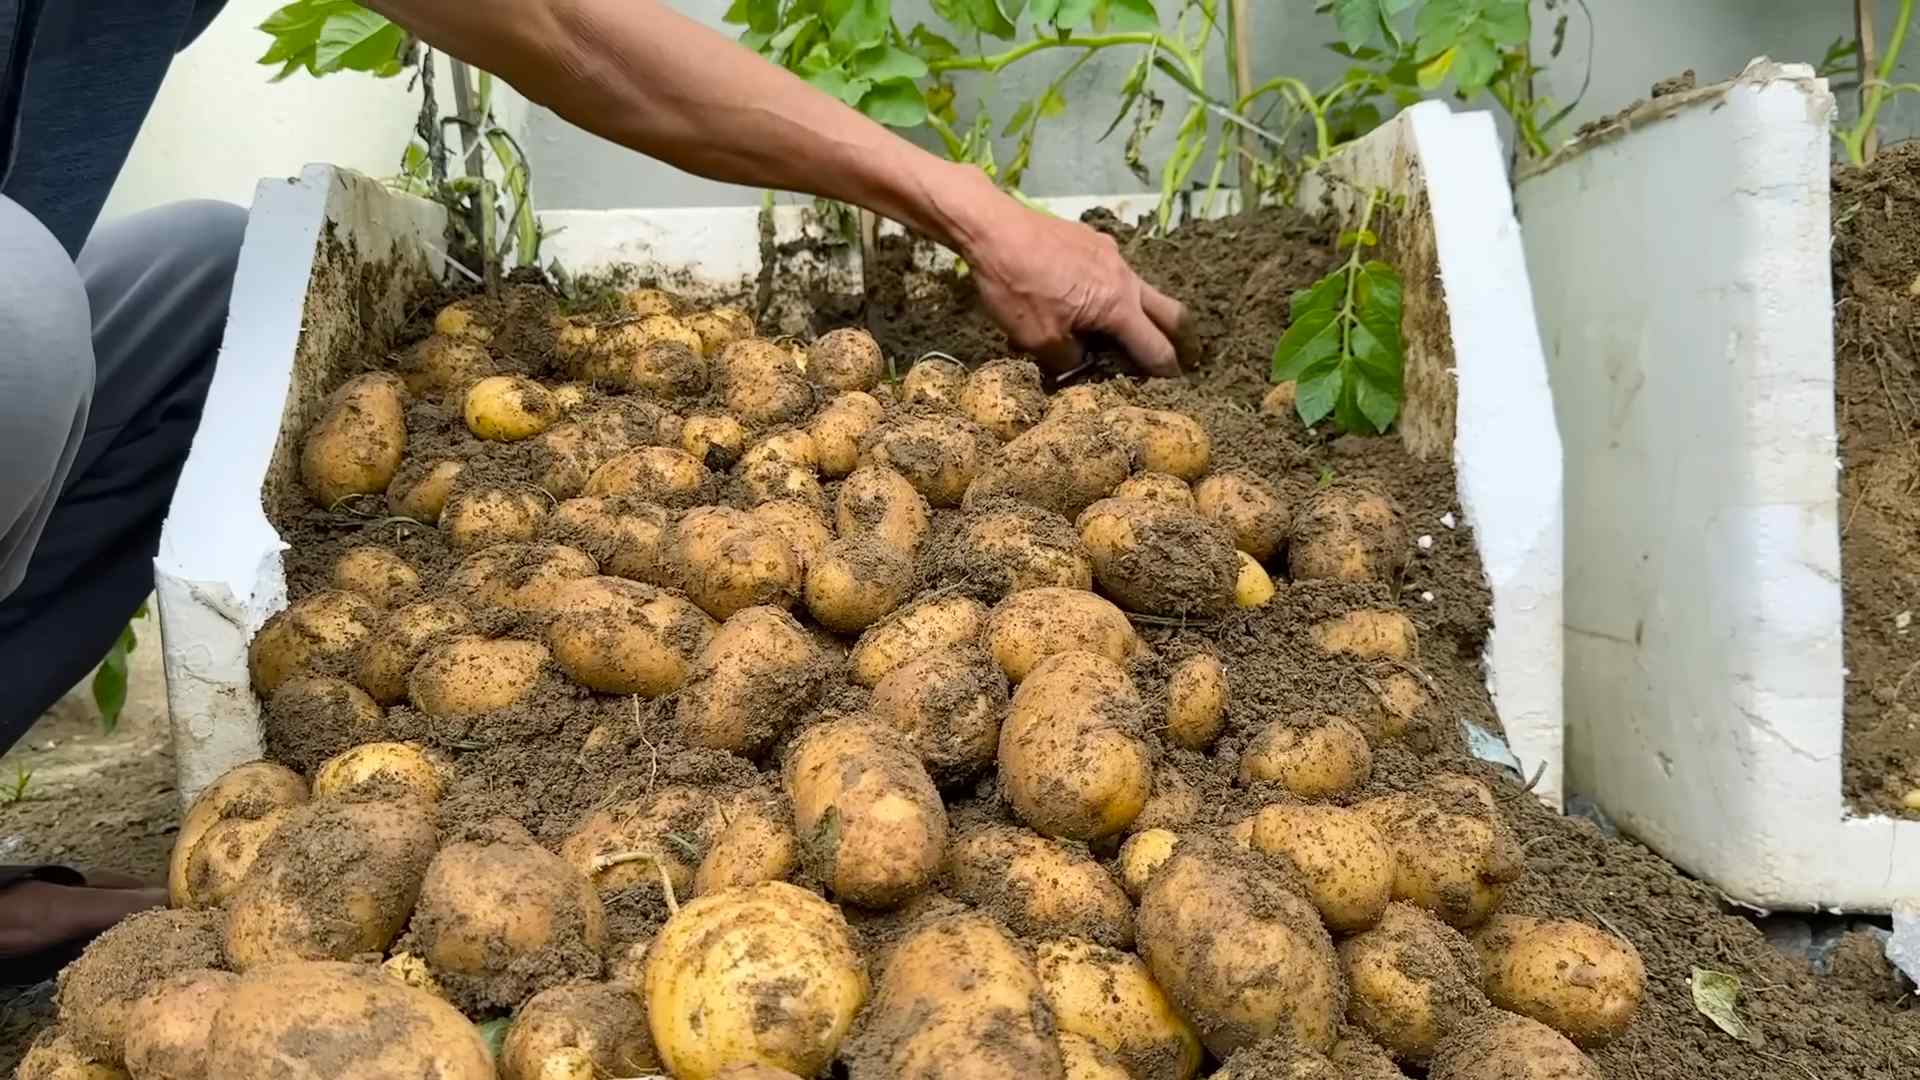
Harvesting Your Potatoes
The moment we’ve all been waiting for! Harvesting your homegrown potatoes is incredibly satisfying.
1. When to Harvest: You can start harvesting “new potatoes” (small, tender potatoes) about 2-3 weeks after the plants flower. To harvest new potatoes, carefully reach into the bag and remove a few potatoes from the top layer of soil. Be careful not to disturb the rest of the plant. For a full harvest of mature potatoes, wait until the plants start to die back and the foliage turns yellow or brown. This usually happens about 80-100 days after planting.
2. Harvesting: Once the foliage has died back, it’s time to harvest the entire crop. Simply tip the bag over and gently sift through the soil to find your potatoes! You’ll be amazed at how many potatoes you can grow in a single bag.
3. Curing (Optional): If you plan to store your potatoes for a longer period, you can cure them for a week or two. To cure potatoes, spread them out in a single layer in a cool, dark, and well-ventilated place. This will help them develop a thicker skin and prevent rot.
Troubleshooting
Even with the best planning, sometimes things don’t go exactly as expected. Here are a few common issues and how to address them:
* No Sprouts: If you don’t see any sprouts after a couple of weeks, it could be that the seed potatoes were not viable, or the soil is too cold. Make sure the soil temperature is above 50°F (10°C). You can also gently dig up a seed potato to check if it’s rotting. If it is, replace it with a fresh one.
* Yellowing Leaves: Yellowing leaves can be a sign of overwatering, underwatering, or nutrient deficiency. Check the soil moisture and adjust your watering accordingly. You can also try fertilizing with a balanced fertilizer.
* Potato Blight: Potato blight is a fungal disease that can cause brown spots on the leaves and stems. To prevent blight, make sure your plants have good air circulation and avoid overhead watering. If you see signs of blight, remove the affected leaves and stems immediately. You can also try spraying with a fungicide.
* Small Potatoes: If your potatoes are small, it could be that they didn’t get enough sunlight or nutrients. Make sure your plants are getting at least 6-8 hours of sunlight per day and fertilize them regularly.
Choosing the Right Potato Variety
The type of potato you choose to grow will impact the flavor, texture, and even the growing time. Here are a few popular varieties to consider:
* Yukon Gold: These are my personal favorite! They have a creamy texture and a buttery flavor. They’re great for roasting, mashing, or boiling.
* Red Potatoes: These have a thin, red skin and a waxy texture. They’re great for boiling, salads, or roasting.
* Russet Potatoes: These are the classic baking potatoes. They have a thick, brown skin and a fluffy texture.
* Fingerling Potatoes: These are small, elongated potatoes with a firm texture. They’re
Conclusion
So, there you have it! Growing potatoes easily at home, even without a sprawling garden, is not only achievable but also incredibly rewarding. We’ve walked you through a simple, effective method that transforms a humble container into a potato-producing powerhouse. This isn’t just about saving money at the grocery store; it’s about connecting with your food, understanding the growing process, and experiencing the pure joy of harvesting something you nurtured from start to finish.
Why is this DIY potato-growing trick a must-try? Because it democratizes gardening. It removes the barriers of space and perceived expertise, making fresh, homegrown potatoes accessible to everyone, regardless of their living situation or gardening experience. Imagine the satisfaction of serving a meal featuring potatoes you grew yourself – the taste is simply unmatched. Plus, it’s a fantastic educational opportunity for kids (and adults!) to learn about plant life cycles and sustainable food practices.
But don’t stop there! Experiment with different potato varieties. Russets are great for baking and frying, Yukon Golds are perfect for creamy mashed potatoes, and red potatoes hold their shape well in salads. You can also try adding different types of compost or fertilizers to see how they affect the yield and flavor. Consider companion planting – marigolds can help deter pests, and basil can improve the flavor of your potatoes.
This method is also incredibly adaptable. If you live in a particularly hot climate, consider using a lighter-colored container to reflect sunlight and prevent the soil from overheating. In cooler climates, a dark-colored container can help retain heat. You can even use grow bags instead of traditional containers for added breathability.
We’ve given you the tools and the knowledge; now it’s time to put them into action. Don’t be intimidated – even if your first attempt isn’t perfect, you’ll learn valuable lessons that will help you improve your technique. The most important thing is to get started and enjoy the process.
We are confident that you will find growing potatoes easily at home to be a fulfilling and delicious experience. So, grab a container, some seed potatoes, and get ready to embark on your potato-growing adventure!
We can’t wait to hear about your experiences! Share your photos, tips, and triumphs in the comments below. Let’s build a community of home potato growers and inspire others to discover the joy of homegrown food. Happy growing!
Frequently Asked Questions (FAQ)
What kind of container should I use for growing potatoes?
The ideal container should be at least 2 feet in diameter and 2 feet deep to allow ample space for the potato plants to develop. You can use plastic containers, grow bags, or even repurposed items like old trash cans (with drainage holes drilled in the bottom). Make sure the container is sturdy enough to hold the weight of the soil and potatoes. Dark-colored containers can absorb more heat, which can be beneficial in cooler climates, but lighter-colored containers are preferable in hotter climates to prevent overheating. Good drainage is crucial to prevent root rot, so ensure your container has adequate drainage holes.
What type of soil is best for growing potatoes in containers?
Potatoes thrive in well-draining, slightly acidic soil. A mix of equal parts potting soil, compost, and peat moss (or coconut coir) works well. Avoid using garden soil, as it can be too heavy and may contain pests or diseases. The compost provides essential nutrients, while the peat moss or coconut coir helps retain moisture. Ensure the soil is loose and airy to allow for proper root development. You can also add a slow-release fertilizer to the soil mix to provide a steady supply of nutrients throughout the growing season.
How often should I water my potato plants?
Water your potato plants regularly, especially during hot and dry weather. The soil should be consistently moist but not waterlogged. Check the soil moisture by sticking your finger about an inch deep – if it feels dry, it’s time to water. Avoid overwatering, as this can lead to root rot. As the plants grow taller and the potatoes begin to develop, they will require more water. During flowering, ensure consistent watering to maximize potato production. Mulching around the base of the plants can help retain moisture and suppress weeds.
How do I know when my potatoes are ready to harvest?
The timing of harvest depends on the potato variety and your preference. “New” potatoes can be harvested about 7-8 weeks after planting, when the plants are flowering. These potatoes will be small and tender. For mature potatoes, wait until the foliage starts to turn yellow and die back, typically around 10-12 weeks after planting. To harvest, gently dig around the base of the plant and lift the potatoes from the soil. Be careful not to damage the potatoes during harvesting.
What are some common pests and diseases that affect potato plants, and how can I prevent them?
Common pests include aphids, potato beetles, and flea beetles. Diseases include early blight, late blight, and potato scab. To prevent pests, inspect your plants regularly and remove any pests by hand or use insecticidal soap. Companion planting with marigolds can also help deter pests. To prevent diseases, use disease-resistant potato varieties, ensure good air circulation, and avoid overwatering. Crop rotation can also help prevent soilborne diseases. If you notice any signs of disease, remove the affected foliage immediately and treat with an appropriate fungicide.
Can I grow potatoes in containers indoors?
While it’s possible to grow potatoes indoors, it can be challenging to provide them with the necessary sunlight and space. Potatoes require at least 6-8 hours of direct sunlight per day. If you don’t have a sunny window, you may need to supplement with grow lights. Indoor potato plants may also be more susceptible to pests and diseases. If you choose to grow potatoes indoors, select a smaller variety and use a large container with good drainage.
What should I do with my potato plants after harvesting the potatoes?
After harvesting the potatoes, you can compost the foliage or use it as mulch in your garden. Do not plant potatoes in the same container or area for at least three years to prevent the buildup of soilborne diseases. You can reuse the soil mix for other plants, but it’s best to amend it with fresh compost and fertilizer. Clean and disinfect your container before using it again.
Can I use store-bought potatoes as seed potatoes?
While you can try using store-bought potatoes as seed potatoes, it’s not always recommended. Store-bought potatoes may have been treated with chemicals to prevent sprouting, and they may also carry diseases. If you do use store-bought potatoes, choose organic potatoes that are firm and free from blemishes. Allow them to sprout before planting. It’s best to use certified seed potatoes from a reputable source to ensure healthy and disease-free plants.
How do I store my harvested potatoes?
Store your harvested potatoes in a cool, dark, and well-ventilated place. The ideal temperature is between 45-50°F (7-10°C). Avoid storing potatoes in the refrigerator, as this can cause them to develop a sweet taste. Store them in a burlap sack or a cardboard box with holes for ventilation. Do not wash the potatoes before storing them, as this can promote rot. Check the potatoes regularly and remove any that are showing signs of spoilage. Properly stored potatoes can last for several months.

Leave a Comment