
Growing Leeks at Home might seem like a culinary dream reserved for seasoned gardeners, but I’m here to tell you it’s surprisingly achievable, even if you’re a complete beginner! Imagine stepping into your backyard and harvesting fresh, flavorful leeks for your favorite soups, stews, and gratins. Forget those bland, overpriced leeks from the grocery store – you’re about to unlock a world of homegrown deliciousness.
Leeks have a rich history, dating back to ancient Egypt, where they were prized for their medicinal properties and culinary uses. The Romans, known for their sophisticated palates, also embraced leeks, spreading their cultivation throughout Europe. Today, leeks remain a staple in many cuisines, adding a delicate oniony flavor to dishes around the globe.
But why should you bother growing leeks at home? Well, for starters, homegrown leeks taste infinitely better than store-bought ones. Plus, you’ll have complete control over the growing process, ensuring they’re free from harmful pesticides and chemicals. In this article, I’ll share my favorite DIY tricks and hacks to help you cultivate a thriving leek patch, no matter your gardening experience. From seed starting to harvesting, I’ll guide you through every step of the process, making it easy and fun to enjoy the satisfaction of growing your own food. Get ready to transform your garden and your kitchen with this versatile and delicious vegetable!
Growing Leeks at Home: A Beginner’s Guide
Okay, so you want to grow leeks at home? Awesome! Leeks are surprisingly easy to cultivate, and nothing beats the flavor of homegrown. Plus, they’re incredibly versatile in the kitchen. I’m going to walk you through everything you need to know, from starting seeds to harvesting your delicious leeks. Let’s get started!
Choosing Your Leek Variety
First things first, let’s talk about leek varieties. There are a bunch to choose from, and the best one for you will depend on your climate and when you want to harvest. Here are a few popular options:
* ‘American Flag’: This is a classic, reliable variety that’s known for its long, white shanks and mild flavor. It’s a great all-around choice.
* ‘Giant Musselburgh’: As the name suggests, this one gets big! It’s a hardy variety that’s perfect for colder climates.
* ‘King Richard’: This is an early-maturing variety, so it’s a good option if you want to harvest your leeks sooner rather than later.
* ‘Bandit’: A popular choice for its disease resistance and good flavor.
I usually go with ‘American Flag’ because it’s readily available and performs well in my garden, but feel free to experiment and find what works best for you!
Starting Leek Seeds Indoors
Leeks have a long growing season, so starting them indoors is usually the way to go, especially if you live in a colder climate. I typically start my seeds about 8-10 weeks before the last expected frost.
Here’s how I do it:
1. Gather Your Supplies: You’ll need:
* Leek seeds (obviously!)
* Seed starting trays or small pots
* Seed starting mix (this is important – regular potting soil can be too heavy)
* A spray bottle filled with water
* A heat mat (optional, but it helps with germination)
* A grow light (also optional, but it prevents leggy seedlings)
2. Sow the Seeds: Fill your seed starting trays or pots with the seed starting mix. Moisten the mix with your spray bottle – you want it damp, but not soggy. Sow the leek seeds about ¼ inch deep and space them about ½ inch apart. I usually sow a few seeds per cell or pot, just in case some don’t germinate.
3. Provide Warmth and Light: Place the trays or pots on a heat mat (if using) and under a grow light (if using). The ideal temperature for germination is around 65-70°F (18-21°C). If you don’t have a heat mat, just find a warm spot in your house. If you don’t have a grow light, place the trays or pots near a sunny window, but be sure to rotate them regularly to prevent the seedlings from leaning towards the light.
4. Keep the Soil Moist: Check the soil moisture daily and mist with your spray bottle as needed to keep it consistently moist. Don’t overwater, though, or you’ll risk damping off (a fungal disease that can kill seedlings).
5. Wait for Germination: Leek seeds typically germinate in about 7-14 days. Once the seedlings emerge, remove the heat mat (if using) and keep the grow light on for about 16 hours a day.
6. Thin the Seedlings: Once the seedlings have a few true leaves (the leaves that look like miniature leeks), thin them out so that only one strong seedling remains in each cell or pot. I know it’s hard to do, but it’s necessary to give the remaining seedlings enough room to grow.
7. Harden Off the Seedlings: About a week before you plan to transplant the seedlings outdoors, you’ll need to harden them off. This means gradually exposing them to outdoor conditions so they don’t get shocked when you transplant them. Start by placing the trays or pots outdoors in a sheltered spot for a few hours each day, gradually increasing the amount of time they spend outside. Also, gradually expose them to more sunlight.
Preparing the Garden Bed
While your leek seedlings are growing indoors, it’s time to prepare the garden bed. Leeks prefer well-drained soil that’s rich in organic matter.
Here’s what I do:
1. Choose a Sunny Location: Leeks need at least 6 hours of sunlight per day.
2. Amend the Soil: Dig in plenty of compost or well-rotted manure to improve the soil’s fertility and drainage. I usually add a few inches of compost to the top of the soil and then till it in.
3. Check the Soil pH: Leeks prefer a soil pH of 6.0-7.0. You can test your soil pH with a soil testing kit. If the pH is too low (acidic), add lime to raise it. If the pH is too high (alkaline), add sulfur to lower it.
4. Create Trenches or Holes: This is where things get a little different depending on how you want to grow your leeks. The goal is to blanch the shanks (the white part) to make them longer and more tender. There are two main methods:
* Trench Method: Dig trenches that are about 6 inches deep and 6 inches wide. Space the trenches about 12 inches apart.
* Hole Method: Dig individual holes that are about 6 inches deep and 6 inches wide. Space the holes about 6 inches apart.
I personally prefer the trench method because it’s easier to manage a larger number of leeks.
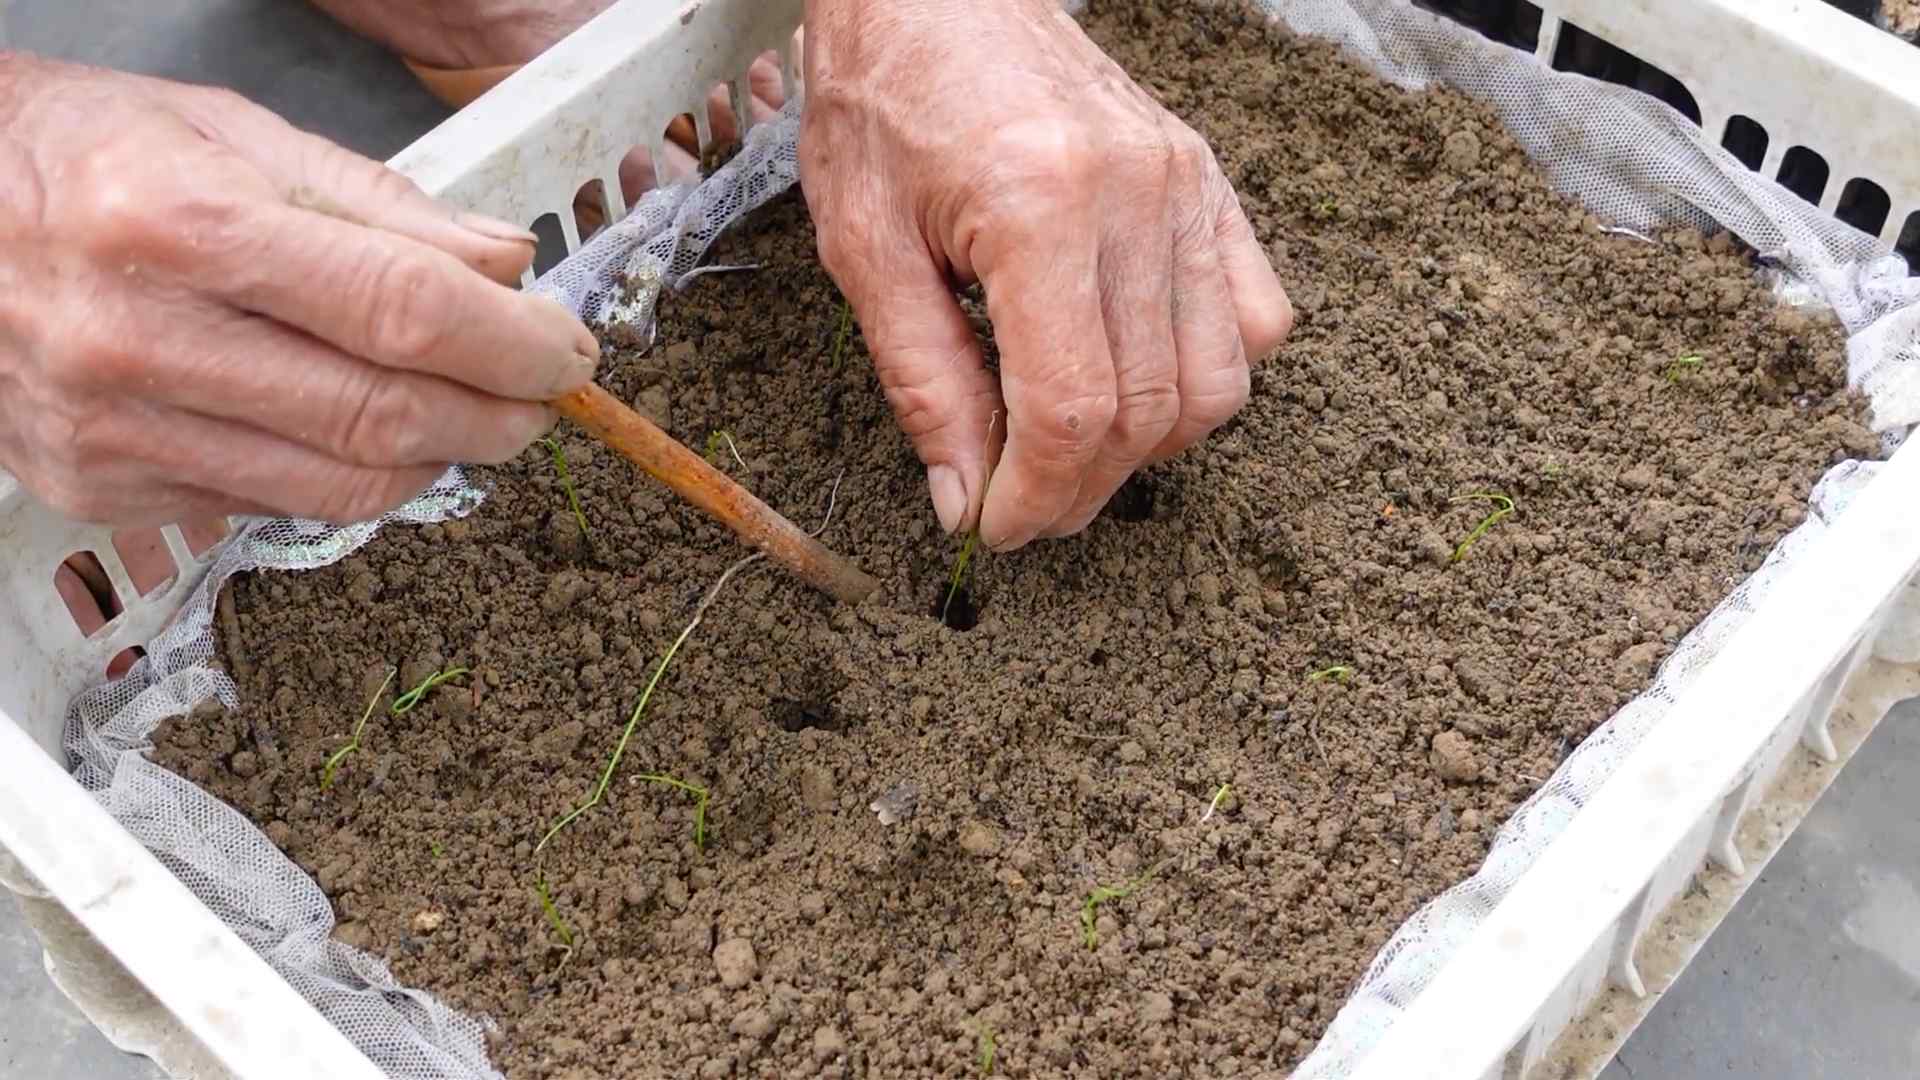
Transplanting Leek Seedlings Outdoors
Once the danger of frost has passed and your leek seedlings have been hardened off, it’s time to transplant them outdoors.
Here’s how I do it:
1. Water the Seedlings: Water the seedlings thoroughly before transplanting them. This will help them to handle the transplant shock.
2. Carefully Remove the Seedlings: Gently remove the seedlings from their trays or pots. Try to keep as much of the root ball intact as possible.
3. Plant the Seedlings:
* Trench Method: Place the seedlings in the trenches, spacing them about 6 inches apart. Backfill the trenches with soil, leaving about 2-3 inches of the seedlings exposed.
* Hole Method: Place the seedlings in the holes. Backfill the holes with soil, leaving about 2-3 inches of the seedlings exposed.
4. Water Thoroughly: Water the transplanted seedlings thoroughly.
5. Mulch: Apply a layer of mulch around the leeks to help retain moisture, suppress weeds, and keep the soil cool. I usually use straw or shredded leaves.
Caring for Your Leeks
Now that your leeks are in the ground, it’s time to take care of them.
Here’s what you need to do:
1. Water Regularly: Leeks need consistent moisture, especially during dry spells. Water them deeply whenever the soil feels dry to the touch.
2. Weed Regularly: Keep the garden bed free of weeds, as they can compete with the leeks for nutrients and water.
3. Fertilize: Leeks are heavy feeders, so they benefit from regular fertilization. I usually side-dress them with a balanced fertilizer every few weeks. You can also use compost tea or fish emulsion.
4. Blanch the Shanks: As the leeks grow, you’ll need to blanch the shanks to keep them white and tender. This is done by gradually mounding soil around the base of the plants.
* Trench Method: As the leeks grow, gradually fill in the trenches with soil.
* Hole Method: As the leeks grow, gradually mound soil around the base of the plants.
I usually blanch the shanks in stages, starting when the leeks are about 6 inches tall and continuing until the shanks are about 6-8 inches long.
5. Watch for Pests and Diseases: Leeks are relatively pest-resistant, but they can be susceptible to onion thrips, leek moths, and onion white rot. Inspect your plants regularly and take action if you see any signs of pests or diseases. I prefer to use organic pest control methods whenever possible.
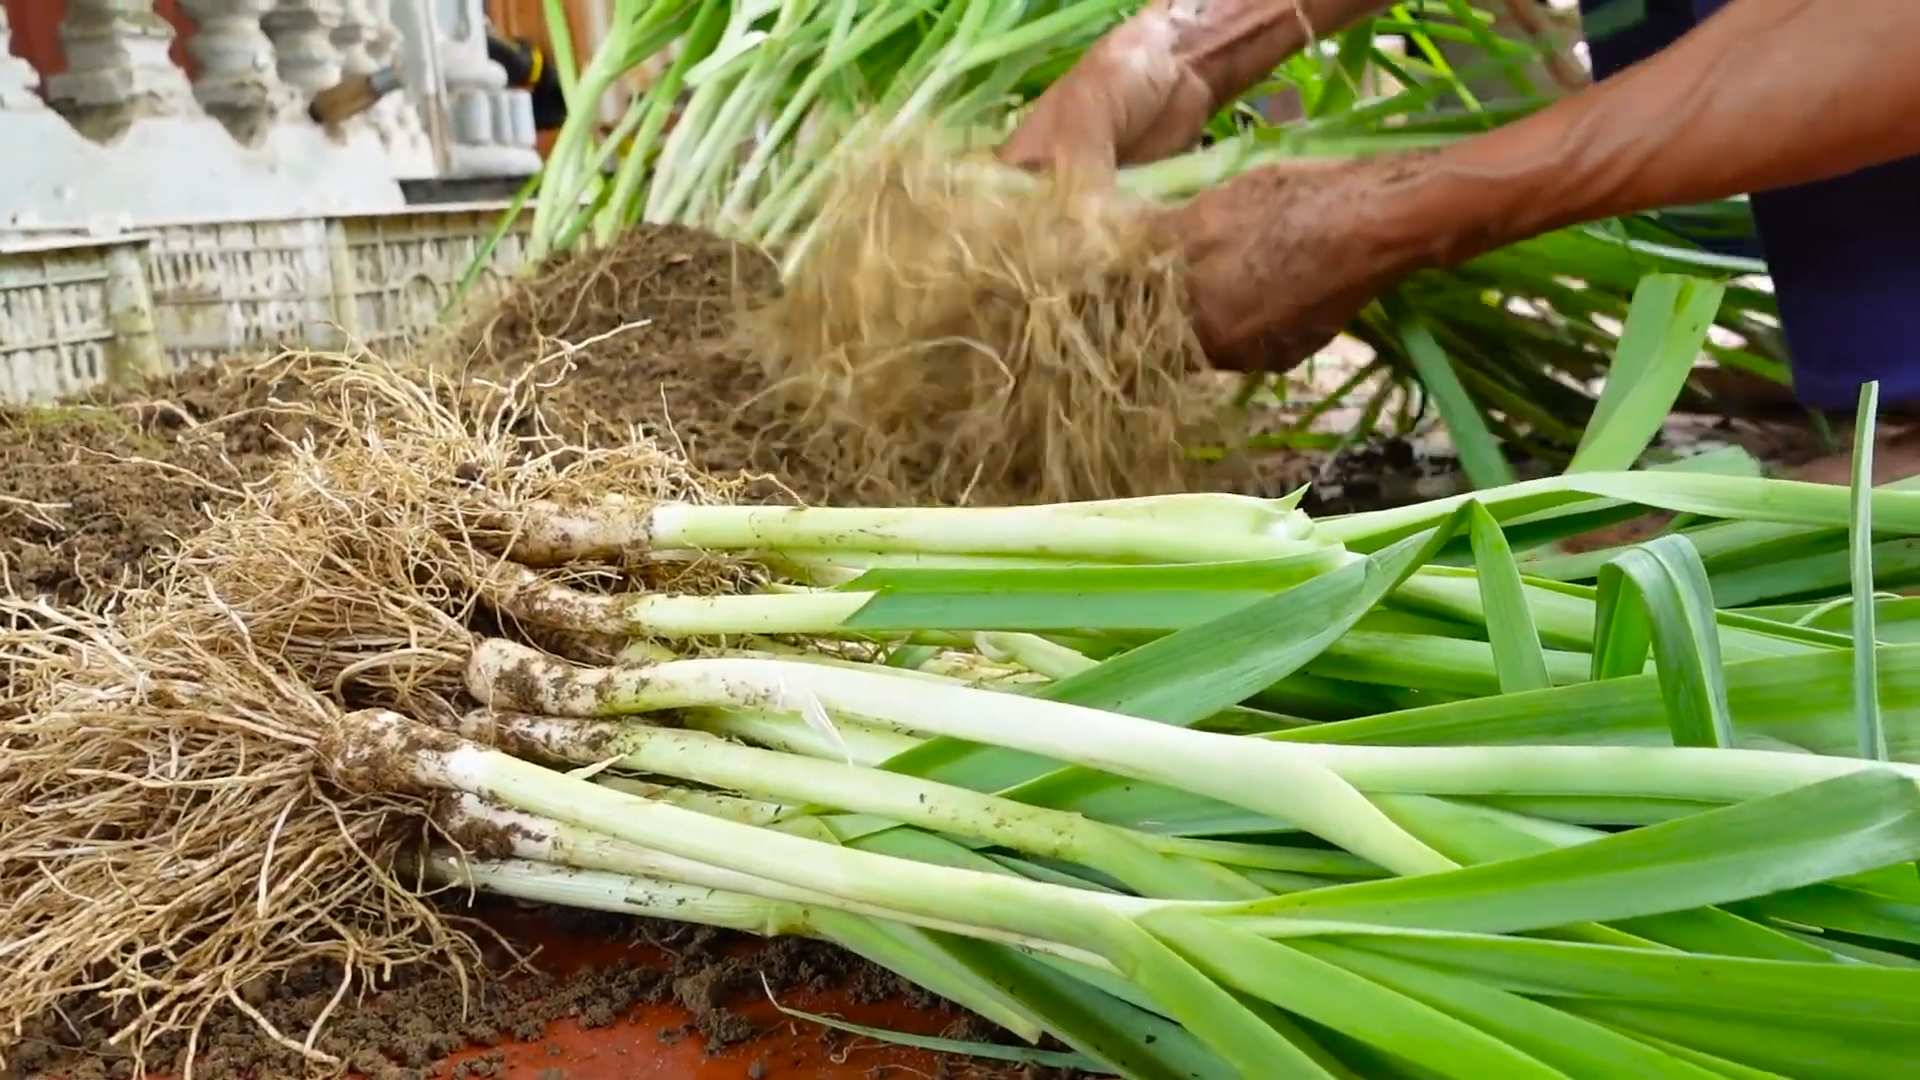
Harvesting Your Leeks
Leeks are typically ready to harvest about 100-120 days after planting. You can harvest them whenever they reach the desired size. I usually start harvesting when they’re about 1 inch in diameter.
Here’s how I harvest them:
1. Loosen the Soil: Use a garden fork or trowel to loosen the soil around the base of the leek.
2. Gently Pull the Leek: Gently pull the
Conclusion
So, there you have it! Growing leeks at home isn’t just a gardening project; it’s an investment in flavor, freshness, and a deeper connection to your food. We’ve walked through the simple steps, from seed to harvest, and hopefully demystified the process. But why should you actually take the plunge and dedicate some space in your garden (or even a container on your balcony) to these alliums?
The answer is multifaceted. First and foremost, the taste of homegrown leeks is simply superior. The subtle sweetness and delicate oniony flavor are amplified when you harvest them fresh, moments before adding them to your favorite dishes. Store-bought leeks, while convenient, often lack the vibrancy and nuanced taste that comes from nurturing your own.
Beyond the flavor, growing your own leeks offers unparalleled control over the quality of your food. You know exactly what goes into your garden – no harsh chemicals, no mystery fertilizers, just good old-fashioned care and attention. This is particularly important for those seeking organic and sustainable food sources.
Furthermore, leeks are incredibly versatile in the kitchen. From creamy leek and potato soup to savory tarts and quiches, they add a depth of flavor that elevates any dish. And the best part? You can use the entire leek, from the white and light green parts to the tougher, darker green leaves (simply wash them thoroughly and use them in stocks or broths).
But the benefits don’t stop there. Gardening itself is a therapeutic activity, offering a chance to connect with nature, reduce stress, and enjoy the satisfaction of nurturing something from seed to harvest. Growing leeks at home is a rewarding experience that combines the joy of gardening with the pleasure of delicious, homegrown food.
Ready to take your leek growing to the next level? Consider these variations:
* Experiment with different varieties: ‘Giant Musselburgh’ is a classic choice, known for its large size and mild flavor. ‘Bandit’ is a faster-growing variety, perfect for those eager to harvest sooner. ‘Autumn Giant’ is a cold-hardy option, ideal for extending your harvest into the winter months.
* Try companion planting: Carrots and leeks are excellent companions, as the leeks deter carrot root flies, and the carrots deter leek moths. Other good companions include celery, onions, and tomatoes.
* Explore different growing methods: While we focused on traditional soil-based growing, you can also try growing leeks in raised beds or containers. Hydroponic leek growing is also possible, although it requires more specialized equipment.
* Leek Greens: Don’t throw away the dark green leaves! They are perfect for making vegetable stock. Simply wash them thoroughly, chop them roughly, and add them to your stockpot along with other vegetable scraps.
So, what are you waiting for? Grab some seeds, prepare your soil, and embark on your leek-growing adventure today! We’re confident that you’ll be amazed by the flavor and satisfaction of homegrown leeks.
We encourage you to share your experiences with us! Post photos of your leek patch on social media using #HomegrownLeeks and tell us about your favorite ways to use your harvest. We can’t wait to see what you create!
Frequently Asked Questions (FAQ)
Q: How long does it take to grow leeks from seed?
A: Growing leeks from seed typically takes around 120-150 days from sowing to harvest. The exact time will depend on the variety of leek you are growing, the growing conditions, and the time of year you sow your seeds. You’ll generally start seeds indoors 8-10 weeks before the last expected frost. After the danger of frost has passed, you can transplant the seedlings outdoors.
Q: What is the best time of year to plant leeks?
A: The best time to plant leeks depends on your climate. In colder climates, start seeds indoors in late winter or early spring for transplanting outdoors in late spring or early summer. In milder climates, you can sow seeds directly outdoors in early spring or even late summer for a fall or winter harvest. Leeks are quite cold-hardy and can tolerate light frosts.
Q: What kind of soil do leeks need?
A: Leeks thrive in rich, well-drained soil with a pH between 6.0 and 7.0. Amend your soil with compost or well-rotted manure before planting to improve its fertility and drainage. Leeks prefer soil that is loose and easy for their roots to penetrate. If your soil is heavy clay, consider adding sand or other amendments to improve its texture.
Q: How much sun do leeks need?
A: Leeks need at least 6 hours of sunlight per day to thrive. Choose a sunny location in your garden for planting. If you are growing leeks in containers, make sure to place them in a spot that receives plenty of sunlight.
Q: How often should I water leeks?
A: Leeks need consistent moisture, especially during hot, dry weather. Water deeply and regularly, aiming to keep the soil consistently moist but not waterlogged. Mulching around the plants can help to retain moisture and suppress weeds.
Q: How do I blanch leeks?
A: Blanching leeks is the process of excluding light from the lower stems to make them white and tender. There are several ways to blanch leeks:
* Hilling: As the leeks grow, gradually mound soil around the stems, burying them deeper and deeper.
* Trenching: Plant the leeks in a trench and gradually fill it in with soil as they grow.
* Using collars: Place cardboard or plastic collars around the stems to block out the light.
Blanching typically starts a few weeks before harvest.
Q: What are some common pests and diseases that affect leeks?
A: Common pests that affect leeks include leek moths, onion flies, and thrips. Diseases that can affect leeks include rust, white rot, and downy mildew. Practice good garden hygiene to prevent pests and diseases. Rotate your crops regularly, remove any infected plants promptly, and consider using organic pest control methods if necessary.
Q: How do I harvest leeks?
A: You can harvest leeks when they are large enough to use, typically when they are about 1 inch in diameter. To harvest, loosen the soil around the base of the plant with a garden fork and gently pull the leek out of the ground. Wash the leeks thoroughly before using them.
Q: Can I store leeks?
A: Yes, you can store leeks for several weeks in the refrigerator. Wrap them loosely in plastic wrap or place them in a plastic bag. You can also freeze leeks. To freeze, wash and chop the leeks, blanch them in boiling water for 2-3 minutes, and then transfer them to an ice bath to stop the cooking process. Drain the leeks thoroughly and freeze them in a single layer on a baking sheet before transferring them to a freezer bag.
Q: Can I grow leeks in containers?
A: Yes, you can grow leeks in containers. Choose a large container that is at least 12 inches deep and wide. Fill the container with a well-draining potting mix and plant the leeks as you would in the garden. Make sure to water the leeks regularly and fertilize them every few weeks.
Q: What are some good companion plants for leeks?
A: Good companion plants for leeks include carrots, celery, onions, tomatoes, and chamomile. These plants can help to deter pests and diseases and improve the growth of the leeks.
Q: Are leeks good for you?
A: Yes, leeks are a healthy and nutritious vegetable. They are a good source of vitamins A, C, and K, as well as folate and fiber. Leeks also contain antioxidants and other beneficial compounds. Adding leeks to your diet can help to improve your overall health.

Leave a Comment