
Growing Lemongrass at Home might seem like a tropical dream reserved for seasoned gardeners, but I’m here to tell you it’s surprisingly achievable, even if you’re a complete beginner! Imagine stepping outside your back door to snip fresh, fragrant lemongrass for your favorite Thai curry or a soothing cup of tea. Forget those wilted, overpriced stalks at the grocery store – with a few simple tricks, you can cultivate your own thriving lemongrass patch right in your backyard or even on your windowsill.
Lemongrass, also known as Cymbopogon, has a rich history deeply intertwined with Asian cuisine and traditional medicine. For centuries, it’s been prized for its distinctive citrusy aroma and purported health benefits, from aiding digestion to relieving stress. In many cultures, it’s more than just an ingredient; it’s a symbol of healing and well-being.
But why should you bother learning how to grow lemongrass at home? Well, besides the obvious convenience and cost savings, it’s incredibly rewarding to nurture your own food source. Plus, commercially grown lemongrass is often treated with pesticides, so growing your own ensures you have access to a fresh, organic supply. This DIY guide will provide you with easy-to-follow instructions and clever hacks to ensure your success. I’ll share my personal experiences and proven methods for growing lemongrass at home, so you can enjoy this versatile herb year-round. Let’s get started!
Growing Lemongrass at Home: A Beginner’s Guide
Hey there, fellow plant enthusiasts! Ever dreamt of having fresh, fragrant lemongrass right at your fingertips? Well, dream no more! Growing lemongrass at home is surprisingly easy, and I’m here to guide you through every step of the process. Trust me, once you’ve tasted homemade lemongrass tea or added it to your favorite Asian-inspired dishes, you’ll never want to be without it.
What You’ll Need
Before we dive in, let’s gather our supplies. Here’s a list of everything you’ll need to successfully grow lemongrass at home:
* Lemongrass stalks: You can usually find these at your local Asian grocery store or even some well-stocked supermarkets. Look for stalks that are firm, green at the top, and have a bulbous base.
* A glass or jar: Tall enough to hold the lemongrass stalks upright with a few inches of water.
* Water: Tap water is fine, but filtered water is even better.
* Potting soil: A well-draining potting mix is essential for healthy growth.
* A pot: Choose a pot that’s at least 12 inches in diameter to give your lemongrass plenty of room to grow. Terracotta pots are great because they allow for good drainage.
* Optional: Rooting hormone: While not strictly necessary, rooting hormone can help speed up the rooting process.
* Optional: Fertilizer: A balanced liquid fertilizer can help boost growth once your lemongrass is established.
Section 1: Rooting Your Lemongrass Stalks
This is the first and arguably most crucial step. We need to encourage those stalks to sprout roots before we can plant them in soil.
1. Prepare the Stalks: Gently peel off the outer, dried-out layers of the lemongrass stalk until you reach the fresh, green core. Trim the top of the stalk, leaving about 4-5 inches of green growth. This helps the plant focus its energy on root development.
2. Place in Water: Fill your glass or jar with a few inches of water. Place the lemongrass stalks in the water, ensuring that the bulbous base is submerged. Don’t overcrowd the jar; give each stalk some space.
3. Find a Sunny Spot: Place the jar in a warm, sunny location. A windowsill that receives at least 6 hours of sunlight per day is ideal.
4. Change the Water Regularly: Change the water every 1-2 days to prevent bacteria growth and keep the water fresh. This is super important!
5. Be Patient: It usually takes about 2-3 weeks for roots to start appearing. You’ll see small, white roots emerging from the base of the stalk. Don’t get discouraged if it takes a little longer; just keep changing the water and providing plenty of sunlight.
6. Check for Root Growth: Once the roots are about 2-3 inches long, your lemongrass is ready to be planted in soil!
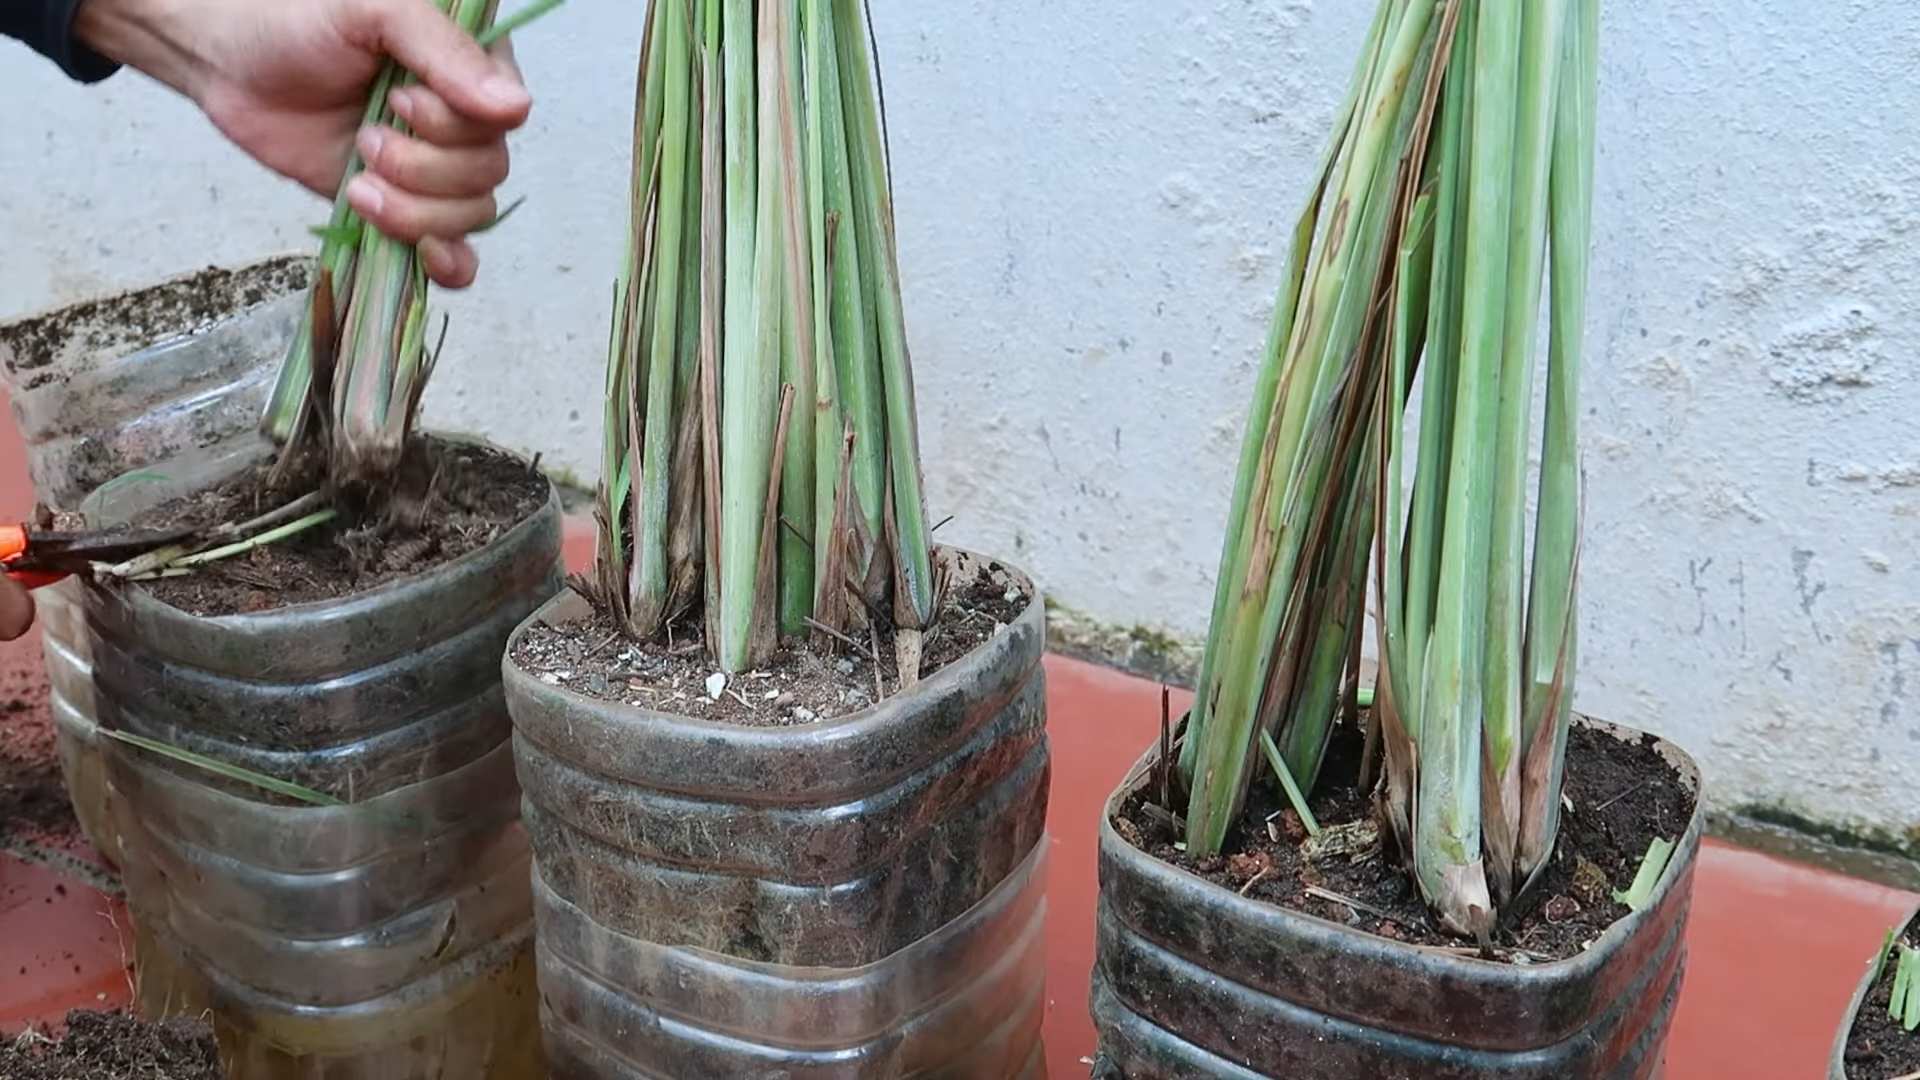
Section 2: Planting Your Rooted Lemongrass
Now that our lemongrass has roots, it’s time to give it a permanent home in a pot.
1. Prepare the Pot: Fill your pot with well-draining potting soil, leaving about an inch of space at the top.
2. Create a Hole: Make a hole in the center of the pot that’s large enough to accommodate the roots of your lemongrass stalk.
3. Gently Plant: Carefully remove the lemongrass stalk from the water and gently place it in the hole. Make sure the roots are spread out and not bunched together.
4. Cover with Soil: Fill the hole with soil, gently patting it down around the base of the stalk. Ensure the base of the stalk is just covered with soil.
5. Water Thoroughly: Water the pot thoroughly until water drains out of the bottom. This helps settle the soil and provides the roots with moisture.
6. Choose a Sunny Location: Place the pot in a sunny location that receives at least 6 hours of sunlight per day. Lemongrass loves sunshine!
Section 3: Caring for Your Lemongrass
Now that your lemongrass is planted, it’s time to provide it with the care it needs to thrive.
1. Watering: Lemongrass needs consistent moisture, especially during the growing season (spring and summer). Water deeply whenever the top inch of soil feels dry to the touch. Avoid overwatering, as this can lead to root rot. In the winter, you can reduce watering frequency.
2. Fertilizing: Feed your lemongrass with a balanced liquid fertilizer every 2-3 weeks during the growing season. Follow the instructions on the fertilizer label. This will help promote healthy growth and vibrant green leaves.
3. Sunlight: As mentioned before, lemongrass loves sunlight. Make sure it gets at least 6 hours of direct sunlight per day. If you live in a particularly hot climate, you may need to provide some afternoon shade to prevent the leaves from scorching.
4. Pruning: Regular pruning helps encourage new growth and keeps your lemongrass looking tidy. Trim off any dead or yellowing leaves. You can also harvest stalks as needed for cooking or tea.
5. Overwintering: Lemongrass is a tropical plant and is not frost-hardy. If you live in a climate with cold winters, you’ll need to bring your lemongrass indoors before the first frost. Place it in a sunny location and reduce watering frequency. You can also cut back the foliage to about 6 inches to conserve energy.
6. Pest Control: Lemongrass is generally pest-resistant, but it can occasionally be affected by aphids or spider mites. If you notice any pests, you can treat them with insecticidal soap or neem oil.
Section 4: Harvesting Your Lemongrass
The best part of growing your own lemongrass is, of course, harvesting it!
1. When to Harvest: You can start harvesting lemongrass stalks when they are at least 1/2 inch in diameter and about 12 inches tall.
2. How to Harvest: Use a sharp knife or pruning shears to cut the stalk at the base, close to the soil.
3. Using Your Harvest: You can use the entire stalk of lemongrass. The bulbous base is the most flavorful part and is often used in curries, soups, and stir-fries. The upper, green part of the stalk can be used to make tea or added to stocks and broths.
4. Storing Your Harvest: Freshly harvested lemongrass can be stored in the refrigerator for up to a week. You can also freeze it for longer storage. To freeze lemongrass, wrap the stalks tightly in plastic wrap or place them in a freezer bag.
Troubleshooting
Even with the best care, you might encounter a few challenges along the way. Here are some common problems and how to fix them:
* Yellowing Leaves: This could be a sign of overwatering, underwatering, or nutrient deficiency. Check the soil moisture and adjust your watering accordingly. If the soil is consistently moist, reduce watering frequency. If the soil is dry, water more deeply. You can also try fertilizing with a balanced liquid fertilizer.
* Slow Growth: This could be due to insufficient sunlight, poor soil, or lack of nutrients. Make sure your lemongrass is getting at least 6 hours of sunlight per day. If the soil is poor, repot it with a well-draining potting mix. You can also try fertilizing with a balanced liquid fertilizer.
* Root Rot: This is caused by overwatering and can be fatal to your lemongrass. If you suspect root rot, stop watering immediately and allow the soil to dry out completely. You may also need to repot the plant with fresh soil.
* Pests: As mentioned before, lemongrass can occasionally be affected by aphids or spider mites. Treat them with insecticidal soap or neem oil.
Growing lemongrass at home is a rewarding experience that allows you to enjoy fresh, flavorful herbs whenever you need them. With a little patience and care, you can have a thriving lemongrass plant that will provide you with years of enjoyment. Happy gardening!

Conclusion
So, there you have it! Growing lemongrass at home is not only achievable, but it’s also incredibly rewarding. Imagine stepping out into your garden or onto your balcony and snipping off fresh, fragrant stalks whenever you need them. No more last-minute trips to the grocery store or settling for dried, less flavorful alternatives. This DIY project is a game-changer for anyone who loves Southeast Asian cuisine, herbal teas, or simply enjoys the refreshing aroma of lemongrass.
But why is this DIY trick a must-try? Beyond the convenience and cost savings, growing your own lemongrass allows you to control the quality and freshness of your ingredients. You know exactly where your lemongrass comes from and how it was grown, ensuring it’s free from harmful pesticides and chemicals. Plus, the process itself is surprisingly simple and therapeutic. There’s something deeply satisfying about nurturing a plant from a humble stalk to a thriving bush.
Ready to take your culinary creations to the next level?
Consider these variations to personalize your lemongrass growing experience:
* **Container Gardening:** If you’re short on space, lemongrass thrives in containers. Choose a large pot with good drainage and use a well-draining potting mix. This is perfect for apartment dwellers or those with limited garden space.
* **Hydroponics:** For the more adventurous gardener, hydroponic lemongrass cultivation is an option. This method involves growing lemongrass in nutrient-rich water without soil.
* **Different Varieties:** While *Cymbopogon citratus* is the most common variety, explore other lemongrass species like *Cymbopogon flexuosus* for slightly different flavor profiles.
* **Companion Planting:** Plant lemongrass alongside other herbs and vegetables that benefit from its presence. Lemongrass can deter certain pests and attract beneficial insects.
Don’t be intimidated by the prospect of growing your own lemongrass. With a little patience and the right guidance, you’ll be harvesting your own supply in no time. The vibrant flavor and aroma of homegrown lemongrass will elevate your cooking and bring a touch of the exotic to your everyday life.
We encourage you to embark on this exciting DIY adventure. Start with a few stalks from your local grocery store or Asian market, follow our simple steps, and watch your lemongrass flourish. Once you’ve experienced the joy of growing your own, you’ll never go back to store-bought again.
Share Your Lemongrass Growing Journey!
We’d love to hear about your experiences growing lemongrass at home. Share your tips, tricks, and photos in the comments below. Let’s create a community of lemongrass enthusiasts and inspire others to embrace this rewarding DIY project. What challenges did you face? What successes did you celebrate? Your insights can help others navigate their own lemongrass growing journey. Let’s all learn together and cultivate a greener, more flavorful world, one lemongrass stalk at a time. Remember, mastering the art of growing lemongrass at home is within your reach!
Frequently Asked Questions (FAQ)
What is the best time of year to start growing lemongrass?
The best time to start growing lemongrass is in the spring or early summer, after the last frost. This gives the plant ample time to establish itself and grow strong before the cooler months arrive. However, if you live in a warm climate with mild winters, you can start growing lemongrass at any time of year. If you are starting indoors, you can start at any time, but ensure adequate light.
How much sunlight does lemongrass need?
Lemongrass thrives in full sun, requiring at least 6-8 hours of direct sunlight per day. If you’re growing lemongrass indoors, place it near a sunny window or supplement with grow lights. Insufficient sunlight can lead to weak, leggy growth and reduced flavor.
What kind of soil is best for lemongrass?
Lemongrass prefers well-draining soil that is rich in organic matter. A slightly acidic to neutral pH (6.0-7.0) is ideal. Amend your soil with compost or other organic materials to improve drainage and fertility. If growing in containers, use a high-quality potting mix specifically formulated for herbs or vegetables.
How often should I water lemongrass?
Water lemongrass regularly, especially during hot, dry weather. Keep the soil consistently moist but not waterlogged. Overwatering can lead to root rot. Check the soil moisture regularly and water when the top inch feels dry to the touch. Reduce watering during the cooler months.
How do I fertilize lemongrass?
Feed lemongrass regularly with a balanced fertilizer or a fertilizer specifically formulated for herbs. Apply fertilizer every 4-6 weeks during the growing season. Avoid over-fertilizing, as this can lead to excessive foliage growth at the expense of flavor. Organic options like compost tea or fish emulsion are also excellent choices.
How do I harvest lemongrass?
Harvest lemongrass stalks when they are at least 12 inches tall and about 1/2 inch in diameter. Use a sharp knife to cut the stalks close to the base of the plant. Remove the outer, tougher leaves and use the tender inner core for cooking. You can harvest lemongrass throughout the growing season.
Can I grow lemongrass indoors?
Yes, lemongrass can be grown indoors, especially in colder climates. Choose a large pot with good drainage and place it in a sunny location. Supplement with grow lights if necessary. Ensure adequate ventilation to prevent fungal diseases.
How do I overwinter lemongrass in cold climates?
In cold climates, lemongrass is not winter hardy and needs to be protected from frost. You can either bring the entire plant indoors or dig up the stalks and store them in a cool, dark place until spring. If bringing the plant indoors, reduce watering and provide adequate light.
Is lemongrass susceptible to any pests or diseases?
Lemongrass is generally pest and disease resistant. However, it can occasionally be affected by aphids, spider mites, or fungal diseases. Inspect your plants regularly and treat any infestations or diseases promptly. Use organic pest control methods whenever possible.
Can I propagate lemongrass from cuttings?
Yes, lemongrass can be easily propagated from cuttings. Simply take a cutting from a mature stalk and place it in water until roots develop. Once the roots are about an inch long, transplant the cutting into a pot with well-draining soil.
How long does it take for lemongrass to grow?
Lemongrass typically takes about 3-6 months to reach maturity and be ready for harvesting. The exact time will depend on the growing conditions, such as sunlight, temperature, and soil fertility.
What are the benefits of growing my own lemongrass?
Growing your own lemongrass offers several benefits, including:
* Fresh, flavorful ingredients
* Cost savings
* Control over quality and growing practices
* Therapeutic gardening experience
* Reduced environmental impact
Can I eat the entire lemongrass stalk?
No, only the tender inner core of the lemongrass stalk is typically used for cooking. The outer leaves are too tough and fibrous to eat. However, you can use the outer leaves to make tea or flavor broths.
How do I store lemongrass?
Fresh lemongrass can be stored in the refrigerator for up to two weeks. Wrap the stalks in a damp paper towel and place them in a plastic bag. You can also freeze lemongrass for longer storage. Simply chop the stalks into smaller pieces and freeze them in an airtight container.
Leave a Comment