
Growing Mustard Greens might seem intimidating, but trust me, it’s one of the most rewarding and surprisingly simple additions you can make to your home garden! Forget those bland, store-bought greens – imagine stepping outside your back door and harvesting peppery, vibrant mustard greens bursting with flavor.
For centuries, mustard greens have been a staple in cuisines around the world, from Asian stir-fries to Southern comfort food. Their history is deeply rooted in traditional medicine and culinary practices, valued not only for their distinctive taste but also for their impressive nutritional benefits. But why should you bother growing them yourself? Well, beyond the superior flavor and freshness, growing mustard greens at home allows you to control exactly what goes into your food – no pesticides, no hidden additives, just pure, healthy goodness.
I know what you’re thinking: “I don’t have a green thumb!” But that’s where this DIY guide comes in. I’m going to share some easy-to-follow tricks and hacks that will have you harvesting a bountiful crop of mustard greens in no time, even if you’re a complete beginner. We’ll cover everything from choosing the right seeds to protecting your plants from pests, ensuring you have a thriving garden and a delicious, healthy addition to your meals. So, grab your gardening gloves, and let’s get started!
Growing Mustard Greens: A Beginner’s Guide to a Spicy Harvest
Mustard greens! They’re peppery, they’re vibrant, and they’re surprisingly easy to grow yourself. I’ve been growing them for years, and I’m excited to share my tips and tricks with you so you can enjoy fresh, homegrown mustard greens too. This guide will walk you through everything from choosing the right variety to harvesting your delicious leafy greens.
Choosing Your Mustard Green Variety
Before we get our hands dirty, let’s talk about the different types of mustard greens. There’s a whole world beyond the standard grocery store variety! Each has its own unique flavor profile and texture.
* Southern Giant Curled: This is a classic, reliable choice. It has large, frilly leaves and a strong, pungent flavor. It’s also quite cold-hardy.
* Florida Broadleaf: A milder option, perfect if you’re not a fan of intense spiciness. It has smooth, broad leaves and a slightly sweet taste.
* Red Giant: As the name suggests, this variety boasts beautiful reddish-purple leaves. It’s not only delicious but also adds a pop of color to your garden. The flavor is similar to Southern Giant Curled, but perhaps a bit milder.
* Mizuna: This Japanese mustard green has a delicate, slightly peppery flavor and feathery leaves. It’s great in salads or stir-fries.
* Gai Choy (Chinese Mustard): This variety forms a loose head and has a slightly bitter, pungent flavor. It’s often used in Asian cuisine.
I personally love growing a mix of varieties to add complexity to my meals. Experiment and see which ones you like best!
Preparing Your Garden Bed
Mustard greens aren’t too fussy, but they do appreciate a little TLC when it comes to soil preparation.
* Sunlight: Mustard greens thrive in full sun (6-8 hours of direct sunlight per day), but they can tolerate partial shade, especially in hotter climates.
* Soil: They prefer well-drained soil that’s rich in organic matter. A slightly acidic to neutral pH (around 6.0 to 7.0) is ideal.
* Amendments: Before planting, I like to amend my soil with compost or well-rotted manure. This adds nutrients and improves drainage. You can also add a balanced fertilizer, following the package instructions.
* Weed Removal: Make sure to remove any weeds from the planting area. Weeds compete with your mustard greens for nutrients and water.
Planting Your Mustard Greens
You can start mustard greens from seed either directly in the garden or indoors for transplanting. I usually prefer direct sowing because it’s less work, but starting indoors can give you a head start, especially in colder climates.
Direct Sowing:
1. Timing: Mustard greens are a cool-season crop, so plant them in early spring or late summer/early fall. Check your local frost dates to determine the best time to plant. I usually aim for 4-6 weeks before the first expected frost in the fall, or as soon as the soil can be worked in the spring.
2. Sowing: Sow seeds about 1/4 to 1/2 inch deep and 1 inch apart in rows that are 12-18 inches apart.
3. Watering: Gently water the soil after planting. Keep the soil consistently moist until the seeds germinate.
4. Thinning: Once the seedlings emerge (usually in 5-7 days), thin them to about 4-6 inches apart. This gives them enough room to grow. You can eat the thinnings! They’re delicious in salads.
Starting Indoors (for Transplanting):
1. Timing: Start seeds indoors about 4-6 weeks before the last expected frost.
2. Sowing: Sow seeds in seed trays or small pots filled with seed-starting mix. Plant them about 1/4 inch deep.
3. Watering: Keep the soil consistently moist.
4. Light: Provide plenty of light. A sunny windowsill or grow lights will work.
5. Hardening Off: Before transplanting, gradually acclimate the seedlings to outdoor conditions by hardening them off. This involves exposing them to increasing amounts of sunlight and wind over a period of 7-10 days.
6. Transplanting: Transplant the seedlings into the garden, spacing them 4-6 inches apart in rows that are 12-18 inches apart.
Caring for Your Mustard Greens
Once your mustard greens are planted, they’re relatively low-maintenance.
* Watering: Water regularly, especially during dry periods. Mustard greens need consistent moisture to thrive. Aim for about 1 inch of water per week.
* Weeding: Keep the area around your mustard greens free of weeds.
* Fertilizing: If your soil is poor, you may need to fertilize your mustard greens. Use a balanced fertilizer or side-dress with compost. I usually fertilize about halfway through their growing cycle.
* Pest Control: Mustard greens can be susceptible to pests like aphids, flea beetles, and cabbage worms.
* Aphids: These tiny insects suck the sap from plants. You can control them with a strong spray of water or by introducing beneficial insects like ladybugs.
* Flea Beetles: These small beetles chew tiny holes in the leaves. You can control them with row covers or by using insecticidal soap.
* Cabbage Worms: These caterpillars eat the leaves of mustard greens. You can handpick them off the plants or use Bacillus thuringiensis (Bt), a natural insecticide.
* Bolting: Mustard greens can bolt (go to seed) in hot weather. Bolting makes the leaves bitter. To prevent bolting, plant in partial shade during the hottest months and keep the soil consistently moist. If your plants do bolt, you can still harvest the leaves, but they may not taste as good.
Harvesting Your Mustard Greens
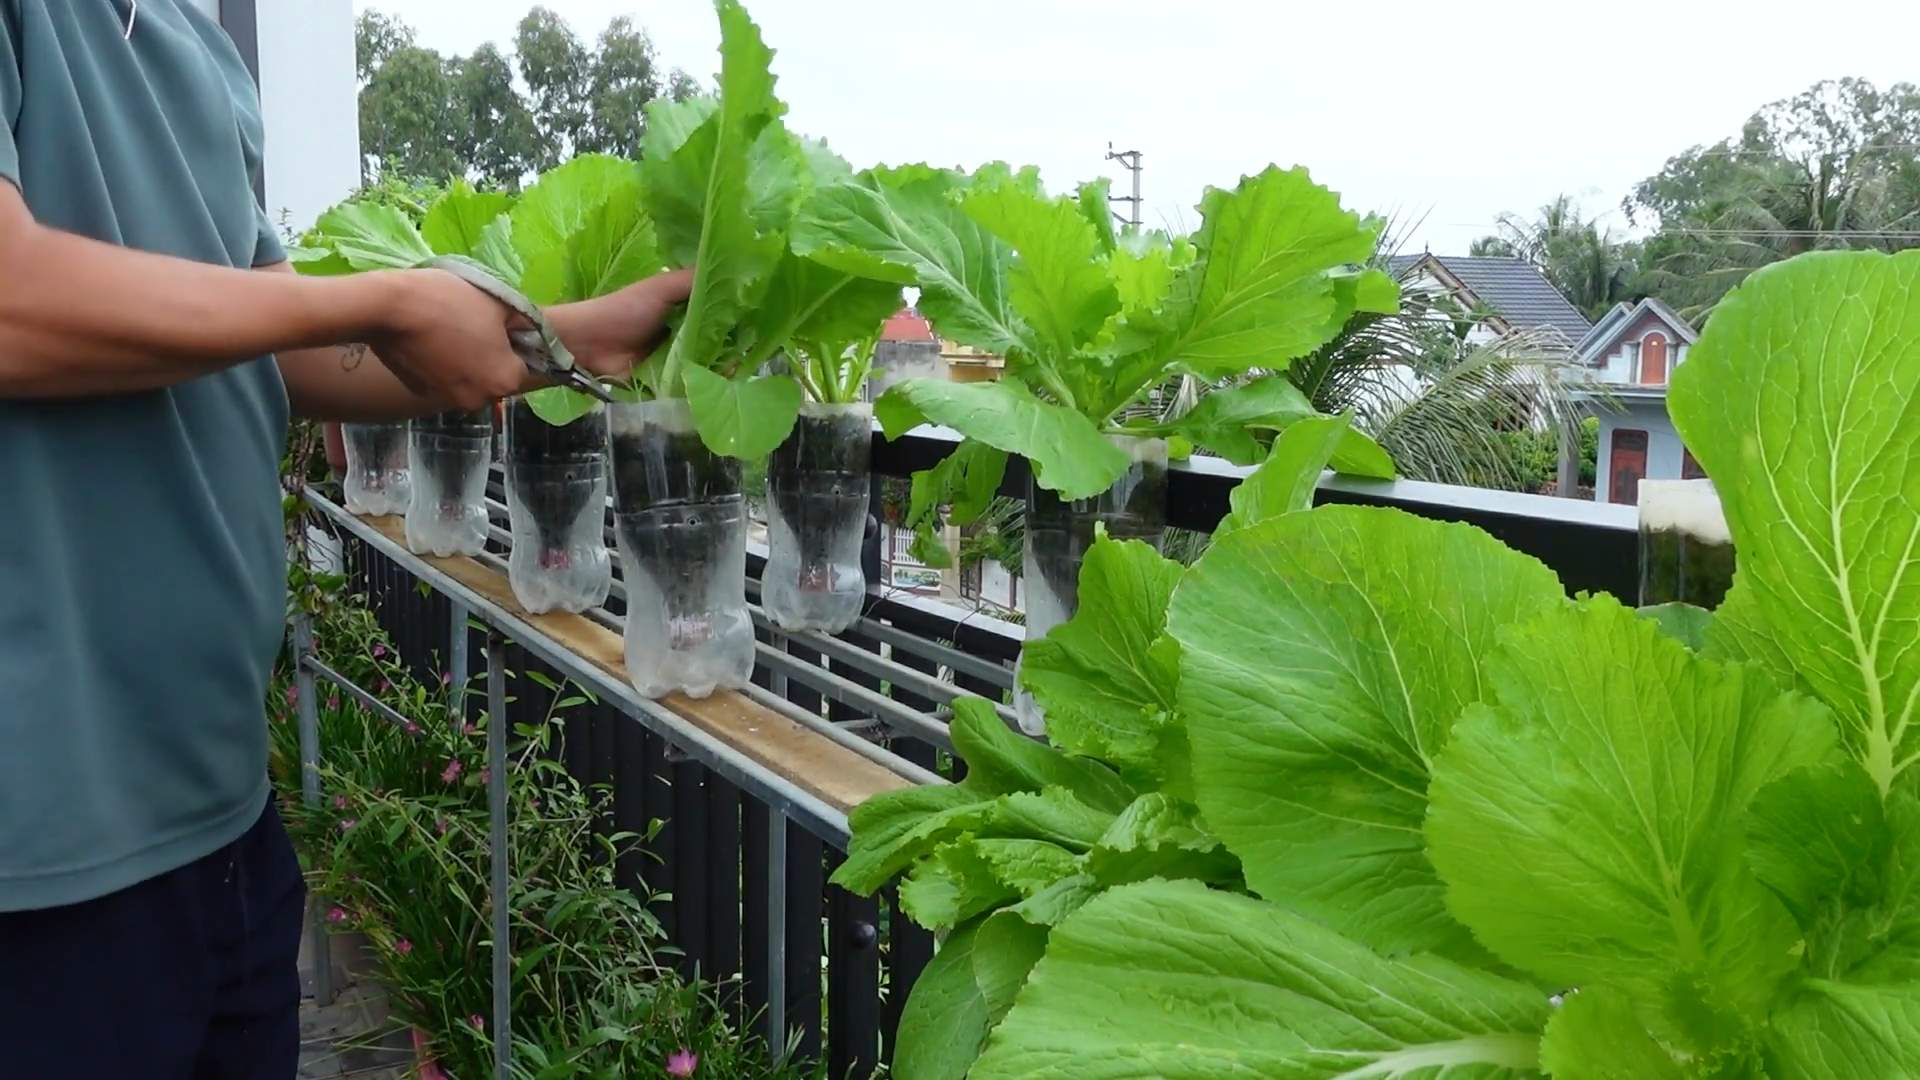
Harvesting is the most rewarding part! You can start harvesting mustard greens when the leaves are about 4-6 inches long.
* Method: You can harvest the entire plant at once by cutting it off at the base, or you can harvest individual leaves as needed. I prefer to harvest individual leaves because it allows the plant to continue producing.
* Timing: Harvest in the morning, after the dew has dried. This is when the leaves are at their freshest.
* Storage: Store mustard greens in the refrigerator in a plastic bag. They will keep for about a week.
Using Your Harvest
Now for the best part: enjoying your homegrown mustard greens! There are so many ways to use them.
* Salads: Young, tender mustard greens are delicious in salads.
* Sautéed: Sautéed mustard greens are a classic Southern dish.
* Stir-fries: Mustard greens add a peppery kick to stir-fries.
* Soups: Add mustard greens to soups for extra flavor and nutrients.
* Juicing: Mustard greens can be juiced for a healthy and refreshing drink.
* Pickling: Pickled mustard greens are a tangy and flavorful condiment.
I often just quickly sauté them with some garlic and olive oil for a simple and delicious side dish. Don’t be afraid to experiment and find your favorite ways to use them!
Troubleshooting
Even with the best planning, sometimes things don’t go exactly as expected. Here are a few common problems you might encounter and how to deal with them:
* Poor Germination: If your seeds don’t germinate, it could be due to several factors:
* Old Seeds: Mustard green seeds are best used within a year or two of purchase.
* Soil Temperature: The soil might be too cold or too hot. Aim for a soil temperature between 60-70°F (15-21°C).
* Moisture: The soil might be too dry or too wet. Keep the soil consistently moist, but not waterlogged.
* Yellowing Leaves: Yellowing leaves can indicate a nutrient deficiency, overwatering, or underwatering.
* Nutrient Deficiency: If the leaves are uniformly yellow, it could be a nitrogen deficiency. Amend the soil with compost or a nitrogen-rich fertilizer.
* Overwatering: Overwatering can lead to root rot, which can cause yellowing leaves. Make sure the soil is well-drained.
* Underwatering: Underwatering can also cause yellowing leaves. Water regularly, especially during dry periods.
* Pest Infestation: As mentioned earlier, mustard greens can be susceptible to pests. Regularly inspect your plants for signs of pests and take action promptly.
Growing mustard greens is a rewarding experience. With a little care and attention, you can enjoy
Conclusion
So, there you have it! Growing mustard greens at home is not only surprisingly simple, but also incredibly rewarding. Forget those wilted, overpriced bunches at the grocery store. With just a little effort and our easy DIY trick, you can have a constant supply of fresh, peppery mustard greens right at your fingertips.
Why is this a must-try? Because it’s about more than just saving money. It’s about connecting with your food, understanding where it comes from, and enjoying the unparalleled flavor of truly fresh produce. Store-bought mustard greens simply can’t compare to the vibrant taste and crisp texture of those you’ve nurtured yourself. Plus, you control everything – from the soil to the sunlight – ensuring your greens are free from harmful pesticides and chemicals.
But the benefits don’t stop there. Growing your own mustard greens is also a fantastic way to add a burst of nutrition to your diet. These leafy greens are packed with vitamins A, C, and K, as well as essential minerals like calcium and iron. Incorporating them into your meals is a delicious and healthy way to boost your overall well-being.
Looking for variations? Absolutely! Experiment with different varieties of mustard greens to find your favorite flavor profile. Some are milder, while others pack a serious punch. Try ‘Florida Broadleaf’ for a classic taste, or ‘Red Giant’ for a beautiful color and slightly spicier flavor. You can also adjust the growing conditions to influence the flavor. For example, providing partial shade can result in milder greens, while more sunlight will intensify the peppery taste.
Consider companion planting your mustard greens with other vegetables like radishes or carrots. These plants can help deter pests and improve the overall health of your garden. You can also succession plant your mustard greens, sowing new seeds every few weeks to ensure a continuous harvest throughout the growing season.
Don’t be afraid to get creative in the kitchen, too! Mustard greens are incredibly versatile and can be used in a wide range of dishes. Add them to salads for a peppery kick, sauté them with garlic and olive oil for a simple side dish, or incorporate them into soups, stews, and stir-fries. They’re also delicious in omelets, frittatas, and even smoothies.
We are confident that this DIY trick for growing mustard greens will transform your kitchen and your meals. It’s a simple, sustainable, and incredibly satisfying way to enjoy fresh, healthy produce.
So, what are you waiting for? Grab some seeds, find a sunny spot, and get growing! We encourage you to try this DIY trick and share your experience with us. Let us know what varieties you try, what dishes you create, and any tips or tricks you discover along the way. Share your photos and stories on social media using #HomegrownMustardGreens. We can’t wait to see what you create! Happy gardening!
Frequently Asked Questions (FAQ)
What is the best time of year to plant mustard greens?
Mustard greens are a cool-season crop, meaning they thrive in cooler temperatures. The best time to plant them is in early spring or late summer/early fall. In spring, sow seeds as soon as the soil can be worked. For a fall harvest, plant seeds about 4-6 weeks before the first expected frost. Avoid planting during the hottest months of summer, as the heat can cause the greens to bolt (go to seed) and become bitter.
How much sunlight do mustard greens need?
Mustard greens prefer full sun, which means at least 6 hours of direct sunlight per day. However, they can also tolerate partial shade, especially in hotter climates. If you live in an area with intense summer heat, providing some afternoon shade can help prevent the greens from bolting.
What kind of soil is best for growing mustard greens?
Mustard greens prefer well-drained soil that is rich in organic matter. Before planting, amend the soil with compost or other organic material to improve its fertility and drainage. The ideal soil pH for mustard greens is between 6.0 and 7.5.
How often should I water my mustard greens?
Mustard greens need consistent moisture to thrive. Water them regularly, especially during dry periods. Aim to keep the soil consistently moist but not waterlogged. A good rule of thumb is to water deeply whenever the top inch of soil feels dry to the touch.
How long does it take for mustard greens to mature?
Mustard greens are a fast-growing crop. Depending on the variety, they typically mature in 30-60 days. You can start harvesting the outer leaves as soon as they are large enough to eat, or you can wait until the entire plant is mature.
What are some common pests and diseases that affect mustard greens?
Some common pests that can affect mustard greens include aphids, flea beetles, cabbage worms, and slugs. To control these pests, you can use organic methods such as hand-picking, insecticidal soap, or row covers. Common diseases that can affect mustard greens include downy mildew and white rust. To prevent these diseases, ensure good air circulation, avoid overwatering, and practice crop rotation.
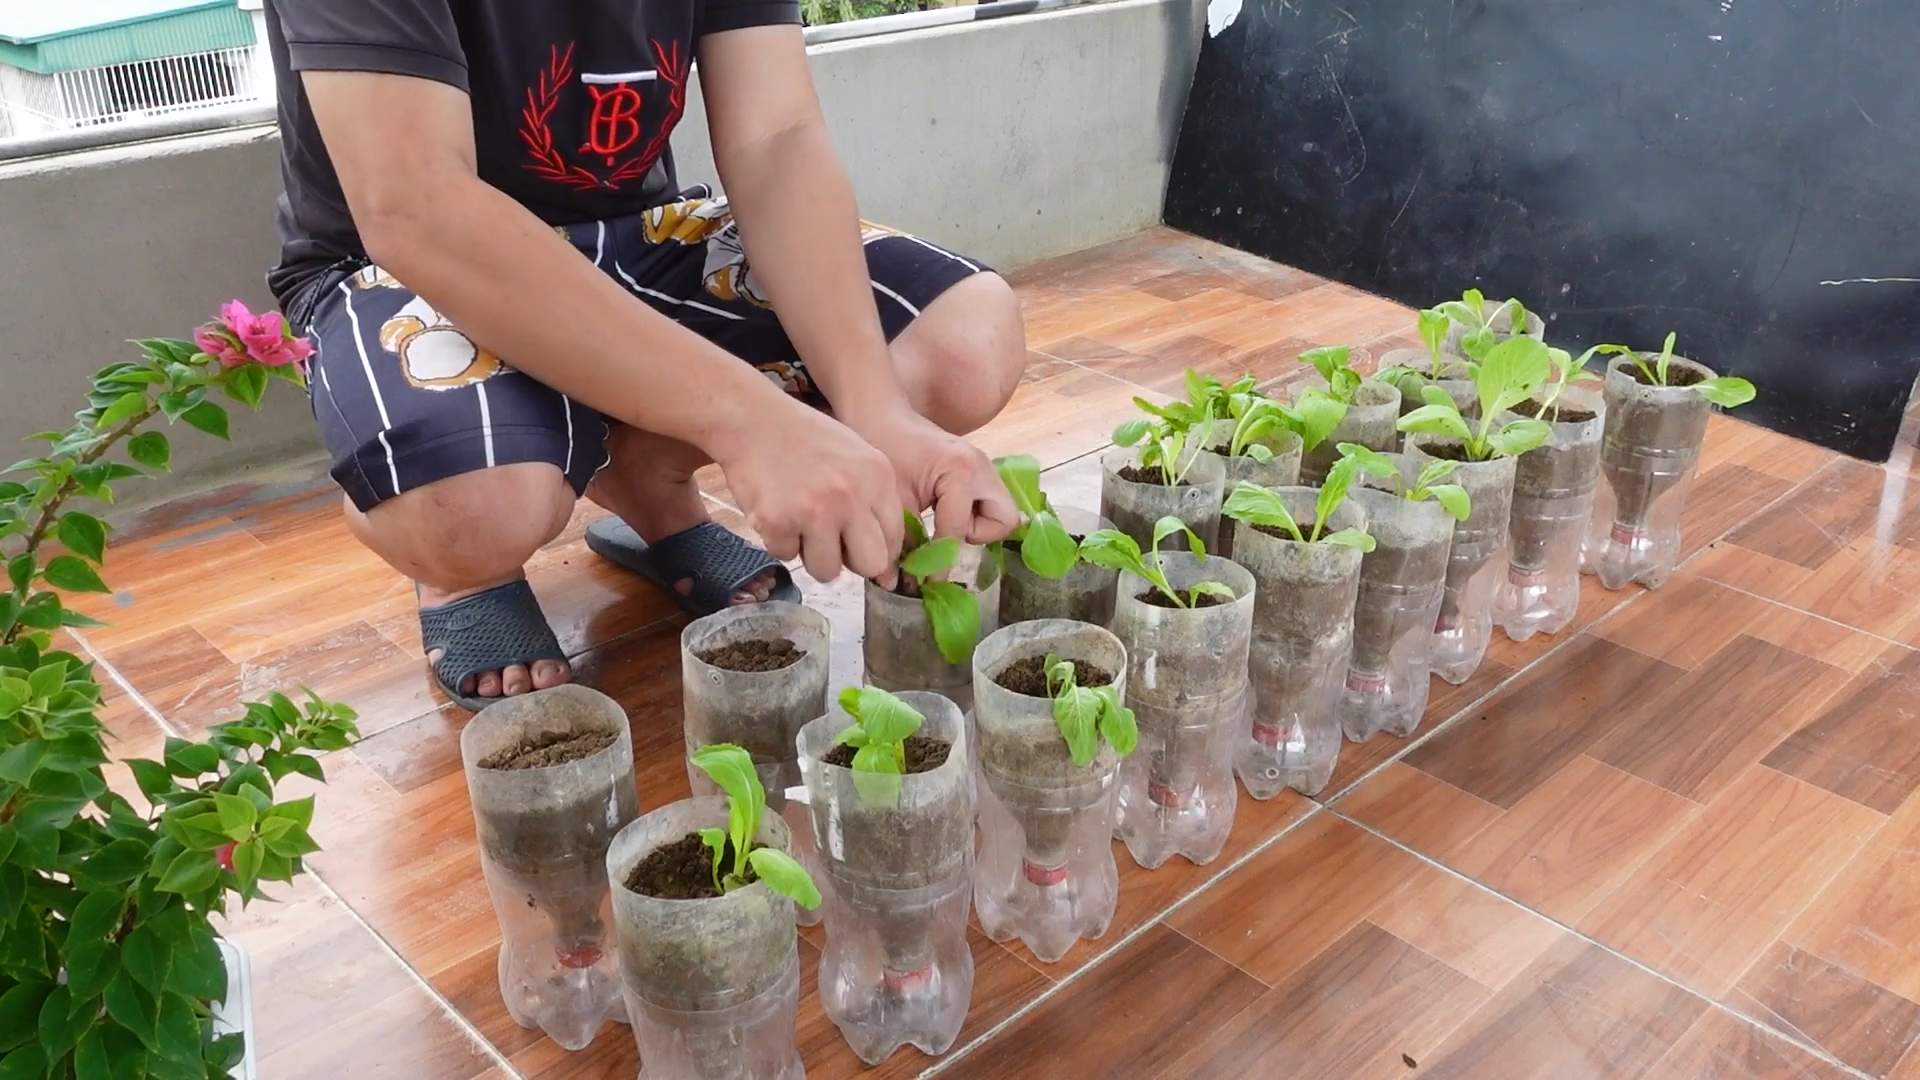
Can I grow mustard greens in containers?
Yes, mustard greens are well-suited for container gardening. Choose a container that is at least 6 inches deep and has drainage holes. Fill the container with a high-quality potting mix and plant the seeds according to the instructions on the seed packet. Place the container in a sunny location and water regularly.
How do I harvest mustard greens?
You can harvest mustard greens by either cutting the outer leaves as needed or harvesting the entire plant at once. To harvest individual leaves, use a sharp knife or scissors to cut the leaves near the base of the plant. To harvest the entire plant, cut it off at the soil level.
How do I store mustard greens?
Mustard greens are best used fresh, but they can be stored in the refrigerator for a few days. To store them, wrap them loosely in a damp paper towel and place them in a plastic bag.
My mustard greens are bolting (going to seed). What should I do?
Bolting is a common problem with mustard greens, especially in hot weather. Once the plants bolt, the leaves will become bitter. To prevent bolting, try to plant your mustard greens in a location that receives some afternoon shade. You can also try planting bolt-resistant varieties. If your plants do bolt, you can still harvest the leaves, but they may not taste as good. You can also allow the plants to go to seed and collect the seeds for planting next season.
Are mustard greens good for you?
Yes! Mustard greens are incredibly nutritious. They are an excellent source of vitamins A, C, and K, as well as folate, calcium, and fiber. They also contain antioxidants that can help protect against disease. Incorporating mustard greens into your diet is a great way to boost your overall health.
Can I eat the stems of mustard greens?
Yes, the stems of mustard greens are edible, but they can be a bit tough. If you prefer, you can remove the stems before cooking the leaves. However, if you are using young, tender mustard greens, the stems will be more tender and can be eaten along with the leaves.
What are some good ways to cook mustard greens?
Mustard greens can be cooked in a variety of ways. They can be sautéed, steamed, boiled, or added to soups and stews. They are also delicious in salads, especially when paired with a vinaigrette dressing. Some popular ways to cook mustard greens include sautéing them with garlic and olive oil, braising them with bacon or ham, or adding them to a stir-fry.
Can I freeze mustard greens?
Yes, you can freeze mustard greens. To freeze them, wash them thoroughly and blanch them in boiling water for 2-3 minutes. Then, transfer them to an ice bath to stop the cooking process. Drain the greens well and pack them into freezer bags or containers. Frozen mustard greens will keep for up to 6 months.
Leave a Comment