
Growing Mustard Greens in Bottles: Sounds unconventional, right? But trust me, this DIY project is about to revolutionize your small-space gardening game! Forget sprawling gardens and back-breaking labor; we’re bringing the farm to your windowsill, one recycled bottle at a time.
Mustard greens, with their peppery bite, have been a culinary staple for centuries, gracing tables from ancient Rome to the American South. But you don’t need acres of land to enjoy their fresh, vibrant flavor. In fact, you don’t even need a garden! This ingenious method allows you to cultivate these nutritious greens in a surprisingly compact and eco-friendly way.
Why should you try growing mustard greens in bottles? Well, for starters, it’s incredibly space-efficient, perfect for apartment dwellers or anyone with limited outdoor space. It’s also a fantastic way to recycle plastic bottles, turning waste into a source of fresh, healthy food. Plus, it’s just plain fun! Imagine the satisfaction of harvesting your own mustard greens, grown with your own two hands (and a few repurposed bottles!). I’m excited to show you how easy and rewarding growing mustard greens in bottles can be. Let’s get started!
Senfgrün im Upcycling-Stil: Anzucht in Plastikflaschen
Hey Leute! Habt ihr Lust auf frische, würzige Senfgrünblätter direkt aus eurer Küche? Und das Ganze noch nachhaltig und kostengünstig? Dann seid ihr hier genau richtig! Ich zeige euch, wie ihr Senfgrün ganz einfach in recycelten Plastikflaschen anbauen könnt. Das ist nicht nur super für die Umwelt, sondern auch ein echter Hingucker!
Was ihr für euer Mini-Senfgrün-Gärtchen braucht:
* Plastikflaschen: Am besten eignen sich 1,5-Liter-Flaschen. Achtet darauf, dass sie sauber und leer sind.
* Senfgrünsamen: Die gibt es in jedem Gartencenter oder online. Achtet auf Bio-Qualität, wenn ihr Pestizide vermeiden wollt.
* Anzuchterde: Diese ist nährstoffarm und locker, ideal für die Keimung der Samen.
* Messer oder Schere: Zum Zuschneiden der Flaschen.
* Sprühflasche: Zum Befeuchten der Erde.
* Optional: Kleine Steine oder Kies für die Drainage.
* Optional: Permanentmarker zum Beschriften der Flaschen.
Schritt-für-Schritt-Anleitung: Senfgrün-Anzucht in Flaschen
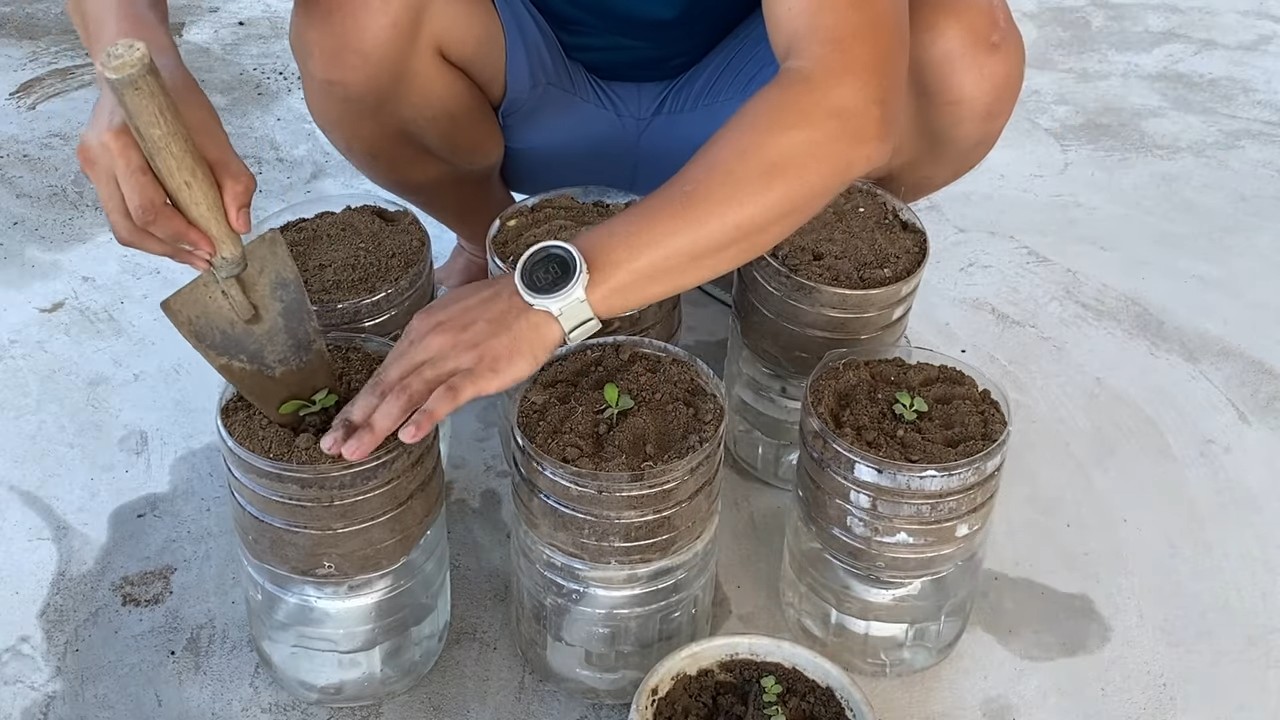
1. Flaschen vorbereiten: Zuerst müsst ihr die Plastikflaschen vorbereiten. Nehmt ein Messer oder eine Schere und schneidet die Flasche etwa in der Mitte durch. Ihr könnt die obere Hälfte entweder wegwerfen oder sie später als Mini-Gewächshaus verwenden (dazu später mehr!). Ich empfehle, die Schnittkanten mit Klebeband zu versehen, um Verletzungen zu vermeiden.
2. Drainage schaffen (optional): Wenn ihr wollt, könnt ihr eine kleine Drainage am Boden der Flasche anlegen. Dazu gebt ihr einfach eine Schicht kleine Steine oder Kies in den unteren Teil der Flasche. Das verhindert Staunässe und sorgt dafür, dass die Wurzeln nicht faulen.
3. Erde einfüllen: Füllt nun den unteren Teil der Flasche mit Anzuchterde. Lasst etwa 2-3 cm Platz bis zum Rand. Drückt die Erde leicht an.
4. Samen aussäen: Verteilt die Senfgrünsamen gleichmäßig auf der Erde. Achtet darauf, dass sie nicht zu dicht liegen, damit die Pflanzen genügend Platz zum Wachsen haben. Ich säe meistens so, dass zwischen den Samen etwa 1-2 cm Platz ist.
5. Samen bedecken: Bedeckt die Samen mit einer dünnen Schicht Erde (ca. 0,5 cm). Drückt die Erde wieder leicht an.
6. Bewässern: Befeuchtet die Erde vorsichtig mit einer Sprühflasche. Die Erde sollte feucht, aber nicht nass sein. Vermeidet es, die Samen wegzuspülen.
7. Standort wählen: Stellt die bepflanzten Flaschen an einen hellen, warmen Ort. Ein Fensterbrett ist ideal. Direkte Sonneneinstrahlung kann die jungen Pflänzchen jedoch verbrennen, also achtet darauf, dass sie nicht den ganzen Tag in der prallen Sonne stehen.
8. Feuchtigkeit halten: Haltet die Erde in den nächsten Tagen feucht, indem ihr sie regelmäßig mit der Sprühflasche befeuchtet. Die Erde sollte nie ganz austrocknen.
9. Keimung beobachten: Nach einigen Tagen (meistens 3-7 Tage) sollten die ersten Keimlinge zu sehen sein. Jetzt ist es wichtig, dass die Pflänzchen genügend Licht bekommen.
10. Mini-Gewächshaus (optional): Wenn ihr die obere Hälfte der Flasche aufgehoben habt, könnt ihr sie jetzt als Mini-Gewächshaus verwenden. Stülpt sie einfach über den unteren Teil der Flasche. Das sorgt für ein feuchtwarmes Klima, das die Keimung beschleunigt. Achtet aber darauf, dass ihr die Flasche regelmäßig lüftet, um Schimmelbildung zu vermeiden.
11. Pflege: Sobald die Pflänzchen etwas größer sind, könnt ihr sie etwas weniger oft gießen. Achtet aber immer darauf, dass die Erde nicht austrocknet. Wenn die Pflänzchen zu dicht stehen, könnt ihr sie vereinzeln, indem ihr einige herauszieht.
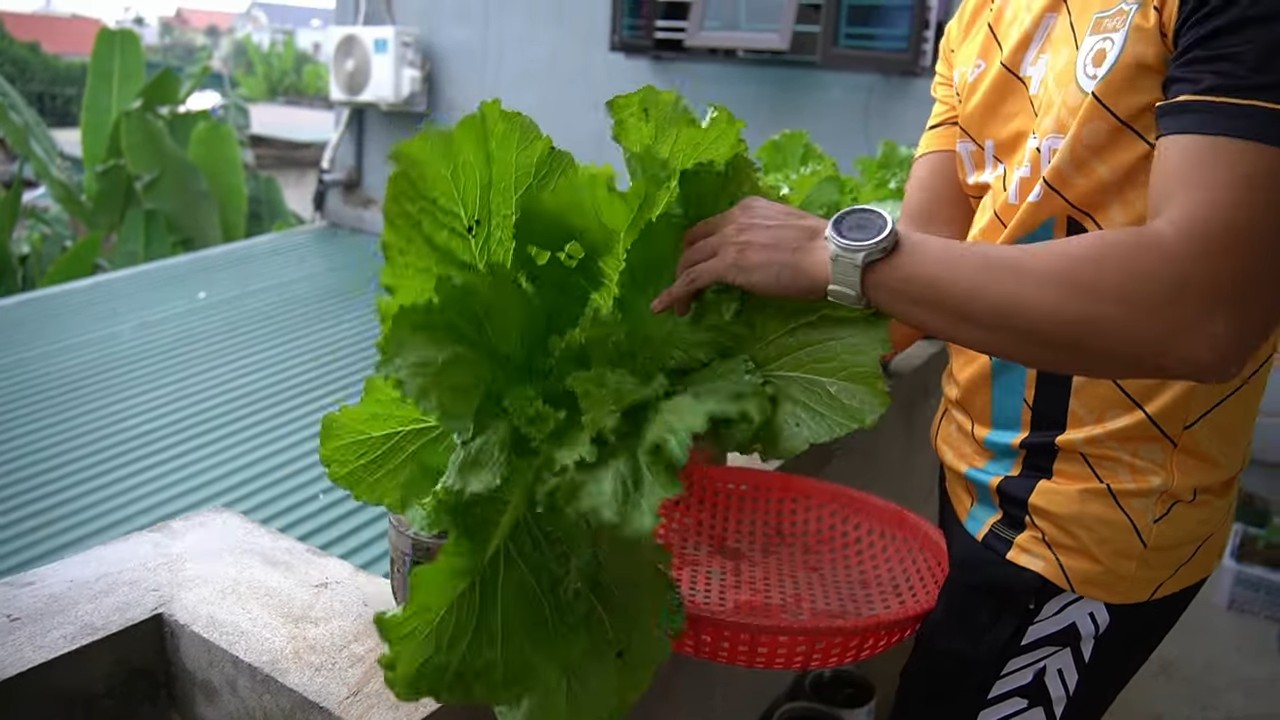
12. Ernten: Nach etwa 2-3 Wochen könnt ihr das erste Mal ernten. Schneidet die Blätter einfach mit einer Schere ab. Lasst dabei die unteren Blätter stehen, damit die Pflanze weiterwachsen kann.
Noch ein paar Tipps und Tricks:
* Verschiedene Sorten: Es gibt verschiedene Sorten von Senfgrün. Probiert doch mal verschiedene aus, um euren Favoriten zu finden!
* Beschriftung: Beschriftet die Flaschen mit einem Permanentmarker, damit ihr wisst, welche Sorte ihr angebaut habt.
* Düngen: Senfgrün braucht nicht viel Dünger. Wenn ihr wollt, könnt ihr aber ab und zu etwas organischen Flüssigdünger ins Gießwasser geben.
* Schädlinge: Senfgrün ist relativ robust gegen Schädlinge. Wenn ihr trotzdem Probleme habt, könnt ihr die Pflänzchen mit einer milden Seifenlösung besprühen.
* Mehrere Anpflanzungen: Um immer frisches Senfgrün zu haben, könnt ihr alle paar Wochen neue Samen aussäen.
* Upcycling: Ihr könnt nicht nur Plastikflaschen, sondern auch andere Behälter wie Joghurtbecher oder Konservendosen für die Anzucht verwenden.
* Kreative Gestaltung: Bemalt die Flaschen doch mal bunt oder beklebt sie mit Aufklebern. So wird euer Mini-Garten zu einem echten Hingucker!
Senfgrün in der Küche:
Senfgrün ist super vielseitig in der Küche einsetzbar. Es schmeckt würzig-scharf und passt hervorragend zu Salaten, Suppen, Sandwiches oder als Beilage zu Fleisch- und Fischgerichten. Ihr könnt es auch kurz in der Pfanne anbraten oder zu einem Pesto verarbeiten.
Häufige Fragen (FAQ):
* Wie lange dauert es, bis Senfgrün keimt? In der Regel dauert es 3-7 Tage, bis die Samen keimen.
* Wie oft muss ich gießen? Gießt die Erde regelmäßig, sodass sie immer feucht, aber nicht nass ist.
* Welchen Standort braucht Senfgrün? Senfgrün braucht einen hellen, warmen Standort. Direkte Sonneneinstrahlung sollte vermieden werden.
* Kann ich Senfgrün auch im Freien anbauen? Ja, Senfgrün kann auch im Freien angebaut werden. Achtet aber darauf, dass es nicht zu kalt wird.
* Wie lange kann ich Senfgrün ernten? Ihr könnt Senfgrün so lange ernten, wie die Pflanze Blätter produziert.
* Was mache ich, wenn die Blätter gelb werden? Gelbe Blätter können ein Zeichen für zu viel oder zu wenig Wasser sein. Überprüft die Feuchtigkeit der Erde und passt die Bewässerung entsprechend an.
* Kann ich die Samen selbst gewinnen? Ja, wenn ihr die Pflanzen blühen lasst, bilden sie Samen, die ihr für die nächste Anzucht verwenden könnt.
Zusammenfassung:
Senfgrün in Plastikflaschen anzubauen ist eine einfache, kostengünstige und nachhaltige Möglichkeit, frische Kräuter zu Hause zu ziehen. Mit ein paar einfachen Schritten und etwas Geduld könnt ihr schon bald eure eigenen würzigen Senfgrünblätter ernten. Probiert es aus und lasst es euch schmecken! Ich hoffe, diese Anleitung hat euch gefallen und inspiriert. Viel Spaß beim Gärtnern!
Conclusion
So, there you have it! Growing mustard greens in bottles is not just a quirky gardening experiment; it’s a genuinely practical and rewarding way to enjoy fresh, peppery greens right at your fingertips. We’ve explored how this method transforms discarded plastic bottles into miniature vertical gardens, offering a sustainable and space-saving solution for urban dwellers, apartment residents, or anyone looking to add a touch of green to their lives.
Why is this DIY trick a must-try? Firstly, it’s incredibly accessible. The materials are readily available – you likely already have empty plastic bottles waiting to be repurposed. Secondly, it’s a fantastic way to reduce waste and embrace a more eco-conscious lifestyle. Instead of tossing those bottles into the recycling bin (or worse, the trash), you’re giving them a new lease on life, contributing to a smaller environmental footprint. Thirdly, it’s surprisingly easy! The process is straightforward, even for beginners, and requires minimal gardening experience.
Beyond the basic method, there’s plenty of room for experimentation and personalization. Consider using different types of bottles – varying sizes and shapes can create an interesting visual display. You could also try painting the bottles to add a splash of color to your balcony or windowsill. For variations, explore different types of mustard greens. There’s a whole world beyond the standard variety, from the milder ‘Florida Broadleaf’ to the spicier ‘Red Giant.’ You can even try growing other leafy greens like spinach or lettuce using the same bottle gardening technique.
Don’t limit yourself to just mustard greens! This method is adaptable to a variety of small herbs and vegetables. Imagine a vertical garden filled with basil, parsley, or even strawberries! The possibilities are truly endless.
Furthermore, growing your own mustard greens in bottles allows you to control the growing environment, ensuring that your greens are free from harmful pesticides and herbicides. You know exactly what’s going into your food, providing you with a healthier and more sustainable source of fresh produce.
But the most compelling reason to try this DIY trick is the sheer joy of watching your plants grow. There’s something incredibly satisfying about nurturing a seed into a thriving plant, especially when you’ve done it using recycled materials. It’s a tangible connection to nature, a reminder of the beauty and resilience of the natural world.
We wholeheartedly encourage you to give this DIY project a try. Gather your bottles, grab some seeds, and get ready to experience the satisfaction of growing your own mustard greens. It’s a fun, educational, and rewarding activity that will bring a touch of green to your life.
And most importantly, we want to hear about your experiences! Share your photos, tips, and challenges in the comments below. Let’s create a community of bottle gardeners, sharing our knowledge and inspiring others to embrace this sustainable and rewarding practice. What bottle types did you use? What varieties of mustard greens did you find most successful? What challenges did you encounter, and how did you overcome them? Your insights will be invaluable to other readers who are just starting out. Let’s cultivate a thriving community around this innovative and eco-friendly gardening technique. So, go ahead, get your hands dirty, and discover the joy of growing your own fresh, delicious mustard greens in bottles!
Frequently Asked Questions (FAQ)
What kind of bottles are best for growing mustard greens?
The best bottles are generally clear plastic bottles, such as those used for water, soda, or juice. Clear bottles allow sunlight to reach the plants, which is essential for photosynthesis. Avoid using dark-colored bottles, as they can block sunlight and hinder growth. The size of the bottle will depend on the variety of mustard greens you’re growing and the space you have available. Smaller bottles (e.g., 16-20 ounce) are suitable for smaller varieties or for starting seedlings, while larger bottles (e.g., 2-liter) can accommodate larger plants or multiple seedlings. Make sure the bottles are clean and free of any residue before using them. Thoroughly rinse them with soap and water to remove any lingering chemicals or sugary substances.
How often should I water my mustard greens grown in bottles?
Watering frequency depends on several factors, including the size of the bottle, the type of soil, the weather conditions, and the stage of growth of the mustard greens. Generally, you should water your mustard greens when the top inch of soil feels dry to the touch. Overwatering can lead to root rot, so it’s important to allow the soil to dry out slightly between waterings. In hot, sunny weather, you may need to water more frequently, perhaps once or even twice a day. In cooler, cloudy weather, you may only need to water every few days. Check the soil moisture regularly and adjust your watering schedule accordingly. When watering, make sure to saturate the soil thoroughly, allowing excess water to drain out of the drainage holes.
What type of soil is best for growing mustard greens in bottles?
A well-draining potting mix is ideal for growing mustard greens in bottles. Avoid using garden soil, as it can be too heavy and compact, leading to poor drainage and root rot. A good potting mix will provide adequate drainage, aeration, and nutrients for your plants. You can also amend your potting mix with compost or other organic matter to improve its fertility and water-holding capacity. A mix of equal parts potting soil, perlite, and vermiculite is a good starting point. Perlite and vermiculite help to improve drainage and aeration, while potting soil provides the necessary nutrients. You can also add a slow-release fertilizer to the potting mix to provide a steady supply of nutrients to your plants.
How much sunlight do mustard greens need when grown in bottles?
Mustard greens thrive in full sun, which means they need at least 6 hours of direct sunlight per day. However, they can also tolerate partial shade, especially in hot climates. If you’re growing your mustard greens indoors, place them near a sunny window or use grow lights to supplement natural light. Insufficient sunlight can lead to leggy growth and reduced yields. If your mustard greens are not getting enough sunlight, they may become pale and weak. Rotate the bottles regularly to ensure that all sides of the plants receive adequate sunlight.
How do I prevent pests and diseases from affecting my mustard greens in bottles?
Prevention is key when it comes to pests and diseases. Start by using clean bottles and fresh potting mix. Inspect your plants regularly for any signs of pests or diseases. Common pests that can affect mustard greens include aphids, flea beetles, and cabbage worms. You can control these pests by handpicking them off the plants, spraying them with insecticidal soap, or using neem oil. Diseases that can affect mustard greens include fungal diseases like powdery mildew and downy mildew. To prevent these diseases, ensure good air circulation around your plants and avoid overwatering. If you notice any signs of disease, remove the affected leaves immediately and treat the plants with a fungicide if necessary.
Can I grow other vegetables or herbs in bottles using the same method?
Absolutely! The bottle gardening method is versatile and can be used to grow a variety of other vegetables and herbs. Some popular choices include lettuce, spinach, kale, basil, parsley, and chives. When choosing what to grow, consider the size of the bottle and the space requirements of the plant. Smaller herbs and leafy greens are generally well-suited for bottle gardening. You may need to adjust the soil mix and watering schedule depending on the specific needs of the plant.
How do I harvest my mustard greens grown in bottles?
You can harvest your mustard greens when the leaves are about 4-6 inches long. Simply snip off the outer leaves with scissors or a knife, leaving the inner leaves to continue growing. This cut-and-come-again method allows you to harvest your mustard greens multiple times over several weeks. Avoid harvesting more than one-third of the plant at a time, as this can stress the plant and reduce its yield. Harvest your mustard greens in the morning, when the leaves are crisp and fresh.
What are some creative ways to display my bottle garden of mustard greens?
There are many creative ways to display your bottle garden of mustard greens. You can hang the bottles from a balcony railing, arrange them on a windowsill, or create a vertical garden on a wall. You can also paint the bottles to add a splash of color to your display. Consider using different sizes and shapes of bottles to create an interesting visual effect. You can also add decorative elements like pebbles, shells, or small figurines to your bottle garden. Get creative and have fun with it!
How do I deal with drainage issues in my bottle garden?
Proper drainage is crucial for the health of your mustard greens. Make sure to create drainage holes in the bottom of the bottles before planting. If you notice that the soil is staying too wet, you can try adding more perlite or vermiculite to the potting mix to improve drainage. You can also elevate the bottles slightly to allow excess water to drain out more easily. Avoid placing the bottles in saucers or trays that can trap water.
Is growing mustard greens in bottles organic?
Yes, growing mustard greens in bottles can be organic if you use organic potting mix, organic fertilizer, and avoid using synthetic pesticides and herbicides. Choose a potting mix that is certified organic and contains no synthetic additives. Use organic fertilizers like compost tea or worm castings to provide nutrients to your plants. Control pests and diseases using organic methods like handpicking, insecticidal soap, or neem oil. By following these practices, you

Leave a Comment