
Growing peanuts in your backyard might sound like a whimsical dream, reserved for sprawling farms in Georgia, but I’m here to tell you it’s totally achievable, even in a small space! Forget those store-bought peanuts – imagine the satisfaction of harvesting your own homegrown, fresh, and flavorful peanuts right outside your back door.
Peanuts, also known as groundnuts, have a rich history, dating back thousands of years to South America. They’ve since become a beloved staple worldwide, enjoyed in countless forms. But did you know that growing them yourself is surprisingly easy and rewarding?
In this DIY guide, I’ll walk you through all the steps, from selecting the right peanut variety to harvesting your very own crop. Growing peanuts in your backyard isn’t just a fun project; it’s a sustainable way to enjoy fresh produce, connect with nature, and impress your friends and family with your green thumb. Plus, who doesn’t love the taste of freshly roasted peanuts? Let’s get started and turn your backyard into a peanut paradise!
Erdnüsse im eigenen Garten anbauen: Eine detaillierte Anleitung
Hallo Gartenfreunde! Habt ihr euch jemals gefragt, ob ihr eure eigenen Erdnüsse anbauen könnt? Ich kann euch sagen, es ist einfacher als ihr denkt und unglaublich befriedigend! In diesem Artikel zeige ich euch Schritt für Schritt, wie ihr Erdnüsse in eurem eigenen Garten erfolgreich anbauen könnt. Lasst uns loslegen!
Was ihr für den Erdnussanbau benötigt
Bevor wir mit dem Pflanzen beginnen, solltet ihr sicherstellen, dass ihr alles Notwendige zur Hand habt. Hier ist eine Liste der Dinge, die ihr benötigt:
* Erdnusssamen: Achtet darauf, unbehandelte Erdnüsse zu kaufen. Geröstete oder gesalzene Erdnüsse keimen nicht. Ihr findet sie in Gartencentern oder online.
* Gartenwerkzeuge: Eine Schaufel, eine Harke und eventuell ein Pflanzholz.
* Gartenhandschuhe: Zum Schutz eurer Hände.
* Kompost oder organischer Dünger: Um den Boden anzureichern.
* Gießkanne oder Gartenschlauch: Für die Bewässerung.
* Mulch (optional): Stroh oder Grasschnitt, um die Feuchtigkeit zu halten und Unkraut zu unterdrücken.
* Geduld: Erdnüsse brauchen Zeit, um zu wachsen!
Die richtige Vorbereitung ist der Schlüssel
Der Erfolg beim Erdnussanbau hängt stark von der richtigen Vorbereitung ab. Hier sind die Schritte, die ihr befolgen solltet:
1. Wählt den richtigen Standort: Erdnüsse lieben die Sonne! Sucht euch einen Platz in eurem Garten, der mindestens 6-8 Stunden direkte Sonneneinstrahlung pro Tag bekommt.
2. Bodenbeschaffenheit: Erdnüsse bevorzugen lockeren, gut durchlässigen Boden. Schwere Lehmböden sind weniger geeignet, da die Erdnüsse Schwierigkeiten haben, in den Boden einzudringen. Wenn ihr Lehmboden habt, könnt ihr ihn mit Kompost, Sand und organischem Material verbessern.
3. Boden testen: Der ideale pH-Wert für Erdnüsse liegt zwischen 6,0 und 6,5. Ihr könnt ein Bodentestkit verwenden, um den pH-Wert zu überprüfen und gegebenenfalls anzupassen.
4. Boden vorbereiten: Lockert den Boden mit einer Schaufel oder einem Grubber auf. Entfernt Steine, Wurzeln und andere Hindernisse. Arbeitet Kompost oder organischen Dünger in den Boden ein, um ihn anzureichern.
5. Beete anlegen: Erdnüsse wachsen am besten in leicht erhöhten Beeten. Das hilft bei der Drainage und erleichtert die Ernte.
Aussaat der Erdnüsse: Schritt für Schritt
Jetzt kommt der spannende Teil: das Pflanzen der Erdnüsse!
1. Der richtige Zeitpunkt: Erdnüsse sind wärmeliebend und sollten erst nach dem letzten Frost gepflanzt werden, wenn die Bodentemperatur mindestens 18°C beträgt. In Deutschland ist das meistens im Mai oder Juni der Fall.
2. Erdnüsse vorkeimen (optional): Um den Keimprozess zu beschleunigen, könnt ihr die Erdnüsse vor dem Pflanzen vorkeimen. Legt sie dazu für 24 Stunden in lauwarmes Wasser. Wickelt sie dann in ein feuchtes Papiertuch und legt sie in einen Plastikbeutel. Bewahrt den Beutel an einem warmen Ort auf. Nach ein paar Tagen sollten die Erdnüsse keimen.
3. Pflanzabstand: Pflanzt die Erdnüsse in einem Abstand von etwa 15-20 cm zueinander und die Reihen etwa 60-75 cm auseinander.
4. Pflanztiefe: Steckt die Erdnüsse etwa 2-5 cm tief in den Boden. Achtet darauf, dass die Keimwurzel nach unten zeigt, falls ihr die Erdnüsse vorgekeimt habt.
5. Bedecken und gießen: Bedeckt die Erdnüsse mit Erde und drückt sie leicht an. Gießt die Erde anschließend gründlich, aber vermeidet Staunässe.
Pflege der Erdnusspflanzen: So bleiben sie gesund und produktiv
Nach dem Pflanzen ist es wichtig, die Erdnusspflanzen gut zu pflegen, damit sie gesund wachsen und viele Erdnüsse produzieren.
1. Bewässerung: Erdnüsse benötigen regelmäßige Bewässerung, besonders während der Blütezeit und der Erdnussbildung. Achtet darauf, dass der Boden feucht, aber nicht nass ist. Vermeidet es, die Blätter zu befeuchten, um Pilzkrankheiten vorzubeugen.
2. Unkrautbekämpfung: Haltet das Unkraut um die Erdnusspflanzen herum frei. Unkraut konkurriert mit den Erdnüssen um Nährstoffe und Wasser. Ihr könnt Unkraut manuell entfernen oder Mulch verwenden, um das Unkrautwachstum zu unterdrücken.
3. Düngung: Erdnüsse benötigen nicht viel Dünger, aber eine leichte Düngung während der Wachstumsperiode kann hilfreich sein. Verwendet einen organischen Dünger, der reich an Phosphor und Kalium ist. Vermeidet stickstoffhaltige Dünger, da diese das Blattwachstum fördern, aber die Erdnussbildung beeinträchtigen können.
4. Anhügeln: Wenn die Erdnusspflanzen etwa 15-20 cm hoch sind, solltet ihr sie anhäufeln. Das bedeutet, dass ihr Erde um die Basis der Pflanzen herum anhäuft. Das fördert die Bildung von Seitentrieben, an denen sich die Erdnüsse entwickeln.
5. Beobachtung: Achtet auf Schädlinge und Krankheiten. Erdnüsse können von Blattläusen, Spinnmilben und Pilzkrankheiten befallen werden. Bei Bedarf könnt ihr biologische Schädlingsbekämpfungsmittel oder Fungizide einsetzen.
Die Ernte: Der Lohn für eure Mühe
Nach etwa 120-150 Tagen, je nach Sorte und Klima, sind eure Erdnüsse reif für die Ernte.
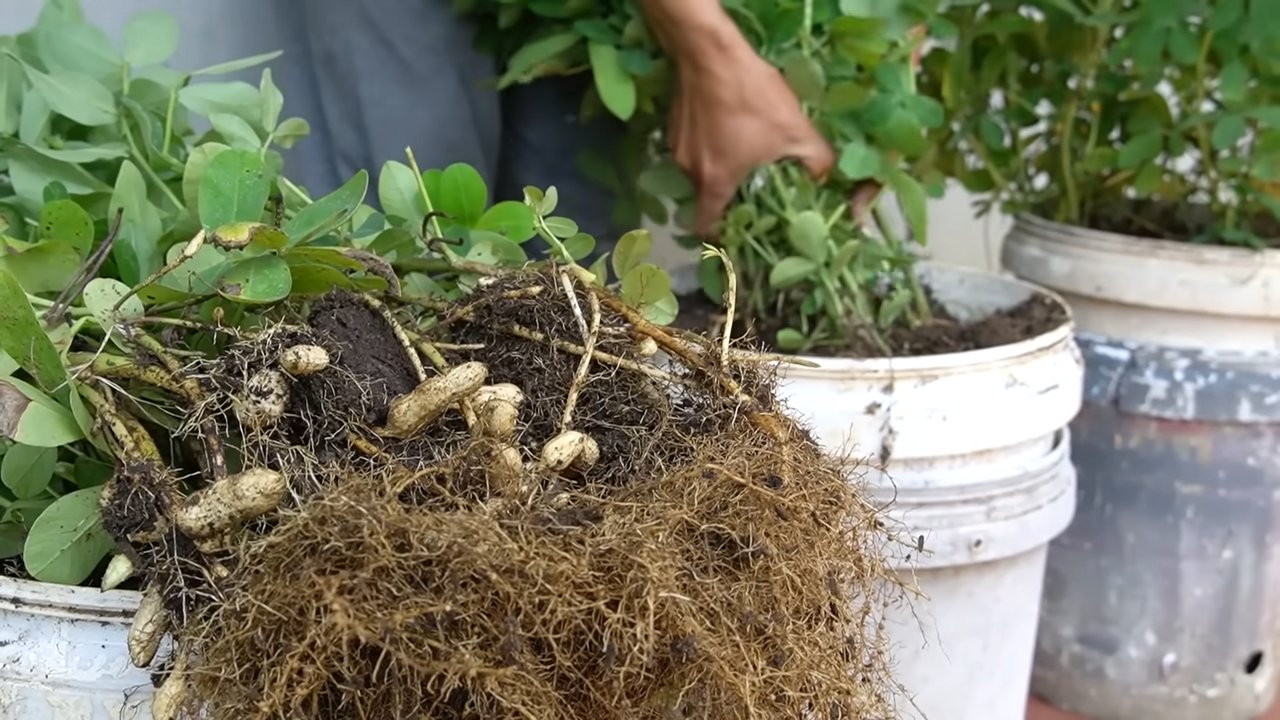
1. Der richtige Zeitpunkt: Der beste Zeitpunkt für die Ernte ist, wenn die Blätter der Erdnusspflanzen gelb werden und absterben. Ihr könnt auch ein paar Pflanzen ausgraben und die Erdnüsse überprüfen. Wenn die Schalen hart und die Kerne gut entwickelt sind, sind sie reif.
2. Die Ernte: Grabt die Erdnusspflanzen vorsichtig mit einer Schaufel aus. Schüttelt die Erde ab und hängt die Pflanzen kopfüber an einem trockenen, luftigen Ort auf, um sie zu trocknen.
3. Trocknung: Lasst die Erdnüsse etwa 2-3 Wochen trocknen. Während dieser Zeit verlieren sie Feuchtigkeit und entwickeln ihren vollen Geschmack.
4. Erdnüsse entfernen: Wenn die Erdnüsse vollständig getrocknet sind, könnt ihr sie von den Pflanzen entfernen.
5. Lagerung: Lagert die Erdnüsse in einem luftdichten Behälter an einem kühlen, trockenen Ort. Sie sind mehrere Monate haltbar.
Häufige Probleme und Lösungen
Auch beim Erdnussanbau können Probleme auftreten. Hier sind einige häufige Probleme und wie ihr sie lösen könnt:
* Schlechte Keimung: Ursachen können schlechte Samenqualität, zu kalter Boden oder zu tiefe Pflanzung sein. Verwendet frische, unbehandelte Samen, wartet, bis der Boden warm genug ist, und pflanzt die Erdnüsse nicht zu tief.
* Gelbe Blätter: Ursachen können Nährstoffmangel, Wassermangel oder Pilzkrankheiten sein. Düngt die Pflanzen mit einem organischen Dünger, sorgt für ausreichende Bewässerung und behandelt Pilzkrankheiten mit einem Fungizid.
* Kleine Erdnüsse: Ursachen können Nährstoffmangel, Wassermangel oder zu dichter Stand sein. Düngt die Pflanzen, sorgt für ausreichende Bewässerung und pflanzt die Erdnüsse in ausreichendem Abstand.
* Schädlinge: Blattläuse und Spinnmilben können die Erdnusspflanzen befallen. Verwendet biologische Schädlingsbekämpfungsmittel oder spült die Pflanzen mit Wasser ab.
Zusätzliche Tipps für den erfolgreichen Erdnussanbau
* Sortenwahl: Es gibt verschiedene Erdnusssorten, die sich in ihrer Reifezeit und ihrem Geschmack unterscheiden. Informiert euch über die verschiedenen Sorten und wählt diejenige aus, die am

Conclusion
So, there you have it! Growing peanuts in your backyard is not only achievable, but it’s also a deeply rewarding experience that connects you to the source of your food in a way that store-bought peanuts simply can’t. We’ve walked you through the entire process, from selecting the right peanut variety and preparing your soil to planting, nurturing, and finally, harvesting your very own crop of delicious, homegrown peanuts.
Why is this DIY trick a must-try? Because it offers a unique blend of benefits that are hard to resist. First and foremost, you get to enjoy the unparalleled flavor of freshly harvested peanuts. The taste is noticeably different – richer, earthier, and simply more vibrant than anything you’ll find on supermarket shelves. Secondly, you gain complete control over the growing process, ensuring that your peanuts are free from harmful pesticides and chemicals. This is especially important if you’re conscious about your health and the environment. Thirdly, it’s an incredibly educational and engaging activity, perfect for families and anyone interested in learning more about where their food comes from. Imagine the satisfaction of sharing your homegrown peanuts with friends and family, knowing that you nurtured them from seed to snack!
But the fun doesn’t stop there! Feel free to experiment with different peanut varieties to discover your personal favorite. Virginia peanuts are known for their large size and excellent roasting qualities, while Spanish peanuts are smaller and sweeter, ideal for candies and snacks. You can also try growing peanuts in containers if you have limited space, or even incorporate them into your existing garden as a nitrogen-fixing cover crop. Consider adding companion plants like marigolds or basil to deter pests and enhance the overall health of your peanut plants.
And speaking of variations, why not try roasting your freshly harvested peanuts with different seasonings? A sprinkle of sea salt and smoked paprika can create a savory treat, while a dusting of cinnamon and sugar can satisfy your sweet tooth. You can even use your homegrown peanuts to make your own peanut butter, peanut brittle, or peanut sauce – the possibilities are endless!
Growing peanuts in your backyard is more than just a gardening project; it’s an adventure. It’s a chance to connect with nature, learn new skills, and enjoy the fruits (or rather, the legumes) of your labor. So, what are you waiting for? Grab a packet of peanut seeds, prepare your soil, and get ready to embark on this exciting journey.
We’re confident that you’ll find growing peanuts in your backyard to be a truly rewarding experience. And we’d love to hear about your adventures! Share your photos, tips, and stories with us in the comments below. Let’s build a community of backyard peanut growers and inspire others to try this amazing DIY trick. Happy growing!
Frequently Asked Questions (FAQ)
1. What is the best time of year to plant peanuts?
The ideal time to plant peanuts is in the spring, after the last frost has passed and the soil has warmed up to at least 65 degrees Fahrenheit (around 18 degrees Celsius). Peanuts need a long, warm growing season of at least 120-150 days to mature properly. In most regions, this means planting in late April or early May. However, if you live in a warmer climate with a longer growing season, you can plant peanuts as early as March. Conversely, if you live in a cooler climate, you may need to wait until late May or early June. To ensure a successful harvest, it’s crucial to monitor the weather forecast and soil temperature before planting. Using a soil thermometer can be a helpful tool to determine when the soil is warm enough.
2. What kind of soil is best for growing peanuts?
Peanuts thrive in well-drained, sandy loam soil that is rich in organic matter. The soil should be loose and friable, allowing the peanut pegs (the stems that develop after flowering and bury themselves in the ground to form the peanuts) to easily penetrate the soil. Avoid heavy clay soils, as they can become compacted and prevent the peanuts from developing properly. The ideal soil pH for peanuts is between 6.0 and 6.5. Before planting, amend your soil with compost, well-rotted manure, or other organic matter to improve its drainage and fertility. You can also add a small amount of gypsum (calcium sulfate) to the soil, as peanuts require calcium for proper pod development. A soil test can help you determine the specific nutrient needs of your soil and guide your amendment strategy.
3. How much sunlight do peanuts need?
Peanuts require at least 6-8 hours of direct sunlight per day to thrive. Choose a planting location that receives full sun throughout the growing season. Insufficient sunlight can result in stunted growth, reduced yields, and poor peanut development. If you are growing peanuts in containers, make sure to place them in a sunny spot on your patio or balcony. You may need to rotate the containers periodically to ensure that all sides of the plants receive adequate sunlight.
4. How often should I water my peanut plants?
Peanuts need consistent moisture throughout the growing season, especially during flowering and pod development. Water your peanut plants deeply and regularly, aiming to keep the soil consistently moist but not waterlogged. Avoid overhead watering, as this can promote fungal diseases. Instead, water at the base of the plants using a soaker hose or drip irrigation system. The frequency of watering will depend on the weather conditions and the type of soil you have. In general, you should water your peanut plants every 2-3 days during hot, dry weather. During cooler, wetter periods, you may only need to water them once a week. Monitor the soil moisture regularly and adjust your watering schedule accordingly.
5. How do I know when my peanuts are ready to harvest?
The best way to determine when your peanuts are ready to harvest is to check the maturity of the pods. About 120-150 days after planting, dig up a few plants and examine the pods. The pods should be plump and full, with a distinct veining pattern on the shells. The inside of the shells should be dark brown or black. If the pods are still white or light-colored, they are not yet mature. You can also check the kernels inside the pods. They should be fully developed and have a reddish-brown skin. If the kernels are small and pale, they are not yet ready to harvest. Once the majority of the pods are mature, you can harvest the entire crop.
6. Can I grow peanuts in containers?
Yes, you can successfully grow peanuts in containers, especially if you have limited space. Choose a large container that is at least 18 inches in diameter and 12 inches deep. Make sure the container has drainage holes to prevent waterlogging. Fill the container with a well-draining potting mix that is rich in organic matter. Plant 2-3 peanut seeds per container, spacing them a few inches apart. Water the plants regularly and fertilize them every few weeks with a balanced fertilizer. Place the container in a sunny location that receives at least 6-8 hours of direct sunlight per day.
7. What are some common pests and diseases that affect peanut plants?
Peanut plants can be susceptible to various pests and diseases, including aphids, spider mites, leafhoppers, nematodes, and fungal diseases like leaf spot and white mold. To prevent pest and disease problems, practice good garden hygiene, such as removing weeds and debris from around your plants. You can also use organic pest control methods, such as insecticidal soap or neem oil, to control aphids, spider mites, and leafhoppers. To prevent fungal diseases, avoid overhead watering and ensure good air circulation around your plants. You can also apply a fungicide to protect your plants from infection. If you suspect that your peanut plants are infected with nematodes, you can have your soil tested and take appropriate measures to control the nematodes.
8. Can I save peanut seeds from my harvest to plant next year?
Yes, you can save peanut seeds from your harvest to plant next year, but it’s important to select healthy, mature pods from disease-free plants. Allow the pods to dry completely before storing them in a cool, dry place. Before planting, crack open the pods and remove the kernels. Choose the largest, healthiest kernels to plant. Keep in mind that peanuts are often hybrids, so the seeds you save may not produce plants that are exactly the same as the parent plants. However, saving your own peanut seeds can be a fun and rewarding way to continue growing peanuts in your backyard year after year.
Leave a Comment