
Growing peppers in bottles might sound a little unconventional, but trust me, it’s a game-changer for any home gardener, especially if you’re short on space or just love a good DIY project! For centuries, resourceful gardeners have been finding creative ways to cultivate their favorite plants, and this method taps into that same spirit of ingenuity. Think of it as a modern twist on the hanging gardens of Babylon, but on a much smaller, more manageable scale – perfect for your balcony or patio.
Let’s be honest, who doesn’t love the vibrant colors and spicy kick of homegrown peppers? But sometimes, traditional gardening can feel intimidating or simply impossible due to limited space or challenging soil conditions. That’s where this DIY trick comes in! Growing peppers in bottles allows you to bypass those common hurdles, creating a self-contained, portable ecosystem for your pepper plants to thrive. I’m excited to share this simple yet effective method that will have you harvesting a bounty of delicious peppers in no time. Get ready to upcycle, get your hands dirty (a little!), and enjoy the satisfaction of growing your own food with this fun and rewarding project!
Growing Peppers in Bottles: A Fun and Space-Saving DIY Project
Hey there, fellow gardening enthusiasts! Are you itching to grow some spicy peppers but short on space? Or maybe you just want a unique and eye-catching way to display your plants? Well, you’ve come to the right place! I’m going to walk you through a super cool DIY project: growing peppers in recycled plastic bottles. It’s budget-friendly, eco-conscious, and surprisingly effective. Trust me, you’ll be amazed at how well peppers thrive in these little vertical gardens.
What You’ll Need
Before we dive in, let’s gather our supplies. This is a pretty low-cost project, so you probably have a lot of this stuff lying around already.
* Plastic Bottles: The star of the show! I recommend using 2-liter soda bottles or larger water bottles. The bigger the bottle, the more room your pepper plants will have to grow. Make sure they’re clean and free of any sticky residue.
* Pepper Seeds or Seedlings: Choose your favorite pepper varieties! Bell peppers, jalapenos, habaneros – the possibilities are endless. If you’re starting from seeds, you’ll need to germinate them first (more on that later). If you’re using seedlings, make sure they’re healthy and well-established.
* Potting Mix: Use a high-quality potting mix that drains well. Avoid using garden soil, as it can compact in the bottles and suffocate the roots.
* Scissors or a Utility Knife: For cutting the bottles. Be careful!
* Drill or Nail: To create drainage holes.
* String or Wire: For hanging the bottles.
* Watering Can or Spray Bottle: To keep your peppers hydrated.
* Optional:
* Gloves (to protect your hands)
* Permanent Marker (for labeling)
* Small Rocks or Gravel (for drainage)
* Fertilizer (for extra nutrients)
Preparing the Bottles
Okay, let’s get our hands dirty! This is where the magic begins.
1. Clean the Bottles: Thoroughly wash the plastic bottles with soap and water to remove any dirt, debris, or sticky residue. Rinse them well and let them dry completely. This is crucial for preventing mold and bacteria growth.
2. Cut the Bottles: This is where you’ll need your scissors or utility knife. There are a couple of ways to do this, depending on how you want to hang your bottles.
* Option 1: Hanging Vertically: Cut the bottle in half horizontally. You’ll be using the bottom half as the planter and the top half as a sort of mini-greenhouse (at least initially). Save the bottle cap!
* Option 2: Hanging Horizontally: Cut a rectangular opening in the side of the bottle, large enough to plant your pepper seedling. This method is great for creating a cascading effect.
3. Create Drainage Holes: Drainage is essential for healthy pepper plants. Use a drill or nail to create several small holes in the bottom of the bottle. If you’re using the vertical method, make holes in the bottom of the bottom half of the bottle. If you’re using the horizontal method, make holes along the bottom of the bottle.
4. Add Drainage Material (Optional): To further improve drainage, you can add a layer of small rocks or gravel to the bottom of the bottle before adding the potting mix. This will help prevent the roots from sitting in water.
Planting Your Peppers
Now for the fun part – planting your peppers!
1. Fill the Bottle with Potting Mix: Fill the prepared bottle with high-quality potting mix, leaving about an inch of space at the top. Gently pat down the soil to remove any air pockets.
2. Plant Your Seeds or Seedlings:
* From Seeds: If you’re starting from seeds, make a small indentation in the soil and sow a few seeds. Cover them lightly with potting mix and water gently. You can use the top half of the bottle (if you cut it vertically) as a mini-greenhouse to help with germination. Just place it over the bottom half and remove the cap for ventilation. Once the seedlings emerge and have a few true leaves, you can remove the top half completely.
* From Seedlings: If you’re using seedlings, gently remove them from their containers and loosen the roots slightly. Dig a small hole in the potting mix and place the seedling in the hole. Backfill with potting mix and gently pat down the soil.
3. Water Thoroughly: After planting, water the peppers thoroughly until water drains out of the drainage holes. This will help settle the soil and ensure that the roots are well-hydrated.
Hanging Your Pepper Plants
Time to get those peppers off the ground!
1. Create Hanging Points: Depending on how you cut your bottles, you’ll need to create hanging points.
* Vertical Method: Drill two small holes on opposite sides of the bottle, near the top rim. Thread string or wire through the holes and tie a knot to create a loop for hanging.
* Horizontal Method: Drill two holes on either side of the opening you cut, near the top of the bottle. Thread string or wire through the holes and tie a knot to create a loop for hanging. You can also create multiple hanging points for added stability.
2. Hang Your Bottles: Choose a sunny location that receives at least 6-8 hours of direct sunlight per day. Hang your pepper plants from a fence, balcony railing, or even a sturdy tree branch. Make sure the hanging structure is strong enough to support the weight of the bottles, soil, and plants.
Caring for Your Pepper Plants
Now that your peppers are planted and hanging, it’s time to give them some TLC.
1. Watering: Peppers need consistent moisture, but they don’t like to be waterlogged. Water your plants when the top inch of soil feels dry to the touch. Water thoroughly until water drains out of the drainage holes. Avoid watering the foliage, as this can lead to fungal diseases.
2. Fertilizing: Peppers are heavy feeders, so they’ll benefit from regular fertilization. Use a balanced fertilizer (e.g., 10-10-10) or a fertilizer specifically formulated for peppers and tomatoes. Follow the instructions on the fertilizer label. I like to use a liquid fertilizer diluted in water every couple of weeks.
3. Sunlight: Peppers need plenty of sunlight to thrive. Make sure your plants are getting at least 6-8 hours of direct sunlight per day. If you live in a particularly hot climate, you may need to provide some afternoon shade to prevent the plants from scorching.
4. Pruning: Pruning can help improve air circulation and encourage bushier growth. Remove any yellowing or dead leaves. You can also pinch off the tips of the branches to encourage more branching.
5. Pest and Disease Control: Keep an eye out for common pepper pests, such as aphids, spider mites, and whiteflies. You can control these pests with insecticidal soap or neem oil. Also, watch out for fungal diseases, such as powdery mildew and blossom end rot. Prevent these diseases by providing good air circulation and avoiding overwatering.
Troubleshooting
Even with the best care, you might encounter some challenges along the way. Here are a few common problems and how to fix them:
* Yellowing Leaves: This could be a sign of overwatering, underwatering, nutrient deficiency, or pest infestation. Check the soil moisture, fertilize your plants, and inspect them for pests.
* Blossom End Rot: This is a calcium deficiency that causes the bottom of the peppers to rot. To prevent blossom end rot, make sure your soil is well-drained and that you’re providing your plants with adequate calcium. You can add crushed eggshells to the soil or use a calcium-rich fertilizer.
* Lack of Fruit: This could be due to a lack of pollination, insufficient sunlight, or extreme temperatures. Make sure your plants are getting enough sunlight and that the temperatures are within the optimal range for pepper growth (70-85°F). You can also hand-pollinate the flowers by gently shaking the plants or using a small paintbrush to transfer pollen from one flower to another.
Harvesting Your Peppers
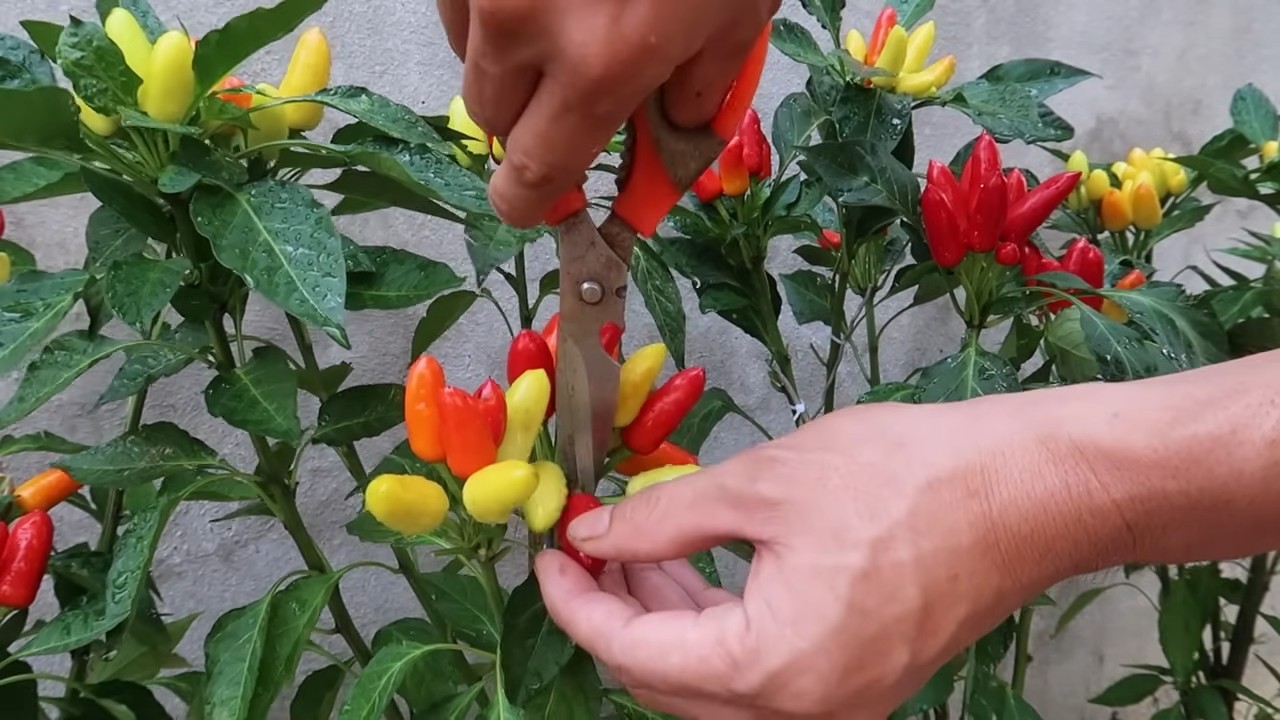
The moment you’ve been waiting for – harvesting your peppers! The time to harvest will depend on the variety of pepper you’re growing. Generally, peppers are ready to harvest when they’ve reached their mature size and color. Use scissors or pruning shears to cut the peppers from the plant, leaving a small stem attached.
And there you have it! You’ve successfully grown peppers in recycled plastic bottles. Now you can enjoy your homegrown peppers in your favorite dishes, share them with friends and family, or even sell them at your local farmers market. This project is not only fun and rewarding, but it’s also a great way to reduce waste and promote sustainable
Conclusion
So, there you have it! Growing peppers in bottles isn’t just a quirky gardening experiment; it’s a genuinely effective and rewarding way to cultivate these vibrant vegetables, especially if you’re short on space or looking for a creative gardening project. We’ve explored the ins and outs of this method, from choosing the right bottle and preparing the soil to transplanting your seedlings and providing ongoing care.
The beauty of this DIY trick lies in its simplicity and accessibility. You don’t need a sprawling garden or expensive equipment to enjoy fresh, homegrown peppers. With a few recycled bottles, some quality potting mix, and a little patience, you can transform your balcony, patio, or even a sunny windowsill into a miniature pepper paradise.
But why is this a must-try? Beyond the obvious space-saving benefits, growing peppers in bottles offers several advantages. The enclosed environment helps retain moisture, reducing the need for frequent watering. It also provides a degree of protection from pests and diseases, giving your peppers a better chance to thrive. Plus, let’s be honest, it’s just plain cool! The visual appeal of peppers growing in repurposed bottles adds a unique touch to any space.
Don’t be afraid to experiment with different varieties of peppers. From sweet bell peppers to fiery habaneros, the possibilities are endless. You can also try using different types of bottles, such as wine bottles or larger water jugs, to accommodate different pepper sizes. Consider painting the bottles to add a splash of color or using clear bottles to observe root growth.
For those looking to take their bottle gardening to the next level, consider incorporating a simple self-watering system. You can achieve this by adding a wick made of cotton rope or felt that draws water from a reservoir at the bottom of the bottle up to the soil. This is particularly useful if you live in a hot climate or tend to forget to water your plants regularly.
Another variation is to create a vertical pepper garden by stacking multiple bottles on top of each other. This not only maximizes space but also creates a stunning visual display. Just be sure to secure the bottles properly to prevent them from toppling over.
Ultimately, the success of growing peppers in bottles depends on your dedication and attention to detail. Regularly check the soil moisture, provide adequate sunlight, and fertilize your plants as needed. With a little effort, you’ll be rewarded with a bountiful harvest of delicious, homegrown peppers.
We wholeheartedly encourage you to give this DIY trick a try. It’s a fun, sustainable, and rewarding way to enjoy fresh peppers, regardless of your gardening experience. And most importantly, we want to hear about your experiences! Share your photos, tips, and challenges in the comments below. Let’s create a community of bottle pepper growers and learn from each other. What kind of peppers did you grow? What challenges did you face? What tips do you have for other beginners? Your insights could be invaluable to someone just starting out. So, grab some bottles, get your hands dirty, and start growing your own peppers today! You might be surprised at how easy and rewarding it can be.
Frequently Asked Questions (FAQ)
What type of peppers are best suited for growing in bottles?
While you can technically grow any type of pepper in a bottle, smaller varieties tend to be more successful. Compact peppers like chili peppers, bell peppers (smaller varieties), and certain ornamental peppers are ideal. Larger pepper varieties, such as some bell peppers or banana peppers, may require larger bottles and more support. Consider the mature size of the pepper plant when choosing your variety.
What size bottle should I use for growing peppers?
The size of the bottle depends on the pepper variety you’re growing. For smaller peppers like chili peppers, a standard 2-liter soda bottle or a large water bottle (1 gallon) may suffice. For larger peppers, consider using larger containers, such as gallon-sized jugs or even repurposed wine bottles. Ensure the bottle is sturdy enough to support the weight of the plant and soil. A good rule of thumb is to choose a bottle that is at least 8-10 inches deep.
What type of soil should I use for growing peppers in bottles?
Use a high-quality potting mix that is well-draining and rich in nutrients. Avoid using garden soil, as it can become compacted in containers and hinder drainage. A mix of peat moss, perlite, and vermiculite is a good option. You can also add compost or other organic matter to improve soil fertility. Ensure the potting mix is specifically formulated for container gardening.
How often should I water my peppers growing in bottles?
Water your peppers regularly, keeping the soil consistently moist but not waterlogged. The frequency of watering will depend on the weather, the size of the bottle, and the type of potting mix you’re using. Check the soil moisture by sticking your finger about an inch into the soil. If it feels dry, it’s time to water. Avoid overwatering, as this can lead to root rot. Consider using a self-watering system or adding drainage holes to the bottom of the bottle to prevent water from accumulating.
How much sunlight do peppers need when grown in bottles?
Peppers need at least 6-8 hours of direct sunlight per day to thrive. Place your bottle peppers in a sunny location, such as a south-facing window or a sunny balcony. If you don’t have enough natural sunlight, you can supplement with grow lights. Rotate the bottles regularly to ensure all sides of the plant receive adequate sunlight.
Do I need to fertilize my peppers growing in bottles?
Yes, peppers grown in bottles will need regular fertilization to provide them with the nutrients they need to grow and produce fruit. Use a balanced fertilizer specifically formulated for vegetables. Follow the instructions on the fertilizer package for application rates and frequency. You can also use organic fertilizers, such as compost tea or fish emulsion. Fertilize your peppers every 2-3 weeks during the growing season.
How do I prevent pests and diseases when growing peppers in bottles?
Growing peppers in bottles can help reduce the risk of pests and diseases, but it’s still important to take precautions. Inspect your plants regularly for signs of pests or diseases. If you find any, take action immediately. You can use organic pest control methods, such as insecticidal soap or neem oil. Ensure good air circulation around your plants to prevent fungal diseases. Avoid overwatering, as this can create a favorable environment for diseases.
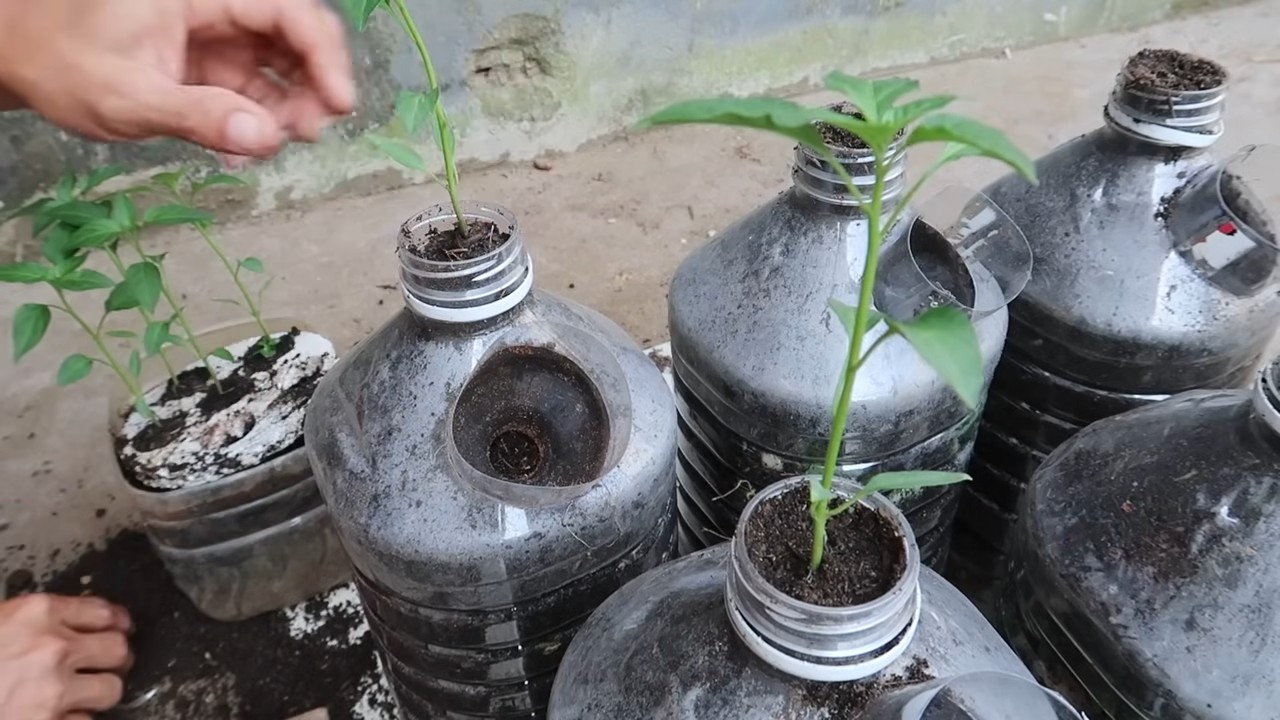
How do I transplant pepper seedlings into bottles?
Carefully remove the pepper seedlings from their original containers, being careful not to damage the roots. Gently loosen the roots and place the seedling in the prepared bottle, filling the remaining space with potting mix. Water thoroughly after transplanting. Provide support for the seedlings if needed, such as a small stake or trellis.
Can I grow peppers indoors in bottles?
Yes, you can grow peppers indoors in bottles, but you’ll need to provide them with adequate sunlight or supplemental lighting. Place the bottles near a sunny window or use grow lights to ensure they receive at least 6-8 hours of light per day. Indoor peppers may also require more frequent watering and fertilization.
How long does it take for peppers to mature when grown in bottles?
The time it takes for peppers to mature depends on the variety and growing conditions. Generally, it takes 60-90 days for peppers to mature after transplanting. Check the seed packet or plant label for specific information on the maturity time for your chosen pepper variety. Be patient and provide your plants with the care they need, and you’ll be rewarded with a bountiful harvest.
Leave a Comment