
Growing pineapples at home might sound like an exotic dream reserved for tropical climates, but I’m here to tell you it’s absolutely achievable, even if you’re miles away from Hawaii! Forget those expensive grocery store pineapples; imagine plucking a sweet, juicy, homegrown pineapple straight from your own garden.
For centuries, the pineapple has been a symbol of hospitality and luxury. Originating in South America, it was quickly adopted by cultures worldwide, becoming a prized possession and a statement of wealth. Today, we can bring that touch of tropical elegance into our own homes, and I’m going to show you how with some simple DIY tricks.
Why should you bother with this DIY project? Well, besides the sheer satisfaction of nurturing a plant from start to finish, growing pineapples at home is incredibly rewarding. Store-bought pineapples often lack the intense flavor of a freshly picked one, and let’s be honest, who doesn’t love a good conversation starter? Plus, you’ll be reducing your carbon footprint by avoiding the transportation involved in getting those pineapples to your local supermarket. So, grab your gardening gloves, and let’s embark on this exciting journey together! I promise, with a little patience and these easy-to-follow steps, you’ll be enjoying your own homegrown pineapple in no time.
Ananas selber ziehen: Dein tropischer Traum für Zuhause
Hey Leute! Habt ihr euch jemals gefragt, wie man eine Ananas zu Hause ziehen kann? Ich habe es ausprobiert und es ist einfacher als ihr denkt! Es braucht zwar Geduld, aber das Ergebnis ist es wert: eine eigene, kleine Ananaspflanze und vielleicht sogar irgendwann eine selbstgezogene Ananas! Hier zeige ich euch, wie es geht.
Was du brauchst:
* Eine reife Ananas (am besten eine, die im Bioladen gekauft wurde, da diese oft nicht mit Wachstumsinhibitoren behandelt wurden)
* Ein scharfes Messer
* Einen Topf (ca. 15-20 cm Durchmesser)
* Anzuchterde oder eine Mischung aus Blumenerde und Sand
* Wasser
* Optional: Bewurzelungshormon
* Optional: Plastiktüte oder Mini-Gewächshaus
Die Vorbereitung: Den Ananas-Schopf vorbereiten
1. Den Schopf abschneiden: Nehmt eure Ananas und schneidet mit dem scharfen Messer den Schopf (also das grüne Blätterbüschel) etwa 2-3 cm unterhalb der Blätter ab. Achtet darauf, dass ihr möglichst wenig Fruchtfleisch am Schopf lasst, da dieses faulen kann.
2. Fruchtfleisch entfernen: Entfernt vorsichtig alle Fruchtfleischreste vom Schopf. Das ist wichtig, um Fäulnis zu vermeiden.
3. Die unteren Blätter entfernen: Zieht die untersten Blätter (ca. 2-3 cm) vorsichtig ab. Dadurch werden die kleinen Wurzelansätze freigelegt, aus denen später die Wurzeln wachsen werden.
4. Trocknen lassen: Lasst den Ananas-Schopf nun für 2-3 Tage an einem trockenen, gut belüfteten Ort trocknen. Das hilft, die Schnittstelle zu versiegeln und Fäulnis vorzubeugen.
Die Bewurzelung: Zwei Methoden
Es gibt zwei gängige Methoden, um den Ananas-Schopf zu bewurzeln: im Wasserglas oder direkt in der Erde. Ich persönlich bevorzuge die Methode im Wasserglas, da man die Wurzelentwicklung besser beobachten kann.
Methode 1: Bewurzelung im Wasserglas
1. Das Wasserglas vorbereiten: Nehmt ein Glas oder eine Vase und füllt es mit Wasser. Achtet darauf, dass das Wasser sauber ist.
2. Den Schopf ins Wasser stellen: Stellt den Ananas-Schopf so ins Wasser, dass nur die freigelegten Wurzelansätze (also der Bereich, wo ihr die Blätter entfernt habt) im Wasser sind. Die Blätter sollten nicht im Wasser stehen, da sie sonst faulen können.
3. Standort wählen: Stellt das Glas an einen hellen, warmen Ort, aber nicht in die direkte Sonne.
4. Wasser wechseln: Wechselt das Wasser alle 2-3 Tage, um Fäulnis zu vermeiden.
5. Geduld haben: Es kann einige Wochen dauern, bis sich Wurzeln bilden. Habt Geduld und beobachtet den Schopf regelmäßig.
Methode 2: Direkte Bewurzelung in der Erde
1. Den Topf vorbereiten: Füllt den Topf mit Anzuchterde oder einer Mischung aus Blumenerde und Sand.
2. Ein Pflanzloch machen: Macht ein kleines Loch in die Erde, das groß genug ist, um den Ananas-Schopf aufzunehmen.
3. Den Schopf einsetzen: Setzt den Ananas-Schopf in das Loch und drückt die Erde leicht an.
4. Angießen: Gießt die Erde vorsichtig an, sodass sie feucht, aber nicht nass ist.
5. Standort wählen: Stellt den Topf an einen hellen, warmen Ort, aber nicht in die direkte Sonne.
6. Feuchtigkeit halten: Haltet die Erde feucht, aber nicht nass. Ihr könnt den Topf auch mit einer Plastiktüte oder einem Mini-Gewächshaus abdecken, um die Luftfeuchtigkeit zu erhöhen.
Das Einpflanzen: Wenn die Wurzeln da sind
Sobald die Wurzeln etwa 2-3 cm lang sind (bei der Wasserglas-Methode) oder ihr merkt, dass der Schopf fest in der Erde sitzt (bei der direkten Bewurzelung), ist es Zeit, die Ananas-Pflanze einzupflanzen.
1. Den Topf vorbereiten: Nehmt einen Topf, der etwas größer ist als der vorherige (ca. 20-25 cm Durchmesser). Füllt den Topf mit einer Mischung aus Blumenerde und Sand oder spezieller Ananas-Erde.
2. Die Pflanze vorsichtig aus dem Wasserglas nehmen: Wenn ihr die Wasserglas-Methode verwendet habt, nehmt die Ananas-Pflanze vorsichtig aus dem Glas und achtet darauf, die Wurzeln nicht zu beschädigen.
3. Ein Pflanzloch machen: Macht ein Loch in die Erde, das groß genug ist, um die Wurzeln aufzunehmen.
4. Die Pflanze einsetzen: Setzt die Ananas-Pflanze in das Loch und füllt es mit Erde auf. Drückt die Erde leicht an.
5. Angießen: Gießt die Erde vorsichtig an, sodass sie feucht, aber nicht nass ist.
Die Pflege: Damit deine Ananas wächst und gedeiht
1. Standort: Ananas-Pflanzen lieben es hell und warm. Stellt sie an einen sonnigen Standort, am besten direkt am Fenster. Im Sommer könnt ihr sie auch nach draußen stellen, aber achtet darauf, dass sie vor starkem Regen und Wind geschützt sind.
2. Gießen: Gießt die Ananas-Pflanze regelmäßig, aber nicht zu viel. Die Erde sollte immer leicht feucht sein, aber nicht nass. Vermeidet Staunässe, da dies zu Wurzelfäule führen kann. Im Winter benötigt die Pflanze weniger Wasser.
3. Düngen: Düngt die Ananas-Pflanze während der Wachstumsperiode (Frühling und Sommer) alle 2-3 Wochen mit einem Flüssigdünger für Zimmerpflanzen oder einem speziellen Ananas-Dünger.
4. Luftfeuchtigkeit: Ananas-Pflanzen bevorzugen eine hohe Luftfeuchtigkeit. Ihr könnt die Luftfeuchtigkeit erhöhen, indem ihr die Pflanze regelmäßig mit Wasser besprüht oder sie in der Nähe eines Luftbefeuchters aufstellt.
5. Umpflanzen: Pflanzt die Ananas-Pflanze alle 1-2 Jahre in einen größeren Topf um.
Die Blüte und Fruchtbildung: Geduld ist gefragt
Es kann einige Jahre dauern, bis eine Ananas-Pflanze blüht und Früchte trägt. Die Blüte wird durch Ethylen ausgelöst. Es gibt verschiedene Methoden, um die Blüte zu fördern:
1. Apfel-Methode: Legt einen reifen Apfel in eine Plastiktüte und stülpt die Tüte über die Ananas-Pflanze. Der Apfel gibt Ethylen ab, was die Blüte anregen kann. Lasst die Tüte für etwa eine Woche über der Pflanze.
2. Ethylen-Gas: Es gibt auch spezielle Ethylen-Gas-Generatoren, die man kaufen kann. Diese sind jedoch eher für den professionellen Anbau gedacht.
3. Geduld: Manchmal braucht es einfach nur Geduld. Die Ananas-Pflanze blüht, wenn sie bereit ist.
Wenn die Ananas-Pflanze blüht, bildet sie eine wunderschöne, lilafarbene Blüte. Nach der Blüte beginnt sich die Frucht zu entwickeln. Es dauert etwa 6 Monate, bis die Ananas reif ist.
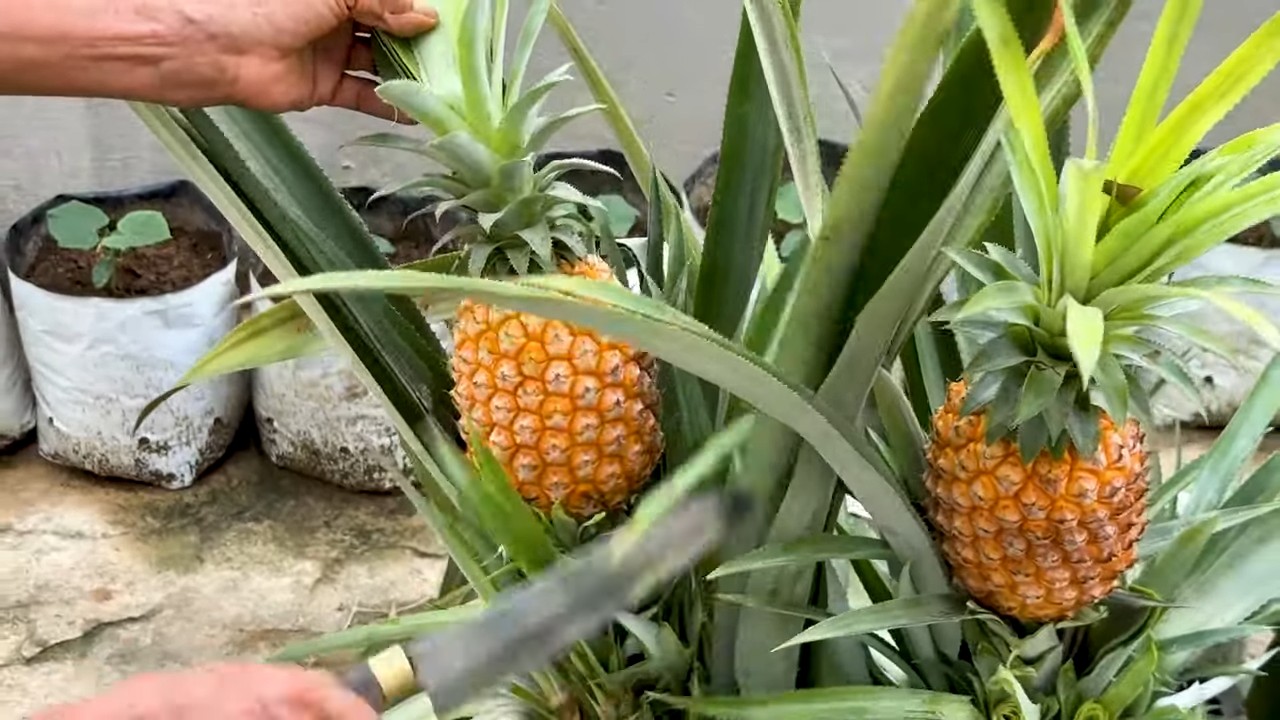
Die Ernte: Der Lohn der Mühe
Wenn die Ananas reif ist, verfärbt sie sich von grün nach gelb oder orange. Sie duftet auch intensiv nach Ananas. Um die Ananas zu ernten, schneidet ihr sie mit einem scharfen Messer ab.
Wichtiger Hinweis: Selbstgezogene Ananas sind oft kleiner und nicht so süß wie gekaufte Ananas. Aber der Stolz, eine eigene Ananas gezogen zu haben, ist unbezahlbar!
Häufige Probleme und Lösungen
* Blätter werden braun: Das kann verschiedene Ursachen haben, z.B. zu viel Sonne, zu wenig Wasser oder zu niedrige Luftfeuchtigkeit. Überprüft die Standortbedingungen und passt die Pflege entsprechend an.
* Wurzelfäule: Das wird durch Staunässe verursacht. Achtet darauf
Conclusion
So, there you have it! Growing pineapples at home, while it might seem like a tropical dream reserved for expert gardeners, is surprisingly achievable with a little patience and the right approach. We’ve walked you through the process, from selecting the perfect pineapple top to nurturing your new plant into a fruit-bearing marvel. But why should you even bother?
The answer is multifaceted. First, there’s the sheer satisfaction of cultivating your own food. Imagine the pride you’ll feel serving a dish featuring a pineapple you personally grew! It’s a connection to nature, a tangible reward for your efforts, and a fantastic conversation starter.
Second, homegrown pineapples often boast a superior flavor compared to store-bought varieties. They’re allowed to ripen more fully on the plant, resulting in a sweeter, more intense taste that you simply can’t replicate. Plus, you know exactly where your pineapple came from and how it was grown, ensuring a pesticide-free and organic treat.
Third, this DIY project is incredibly cost-effective. Instead of discarding the pineapple top, you’re essentially turning waste into a valuable resource. Over time, the savings can really add up, especially if you become a pineapple-growing enthusiast!
But the benefits don’t stop there. Growing pineapples is also a fantastic educational activity for children (and adults!). It teaches them about plant life cycles, responsibility, and the importance of sustainable practices. It’s a hands-on learning experience that’s both fun and rewarding.
Ready to take your pineapple growing to the next level? Consider these variations:
* Experiment with different pineapple varieties: While smooth Cayenne is the most common, explore other options like MD-2 or even ornamental varieties for their unique foliage.
* Hydroponic pineapple growing: For those with limited space or a penchant for modern gardening techniques, hydroponics offers a soil-free alternative.
* Greenhouse cultivation: If you live in a colder climate, a greenhouse can provide the ideal warm and humid environment for optimal pineapple growth.
* Container gardening: Even without a garden, you can successfully grow pineapples in large containers on your patio or balcony.
We’ve provided you with all the essential information to embark on your pineapple-growing adventure. Now, it’s your turn to get your hands dirty! Don’t be afraid to experiment, learn from your mistakes, and most importantly, have fun.
We are confident that you will find growing pineapples at home a rewarding experience. We encourage you to try this DIY trick and share your experiences with us. Post pictures of your pineapple plants, share your tips and tricks, and let us know how your homegrown pineapples taste! Your feedback will not only inspire others but also help us refine our guide and make it even better. Happy growing!
Frequently Asked Questions (FAQ)
How long does it take to grow a pineapple at home?
Patience is key when growing pineapples! From planting the top to harvesting a ripe fruit, it typically takes anywhere from 2 to 3 years. The exact timeframe depends on factors like climate, variety, and growing conditions. Don’t be discouraged if it takes longer than expected; the wait is well worth it!
What is the best type of soil for growing pineapples?
Pineapples thrive in well-draining, slightly acidic soil. A mix of potting soil, perlite, and peat moss is a good option. Avoid heavy clay soils, as they can lead to root rot. You can also amend your soil with organic matter like compost to improve drainage and fertility.
How often should I water my pineapple plant?
Water your pineapple plant regularly, especially during the growing season (spring and summer). Allow the soil to dry out slightly between waterings. Overwatering can lead to root rot, so it’s better to err on the side of underwatering. In the winter, reduce watering frequency.
What kind of fertilizer should I use for my pineapple plant?
Pineapples are heavy feeders, so regular fertilization is essential. Use a balanced fertilizer (e.g., 10-10-10) diluted to half strength every 2-3 months during the growing season. You can also use a fertilizer specifically formulated for bromeliads. Avoid over-fertilizing, as this can burn the roots.
How much sunlight does a pineapple plant need?
Pineapples need plenty of sunlight to thrive. Aim for at least 6 hours of direct sunlight per day. If you’re growing your pineapple indoors, place it near a sunny window or supplement with grow lights. Insufficient sunlight can result in slow growth and reduced fruit production.
How do I induce my pineapple plant to fruit?
Even with proper care, some pineapple plants can be reluctant to fruit. To encourage fruiting, you can try the ethylene gas trick. Place a ripe apple or banana near the plant, covering both with a plastic bag for a few days. The ethylene gas released by the fruit can stimulate flowering. You can also use calcium carbide dissolved in water and poured into the center of the plant. Be careful when handling calcium carbide.
What are some common pests and diseases that affect pineapple plants?
Pineapples are generally resistant to pests and diseases, but they can be susceptible to mealybugs, scale, and root rot. Inspect your plant regularly for signs of infestation or disease. Treat any problems promptly with appropriate insecticides or fungicides. Good air circulation and proper watering can help prevent many issues.
Can I grow pineapples indoors?
Yes, you can grow pineapples indoors, especially in colder climates. Choose a large pot with good drainage and place it in a sunny location. Supplement with grow lights if necessary. Maintain a warm and humid environment. Indoor-grown pineapples may take longer to fruit than those grown outdoors.
What do I do with the pineapple after I harvest the fruit?
After harvesting the pineapple, you can leave the plant in the ground or pot. It may produce “suckers” or “pups” around the base, which can be separated and planted to grow new pineapple plants. Alternatively, you can discard the old plant and start a new one from the top of the harvested pineapple.
Is it safe to eat a pineapple grown at home?
Absolutely! Homegrown pineapples are perfectly safe to eat, as long as they are properly ripened and free from pests or diseases. In fact, they are often more flavorful and nutritious than store-bought varieties. Enjoy the fruits of your labor!
Leave a Comment