
Growing Sweet Potatoes can seem daunting, but trust me, with a few simple tricks and a little DIY spirit, you can harvest a bounty of these delicious and nutritious tubers right in your own backyard! Forget those bland, store-bought sweet potatoes – imagine sinking your teeth into a homegrown, perfectly sweet and earthy delight.
For centuries, sweet potatoes have been a staple in diets around the world, originating in Central and South America and spreading globally thanks to their adaptability and nutritional value. They’re more than just a Thanksgiving side dish; they’re a powerhouse of vitamins and minerals! But why settle for buying them when you can experience the joy of nurturing them from slips to substantial spuds?
This guide is packed with easy-to-follow DIY hacks that will take the mystery out of growing sweet potatoes. I’ll share my favorite techniques for everything from starting your own slips (the little sprouts that grow into plants) to ensuring a rich harvest. Whether you have a sprawling garden or just a few containers on your patio, I’ll show you how to make the most of your space and enjoy the satisfaction of growing your own food. So, grab your gardening gloves, and let’s get started on this sweet potato adventure!
Süßkartoffeln selbst anbauen: Ein umfassender DIY-Leitfaden
Hallo liebe Gartenfreunde! Ich freue mich riesig, euch heute in die Welt des Süßkartoffelanbaus einzuführen. Süßkartoffeln sind nicht nur super lecker und vielseitig in der Küche, sondern auch relativ einfach selbst anzubauen, selbst wenn ihr keinen riesigen Garten habt. In diesem Artikel zeige ich euch Schritt für Schritt, wie ihr eure eigenen Süßkartoffeln ziehen könnt, von der Vorbereitung bis zur Ernte. Los geht’s!
Was du für den Süßkartoffelanbau brauchst
Bevor wir loslegen, hier eine Liste der Dinge, die du für den erfolgreichen Anbau von Süßkartoffeln benötigst:
* Süßkartoffel-Knollen: Am besten Bio-Süßkartoffeln, da diese nicht mit Keimhemmern behandelt wurden.
* Wasserglas oder Behälter: Für die Anzucht der “Slips” (Triebe).
* Zahnstocher: Um die Süßkartoffel im Wasserglas zu stabilisieren.
* Anzuchterde: Für das Vorziehen der Slips in Töpfen.
* Töpfe oder Anzuchtschalen: Für das Vorziehen.
* Gartenerde: Für das endgültige Beet oder den Kübel.
* Kompost oder organischer Dünger: Um den Boden anzureichern.
* Gießkanne oder Schlauch: Zum Bewässern.
* Mulchmaterial (Stroh, Heu, Rasenschnitt): Um die Feuchtigkeit im Boden zu halten und Unkraut zu unterdrücken.
* Gartenvlies (optional): Zum Schutz vor Kälte in den ersten Wochen.
* Spaten oder Grabegabel: Zum Umgraben des Beetes.
Phase 1: Die Anzucht der Slips (Triebe)
Die Anzucht der Slips ist der erste und wichtigste Schritt. Süßkartoffeln werden nämlich nicht direkt aus Samen gezogen, sondern aus den Trieben, die aus der Knolle wachsen.
1. Die Süßkartoffel vorbereiten: Wähle eine gesunde Süßkartoffel-Knolle aus. Stecke 3-4 Zahnstocher etwa in der Mitte der Knolle rundherum ein. Diese dienen dazu, die Knolle im Wasserglas zu stabilisieren.
2. Ins Wasserbad: Fülle ein Glas oder einen Behälter mit Wasser. Die Knolle sollte etwa zur Hälfte im Wasser stehen. Achte darauf, dass das untere Ende der Knolle im Wasser ist, da dort die Wurzeln wachsen werden.
3. Der richtige Standort: Stelle das Glas an einen warmen, hellen Ort, aber nicht in die pralle Sonne. Ein Fensterbrett ist ideal.
4. Geduld ist gefragt: Jetzt heißt es warten. Wechsle das Wasser alle paar Tage, um Fäulnis zu vermeiden. Nach etwa 2-4 Wochen sollten sich an der Knolle kleine Triebe (Slips) bilden.
5. Slips ernten: Sobald die Slips etwa 15-20 cm lang sind, kannst du sie vorsichtig von der Knolle abdrehen oder abschneiden. Achte darauf, dass du die Knolle nicht beschädigst.
6. Bewurzelung der Slips: Stelle die abgeschnittenen Slips in ein Glas mit Wasser. Nach einigen Tagen sollten sich kleine Wurzeln bilden. Dieser Schritt ist optional, aber er erhöht die Erfolgschancen beim Einpflanzen.
Phase 2: Vorbereitung des Beetes oder Kübels
Süßkartoffeln lieben Wärme und einen lockeren, gut durchlässigen Boden. Die richtige Vorbereitung des Beetes ist entscheidend für eine reiche Ernte.
1. Der richtige Standort: Wähle einen sonnigen Standort für dein Süßkartoffelbeet. Süßkartoffeln brauchen mindestens 6-8 Stunden Sonne pro Tag.
2. Boden vorbereiten: Grabe den Boden gründlich um und entferne Unkraut und Steine. Lockere den Boden gut auf, damit die Wurzeln der Süßkartoffeln sich gut entwickeln können.
3. Boden anreichern: Süßkartoffeln sind Starkzehrer. Arbeite reichlich Kompost oder organischen Dünger in den Boden ein. Das sorgt für eine gute Nährstoffversorgung.
4. Dämme anlegen (optional): In kühleren Regionen empfiehlt es sich, Dämme anzulegen. Das erwärmt den Boden schneller und verbessert die Drainage. Die Dämme sollten etwa 20-30 cm hoch und 60-90 cm breit sein.
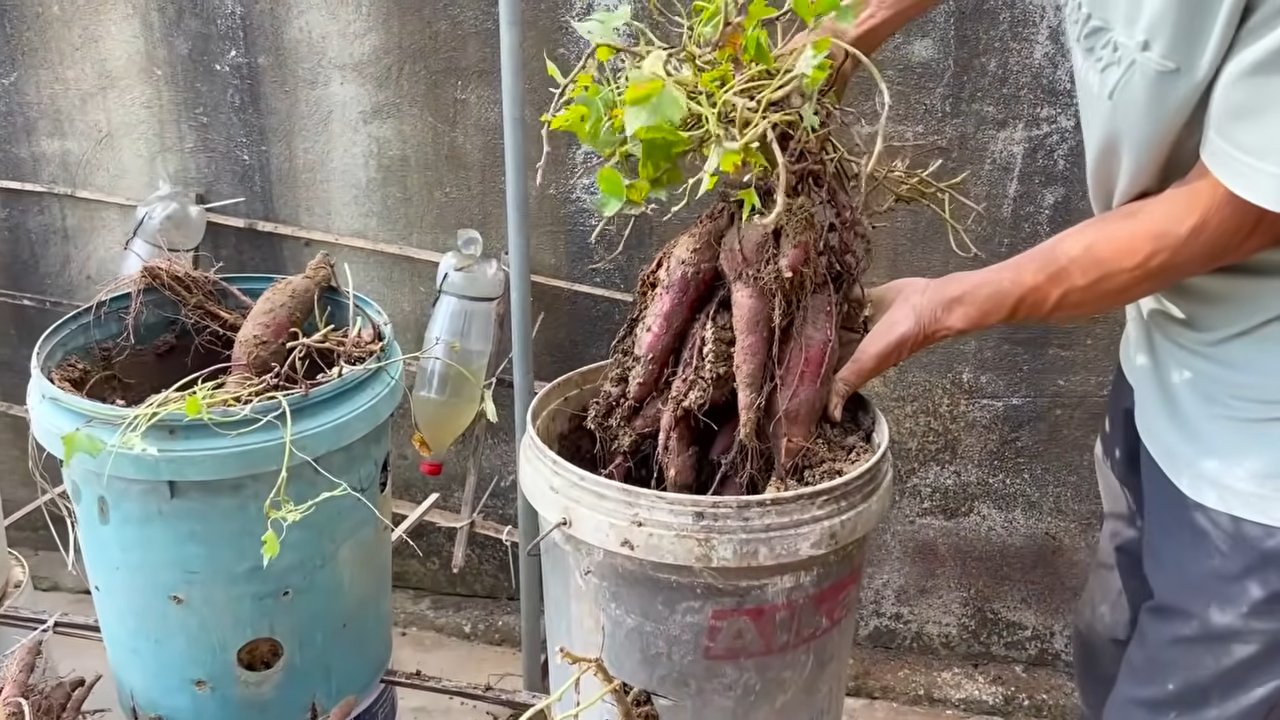
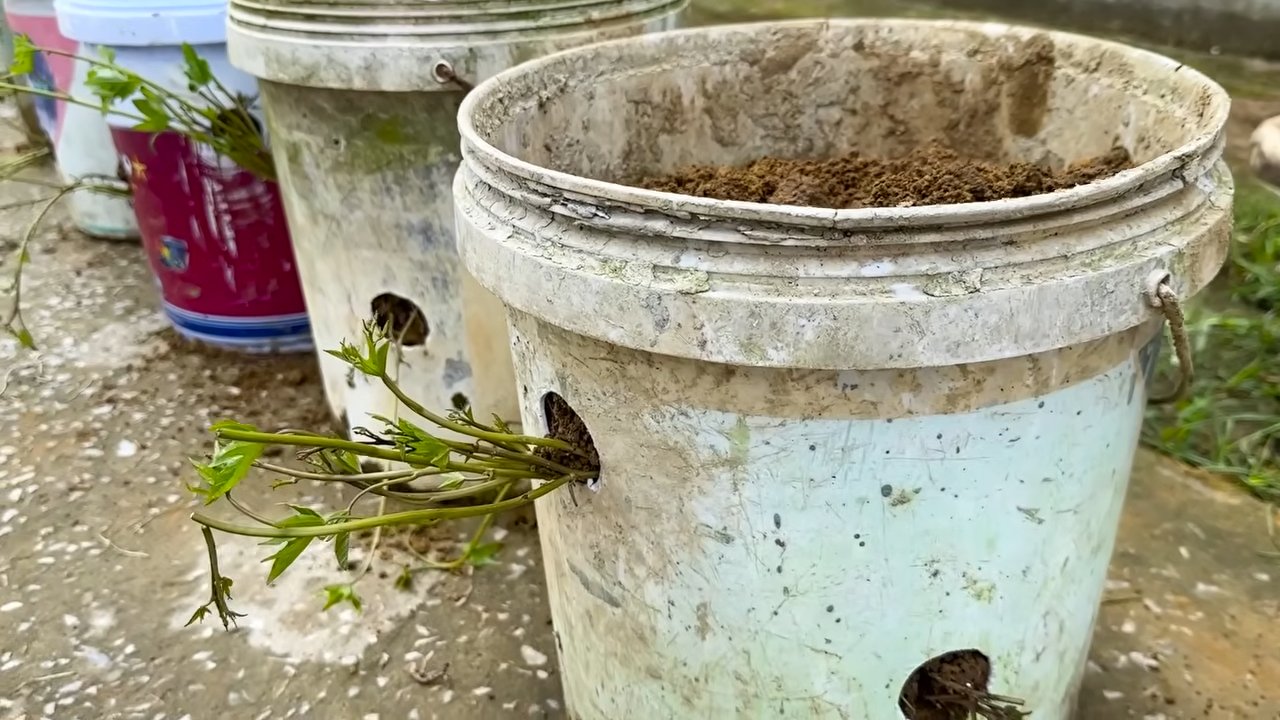
5. Kübel vorbereiten (Alternative): Wenn du Süßkartoffeln im Kübel anbauen möchtest, wähle einen großen Kübel mit mindestens 30 Litern Fassungsvermögen. Fülle den Kübel mit einer Mischung aus Gartenerde, Kompost und etwas Sand. Achte auf eine gute Drainage, damit keine Staunässe entsteht.
Phase 3: Das Einpflanzen der Slips
Jetzt kommt der spannende Teil: das Einpflanzen der Slips in das vorbereitete Beet oder den Kübel.
1. Der richtige Zeitpunkt: Warte, bis keine Frostgefahr mehr besteht. Süßkartoffeln sind sehr frostempfindlich. In der Regel ist das Mitte Mai bis Anfang Juni der Fall.
2. Pflanzabstand: Pflanze die Slips im Beet in einem Abstand von etwa 30-40 cm zueinander. In Reihen sollten die Reihen etwa 90-100 cm auseinander liegen. Im Kübel reicht ein Slip pro Kübel.
3. Einpflanzen: Grabe kleine Löcher in den Boden und setze die Slips hinein. Achte darauf, dass die Wurzeln gut mit Erde bedeckt sind. Gieße die Slips nach dem Einpflanzen gründlich an.
4. Mulchen: Bedecke den Boden um die Pflanzen herum mit Mulchmaterial wie Stroh, Heu oder Rasenschnitt. Das hält die Feuchtigkeit im Boden, unterdrückt Unkraut und wärmt den Boden.
5. Gartenvlies (optional): In den ersten Wochen kannst du die Pflanzen mit einem Gartenvlies abdecken, um sie vor Kälte und Schädlingen zu schützen.
Phase 4: Pflege der Süßkartoffelpflanzen
Die Pflege der Süßkartoffelpflanzen ist relativ einfach. Achte auf ausreichend Wasser und eine gute Nährstoffversorgung.
1. Bewässerung: Gieße die Pflanzen regelmäßig, besonders in trockenen Perioden. Der Boden sollte immer leicht feucht sein, aber nicht nass. Vermeide Staunässe.
2. Düngung: Dünge die Pflanzen während der Wachstumsphase regelmäßig mit einem organischen Dünger. Komposttee oder verdünnte Brennnesseljauche sind ideal.
3. Unkraut entfernen: Entferne regelmäßig Unkraut, das um die Pflanzen herum wächst. Unkraut konkurriert mit den Süßkartoffeln um Nährstoffe und Wasser.
4. Ranken kürzen (optional): Süßkartoffeln bilden lange Ranken. Wenn die Ranken zu lang werden, kannst du sie kürzen, um die Bildung der Knollen zu fördern.
Phase 5: Die Ernte
Die Ernte der Süßkartoffeln ist der krönende Abschluss des Anbauprozesses.
1. Der richtige Zeitpunkt: Süßkartoffeln werden im Herbst geerntet, bevor der erste Frost kommt. In der Regel ist das im September oder Oktober der Fall. Die Blätter der Pflanzen beginnen, gelb zu werden und abzusterben.
2. Ernte: Grabe die Knollen vorsichtig mit einer Grabegabel oder einem Spaten aus. Achte darauf, die Knollen nicht zu beschädigen.
3. Trocknen: Lasse die geernteten Knollen einige Tage an einem warmen, trockenen Ort trocknen. Das härtet die Schale und verbessert die Lagerfähigkeit.
4. Lagerung: Lagere die getrockneten Knollen an einem kühlen, dunklen und trockenen Ort. Ideal ist ein Keller oder eine Speisekammer. Süßkartoffeln können mehrere Monate gelagert werden.
Zusätzliche Tipps und Tricks
* Sortenwahl: Es gibt verschiedene Süßkartoffelsorten. Wähle eine Sorte, die für dein Klima geeignet ist.
* Schädlinge und Krankheiten: Süßkartoffeln sind relativ resistent gegen Schädlinge und Krankheiten. Achte aber auf Schnecken
Conclusion
So, there you have it! Growing sweet potatoes at home, while it might seem daunting at first, is an incredibly rewarding experience. This DIY trick, focusing on creating your own sweet potato slips from existing sweet potatoes, is not just a cost-effective alternative to buying them from a nursery, but it also connects you more deeply to the growing process. You witness the miracle of life unfold right before your eyes, transforming a humble root vegetable into a source of vibrant, healthy plants ready to populate your garden.
The benefits extend beyond mere economics. You gain control over the variety of sweet potatoes you grow. Perhaps you have a particular favorite from the grocery store, or maybe you’re interested in exploring heirloom varieties not readily available commercially. This method allows you to experiment and cultivate exactly what your heart (and stomach) desires.
Think about the possibilities! You could try different methods of sprouting – water suspension, soil burial, or even a combination of both. Experiment with different containers, from repurposed glass jars to dedicated seed trays. Consider the location where you sprout your sweet potatoes; a sunny windowsill, a warm greenhouse, or even under grow lights. Each variation will yield slightly different results, adding to the learning experience and the fun.
And don’t limit yourself to just one sweet potato! Sprout several at once, and you’ll have a surplus of slips to share with friends, family, or even your local community garden. Imagine the joy of spreading the sweet potato love and encouraging others to embark on this fulfilling journey.
This DIY trick is a must-try because it empowers you to take control of your food source, reduces your reliance on commercial nurseries, and provides a fascinating glimpse into the wonders of plant propagation. It’s a sustainable, eco-friendly, and deeply satisfying way to grow your own delicious and nutritious sweet potatoes.
We urge you to give this method a try. Don’t be afraid to experiment, adapt, and learn from your experiences. And most importantly, share your journey with us! We’d love to hear about your successes, your challenges, and any tips or tricks you discover along the way. Post photos of your sprouting sweet potatoes, share your favorite varieties, and let us know how this DIY trick has transformed your gardening experience. Let’s build a community of sweet potato enthusiasts, all learning and growing together.
Ready to Grow Your Own Sweet Potatoes?
Don’t delay! Grab a sweet potato, follow these simple steps, and get ready to enjoy the fruits (or rather, the roots) of your labor. You’ll be amazed at how easy and rewarding it is to grow your own sweet potatoes from scratch. Happy growing!
Frequently Asked Questions (FAQ)
What kind of sweet potato should I use for sprouting slips?
You can use almost any sweet potato you find at the grocery store, but organic sweet potatoes are generally recommended. Non-organic sweet potatoes may be treated with sprout inhibitors to prolong their shelf life, which can hinder the sprouting process. If you’re unsure, look for sweet potatoes that are already starting to sprout eyes – these are a good indication that they’re viable for slip production. Also, consider the variety. If you particularly enjoy a certain type of sweet potato, try sprouting that one! Beauregard, Jewel, and Garnet are popular and readily available varieties that tend to sprout well.
How long does it take for sweet potato slips to grow?
The time it takes for slips to grow varies depending on several factors, including temperature, humidity, and the variety of sweet potato. Generally, you can expect to see sprouts emerging within 2-4 weeks. Once the sprouts are about 6-8 inches long, they’re ready to be carefully removed and planted. Be patient, and ensure your sweet potato is kept in a warm, bright location to encourage sprouting.
How do I remove the slips from the sweet potato without damaging them?
This is a crucial step! Gently hold the sweet potato and carefully wiggle the slip back and forth near its base. You can also use a sharp, clean knife or scissors to cut the slip close to the sweet potato. Be careful not to damage the other sprouts. Once removed, place the slips in a glass of water, ensuring that the bottom inch or two is submerged. This will encourage root development before planting.
How do I care for the slips after removing them from the sweet potato?
After removing the slips and placing them in water, change the water every 1-2 days to prevent algae growth and keep the water fresh. Place the glass of slips in a bright, indirect light location. Within a week or two, you should see roots developing. Once the roots are about an inch long, the slips are ready to be transplanted into your garden or containers.
When is the best time to plant sweet potato slips?
Sweet potatoes are warm-weather crops, so it’s essential to wait until the soil has warmed up to at least 60°F (15°C) before planting. This is typically a few weeks after the last expected frost in your area. Planting too early in cold soil can stunt their growth or even kill them.
What kind of soil do sweet potatoes need?
Sweet potatoes prefer well-drained, sandy loam soil. They don’t thrive in heavy clay soil, as it can restrict root development. If your soil is heavy, amend it with compost, sand, and other organic matter to improve drainage and aeration. A slightly acidic soil pH of 6.0 to 6.5 is ideal.
How much sun do sweet potatoes need?
Sweet potatoes need at least 6-8 hours of direct sunlight per day to thrive. Choose a sunny location in your garden where they will receive ample sunlight throughout the growing season.
How often should I water sweet potatoes?
Water sweet potatoes regularly, especially during dry periods. Keep the soil consistently moist, but avoid overwatering, which can lead to root rot. Once the plants are established, they become more drought-tolerant.
Do sweet potatoes need fertilizer?
Sweet potatoes are not heavy feeders, but they benefit from a balanced fertilizer applied at planting time. Avoid using fertilizers that are high in nitrogen, as this can promote excessive vine growth at the expense of root development. A fertilizer with a higher phosphorus and potassium content is ideal.
How do I know when my sweet potatoes are ready to harvest?
Sweet potatoes are typically ready to harvest about 90-120 days after planting. The leaves will start to turn yellow and the vines may begin to die back. You can also dig up a test potato to check for size and maturity. Harvest before the first frost, as frost can damage the potatoes.
How do I cure sweet potatoes after harvesting?
Curing is an essential step in preserving sweet potatoes and improving their flavor. After harvesting, gently brush off any excess soil and allow the sweet potatoes to dry in a warm, humid place (80-85°F or 27-29°C and 85-90% humidity) for about 7-10 days. This process allows the skins to harden and heal any minor cuts or bruises, preventing rot and improving storage life.
How do I store sweet potatoes?
After curing, store sweet potatoes in a cool, dry, and dark place (55-60°F or 13-16°C) with good ventilation. Avoid storing them in the refrigerator, as this can cause them to develop a hard core and lose flavor. Properly cured and stored sweet potatoes can last for several months.
Can I grow sweet potatoes in containers?
Yes, you can successfully grow sweet potatoes in containers, but you’ll need a large container (at least 20 gallons) with good drainage. Choose a container that is wide and deep enough to accommodate the developing roots. Use a well-draining potting mix and provide plenty of sunlight and water.
What are some common pests and diseases that affect sweet potatoes?
Some common pests that affect sweet potatoes include sweet potato weevils, flea beetles, and wireworms. Diseases include stem rot, black rot, and scurf. Practice crop rotation, use disease-resistant varieties, and monitor your plants regularly for signs of pests or diseases.
Can I eat the sweet potato leaves?
Yes, sweet potato leaves are edible and nutritious! They can be eaten raw in salads or cooked like spinach. Choose young, tender leaves for the best flavor.

Leave a Comment