
Growing Tomatoes for More Fruit – isn’t that the dream of every home gardener? I know it’s mine! Imagine baskets overflowing with juicy, sun-ripened tomatoes, ready for salads, sauces, and everything in between. But sometimes, despite our best efforts, our tomato plants just don’t seem to produce as much as we’d hoped.
The history of tomato cultivation is fascinating, stretching back to South America and evolving over centuries. From humble beginnings, tomatoes have become a global staple, a testament to their deliciousness and versatility. But even with all that history, maximizing your tomato yield can still feel like a mystery!
That’s where these DIY tricks and hacks come in. We’ve all been there, staring at a tomato plant laden with leaves but disappointingly few fruits. It’s frustrating! But don’t worry, I’m here to share some simple, effective techniques that can dramatically increase your tomato harvest. These aren’t complicated, expensive solutions; they’re practical tips you can implement right now to get the most out of your plants.
Why do you need these tricks? Because everyone deserves a bountiful tomato harvest! Whether you’re a seasoned gardener or just starting out, these tips for growing tomatoes for more fruit will empower you to achieve your gardening goals. Let’s dive in and unlock the secrets to a tomato-filled summer!
Growing Tomatoes for More Fruit: My Secret DIY Hack!
Okay, tomato lovers, gather ’round! I’m about to share my tried-and-true method for getting a bumper crop of juicy, delicious tomatoes. Forget those puny, store-bought imitations – we’re talking about homegrown goodness bursting with flavor. This isn’t just about planting a seed and hoping for the best; it’s about understanding the plant’s needs and giving it a little boost along the way. I’ve been doing this for years, and trust me, it works!
Understanding Tomato Needs: The Foundation for Success
Before we dive into the nitty-gritty, let’s quickly cover the basics. Tomatoes are sun-worshippers, so they need at least 6-8 hours of direct sunlight per day. They also crave well-drained soil that’s rich in organic matter. Think of it as building a strong foundation for a healthy, productive plant.
* Sunlight: Minimum 6-8 hours of direct sunlight.
* Soil: Well-drained, rich in organic matter (compost is your best friend!).
* Watering: Consistent and deep watering, especially during dry spells. Avoid overhead watering to prevent diseases.
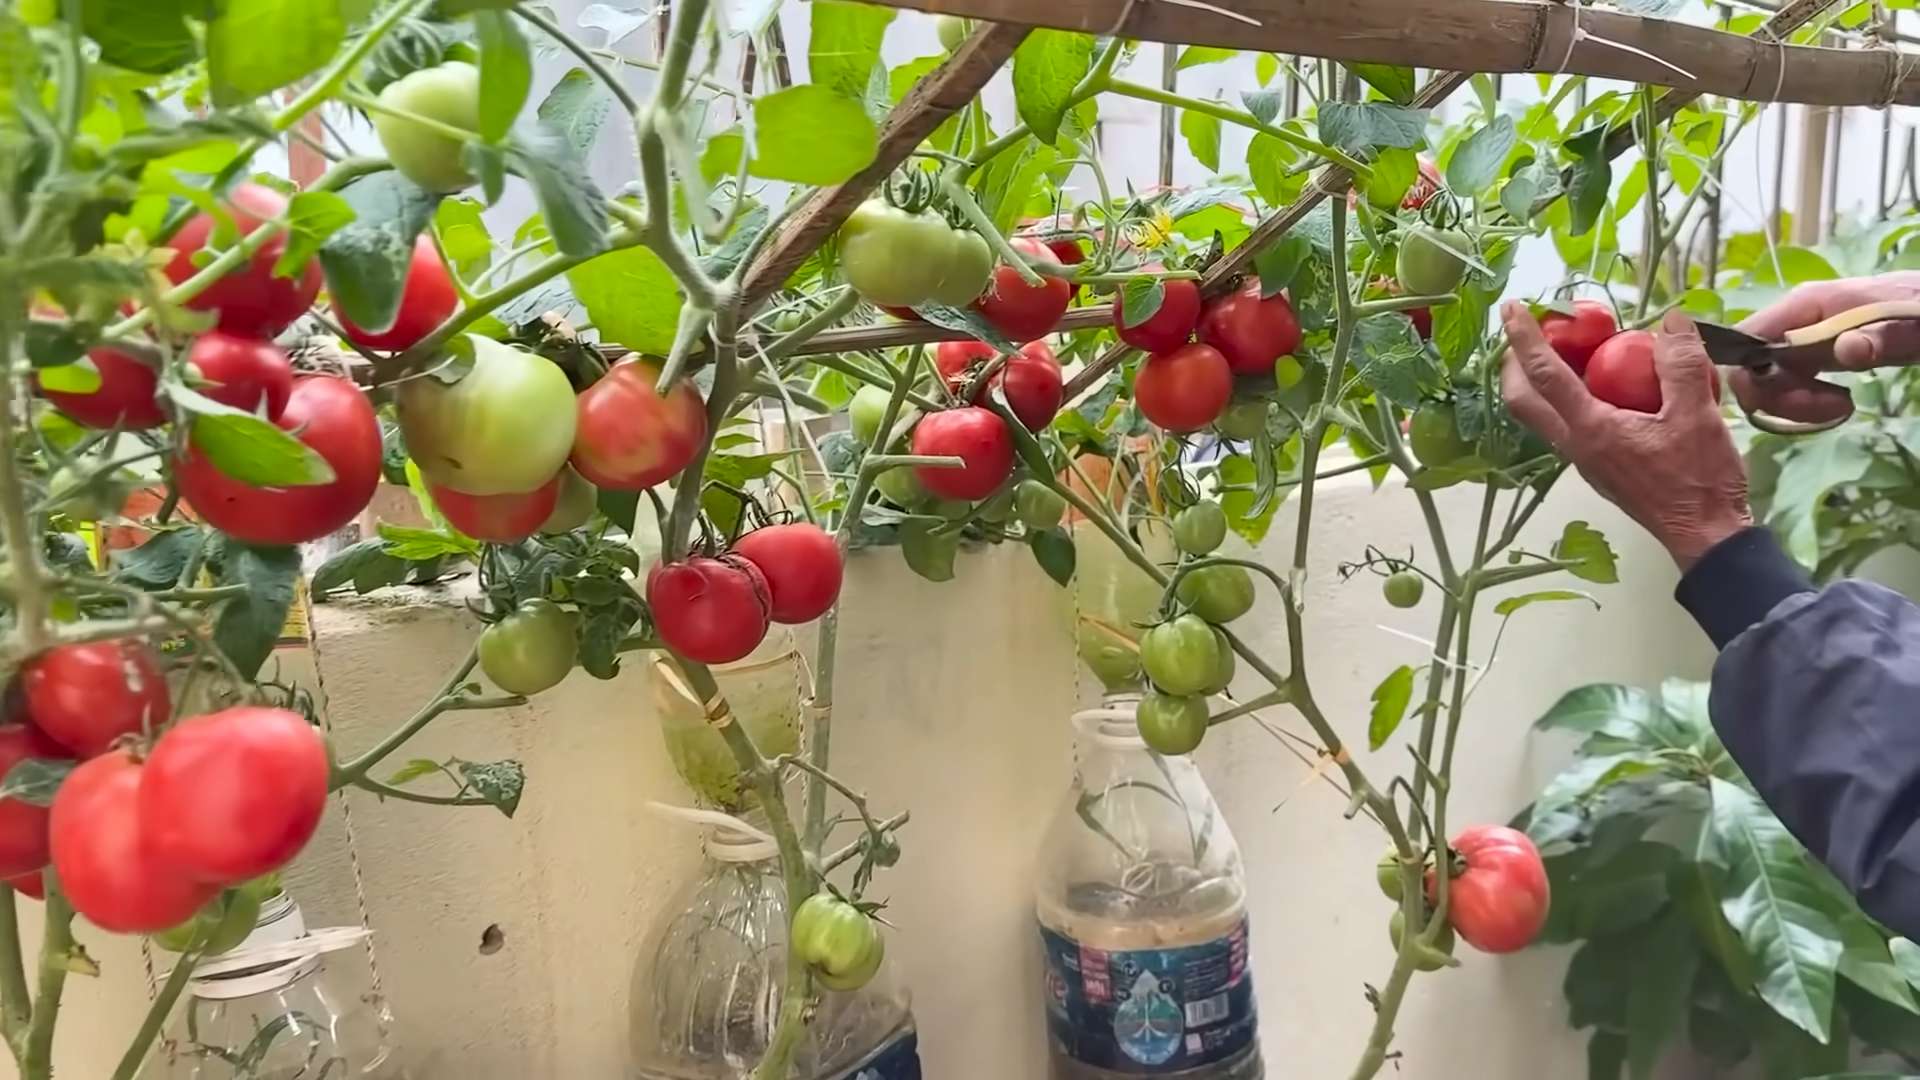
* Support: Tomatoes need support as they grow – stakes, cages, or trellises are essential.
* Fertilizing: Regular feeding with a tomato-specific fertilizer.
The DIY Hack: My Secret Weapon for Tomato Abundance
Now for the fun part! This hack involves a simple technique that encourages the tomato plant to develop a stronger root system, leading to more nutrient uptake and, ultimately, more fruit. It’s all about burying a significant portion of the stem when you transplant your seedlings.
Why This Works: The Science Behind the Magic
Tomato stems have the amazing ability to grow roots along their entire length when buried. By burying a large portion of the stem, you’re essentially creating a massive root system underground. This expanded root system allows the plant to absorb more water and nutrients from the soil, resulting in a healthier, more vigorous plant that can support a larger crop of tomatoes. It’s like giving your tomato plant a super-powered engine!
Step-by-Step Guide: Burying for Bounty
Here’s how to put this hack into action:
1. Prepare Your Seedlings: Start with healthy tomato seedlings. I usually start mine indoors about 6-8 weeks before the last expected frost. Make sure they’re hardened off before transplanting them outdoors. Hardening off means gradually exposing them to outdoor conditions (sun, wind, temperature) over a week or two. This prevents transplant shock.
2. Choose Your Planting Location: Select a sunny spot in your garden with well-drained soil. Amend the soil with plenty of compost or other organic matter. I like to add a handful of bone meal to each planting hole for extra phosphorus, which promotes root development.
3. Dig a Deep Hole: This is where the magic happens! Dig a hole that’s much deeper than you would normally dig for a tomato seedling. You want to bury a significant portion of the stem – I usually aim for about two-thirds of the plant. The deeper the better, within reason. Don’t bury the leaves!
4. Gently Remove Lower Leaves: Carefully remove the lower leaves from the tomato seedling, leaving only the top few sets of leaves. This will prevent the buried leaves from rotting and potentially causing disease.
5. Lay the Seedling Down: Gently lay the tomato seedling horizontally in the hole. The top of the plant (with the remaining leaves) should be pointing upwards.
6. Cover the Stem with Soil: Carefully cover the buried stem with soil, leaving the top few sets of leaves exposed. Gently pat the soil around the base of the plant.
7. Water Thoroughly: Water the newly transplanted tomato seedling thoroughly. This will help settle the soil and encourage root growth.
8. Add Support: Immediately after planting, install a stake, cage, or trellis to support the tomato plant as it grows. This will prevent the plant from sprawling on the ground and keep the fruit off the soil.
9. Mulch Around the Plant: Apply a layer of mulch around the base of the plant to help retain moisture, suppress weeds, and regulate soil temperature. I like to use straw or shredded leaves.
10. Fertilize Regularly: Start fertilizing your tomato plants about two weeks after transplanting. Use a tomato-specific fertilizer according to the package directions. I prefer to use a slow-release fertilizer, which provides a steady supply of nutrients over time.
Ongoing Care: Nurturing Your Tomato Plants
Transplanting is just the beginning! Here’s how to keep your tomato plants happy and healthy throughout the growing season:
* Watering: Water deeply and regularly, especially during dry spells. Aim for about 1-2 inches of water per week. Water at the base of the plant to avoid wetting the leaves, which can lead to disease.
* Fertilizing: Continue to fertilize your tomato plants every 2-3 weeks throughout the growing season.
* Pruning: Prune your tomato plants regularly to remove suckers (the small shoots that grow in the crotch between the main stem and the branches). Pruning helps to improve air circulation and encourage fruit production. I usually prune suckers up to the first flower cluster.
* Pest and Disease Control: Keep an eye out for pests and diseases. Common tomato pests include aphids, tomato hornworms, and whiteflies. Common tomato diseases include early blight, late blight, and blossom end rot. Treat any problems promptly with appropriate organic or chemical controls. I prefer to use organic methods whenever possible.
* Support: Make sure your tomato plants have adequate support as they grow. As the plants get larger and the fruit starts to develop, they can become quite heavy. You may need to add additional support to prevent the plants from collapsing.
Troubleshooting: Common Tomato Problems and Solutions
Even with the best care, you may encounter some problems along the way. Here are some common tomato problems and how to fix them:
* Blossom End Rot: This is a common problem that causes the bottom of the tomato to turn black and leathery. It’s usually caused by a calcium deficiency, which can be due to inconsistent watering or poor soil. To prevent blossom end rot, water your tomato plants regularly and amend the soil with calcium-rich amendments like bone meal or crushed eggshells.
* Early Blight: This is a fungal disease that causes dark spots to appear on the leaves. To prevent early blight, avoid overhead watering, improve air circulation, and remove any infected leaves. You can also treat early blight with a fungicide.
* Late Blight: This is another fungal disease that can quickly destroy tomato plants. It’s more common in cool, wet weather. To prevent late blight, choose disease-resistant varieties, improve air circulation, and avoid overhead watering. You can also treat late blight with a fungicide.
* Aphids: These small, sap-sucking insects can weaken tomato plants. To control aphids, spray them with a strong stream of water or use insecticidal soap.
* Tomato Hornworms: These large caterpillars can quickly defoliate tomato plants. To control tomato hornworms, handpick them off the plants or use Bacillus thuringiensis (Bt), a natural insecticide.
Choosing the Right Tomato Variety: Setting Yourself Up for Success
The variety of tomato you choose can also impact your success. Some varieties are more disease-resistant, while others are more productive. Here are a few of my favorite tomato varieties:
* ‘Early Girl’: A classic early-season variety that produces medium-sized, red tomatoes. It’s known for its reliability and disease resistance.
* ‘Roma’: A paste tomato that’s perfect for making sauces and canning. It’s also very productive.
* ‘Beefsteak’: A large, meaty tomato that’s perfect for slicing and sandwiches. It’s known for its rich flavor.
* ‘Cherry Tomato’: A small, sweet tomato that’s perfect for snacking and salads. There are many different varieties of cherry tomatoes to choose from.
* ‘Heirloom Tomatoes’: These are older varieties that have been passed down through generations. They often have unique flavors and colors. Some popular heirloom varieties include ‘Brandywine’, ‘Cherokee Purple’, and ‘Green Zebra’.
Harvesting Your Tomatoes: The Sweet Reward
After all your hard work, it’s finally time to harvest your tomatoes! Tomatoes are ready to harvest when they are fully colored and slightly soft to the touch. Gently twist the tomato off the vine, leaving the stem attached. Store your tomatoes at room temperature for the best flavor.
And that’s it! With a little bit of effort and this simple DIY hack, you can grow a bumper crop of delicious tomatoes. Happy gardening!
Conclusion
So, there you have it! This simple yet effective DIY trick for growing tomatoes for more fruit is a game-changer for any gardener, whether you’re a seasoned pro or just starting out. We’ve walked you through the process, highlighting the science behind why pinching off those pesky suckers and strategically pruning your tomato plants leads to a more abundant harvest. It’s not just about getting *some* tomatoes; it’s about maximizing your yield and enjoying the fruits (literally!) of your labor.
Why is this a must-try? Because it’s easy, inexpensive, and incredibly rewarding. Imagine biting into a juicy, sun-ripened tomato that you nurtured to perfection. This DIY method empowers you to take control of your tomato plants’ growth, directing their energy towards fruit production rather than leafy foliage. You’ll be amazed at the difference it makes.
But don’t stop there! Experiment with different variations to find what works best for your specific tomato variety and growing conditions. For example, if you’re growing indeterminate tomatoes (those that keep growing and producing all season), you might want to be more aggressive with your pruning. Conversely, determinate tomatoes (those that grow to a certain size and produce all their fruit at once) may require less pruning. You could also try different methods of supporting your tomato plants, such as staking, caging, or using the Florida weave technique. Each method has its own advantages and disadvantages, so research and choose the one that suits your needs.
Consider also the type of fertilizer you use. A balanced fertilizer early in the season will help establish strong roots and healthy foliage. However, once your tomato plants start to flower and set fruit, switch to a fertilizer that is higher in phosphorus and potassium. These nutrients are essential for fruit development and will help you achieve a bumper crop.
Another variation to consider is companion planting. Certain plants, such as basil, marigolds, and garlic, are known to deter pests and attract beneficial insects to your tomato plants. Planting these companions alongside your tomatoes can help protect them from damage and improve their overall health.
Finally, remember to monitor your tomato plants regularly for signs of disease or pests. Early detection is key to preventing problems from spreading and affecting your harvest. If you notice any issues, take action immediately to address them.
We’re confident that this DIY trick will transform your tomato-growing experience. Don’t just take our word for it, though. Give it a try and see for yourself! We encourage you to share your results with us and the wider gardening community. Post pictures of your thriving tomato plants, share your tips and tricks, and let us know what worked (or didn’t work) for you. Together, we can all become better tomato growers. So, grab your pruning shears, get out into the garden, and start growing tomatoes for more fruit today! We can’t wait to hear about your success!
Frequently Asked Questions (FAQ)
What exactly are “suckers” on a tomato plant, and why should I remove them?
Suckers are small shoots that grow in the “V” formed between the main stem and a branch of your tomato plant. They are essentially new stems that will eventually produce their own leaves, flowers, and fruit. However, if left unchecked, these suckers will compete with the main stem for resources like sunlight, water, and nutrients. This can lead to a crowded plant with reduced airflow, making it more susceptible to diseases. More importantly, it diverts energy away from the existing fruit, resulting in smaller, less flavorful tomatoes and a lower overall yield. Removing suckers, a key part of growing tomatoes for more fruit, directs the plant’s energy towards developing the tomatoes already on the vine.
When is the best time to start pruning my tomato plants?
You can start pruning your tomato plants as soon as you see suckers developing. This usually happens when the plants are about 12-18 inches tall. It’s best to prune early in the morning when the plants are dry, as this will help prevent the spread of diseases. Regularly check your plants every few days and remove any new suckers that have emerged. Consistency is key!
How do I properly remove suckers from my tomato plants?
The easiest way to remove suckers is to simply pinch them off with your fingers. If the suckers are larger than a few inches, you can use pruning shears or a sharp knife. Make sure to cut close to the main stem without damaging it. Avoid tearing the suckers, as this can create an open wound that is susceptible to infection.
Will pruning my tomato plants hurt them?
No, pruning your tomato plants will not hurt them. In fact, it will actually benefit them by improving airflow, reducing disease risk, and directing energy towards fruit production. Think of it as giving your tomato plants a haircut – it helps them stay healthy and productive.
How much should I prune my tomato plants?
The amount of pruning you should do depends on the type of tomato plant you are growing. Indeterminate tomatoes, which continue to grow and produce fruit throughout the season, require more aggressive pruning than determinate tomatoes, which grow to a certain size and produce all their fruit at once. For indeterminate tomatoes, you should remove all suckers that grow below the first flower cluster. For determinate tomatoes, you can be more lenient with your pruning, only removing suckers that are growing close to the ground or that are blocking airflow.
What if I accidentally remove a branch that has flowers or fruit on it?
Don’t worry! It happens. While it’s best to avoid removing branches with flowers or fruit, accidentally removing one won’t necessarily ruin your harvest. The plant will likely compensate by producing more flowers and fruit on other branches. Just be more careful in the future.
Can I use the suckers I remove to grow new tomato plants?
Yes, you can! Tomato suckers can be easily rooted to create new tomato plants. Simply place the suckers in a glass of water and wait for roots to develop. Once the roots are a few inches long, you can transplant the suckers into pots or directly into the garden. This is a great way to propagate your favorite tomato varieties.
What are some other tips for growing healthy tomato plants?
In addition to pruning, there are several other things you can do to ensure healthy tomato plants and a bountiful harvest. These include:
* **Providing adequate sunlight:** Tomato plants need at least 6-8 hours of sunlight per day.
* **Watering deeply and regularly:** Water your tomato plants deeply and regularly, especially during hot, dry weather. Avoid watering the foliage, as this can promote disease.
* **Fertilizing properly:** Use a balanced fertilizer early in the season and then switch to a fertilizer that is higher in phosphorus and potassium once the plants start to flower and set fruit.
* **Supporting your plants:** Use stakes, cages, or the Florida weave technique to support your tomato plants and prevent them from falling over.
* **Controlling pests and diseases:** Monitor your plants regularly for signs of pests or diseases and take action immediately to address any issues.
My tomato plants are growing tall and leafy, but they aren’t producing much fruit. What should I do?
This is a common problem, and it’s often caused by over-fertilizing with nitrogen. Nitrogen promotes leafy growth, but it can inhibit fruit production. To remedy this, stop fertilizing with nitrogen and switch to a fertilizer that is higher in phosphorus and potassium. You should also make sure that your tomato plants are getting enough sunlight and that you are pruning them properly.
How do I know when my tomatoes are ripe?
Tomatoes are ripe when they are fully colored and slightly soft to the touch. The exact color will depend on the variety of tomato you are growing. Ripe tomatoes should also detach easily from the vine.

Leave a Comment