
Growing Long Beans Successfully can feel like a real victory in the home garden! Imagine stepping outside and harvesting armfuls of these vibrant, delicious beans, knowing you nurtured them from tiny seeds to impressive lengths. It’s a rewarding experience, and trust me, it’s totally achievable, even if you’re a beginner gardener like I once was.
Long beans, also known as yardlong beans or asparagus beans, have a fascinating history, particularly in Asian cuisine where they’ve been cultivated for centuries. They’re a staple in stir-fries, curries, and salads, adding a unique texture and flavor that’s hard to resist. But beyond their culinary appeal, growing your own long beans offers so much more.
Why should you try this DIY gardening trick? Well, for starters, store-bought long beans can sometimes be expensive and lack the freshness of homegrown produce. Plus, knowing exactly where your food comes from and how it’s grown is incredibly empowering. With a few simple techniques, you can avoid common pitfalls and ensure a bountiful harvest. This DIY guide will provide you with the essential tips and tricks to growing long beans successfully, transforming your garden into a thriving source of these amazing vegetables. Let’s get started!
DIY: Unleash Your Inner Gardener and Grow Long Beans Like a Pro!
Okay, fellow gardening enthusiasts! Let’s dive into the wonderful world of long beans (also known as yardlong beans, asparagus beans, or Chinese long beans). I’m going to share my secrets to growing these delicious and impressive veggies right in your own backyard. Trust me, it’s easier than you think, and the reward of fresh, homegrown long beans is totally worth it!
What You’ll Need: The Long Bean Starter Pack
Before we get our hands dirty, let’s gather our supplies. Here’s a checklist of everything you’ll need to become a long bean growing guru:
* Long Bean Seeds: Choose a variety that suits your climate. I personally love the ‘Red Noodle’ variety for its vibrant color and excellent flavor.
* Well-Draining Soil: Long beans aren’t fans of soggy feet! Amend your soil with compost or other organic matter to improve drainage.
* Compost or Aged Manure: This is your secret weapon for nutrient-rich soil.
* Trellis or Support Structure: These beans are climbers, so they need something to hold onto. A trellis, fence, or even sturdy bamboo poles will do the trick.
* Gardening Gloves: Protect those precious hands!
* Hand Trowel or Shovel: For planting and digging.
* Watering Can or Hose: Essential for keeping your beans hydrated.
* Optional:
* Seed starting trays and potting mix (if starting indoors).
* Organic fertilizer.
* Mulch (straw, wood chips, etc.).
Phase 1: Getting Started – From Seed to Seedling (Optional)
While you can directly sow long bean seeds into the ground, starting them indoors gives them a head start, especially in cooler climates. Here’s how I do it:
1. Sow Seeds Indoors (2-3 weeks before the last frost): Fill seed starting trays with a good quality potting mix. Plant 2-3 seeds per cell, about 1 inch deep.
2. Water Gently: Keep the soil consistently moist, but not waterlogged.
3. Provide Warmth and Light: Place the trays in a warm location (around 70-80°F) and provide plenty of light. A sunny windowsill or grow lights work well.
4. Thin Seedlings (if necessary): Once the seedlings emerge, thin them to one strong seedling per cell.
5. Harden Off Seedlings: Before transplanting outdoors, gradually acclimate the seedlings to outdoor conditions by exposing them to increasing amounts of sunlight and wind over a week or two.
Phase 2: Planting Your Long Bean Patch
Now for the fun part – getting those beans in the ground!
1. Choose a Sunny Location: Long beans need at least 6-8 hours of sunlight per day.
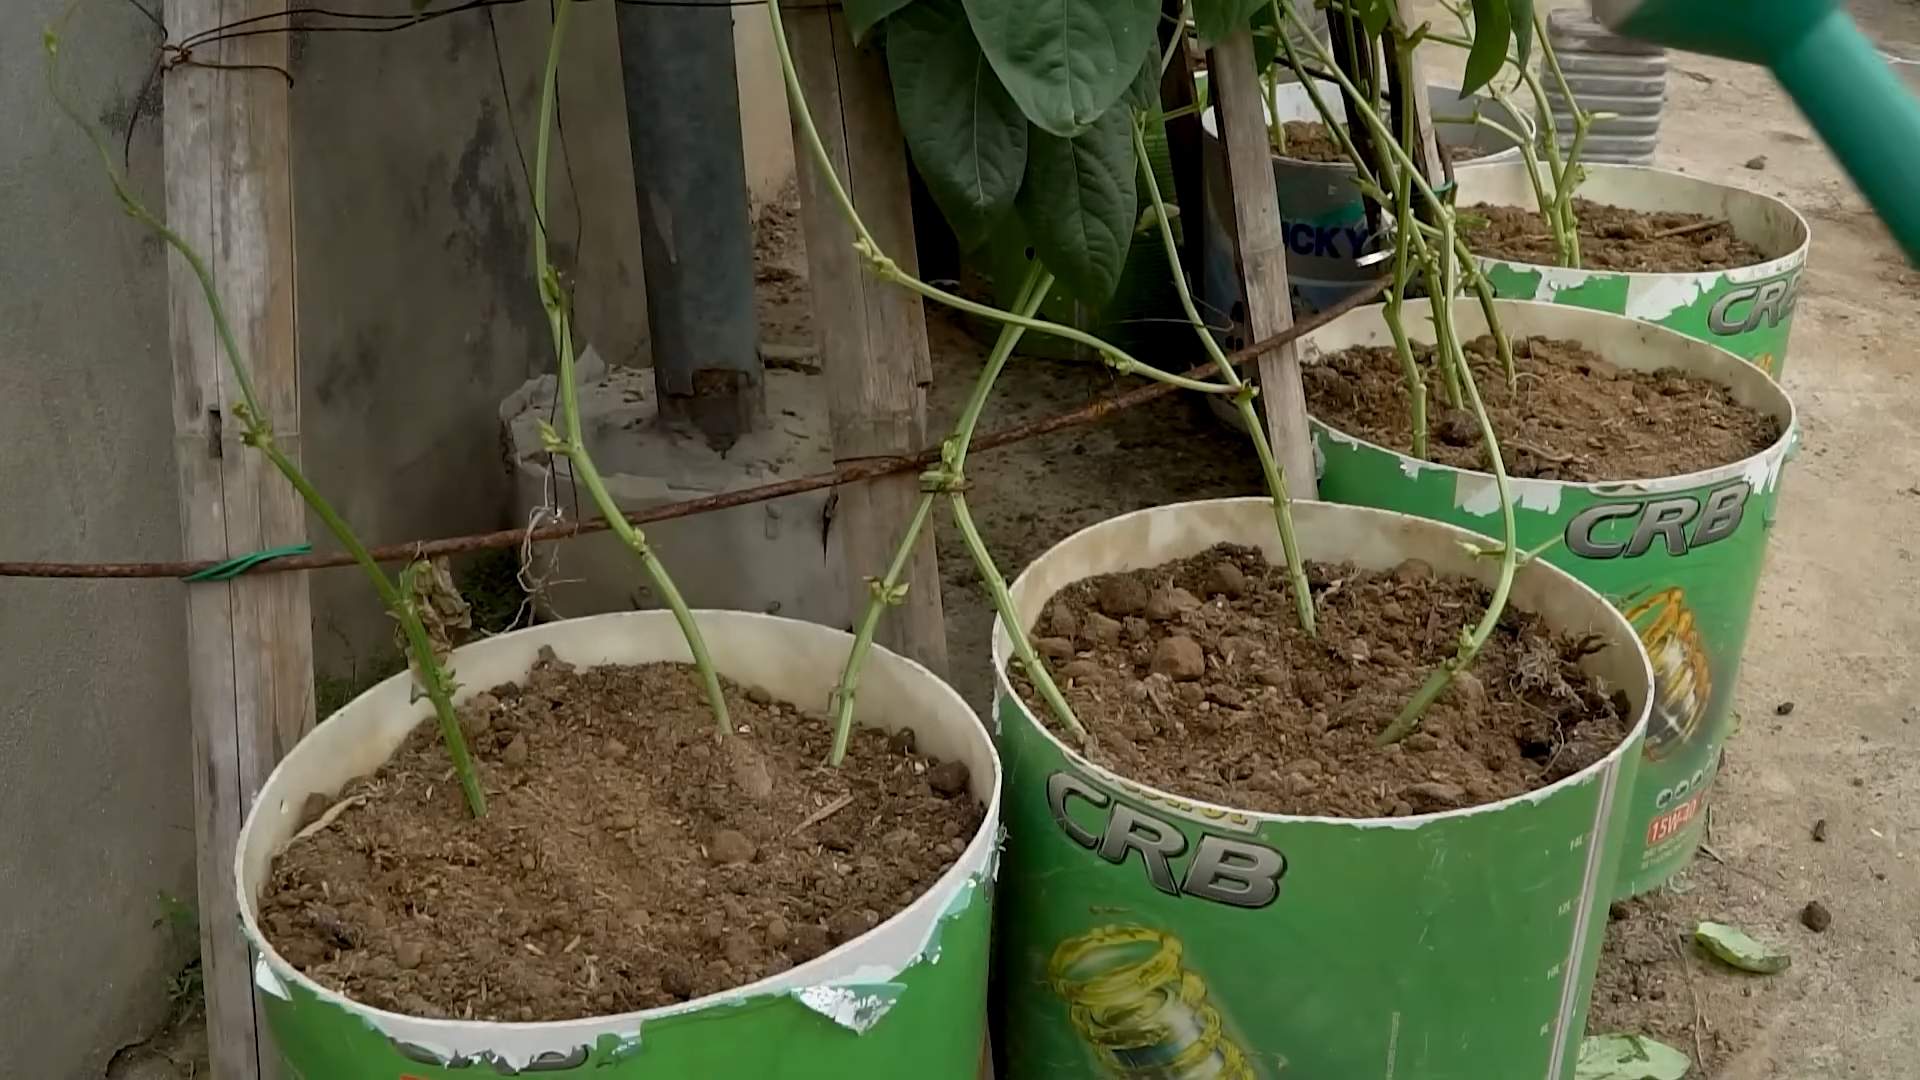
2. Prepare the Soil: Loosen the soil with a garden fork or tiller. Amend with compost or aged manure to improve fertility and drainage.
3. Install Your Trellis: Before planting, set up your trellis or support structure. This will prevent you from disturbing the roots later. Make sure it’s sturdy enough to support the weight of the mature plants.
4. Direct Sowing (if not starting indoors): Sow seeds directly into the ground after the last frost, when the soil has warmed up to at least 60°F. Plant seeds about 1 inch deep and 4-6 inches apart.
5. Transplanting Seedlings (if starting indoors): Gently remove the seedlings from the trays and plant them in the ground, spacing them about 4-6 inches apart.
6. Water Thoroughly: After planting, water the area well to settle the soil around the roots.
7. Mulch (Optional): Apply a layer of mulch around the plants to help retain moisture, suppress weeds, and regulate soil temperature.
Phase 3: Nurturing Your Growing Long Beans
Once your long beans are planted, it’s time to provide them with the care they need to thrive.
1. Water Regularly: Long beans need consistent moisture, especially during hot, dry weather. Water deeply whenever the top inch of soil feels dry. Avoid overhead watering, as this can promote fungal diseases. Drip irrigation is ideal.
2. Fertilize (Optional): If your soil is poor, you can fertilize your long beans every few weeks with an organic fertilizer. Follow the instructions on the fertilizer package. I like to use a balanced fertilizer or one that is slightly higher in phosphorus to promote flowering and pod development.
3. Train the Vines: As the long bean vines grow, gently guide them onto the trellis or support structure. They will naturally climb, but you may need to help them get started.
4. Weed Regularly: Keep the area around your long beans free of weeds, which can compete for nutrients and water.
5. Pest and Disease Control: Keep an eye out for common pests like aphids, bean beetles, and spider mites. Treat infestations promptly with organic pest control methods, such as insecticidal soap or neem oil. Also, watch for signs of fungal diseases, such as powdery mildew or bean rust. Improve air circulation and avoid overhead watering to prevent these diseases.
Phase 4: Harvesting Your Bounty of Long Beans
The moment you’ve been waiting for! Harvesting your homegrown long beans is incredibly satisfying.
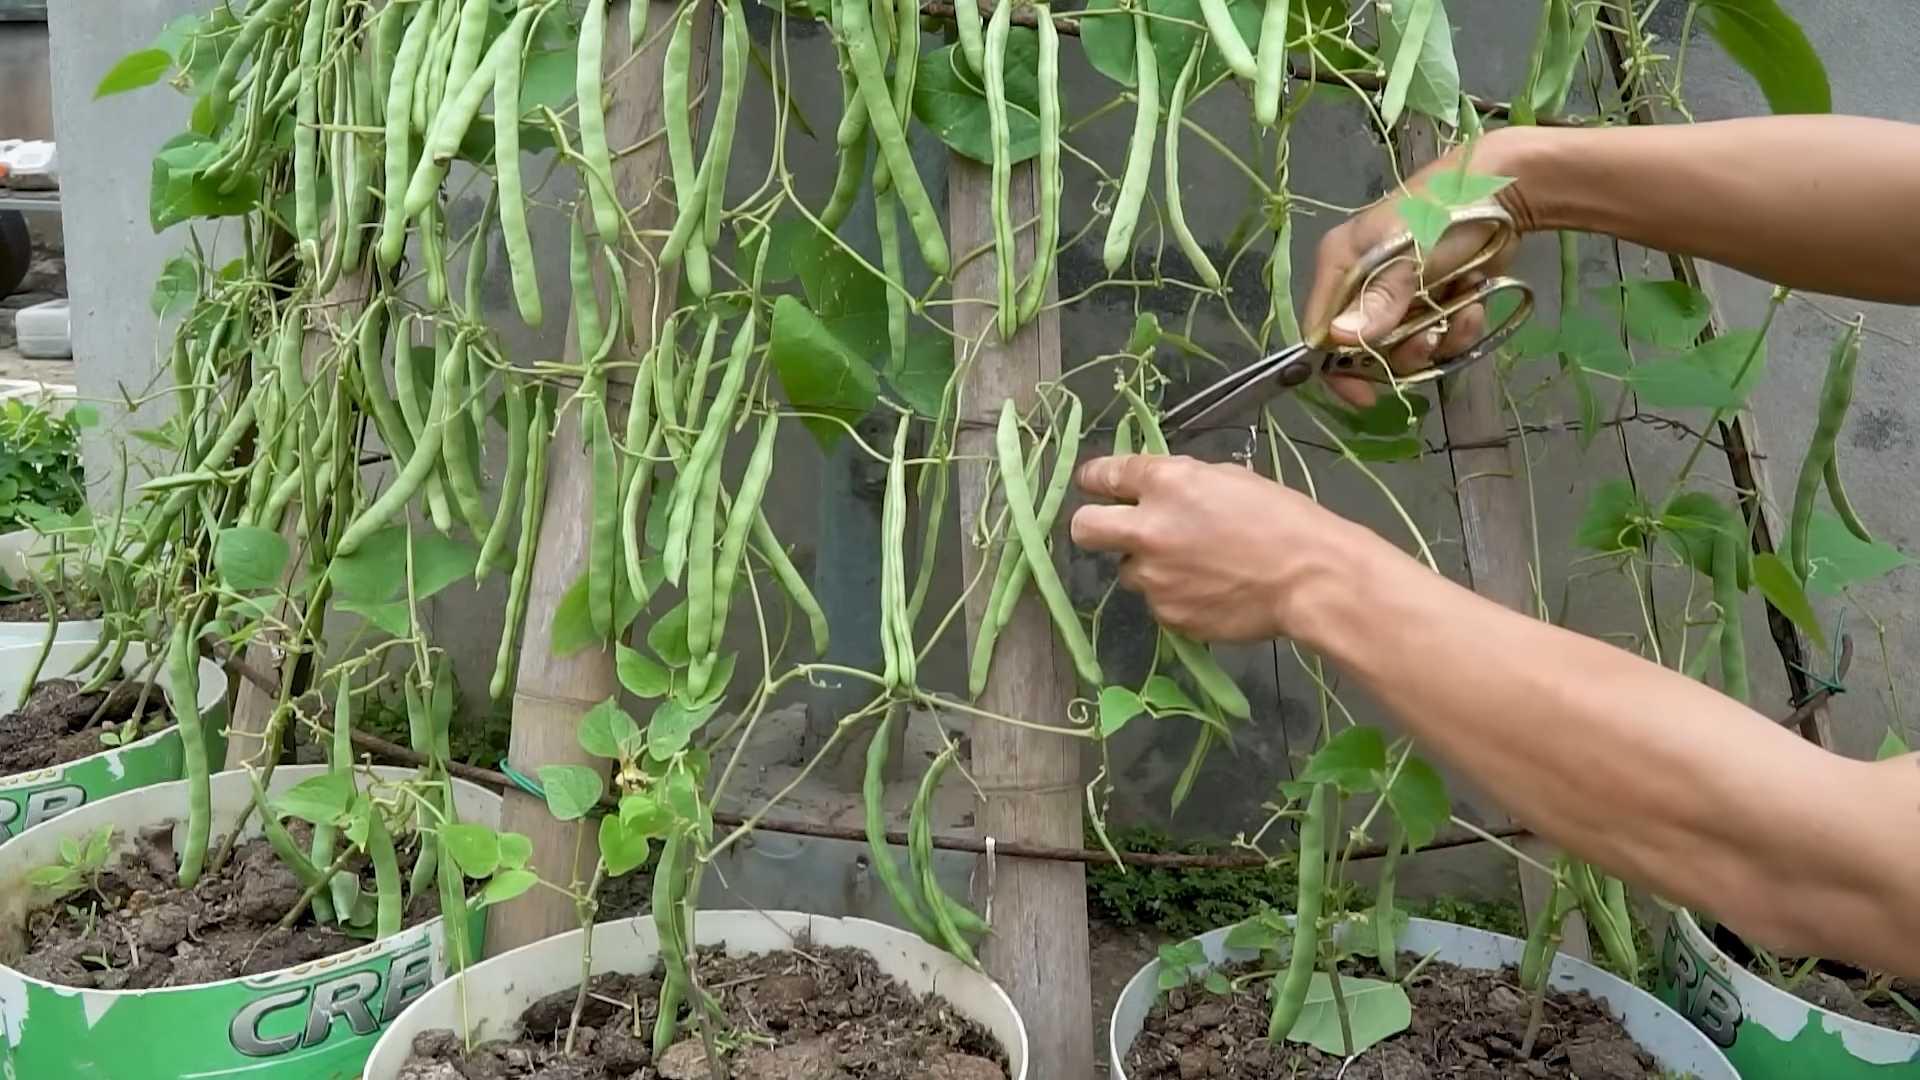
1. Harvest When Young and Tender: Long beans are best harvested when they are young, tender, and about 12-18 inches long. They should be firm and snap easily.
2. Harvest Regularly: Frequent harvesting encourages the plants to produce more beans. Check your plants every day or two during peak season.
3. Use Scissors or Pruners: Cut the beans from the vine with scissors or pruners to avoid damaging the plant.
4. Handle with Care: Long beans are delicate, so handle them gently to avoid bruising.
5. Store Properly: Store harvested long beans in the refrigerator for up to a week.
Troubleshooting: Common Long Bean Growing Problems
Even with the best care, you might encounter some challenges along the way. Here are a few common problems and how to address them:
* Poor Germination: If your seeds aren’t germinating, make sure the soil is warm enough and consistently moist. You can also try soaking the seeds in water for 24 hours before planting to improve germination rates.
* Yellowing Leaves: Yellowing leaves can indicate a nutrient deficiency, overwatering, or a pest infestation. Check the soil moisture and nutrient levels, and inspect the plants for pests.
* Lack of Flowers or Pods: A lack of flowers or pods can be caused by insufficient sunlight, poor soil fertility, or extreme temperatures. Make sure your plants are getting enough sunlight and nutrients, and protect them from extreme heat or cold.
* Pest Infestations: As mentioned earlier, keep an eye out for common pests and treat infestations promptly with organic pest control methods.
* Fungal Diseases: Prevent fungal diseases by improving air circulation, avoiding overhead watering, and using disease-resistant varieties.
Tips and Tricks for Long Bean Success
Here are a few extra tips to help you grow the best long beans ever:
* Succession Planting: Plant long beans every few weeks to extend your harvest season.
* Companion Planting: Plant long beans with beneficial companion plants like marigolds, nasturtiums, and rosemary to deter pests.
* Nitrogen Fixation: Long beans are legumes, which means they can fix nitrogen in the soil. This can benefit other plants in your garden.
* Saving Seeds: If you want to save seeds from your long beans, allow a few pods to mature completely on the vine. Once the pods are dry and brown, harvest the seeds and store them in a cool, dry place.
* Enjoy Your Harvest! Experiment with different ways to cook and enjoy your homegrown long beans. They’re delicious stir-fried, steamed, grilled, or added to soups and stews.
Growing long beans is a rewarding experience that will provide you with a delicious and unique vegetable to enjoy. With a little bit of care and attention, you can grow a bountiful harvest of long beans right in your own backyard. Happy gardening!
Conclusion
So, there you have it! Growing long beans successfully doesn’t require a green thumb blessed by the gardening gods. It’s about understanding their needs, providing the right support, and a little bit of patience. This DIY trick, focusing on creating a robust and well-draining soil mix enriched with organic matter, is a game-changer. It addresses the long bean’s specific requirements for healthy root development and nutrient uptake, leading to a significantly higher yield and more flavorful beans.
Why is this a must-try? Because it’s simple, cost-effective, and yields impressive results. Forget struggling with poor soil conditions or relying solely on expensive fertilizers. This method empowers you to take control of your growing environment and cultivate thriving long bean plants right in your own backyard, or even in containers on your balcony. The difference in plant vigor and bean production will be noticeable, trust me.
But don’t stop there! Experiment with different variations to find what works best for your specific climate and soil type. Consider adding a handful of bone meal to the soil mix for an extra boost of phosphorus, which promotes flowering and fruiting. If you live in a particularly hot climate, incorporating some water-retaining crystals into the soil can help prevent the soil from drying out too quickly. You can also try companion planting. Marigolds, for example, are known to deter pests that can affect long beans.
The key is to observe your plants and adjust your approach as needed. Gardening is a learning process, and every season brings new opportunities to refine your techniques. This DIY soil mix is a solid foundation, but feel free to personalize it to suit your unique growing conditions.
We are confident that this DIY trick will revolutionize your long bean growing experience. It’s a simple yet powerful way to ensure a bountiful harvest of delicious, homegrown long beans. Now, it’s your turn to put this knowledge into action.
We encourage you to try this DIY soil mix for your long beans and share your results with us! Let us know in the comments how it worked for you, what variations you tried, and any tips you discovered along the way. Your experiences can help other gardeners achieve success and build a thriving community of long bean enthusiasts. Happy gardening!
Frequently Asked Questions (FAQ)
What exactly is the benefit of using this DIY soil mix compared to store-bought potting mix?
Store-bought potting mixes can be convenient, but they often lack the specific nutrients and drainage properties that long beans need to thrive. Many commercial mixes are peat-based, which can become compacted and waterlogged over time, hindering root development. Our DIY mix allows you to customize the soil composition to perfectly match the long bean’s requirements. The addition of compost provides a slow-release source of essential nutrients, while the perlite or vermiculite ensures excellent drainage, preventing root rot. Ultimately, this leads to healthier plants and a more abundant harvest.
Can I use this DIY soil mix for other types of beans or vegetables?
Yes, absolutely! This soil mix is generally beneficial for other legumes and vegetables that prefer well-draining soil rich in organic matter. Plants like peas, bush beans, cucumbers, and tomatoes can also benefit from this type of soil. However, always research the specific needs of each plant to ensure the mix is suitable. For example, some plants may prefer a slightly more acidic or alkaline soil. You might need to adjust the proportions of the ingredients based on the specific needs of the plant.
How often should I water long beans grown in this DIY soil mix?
Watering frequency depends on several factors, including the climate, the size of the container, and the stage of plant growth. Generally, you should water long beans when the top inch of soil feels dry to the touch. Avoid overwatering, as this can lead to root rot. During hot, dry weather, you may need to water daily, while during cooler, wetter periods, you may only need to water every few days. A good rule of thumb is to water deeply and less frequently, rather than shallowly and more often.
What type of compost is best to use in this DIY soil mix?
Any good quality compost will work well, but some types are particularly beneficial. Worm castings are an excellent choice, as they are rich in nutrients and beneficial microbes. Composted manure is another great option, but make sure it is well-rotted to avoid burning the plants. Leaf mold is also a good source of organic matter and can help improve soil structure. You can even make your own compost at home using kitchen scraps and yard waste. The key is to use a compost that is fully decomposed and free of weed seeds and pathogens.
How do I know if my long beans are getting enough nutrients from this DIY soil mix?
The appearance of your plants can tell you a lot about their nutrient status. Healthy long bean plants should have vibrant green leaves and strong, sturdy stems. If the leaves are yellowing, especially the older leaves, it could indicate a nitrogen deficiency. If the leaves are turning purple, it could indicate a phosphorus deficiency. If the leaves have brown edges, it could indicate a potassium deficiency. If you suspect a nutrient deficiency, you can supplement with a balanced organic fertilizer.
What are some common pests and diseases that affect long beans, and how can I prevent them?
Common pests that affect long beans include aphids, bean beetles, and spider mites. Diseases include powdery mildew, bean rust, and anthracnose. To prevent these problems, practice good garden hygiene. Remove any dead or diseased leaves and debris from around the plants. Water at the base of the plants to avoid wetting the foliage, which can promote fungal diseases. Use organic pest control methods, such as insecticidal soap or neem oil, to control pests. Ensure good air circulation around the plants by spacing them properly. Crop rotation can also help prevent soilborne diseases.
Can I grow long beans in containers using this DIY soil mix?
Yes, this DIY soil mix is perfect for growing long beans in containers. Choose a container that is at least 12 inches deep and wide to accommodate the plant’s root system. Make sure the container has drainage holes to prevent waterlogging. You will also need to provide a trellis or other support for the long bean vines to climb. Water and fertilize regularly, as container-grown plants tend to dry out and deplete nutrients more quickly than those grown in the ground.
How long does it take for long beans to mature after planting?
Long beans typically take 60-90 days to mature after planting, depending on the variety and growing conditions. You can start harvesting the beans when they are about 12-18 inches long and still tender. Harvest regularly to encourage continued production. Overripe beans will become tough and stringy.
What if I don’t have all the ingredients for the DIY soil mix? Can I still make it?
While the recommended ingredients provide the optimal balance of nutrients and drainage, you can still make a serviceable soil mix with what you have available. The most important components are good quality soil and some form of organic matter, such as compost or well-rotted manure. If you don’t have perlite or vermiculite, you can use coarse sand to improve drainage. The key is to create a mix that is well-draining and rich in nutrients. Don’t be afraid to experiment and adjust the proportions based on what you have on hand.
Is there anything else I should know about growing long beans successfully?
Yes! Long beans are heat-loving plants, so make sure to plant them in a location that receives at least 6-8 hours of sunlight per day. They also need consistent moisture, so water regularly, especially during hot, dry weather. Provide a trellis or other support for the vines to climb. Fertilize regularly with a balanced organic fertilizer. And most importantly, be patient and enjoy the process! Growing your own long beans can be a rewarding experience.

Leave a Comment