
Hanging bottle lettuce garden: Imagine stepping outside your door and snipping fresh, crisp lettuce leaves for your salad, all grown in a charming, space-saving garden you created yourself! Sounds idyllic, right? Well, it’s totally achievable with a DIY hanging bottle lettuce garden! For centuries, humans have cultivated gardens, from the elaborate hanging gardens of Babylon to the humble kitchen gardens of medieval Europe. The desire to nurture and grow our own food is deeply ingrained in us.
But let’s face it, not everyone has the luxury of a sprawling backyard. That’s where this ingenious DIY trick comes in. A hanging bottle lettuce garden is the perfect solution for apartment dwellers, balcony gardeners, or anyone looking to maximize their growing space. It’s also a fantastic way to recycle those plastic bottles that might otherwise end up in a landfill. I’m excited to show you how to transform ordinary plastic bottles into a thriving vertical garden, providing you with a constant supply of fresh, organic lettuce.
This project is not only incredibly practical but also adds a touch of whimsy and personality to your outdoor space. Plus, it’s a fun and rewarding activity that the whole family can enjoy. So, grab your scissors, gather your bottles, and let’s get started on creating your very own hanging bottle lettuce garden! You’ll be amazed at how easy and satisfying it is to grow your own food, even in the smallest of spaces.
DIY Hängender Flaschen-Salatgarten: Dein grüner Daumen für die Wand
Hallo liebe Gartenfreunde! Habt ihr wenig Platz, aber Lust auf frischen Salat direkt vom Balkon oder der Terrasse? Dann habe ich hier genau das Richtige für euch: einen hängenden Flaschen-Salatgarten! Das ist nicht nur super platzsparend, sondern auch ein echter Hingucker. Und das Beste: Es ist kinderleicht selbst zu machen! Lasst uns loslegen!
Was du brauchst:
* Leere Plastikflaschen: Am besten PET-Flaschen in verschiedenen Größen (1,5 Liter oder 2 Liter sind ideal). Je nachdem, wie groß dein Garten werden soll, brauchst du entsprechend viele Flaschen.
* Ein scharfes Messer oder eine Schere: Zum Schneiden der Flaschen.
* Einen Bohrer oder einen Nagel und Hammer: Für die Löcher zur Befestigung.
* Stabile Schnur, Draht oder Kabelbinder: Zum Aufhängen der Flaschen.
* Erde: Am besten Blumenerde oder spezielle Gemüseerde.
* Salatsamen oder Jungpflanzen: Je nach Geschmack und Saison.
* Kleine Steine oder Tonscherben: Für die Drainage.
* Handschuhe: Um deine Hände sauber zu halten.
* Gießkanne oder Sprühflasche: Zum Bewässern.
* (Optional) Sprühfarbe: Um die Flaschen zu verschönern.
* (Optional) Vliesstoff: Um die Erde in den Flaschen zu halten.
Schritt-für-Schritt-Anleitung:
1. Vorbereitung der Flaschen
1. Reinigung: Zuerst müssen die Flaschen gründlich gereinigt werden. Entferne alle Etiketten und spüle sie mit warmem Wasser und Spülmittel aus. Lass sie gut trocknen. Das ist wichtig, damit keine Rückstände die Pflanzen schädigen.
2. Schneiden: Jetzt kommt der spannende Teil: das Schneiden der Flaschen. Es gibt verschiedene Möglichkeiten, wie du das machen kannst, je nachdem, welchen Look du erzielen möchtest.
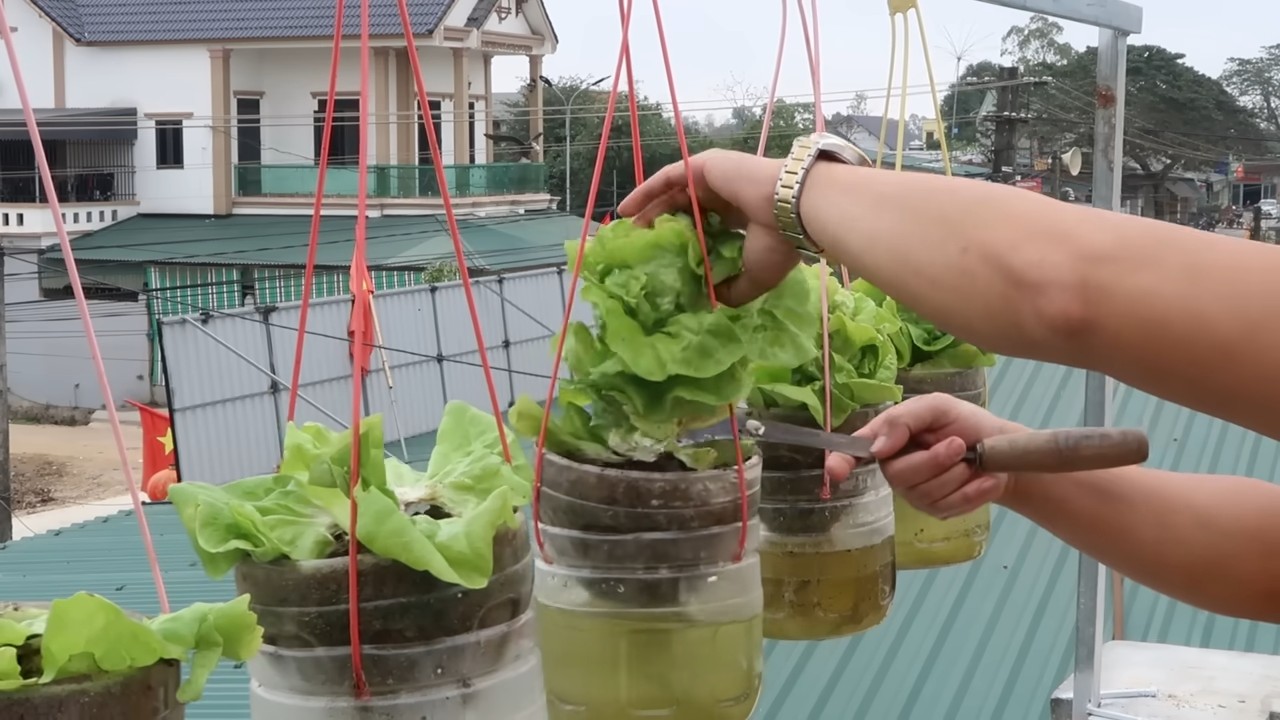
* Variante 1: Horizontales Schneiden: Schneide die Flasche horizontal durch, etwa ein Drittel von oben. Der obere Teil wird später umgedreht und in den unteren Teil gesteckt, um einen selbstbewässernden Effekt zu erzielen.
* Variante 2: Seitliches Schneiden: Schneide ein rechteckiges oder ovales Loch in die Seite der Flasche. Dieses Loch wird später mit Erde befüllt und bepflanzt. Achte darauf, dass das Loch groß genug ist, damit die Salatpflanzen genügend Platz haben.
* Variante 3: Kombination: Du kannst auch beide Varianten kombinieren, um einen abwechslungsreichen Look zu erzielen.
Wichtig: Sei beim Schneiden vorsichtig und verwende ein scharfes Messer oder eine Schere. Wenn du dir unsicher bist, lass dir von jemandem helfen.
3. Löcher bohren: Damit das Wasser gut ablaufen kann und keine Staunässe entsteht, bohre oder steche mit einem Nagel und Hammer mehrere kleine Löcher in den Boden der Flasche. Das ist besonders wichtig, wenn du die Flaschen horizontal geschnitten hast.
4. (Optional) Bemalen: Wenn du möchtest, kannst du die Flaschen jetzt mit Sprühfarbe bemalen. Das ist eine tolle Möglichkeit, deinen hängenden Garten individuell zu gestalten. Verwende am besten Farben, die für den Außenbereich geeignet sind. Lass die Farbe gut trocknen, bevor du mit dem nächsten Schritt fortfährst.
2. Bepflanzung der Flaschen
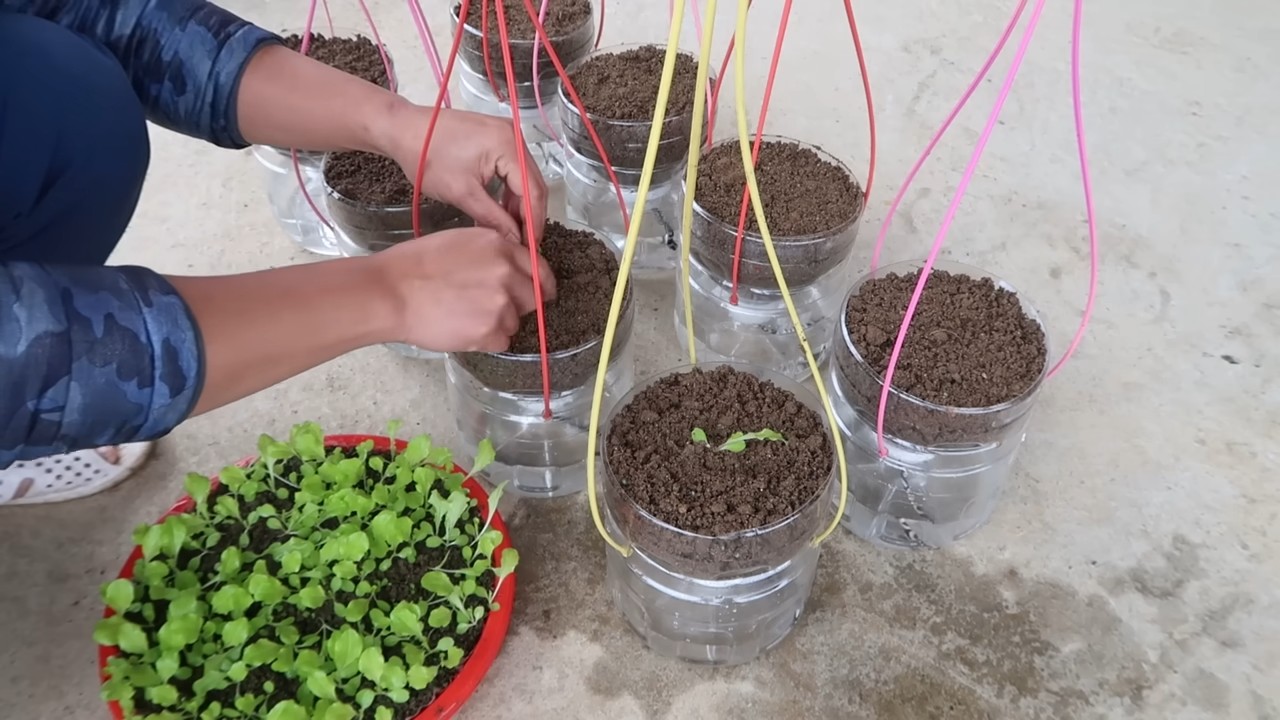
1. Drainage: Fülle den Boden der Flasche mit einer Schicht kleinen Steinen oder Tonscherben. Das sorgt für eine gute Drainage und verhindert Staunässe.
2. Erde einfüllen: Fülle die Flasche mit Erde. Verwende am besten Blumenerde oder spezielle Gemüseerde. Achte darauf, dass die Erde locker und luftig ist.
3. Pflanzen einsetzen: Jetzt kannst du die Salatsamen oder Jungpflanzen einsetzen. Wenn du Samen verwendest, beachte die Anweisungen auf der Packung. Wenn du Jungpflanzen verwendest, setze sie vorsichtig in die Erde und drücke die Erde leicht an.
4. Gießen: Gieße die Pflanzen vorsichtig an. Achte darauf, dass die Erde feucht, aber nicht nass ist.
3. Aufhängen der Flaschen
1. Befestigungslöcher: Bohre oder steche mit einem Nagel und Hammer Löcher in die Oberseite der Flaschen. Die Anzahl der Löcher hängt davon ab, wie du die Flaschen aufhängen möchtest.
2. Schnur befestigen: Fädle die Schnur, den Draht oder die Kabelbinder durch die Löcher und befestige die Flaschen an einem geeigneten Ort. Das kann ein Balkongeländer, eine Pergola oder ein anderer stabiler Ort sein. Achte darauf, dass die Flaschen sicher hängen und nicht herunterfallen können.
3. Abstand: Achte darauf, dass die Flaschen genügend Abstand zueinander haben, damit die Pflanzen genügend Licht und Luft bekommen.
4. Pflege deines hängenden Salatgartens
1. Gießen: Gieße die Pflanzen regelmäßig, besonders an heißen Tagen. Achte darauf, dass die Erde immer feucht ist, aber nicht nass.
2. Düngen: Dünge die Pflanzen regelmäßig mit einem Flüssigdünger. Das sorgt für ein gesundes Wachstum und eine reiche Ernte.
3. Schädlinge: Kontrolliere die Pflanzen regelmäßig auf Schädlinge. Wenn du Schädlinge entdeckst, bekämpfe sie mit einem geeigneten Mittel.
4. Ernte: Ernte den Salat, sobald er groß genug ist. Schneide die Blätter einfach mit einem Messer ab. Die Pflanzen wachsen weiter und du kannst immer wieder ernten.
Zusätzliche Tipps und Tricks:
* Selbstbewässerung: Wenn du die Flaschen horizontal geschnitten hast, kannst du den oberen Teil umgedreht in den unteren Teil stecken. Fülle den oberen Teil mit Wasser. Das Wasser sickert langsam in die Erde und sorgt für eine gleichmäßige Bewässerung.
* Vliesstoff: Um zu verhindern, dass die Erde aus den Löchern fällt, kannst du die Löcher mit Vliesstoff auslegen.
* Verschiedene Salatsorten: Pflanze verschiedene Salatsorten, um einen abwechslungsreichen Salat zu erhalten.
* Kräuter: Du kannst auch Kräuter wie Petersilie, Schnittlauch oder Basilikum in die Flaschen pflanzen.
* Standort: Wähle einen sonnigen Standort für deinen hängenden Garten. Salat benötigt mindestens sechs Stunden Sonne pro Tag.
* Windschutz: Schütze deinen hängenden Garten vor starkem Wind.
* Recycling: Verwende recycelte Plastikflaschen, um die Umwelt zu schonen.
* Beschriftung: Beschrifte die Flaschen, damit du weißt, welche Salatsorte du gepflanzt hast.
Weitere Ideen für deinen hängenden Garten:
* Vertikaler Kräutergarten: Anstatt Salat kannst du auch verschiedene Kräuter in die Flaschen pflanzen.
* Blumengarten: Pflanze bunte Blumen in die Flaschen, um deinen Balkon oder deine Terrasse zu verschönern.
* Erdbeergarten: Pflanze Erdbeeren in die Flaschen und ernte frische Erdbeeren direkt vom Balkon.
Ich hoffe, diese Anleitung hat dir geholfen, deinen eigenen hängenden Flaschen-Salatgarten zu gestalten. Es ist ein tolles Projekt, das nicht nur Spaß macht, sondern auch frischen Salat auf deinen Tisch bringt. Viel Spaß beim Gärtnern!
Conclusion
So, there you have it! Transforming discarded plastic bottles into a thriving, vertical lettuce garden is not just a fun project; it’s a sustainable solution that brings fresh, organic greens right to your doorstep. We’ve walked you through the simple steps, highlighting how easy it is to create your own hanging bottle lettuce garden, even if you don’t have a green thumb.
Why is this DIY trick a must-try? Because it’s a win-win-win! You’re reducing plastic waste, maximizing space, and enjoying delicious, homegrown lettuce. Think about it: no more trips to the grocery store for wilted, overpriced lettuce. No more worrying about harmful pesticides. Just fresh, crisp leaves ready to be harvested whenever you need them.
But the beauty of this project lies in its adaptability. Feel free to experiment with different types of lettuce. Romaine, butterhead, and loose-leaf varieties all thrive in this environment. You can also add other herbs like basil, parsley, or mint to your hanging garden for a diverse and aromatic culinary experience. Consider painting your bottles with bright, cheerful colors to add a touch of personality to your space. Or, if you’re feeling ambitious, create a multi-tiered system for an even more impressive vertical garden.
Don’t be afraid to get creative with your setup. Use different types of rope or chain to hang your bottles. Incorporate decorative elements like pebbles or shells to add visual appeal. The possibilities are endless!
This hanging bottle lettuce garden is more than just a gardening project; it’s a statement. It’s a statement about your commitment to sustainability, your resourcefulness, and your love for fresh, healthy food. It’s a conversation starter, a source of pride, and a constant reminder that even the simplest actions can have a big impact.
We wholeheartedly encourage you to give this DIY project a try. It’s a rewarding experience that will not only provide you with fresh lettuce but also connect you with nature in a meaningful way. And once you’ve created your own hanging bottle lettuce garden, we’d love to hear about your experience! Share your photos, tips, and variations in the comments below. Let’s inspire each other to create a more sustainable and delicious world, one bottle at a time. Your journey to fresh, homegrown lettuce starts now!
Frequently Asked Questions (FAQ)
What kind of plastic bottles are best for this project?
Ideally, you want to use sturdy, food-grade plastic bottles. Two-liter soda bottles or larger water bottles work well. Avoid using bottles that have contained harsh chemicals or cleaning products, as these could contaminate your lettuce. Make sure to thoroughly wash and rinse the bottles before using them. Clear or translucent bottles are preferable as they allow sunlight to reach the soil.
What type of soil should I use?
A well-draining potting mix is essential for healthy lettuce growth. You can use a commercially available potting mix or create your own by combining equal parts of compost, peat moss, and perlite or vermiculite. Avoid using garden soil, as it can be too heavy and may not drain properly. The goal is to provide a light, airy medium that allows the roots to breathe and absorb nutrients effectively.
How often should I water my hanging bottle lettuce garden?
Watering frequency depends on the weather and the type of soil you’re using. Generally, you’ll need to water your lettuce garden every day or every other day, especially during hot, dry periods. Check the soil moisture by sticking your finger into the top inch of soil. If it feels dry, it’s time to water. Water slowly and evenly until the water drains out of the bottom of the bottle. Avoid overwatering, as this can lead to root rot.
Where should I hang my lettuce garden?
Choose a location that receives at least six hours of sunlight per day. A south-facing balcony or patio is ideal. If you don’t have a sunny spot, you can supplement with grow lights. Make sure the location is protected from strong winds, which can damage the bottles and dry out the soil. Also, consider the weight of the bottles when choosing a hanging location. Ensure that the structure you’re hanging them from is strong enough to support the weight.
What kind of fertilizer should I use?
Lettuce is a relatively light feeder, but it will benefit from regular fertilization. Use a balanced, water-soluble fertilizer diluted to half strength. Apply the fertilizer every two to three weeks, following the instructions on the package. You can also use organic fertilizers like compost tea or fish emulsion. Avoid over-fertilizing, as this can burn the roots and damage the plants.
How do I prevent pests and diseases?
Regularly inspect your lettuce plants for signs of pests or diseases. Common pests include aphids, slugs, and snails. You can control aphids with a strong spray of water or by introducing beneficial insects like ladybugs. Slugs and snails can be handpicked or trapped with beer traps. To prevent diseases, ensure good air circulation and avoid overwatering. Remove any diseased leaves promptly to prevent the spread of infection.
How long does it take for lettuce to grow in a hanging bottle garden?
Lettuce typically matures in 30 to 60 days, depending on the variety and growing conditions. You can start harvesting leaves as soon as they are large enough to eat. Cut the outer leaves first, allowing the inner leaves to continue growing. This cut-and-come-again method will provide you with a continuous supply of fresh lettuce throughout the growing season.
Can I grow other plants besides lettuce in a hanging bottle garden?
Yes, you can grow other small herbs and vegetables in a hanging bottle garden. Suitable options include spinach, kale, arugula, basil, parsley, mint, and strawberries. Choose plants that have similar growing requirements to lettuce, such as well-draining soil, adequate sunlight, and regular watering. Be mindful of the size of the plants and choose bottles that are large enough to accommodate their root systems.
How do I overwinter my hanging bottle lettuce garden?
In colder climates, you can overwinter your lettuce garden by bringing the bottles indoors. Place them in a sunny location or under grow lights. Reduce watering frequency and fertilize sparingly. You can also protect the plants from frost by covering them with a blanket or tarp on cold nights. Alternatively, you can start new lettuce plants indoors in late winter and transplant them to your hanging bottles in the spring.
What if my bottles are leaking?
If your bottles are leaking, check the drainage holes to make sure they are not clogged. You can also try lining the bottom of the bottle with a layer of gravel or pebbles to improve drainage. If the leaks persist, you may need to replace the bottle with a new one. Ensure that the bottles are securely fastened to the hanging structure to prevent them from falling.

Leave a Comment