
Hanging sweet potatoes yield a bountiful harvest and add a touch of whimsical charm to your home garden! Have you ever dreamed of a garden overflowing with delicious, homegrown sweet potatoes, but thought you didn’t have the space? Well, get ready to ditch those space constraints because I’m about to share some incredible DIY tricks that will have you harvesting sweet potatoes from hanging baskets in no time!
The practice of growing food vertically, including root vegetables, has roots (pun intended!) in various cultures throughout history. From ancient terraced farming to modern urban gardening, the desire to maximize space and yield has always driven innovation. Think of the Hanging Gardens of Babylon – a testament to human ingenuity in creating lush, elevated landscapes. While we might not be building wonders of the ancient world, we can certainly borrow inspiration from their spirit of innovation to cultivate our own little edible paradises.
Let’s face it, not everyone has access to a sprawling backyard. Apartment dwellers, balcony gardeners, and even those with limited garden space can benefit immensely from these clever techniques. Hanging sweet potatoes yield more than just delicious food; they offer a sense of accomplishment, a connection to nature, and a beautiful, unique addition to your living space. Plus, who wouldn’t want to impress their friends with a cascade of vibrant sweet potato vines? So, grab your gardening gloves, and let’s dive into the wonderful world of hanging sweet potatoes!

Turning Sweet Potatoes into Hanging Vines: A DIY Guide
Hey there, fellow plant enthusiasts! Have you ever looked at a sweet potato and thought, “That could be more than just dinner?” Well, I have! And I’m here to share my super fun and surprisingly easy method for turning ordinary sweet potatoes into gorgeous, trailing vines. It’s a fantastic way to add a touch of green to your home, and it’s a project that even beginners can tackle. Let’s get started!
What You’ll Need
Before we dive in, let’s gather our supplies. This is a pretty low-cost project, which is always a win in my book!
* Sweet Potatoes: Choose organic sweet potatoes if possible. They tend to sprout more readily. Look for ones that are firm and free of blemishes. Size doesn’t matter too much, but larger ones will obviously produce more substantial vines. I usually grab 2-3 to increase my chances of success.
* Glass Jars or Containers: Mason jars, old vases, even recycled glass food containers work great. The size should be appropriate for the sweet potato you’ve chosen. You want the potato to sit comfortably on top, with the bottom submerged in water.
* Toothpicks: These are crucial for suspending the sweet potato in the jar. You’ll need 3-4 per potato.
* Water: Tap water is fine, but filtered water is even better.
* Optional: Rooting hormone (powder or liquid) can help speed up the sprouting process, but it’s not essential. I sometimes use it, sometimes I don’t, and I still get great results.
* Optional: Decorative pebbles or stones can add a nice aesthetic touch to your jars.
Preparing Your Sweet Potatoes
This is a crucial step, so pay close attention! We want to encourage those roots to grow.
1. Wash the Sweet Potatoes: Gently scrub the sweet potatoes under cool water to remove any dirt or debris. This helps prevent mold and bacteria growth in the water later on.
2. Optional: Cut the Sweet Potato (Sometimes): This is where things get a little nuanced. If your sweet potato is very long and thin, you can skip this step. But if it’s more round or oval, I recommend cutting it in half crosswise. This gives you two chances for sprouting! The cut end will be the one submerged in water. Let the cut end callous over for a day or two before placing it in water. This helps prevent rotting.
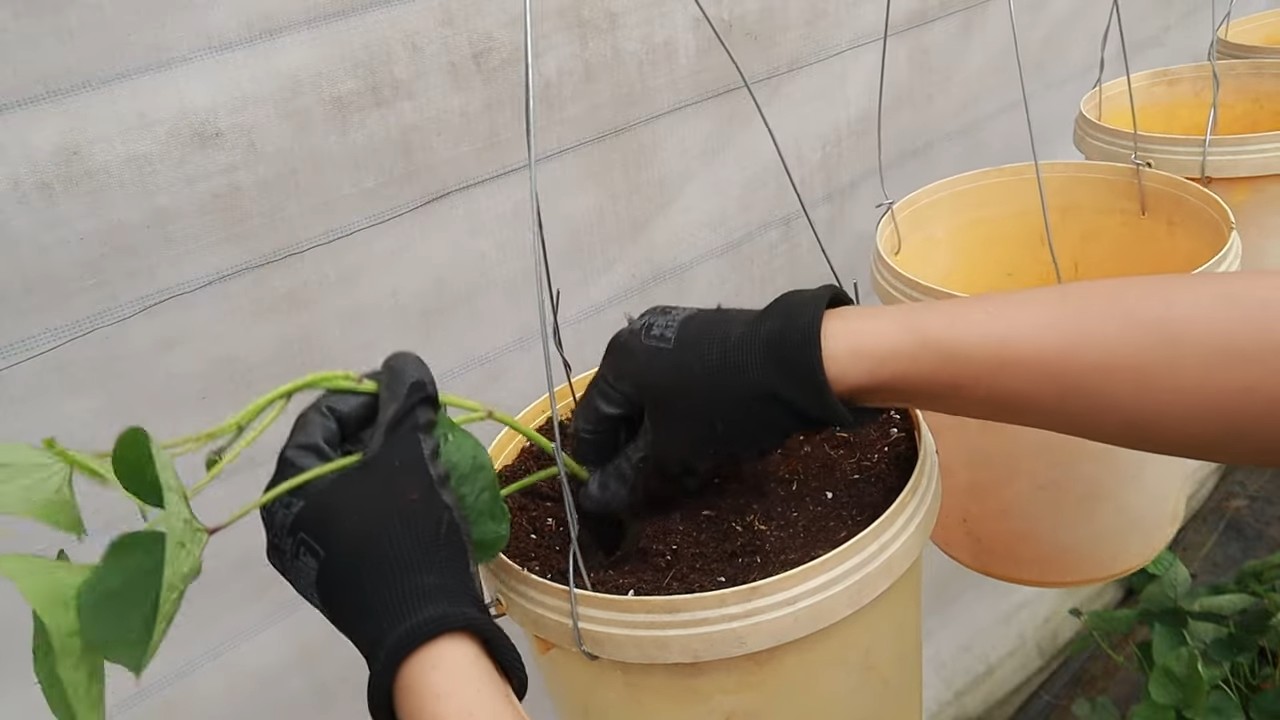
3. Insert the Toothpicks: This is where the toothpicks come in. Insert 3-4 toothpicks evenly spaced around the middle of the sweet potato. Push them in far enough to provide a stable base, but not so far that they pierce all the way through. The toothpicks will act as “legs” to hold the sweet potato above the water level, with only the bottom portion submerged.
Setting Up Your Sweet Potato “Vase”
Now, let’s get those sweet potatoes into their new homes!
1. Fill the Jars with Water: Fill your glass jars or containers with water, leaving about an inch of space at the top. If you’re using rooting hormone, add a small amount to the water according to the package instructions.
2. Position the Sweet Potatoes: Carefully place the sweet potatoes on top of the jars, using the toothpicks to suspend them. Make sure the bottom of the sweet potato is submerged in the water. If you cut your sweet potato in half, the cut side should be facing down in the water.
3. Add Decorative Elements (Optional): If you want to add a little flair, you can place decorative pebbles or stones around the base of the sweet potato in the jar. This not only looks nice but can also help stabilize the potato.
Caring for Your Sweet Potato Vines
This is the ongoing part of the project, and it’s pretty low-maintenance.
1. Choose the Right Location: Place your sweet potato jars in a bright, indirect sunlight location. A windowsill is ideal, but avoid direct sunlight, which can scorch the leaves.
2. Change the Water Regularly: This is super important! Change the water every 3-5 days to prevent algae growth and keep the water fresh. When you change the water, gently rinse the sweet potato to remove any slime or debris.
3. Monitor Water Level: Make sure the bottom of the sweet potato remains submerged in water. Add water as needed to maintain the water level.
4. Be Patient: It can take a few weeks for the sweet potato to start sprouting roots and vines. Don’t get discouraged if you don’t see results immediately. Just keep the water fresh and the potato in a bright location.
5. Fertilize (Optional): Once the vines start growing, you can fertilize them occasionally with a diluted liquid fertilizer. This will help promote healthy growth. I usually fertilize every 2-3 weeks during the growing season (spring and summer).
Troubleshooting
Sometimes, things don’t go exactly as planned. Here are a few common issues and how to address them:
* Sweet Potato Rotting: If the sweet potato starts to rot, it’s usually due to bacteria or fungus growth. Remove the potato from the jar, rinse it thoroughly, and cut away any rotten parts. Change the water more frequently and consider adding a small amount of hydrogen peroxide to the water to kill bacteria. If the rot is extensive, it might be best to start with a new sweet potato.
* No Sprouting: If your sweet potato isn’t sprouting after several weeks, try moving it to a warmer location. You can also try scratching the surface of the potato with a fork to encourage sprouting. Make sure the bottom of the potato is consistently submerged in water.
* Yellowing Leaves: Yellowing leaves can indicate overwatering or underwatering. Make sure you’re changing the water regularly and that the potato is not sitting in stagnant water. If the soil is too dry, increase the frequency of watering.
* Pests: Sweet potato vines can sometimes attract pests like aphids or spider mites. If you notice any pests, spray the vines with a diluted solution of soapy water. You can also use insecticidal soap if the infestation is severe.
Enjoying Your Sweet Potato Vines
Once your sweet potato vines start growing, you can enjoy them for months! They’ll add a touch of green to your home and create a unique and eye-catching display. You can even train the vines to climb up a trellis or drape over a shelf.
Important Note: While sweet potato vines are beautiful, they are not the same as ornamental sweet potato vines. Ornamental sweet potato vines are specifically bred for their foliage and are not edible. The vines from your sprouted sweet potato are technically edible, but they may not taste very good. I personally grow them for their aesthetic value rather than for consumption.
Taking Cuttings (Propagating More Vines!)
Once your sweet potato vine is thriving, you can easily propagate more vines by taking cuttings. This is a great way to expand your collection or share your vines with friends and family.
1. Select a Healthy Vine: Choose a healthy vine that is at least 6 inches long.
2. Cut the Vine: Use a clean, sharp knife or scissors to cut the vine just below a node (the point where a leaf or stem grows).
3. Remove Lower Leaves: Remove the leaves from the bottom 2 inches of the cutting.
4. Rooting: Place the cutting in a glass of water, making sure the nodes are submerged. You can also dip the cut end in rooting hormone to speed up the process.
5. Wait for Roots: Place the glass of water in a bright, indirect sunlight location. Change the water every few days. In a few weeks, the cutting should start to develop roots.
6. Planting: Once the roots are about an inch long, you can plant the cutting in a pot filled with well-draining potting mix.
Beyond the Basics: Creative Ideas
Want to take your sweet potato vine project to the next level? Here are a few creative ideas:
* Create a Sweet Potato “Waterfall”: Use multiple sweet potatoes in different sized jars and arrange them on a shelf or windowsill to create a cascading effect.
* Use Different Types of Jars: Experiment with different shapes and sizes of jars to create a unique and eclectic display.
* Add Fairy Lights: Wrap fairy lights around the vines to add a touch of magic and sparkle.
* Gift Your Vines: Sweet potato vines make a thoughtful and unique gift for plant lovers.
I hope you enjoyed this guide! Growing sweet potato vines is a fun and rewarding project that anyone can do. So grab a sweet potato, a jar, and some toothpicks, and get ready to watch your own little piece of nature come to life! Happy growing!
Conclusion
So, there you have it! Transforming ordinary sweet potatoes into stunning, cascading vines is not only surprisingly simple, but also incredibly rewarding. This DIY trick for hanging sweet potatoes offers a unique blend of aesthetics and practicality. Imagine the vibrant green foliage adorning your patio, balcony, or even a sunny indoor space. It’s a conversation starter, a natural air purifier, and a testament to your green thumb – even if you’re a beginner!
But the beauty of this project extends beyond mere visual appeal. It’s about connecting with nature, understanding the life cycle of a plant, and experiencing the satisfaction of nurturing something from humble beginnings. Plus, it’s a fantastic way to repurpose sweet potatoes that might be sprouting in your pantry. Talk about sustainable living!
Don’t be afraid to experiment with different varieties of sweet potatoes. While the orange-fleshed varieties are most common, consider trying Japanese sweet potatoes with their purple skin and creamy white flesh, or even the Beauregard variety known for its vibrant color and vigorous growth. Each variety will offer a slightly different aesthetic and growth habit, adding to the uniqueness of your hanging garden.
For an extra touch of flair, consider adding companion plants to your hanging sweet potato setup. Trailing herbs like rosemary or thyme can complement the sweet potato vines beautifully and add a fragrant element to your display. You could also incorporate colorful flowers like petunias or impatiens for a burst of color. Just be sure to choose plants that have similar light and watering requirements.
Remember to provide adequate support for your growing vines. As they mature, they can become quite heavy, so a sturdy hanging basket or container is essential. You can also use trellises or stakes to guide the vines and create a more structured look.
This DIY project is more than just a gardening hack; it’s an opportunity to unleash your creativity and bring a touch of nature into your home. It’s a chance to learn, experiment, and enjoy the simple pleasures of growing your own plants.
We wholeheartedly encourage you to try this DIY trick for hanging sweet potatoes. It’s a fun, affordable, and visually stunning way to add a touch of green to your life. And once you’ve created your own hanging sweet potato masterpiece, we’d love to see it! Share your photos and experiences with us on social media using [Your Hashtag Here]. Let’s inspire others to embrace the beauty of nature and discover the joy of DIY gardening. We can’t wait to see what you create!
Frequently Asked Questions (FAQ)
What kind of sweet potato should I use?
You can use any variety of sweet potato for this project! However, some varieties are more visually appealing than others. Orange-fleshed sweet potatoes are the most common and readily available, and they produce lush green vines. Japanese sweet potatoes, with their purple skin and white flesh, offer a unique contrast. Beauregard sweet potatoes are known for their vigorous growth and vibrant color. Experiment with different varieties to see which one you prefer! Just make sure the sweet potato is firm and healthy, with no signs of rot or disease.
How long does it take for the sweet potato to sprout?
Sprouting time can vary depending on the temperature and humidity. Generally, you can expect to see sprouts within 2-4 weeks. To speed up the process, keep the sweet potato in a warm, humid environment. You can also try partially submerging the sweet potato in water, ensuring that the bottom portion is submerged while the top remains dry. This will encourage root development and sprouting.
How much sunlight does the hanging sweet potato need?
Sweet potatoes thrive in bright, indirect sunlight. Avoid placing them in direct sunlight, especially during the hottest part of the day, as this can scorch the leaves. A location that receives morning sun and afternoon shade is ideal. If you’re growing your sweet potato indoors, place it near a sunny window or supplement with artificial grow lights.
How often should I water the hanging sweet potato?
Water your hanging sweet potato regularly, keeping the soil consistently moist but not waterlogged. Check the soil moisture by sticking your finger into the soil. If the top inch feels dry, it’s time to water. Avoid overwatering, as this can lead to root rot. During the warmer months, you may need to water more frequently than during the cooler months.
What kind of soil should I use?
Use a well-draining potting mix for your hanging sweet potato. A mix of peat moss, perlite, and vermiculite is a good option. Avoid using heavy garden soil, as it can compact and suffocate the roots. You can also add some compost to the potting mix to provide extra nutrients.
Can I eat the sweet potatoes that grow on the vines?
While it’s technically possible to eat the sweet potatoes that grow on the vines, they are typically small and not as flavorful as those grown in the ground. The primary purpose of this DIY project is to enjoy the aesthetic beauty of the vines, rather than to harvest a large crop of sweet potatoes.
How do I prevent pests and diseases?
Regularly inspect your hanging sweet potato for signs of pests or diseases. Common pests include aphids, spider mites, and whiteflies. You can control these pests by spraying the plant with insecticidal soap or neem oil. To prevent diseases, ensure good air circulation and avoid overwatering. If you notice any signs of disease, such as yellowing leaves or spots, remove the affected leaves immediately.
Can I grow a hanging sweet potato indoors?
Yes, you can absolutely grow a hanging sweet potato indoors! Just make sure to provide it with adequate light and humidity. Place it near a sunny window or supplement with artificial grow lights. You can also increase humidity by misting the plant regularly or placing it on a tray filled with water and pebbles.
How do I prune the vines?
Pruning is not essential, but it can help to maintain the shape and size of your hanging sweet potato. You can prune the vines to encourage bushier growth or to remove any dead or damaged leaves. Use clean, sharp pruning shears to avoid spreading disease.
How long will the hanging sweet potato last?
With proper care, a hanging sweet potato can last for several months, or even a year or more. However, it’s important to note that sweet potatoes are tropical plants and are sensitive to frost. If you live in a cold climate, you’ll need to bring your hanging sweet potato indoors during the winter months.

Leave a Comment