
Indoor Mint Growing Tips: Unlock the secrets to a fragrant, thriving mint garden right inside your home! Have you ever craved the fresh, invigorating taste of mint in your tea, cocktails, or culinary creations, only to find yourself without it? I know I have! That’s where the magic of growing your own mint indoors comes in.
Mint, with its rich history dating back to ancient civilizations, has been cherished for its medicinal and culinary properties for centuries. From the Egyptians using it in embalming to the Romans flavoring their sauces and wines, mint has always held a special place in human culture. Today, we can easily bring this historical herb into our modern lives, and I’m here to show you how!
But why bother with indoor mint growing tips when you can just buy it at the store? Well, store-bought mint often lacks the intense flavor and freshness of homegrown varieties. Plus, let’s be honest, it can be expensive! Growing your own mint indoors is not only cost-effective but also incredibly rewarding. Imagine having a constant supply of fresh, organic mint at your fingertips, ready to elevate your dishes and drinks. This DIY guide will provide you with all the essential tips and tricks to cultivate a flourishing indoor mint garden, even if you don’t have a green thumb. Get ready to enjoy the delightful aroma and taste of homegrown mint all year round!
Growing Mint Indoors: A Beginner’s Guide to Fresh Flavor All Year Round
Hey there, fellow herb enthusiasts! Are you dreaming of fresh mint for your mojitos, teas, and culinary creations, even when the weather outside is frightful? Well, you’re in luck! Growing mint indoors is surprisingly easy and rewarding. I’m going to walk you through everything you need to know to cultivate a thriving mint patch right in your home. Let’s get started!
Choosing the Right Mint Variety
First things first, let’s talk about mint varieties. While all mints share that characteristic refreshing flavor, they each have their own unique nuances. Here are a few popular choices for indoor growing:
* Peppermint: The classic, strong mint flavor perfect for teas and desserts.
* Spearmint: A milder, sweeter mint often used in chewing gum and sauces.
* Chocolate Mint: A delightful blend of mint and chocolate flavors, ideal for desserts and cocktails.
* Apple Mint: A fruity, slightly fuzzy mint with a gentle apple aroma.
I recommend starting with spearmint or peppermint, as they’re generally the easiest to grow. Once you’ve mastered those, feel free to experiment with other varieties!
Essential Supplies: Gathering Your Arsenal
Before we dive into the planting process, let’s make sure you have all the necessary supplies. Here’s what you’ll need:
* Mint Seeds or Cuttings: You can start from seeds, but I find that cuttings from an established plant are much faster and more reliable. Ask a friend or neighbor if they’re willing to share a few sprigs!
* Potting Mix: Use a well-draining potting mix specifically formulated for containers. Avoid using garden soil, as it can compact and suffocate the roots.
* Pot with Drainage Holes: Choose a pot that’s at least 6 inches in diameter and has drainage holes to prevent waterlogging. Terracotta pots are a great option, as they allow the soil to breathe.
* Watering Can or Spray Bottle: For gentle watering.
* Grow Light (Optional): If you don’t have a sunny windowsill, a grow light will provide the necessary light for your mint to thrive.
* Scissors or Pruning Shears: For harvesting and pruning.
* Rooting Hormone (Optional): If you’re using cuttings, rooting hormone can help encourage root development.
Planting Your Mint: From Seed to Sprout
Okay, now for the fun part! Let’s get your mint planted.
Starting from Seeds: A Patient Approach
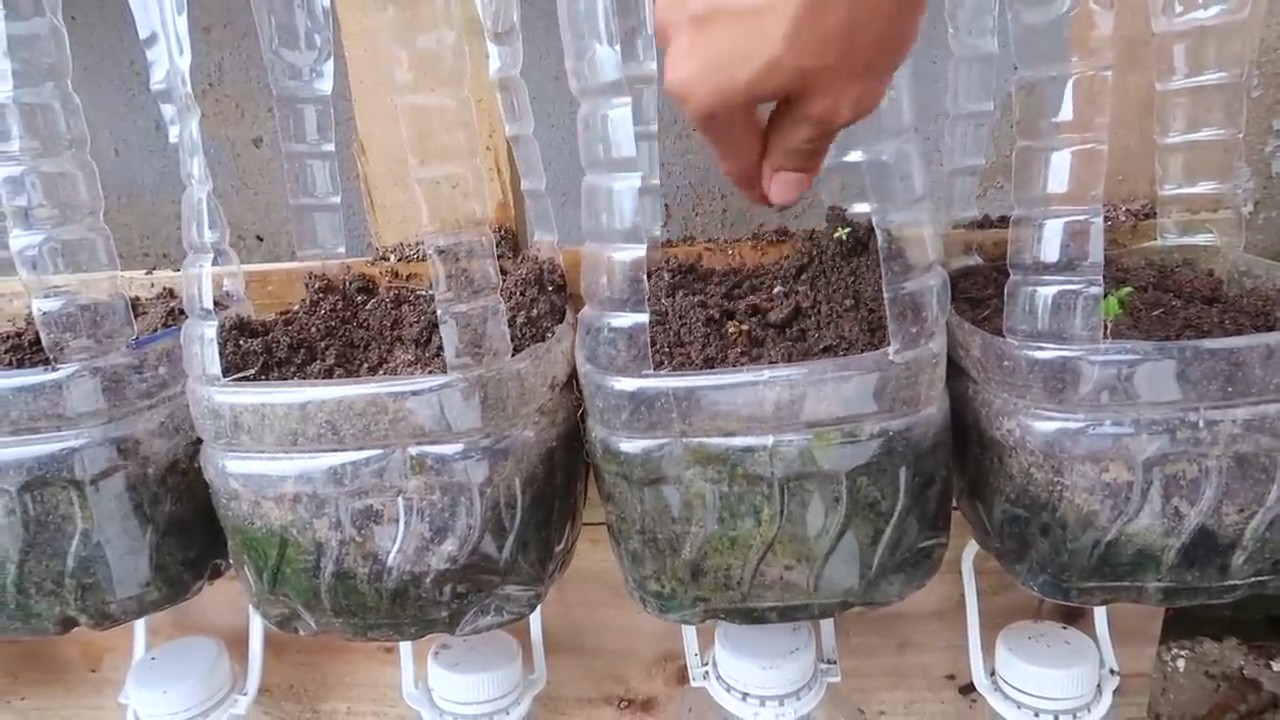
1. Prepare the Pot: Fill your pot with potting mix, leaving about an inch of space at the top. Gently pat down the soil.
2. Sow the Seeds: Sprinkle the mint seeds evenly over the surface of the soil. Mint seeds are tiny, so don’t overcrowd them.
3. Cover Lightly: Cover the seeds with a very thin layer of potting mix.
4. Water Gently: Use a spray bottle to mist the soil thoroughly. You want to keep the soil moist but not soggy.
5. Provide Light and Warmth: Place the pot in a warm, sunny location or under a grow light. Mint seeds need light to germinate.
6. Be Patient: Germination can take anywhere from 10 to 21 days. Keep the soil consistently moist during this time.
Starting from Cuttings: A Quick Start
This is my preferred method because it’s faster and more reliable.
1. Take Cuttings: Using clean scissors or pruning shears, take cuttings from an established mint plant. The cuttings should be about 4-6 inches long and have several leaves.
2. Remove Lower Leaves: Remove the leaves from the bottom inch or two of the cuttings. This will expose the nodes where roots will develop.
3. Apply Rooting Hormone (Optional): Dip the cut ends of the cuttings in rooting hormone powder or liquid. This will help stimulate root growth.
4. Plant the Cuttings: Insert the cuttings into the prepared pot of potting mix, spacing them about 2 inches apart. Make sure the nodes where you removed the leaves are buried in the soil.
5. Water Gently: Water the cuttings thoroughly, making sure the soil is moist but not soggy.
6. Create a Humid Environment: Cover the pot with a clear plastic bag or place it in a humidity dome. This will help keep the cuttings moist and prevent them from drying out.
7. Provide Light and Warmth: Place the pot in a warm, sunny location or under a grow light.
8. Wait for Roots to Develop: Roots should start to develop in about 1-2 weeks. You can check for roots by gently tugging on the cuttings. If they resist, they’ve rooted!
9. Remove the Humidity Dome: Once the cuttings have rooted, gradually remove the humidity dome over a few days to acclimate them to the drier air.
Caring for Your Indoor Mint: Keeping it Happy and Healthy
Now that your mint is planted, it’s time to learn how to care for it. Here are some key tips:
* Light: Mint thrives in bright, indirect light. A sunny windowsill facing east or west is ideal. If you don’t have enough natural light, use a grow light. Aim for at least 6-8 hours of light per day.
* Watering: Keep the soil consistently moist but not soggy. Water when the top inch of soil feels dry to the touch. Avoid overwatering, as this can lead to root rot.
* Humidity: Mint prefers moderate humidity. If your home is dry, you can increase humidity by misting the plants regularly, placing a tray of water near the plants, or using a humidifier.
* Fertilizing: Feed your mint with a balanced liquid fertilizer every 2-4 weeks during the growing season (spring and summer). Dilute the fertilizer to half strength to avoid burning the roots.
* Pruning: Pruning is essential for keeping your mint plant bushy and productive. Pinch off the top leaves regularly to encourage branching. You can also prune back the entire plant by about one-third every few months to rejuvenate it.
* Pest Control: Mint is generally pest-resistant, but it can occasionally be affected by aphids, spider mites, or whiteflies. If you notice any pests, treat them with insecticidal soap or neem oil.
* Repotting: Mint is a fast-growing plant, so you’ll likely need to repot it every year or two. Choose a pot that’s slightly larger than the previous one.
Harvesting Your Mint: Enjoying the Fruits (or Leaves!) of Your Labor
The best part about growing mint indoors is being able to harvest fresh leaves whenever you need them!
* When to Harvest: You can start harvesting mint leaves as soon as the plant is a few inches tall.
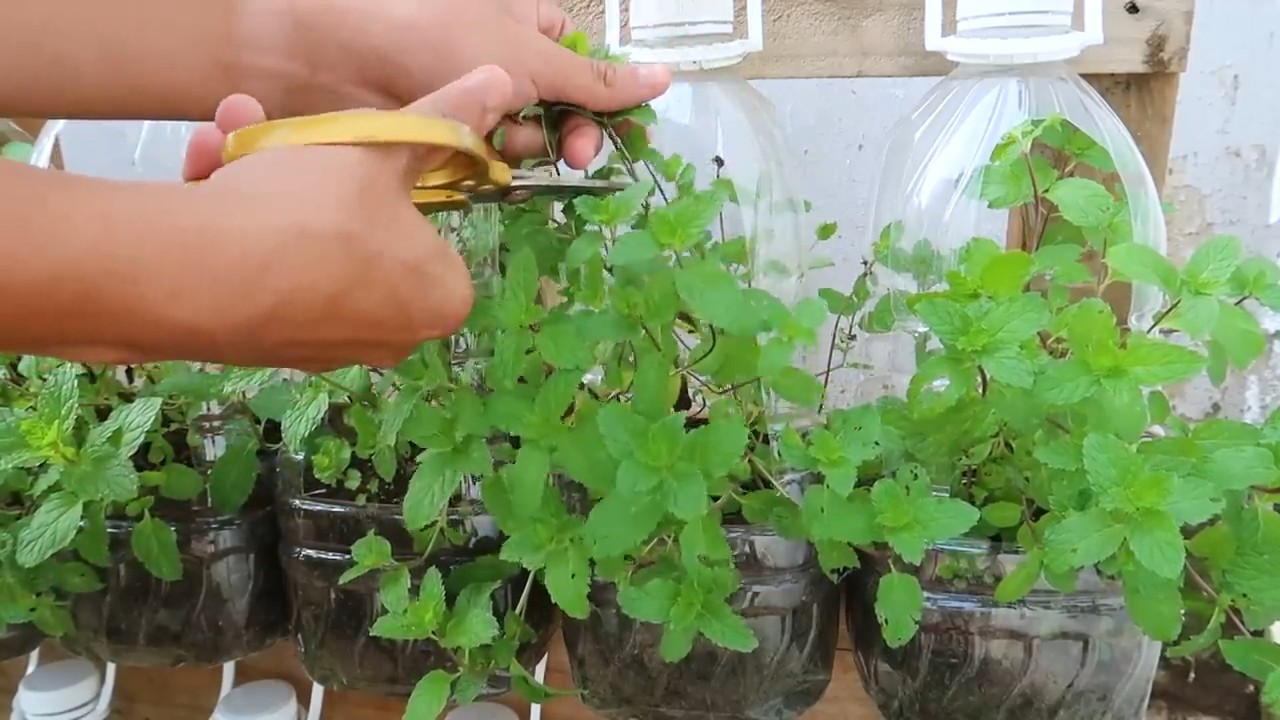
* How to Harvest: Use scissors or pruning shears to cut off stems just above a leaf node. This will encourage new growth.
* Harvest Regularly: The more you harvest, the more your mint plant will produce. Don’t be afraid to cut it back!
* Preserving Mint: If you have more mint than you can use fresh, you can dry it or freeze it for later use. To dry mint, hang the stems upside down in a cool, dry place until the leaves are brittle. To freeze mint, chop the leaves and place them in ice cube trays with water.
Troubleshooting: Addressing Common Mint Problems
Even with the best care, you might encounter some pro
Hey there, fellow herb enthusiasts! Are you dreaming of fresh mint for your mojitos, teas, and culinary creations, even when the weather outside is frightful? Well, you’re in luck! Growing mint indoors is surprisingly easy and rewarding. I’m going to walk you through everything you need to know to cultivate a thriving mint patch right in your home. Let’s get started!
Choosing the Right Mint Variety
First things first, let’s talk about mint varieties. While all mints share that characteristic refreshing flavor, they each have their own unique nuances. Here are a few popular choices for indoor growing:
* Peppermint: The classic, strong mint flavor perfect for teas and desserts.
* Spearmint: A milder, sweeter mint often used in chewing gum and sauces.
* Chocolate Mint: A delightful blend of mint and chocolate flavors, ideal for desserts and cocktails.
* Apple Mint: A fruity, slightly fuzzy mint with a gentle apple aroma.
I recommend starting with spearmint or peppermint, as they’re generally the easiest to grow. Once you’ve mastered those, feel free to experiment with other varieties!
Essential Supplies: Gathering Your Arsenal
Before we dive into the planting process, let’s make sure you have all the necessary supplies. Here’s what you’ll need:
* Mint Seeds or Cuttings: You can start from seeds, but I find that cuttings from an established plant are much faster and more reliable. Ask a friend or neighbor if they’re willing to share a few sprigs!
* Potting Mix: Use a well-draining potting mix specifically formulated for containers. Avoid using garden soil, as it can compact and suffocate the roots.
* Pot with Drainage Holes: Choose a pot that’s at least 6 inches in diameter and has drainage holes to prevent waterlogging. Terracotta pots are a great option, as they allow the soil to breathe.
* Watering Can or Spray Bottle: For gentle watering.
* Grow Light (Optional): If you don’t have a sunny windowsill, a grow light will provide the necessary light for your mint to thrive.
* Scissors or Pruning Shears: For harvesting and pruning.
* Rooting Hormone (Optional): If you’re using cuttings, rooting hormone can help encourage root development.
Planting Your Mint: From Seed to Sprout
Okay, now for the fun part! Let’s get your mint planted.
Starting from Seeds: A Patient Approach
1. Prepare the Pot: Fill your pot with potting mix, leaving about an inch of space at the top. Gently pat down the soil.
2. Sow the Seeds: Sprinkle the mint seeds evenly over the surface of the soil. Mint seeds are tiny, so don’t overcrowd them.
3. Cover Lightly: Cover the seeds with a very thin layer of potting mix.
4. Water Gently: Use a spray bottle to mist the soil thoroughly. You want to keep the soil moist but not soggy.
5. Provide Light and Warmth: Place the pot in a warm, sunny location or under a grow light. Mint seeds need light to germinate.
6. Be Patient: Germination can take anywhere from 10 to 21 days. Keep the soil consistently moist during this time.
Starting from Cuttings: A Quick Start
This is my preferred method because it’s faster and more reliable.
1. Take Cuttings: Using clean scissors or pruning shears, take cuttings from an established mint plant. The cuttings should be about 4-6 inches long and have several leaves.
2. Remove Lower Leaves: Remove the leaves from the bottom inch or two of the cuttings. This will expose the nodes where roots will develop.
3. Apply Rooting Hormone (Optional): Dip the cut ends of the cuttings in rooting hormone powder or liquid. This will help stimulate root growth.
4. Plant the Cuttings: Insert the cuttings into the prepared pot of potting mix, spacing them about 2 inches apart. Make sure the nodes where you removed the leaves are buried in the soil.
5. Water Gently: Water the cuttings thoroughly, making sure the soil is moist but not soggy.
6. Create a Humid Environment: Cover the pot with a clear plastic bag or place it in a humidity dome. This will help keep the cuttings moist and prevent them from drying out.
7. Provide Light and Warmth: Place the pot in a warm, sunny location or under a grow light.
8. Wait for Roots to Develop: Roots should start to develop in about 1-2 weeks. You can check for roots by gently tugging on the cuttings. If they resist, they’ve rooted!
9. Remove the Humidity Dome: Once the cuttings have rooted, gradually remove the humidity dome over a few days to acclimate them to the drier air.
Caring for Your Indoor Mint: Keeping it Happy and Healthy
Now that your mint is planted, it’s time to learn how to care for it. Here are some key tips:
* Light: Mint thrives in bright, indirect light. A sunny windowsill facing east or west is ideal. If you don’t have enough natural light, use a grow light. Aim for at least 6-8 hours of light per day.
* Watering: Keep the soil consistently moist but not soggy. Water when the top inch of soil feels dry to the touch. Avoid overwatering, as this can lead to root rot.
* Humidity: Mint prefers moderate humidity. If your home is dry, you can increase humidity by misting the plants regularly, placing a tray of water near the plants, or using a humidifier.
* Fertilizing: Feed your mint with a balanced liquid fertilizer every 2-4 weeks during the growing season (spring and summer). Dilute the fertilizer to half strength to avoid burning the roots.
* Pruning: Pruning is essential for keeping your mint plant bushy and productive. Pinch off the top leaves regularly to encourage branching. You can also prune back the entire plant by about one-third every few months to rejuvenate it.
* Pest Control: Mint is generally pest-resistant, but it can occasionally be affected by aphids, spider mites, or whiteflies. If you notice any pests, treat them with insecticidal soap or neem oil.
* Repotting: Mint is a fast-growing plant, so you’ll likely need to repot it every year or two. Choose a pot that’s slightly larger than the previous one.
Harvesting Your Mint: Enjoying the Fruits (or Leaves!) of Your Labor
The best part about growing mint indoors is being able to harvest fresh leaves whenever you need them!
* When to Harvest: You can start harvesting mint leaves as soon as the plant is a few inches tall.
* How to Harvest: Use scissors or pruning shears to cut off stems just above a leaf node. This will encourage new growth.
* Harvest Regularly: The more you harvest, the more your mint plant will produce. Don’t be afraid to cut it back!
* Preserving Mint: If you have more mint than you can use fresh, you can dry it or freeze it for later use. To dry mint, hang the stems upside down in a cool, dry place until the leaves are brittle. To freeze mint, chop the leaves and place them in ice cube trays with water.
Troubleshooting: Addressing Common Mint Problems
Even with the best care, you might encounter some problems while growing mint indoors. Here are a few common issues and how to address them:
* Yellowing Leaves: This can be caused by overwatering, underwatering, or nutrient deficiencies. Check the soil moisture and adjust your watering accordingly. If the soil is dry, water thoroughly. If the soil is soggy, allow it to dry out before watering again. You may also need to fertilize your mint plant.
* Leggy Growth: This is usually caused by insufficient light. Move your mint plant to a brighter location or provide supplemental light with a grow light.
* Brown Spots on Leaves: This can be caused by fungal diseases or pests. Remove any affected leaves and treat the plant with a fungicide or insecticide.
* Lack of Flavor: This can be caused by insufficient light or overwatering. Make sure your mint plant is getting enough light and that the soil is well-draining.
Mint’s Invasive Nature: A Word of Caution
Mint is known for its invasive nature, so it’s important to keep it contained. Growing it in a pot indoors is a great way to prevent it from spreading. If you do decide to plant mint outdoors, be sure to plant it in a container or a designated area that’s surrounded by a barrier.
Enjoy Your Fresh Mint!
And there you have it! With a little bit of care and
Conclusion
So, there you have it! Mastering the art of indoor mint growing is not only achievable but also incredibly rewarding. We’ve explored the simple yet effective techniques that will transform your windowsill into a thriving herb garden, providing you with a constant supply of fresh, fragrant mint for all your culinary and beverage needs.
Why is this DIY approach a must-try? Because it empowers you to control the quality and freshness of your mint, eliminating the need for store-bought options that can often be wilted, expensive, or treated with unwanted chemicals. Imagine the satisfaction of snipping off a few sprigs of vibrant green mint leaves to add to your morning tea, a refreshing mojito, or a flavorful salad, all grown with your own two hands.
Beyond the practical benefits, growing mint indoors offers a therapeutic and aesthetically pleasing experience. The vibrant green foliage adds a touch of nature to your living space, while the invigorating aroma fills the air, creating a calming and uplifting atmosphere. It’s a simple way to connect with nature and bring a little bit of the outdoors inside.
Don’t be afraid to experiment with different varieties of mint! Peppermint, spearmint, chocolate mint, and even apple mint each offer unique flavors and aromas. Try growing a few different types side-by-side to discover your personal favorites. You can also explore different container options, from simple terracotta pots to stylish self-watering planters, to find what works best for your space and aesthetic. Consider using a vertical planter to maximize space if you’re limited on windowsill area.
Furthermore, think about companion planting. While mint is vigorous and can sometimes be invasive in the garden, growing it in containers indoors allows you to pair it with other herbs that benefit from its presence. For example, basil and mint can thrive together, creating a fragrant and flavorful combination.
We’ve covered the essentials – choosing the right pot and soil, providing adequate sunlight, watering correctly, and harvesting regularly. Remember to monitor your mint for any signs of pests or diseases and take action promptly to prevent them from spreading. A simple solution of diluted neem oil can often be effective in treating common issues.
Now, it’s your turn to embark on this exciting journey of indoor mint cultivation. Don’t be intimidated if you’re a beginner; mint is a relatively forgiving herb, and with a little care and attention, you’ll be enjoying fresh, homegrown mint in no time.
We encourage you to try these DIY tips and share your experiences with us! Let us know what varieties of mint you’re growing, what challenges you’ve encountered, and what successes you’ve achieved. Share your photos and stories in the comments section below. We’re eager to learn from your experiences and build a community of indoor mint enthusiasts. Happy growing!
Frequently Asked Questions (FAQ)
1. What is the best type of mint to grow indoors?
The best type of mint to grow indoors depends on your personal preferences. However, spearmint and peppermint are generally considered to be the easiest and most versatile options for beginners. They are relatively low-maintenance and offer a classic mint flavor that is suitable for a wide range of culinary and beverage applications. Chocolate mint and apple mint are also popular choices, offering unique flavor profiles that can add a special touch to your creations. Experiment with different varieties to discover your favorites! Remember that some mint varieties can be more vigorous than others, so choose a pot size that can accommodate their growth.
2. How much sunlight does indoor mint need?
Mint thrives in bright, indirect sunlight. Aim for at least 4-6 hours of sunlight per day. If you don’t have a sunny windowsill, you can supplement with a grow light. Place the grow light about 6-12 inches above the plant and keep it on for 12-14 hours per day. Insufficient sunlight can lead to leggy growth and a less intense flavor. Rotate your mint plant regularly to ensure that all sides receive adequate light.
3. What kind of soil should I use for growing mint indoors?
Use a well-draining potting mix that is rich in organic matter. A mixture of equal parts potting soil, perlite, and compost is a good option. Avoid using garden soil, as it can be too heavy and may contain pests or diseases. Good drainage is crucial to prevent root rot, which is a common problem with indoor mint. Ensure your pot has drainage holes and consider adding a layer of gravel or pebbles at the bottom of the pot to improve drainage.
4. How often should I water my indoor mint plant?
Water your mint plant when the top inch of soil feels dry to the touch. Avoid overwatering, as this can lead to root rot. Water thoroughly until water drains out of the drainage holes. During the warmer months, you may need to water more frequently. Check the soil moisture regularly and adjust your watering schedule accordingly. Consider using a moisture meter to help you determine when to water.
5. How do I harvest mint leaves?
Harvest mint leaves regularly to encourage bushier growth. Simply snip off the stems just above a leaf node. You can harvest up to one-third of the plant at a time without harming it. Regular harvesting also helps to prevent the plant from flowering, which can diminish the flavor of the leaves. Harvest in the morning for the best flavor.
6. How do I propagate mint?
Mint is very easy to propagate from stem cuttings. Simply cut a 4-6 inch stem from a healthy plant and remove the lower leaves. Place the stem in a glass of water and wait for roots to develop. Once the roots are about an inch long, you can plant the cutting in a pot of soil. You can also propagate mint by dividing the root ball of an established plant.
7. What are some common pests and diseases that affect indoor mint?
Common pests that can affect indoor mint include aphids, spider mites, and whiteflies. These pests can be controlled with insecticidal soap or neem oil. Overwatering can lead to root rot, which is a fungal disease. To prevent root rot, ensure that your pot has good drainage and avoid overwatering. Good air circulation can also help to prevent fungal diseases.
8. Can I grow mint from seed indoors?
While it’s possible to grow mint from seed indoors, it’s generally easier and faster to propagate from stem cuttings or to purchase a starter plant. Mint seeds can be slow to germinate and may not always produce plants that are true to type. If you do choose to grow from seed, start the seeds indoors 6-8 weeks before the last frost.
9. How do I overwinter my indoor mint plant?
Mint is a perennial plant, so it can survive for several years. During the winter months, your mint plant may go dormant. Reduce watering and fertilizing during this time. You can also prune the plant back to encourage new growth in the spring. Place the plant in a cool, bright location.
10. Can I use fertilizer on my indoor mint plant?
Yes, you can use fertilizer on your indoor mint plant. Use a balanced liquid fertilizer diluted to half strength. Fertilize every 2-4 weeks during the growing season. Avoid over-fertilizing, as this can lead to leggy growth and a less intense flavor. Organic fertilizers, such as compost tea, are also a good option.
11. My mint plant is getting leggy. What should I do?
Leggy growth in mint is often caused by insufficient sunlight. Move your plant to a sunnier location or supplement with a grow light. You can also prune the plant back to encourage bushier growth. Pinch off the tips of the stems to promote branching.
12. My mint leaves are turning yellow. What could be the problem?
Yellowing leaves can be caused by several factors, including overwatering, underwatering, nutrient deficiencies, or pests. Check the soil moisture and adjust your watering schedule accordingly. Fertilize the plant with a balanced liquid fertilizer. Inspect the plant for pests and treat accordingly.
13. Can I use my indoor mint for cooking and beverages?
Absolutely! That’s the whole point! Freshly grown indoor mint is perfect for adding flavor to a wide variety of dishes and drinks. Use it in teas, cocktails, salads, desserts, and more. The possibilities are endless! Just remember to wash the leaves thoroughly before using them.
14. Is growing mint indoors a good way to have fresh herbs year-round?
Yes, growing mint indoors is an excellent way to ensure a continuous supply of fresh herbs, regardless of the season. With proper care and attention, you can enjoy the delightful flavor and aroma of homegrown mint all year long. It’s a sustainable and rewarding way to enhance your culinary creations and bring a touch of nature into your home.
Leave a Comment