
Low Maintenance Zucchini Setup: Dreaming of fresh, homegrown zucchini but dreading the constant upkeep? You’re not alone! I used to think growing zucchini was a full-time job, requiring daily watering, weeding, and battling pests. But I’ve discovered some game-changing DIY tricks that have transformed my zucchini growing experience, and I’m excited to share them with you.
Zucchini, a member of the squash family, has a rich history, tracing back to Central and South America thousands of years ago. While its cultivation has evolved, the desire for a bountiful harvest remains constant. For centuries, gardeners have sought ways to maximize yields with minimal effort. That’s where these DIY hacks come in!
In today’s busy world, who has time to spend hours tending to their garden? That’s why a low maintenance zucchini setup is a game-changer. Imagine enjoying delicious, homegrown zucchini without the constant worry and back-breaking labor. These simple, yet effective, DIY tricks will help you create a thriving zucchini patch that practically takes care of itself. From clever watering solutions to natural pest control methods, I’ll guide you through each step, ensuring you have a successful and stress-free zucchini growing season. Get ready to harvest more zucchini with less work!
Creating a Low-Maintenance Zucchini Paradise
Okay, zucchini lovers, let’s face it: zucchini plants are prolific. They’re practically begging you to harvest them every other day. But what if you could minimize the constant tending and still reap a bountiful harvest? That’s what we’re going to achieve with this low-maintenance zucchini setup! I’m going to walk you through creating a system that reduces watering, weeding, and overall fuss, leaving you with more time to enjoy those delicious zucchini creations.
Choosing the Right Location and Preparing the Soil
Before we even think about planting, location is key. Zucchini plants are sun-worshippers, so you’ll need a spot that gets at least 6-8 hours of direct sunlight per day. Seriously, don’t skimp on the sun 鈥?it makes a huge difference!
Here’s what you need to consider:
* Sunlight: Full sun is non-negotiable. Observe your garden throughout the day to identify the sunniest spot.
* Soil Drainage: Zucchini hates soggy feet! Make sure your soil drains well. If you have heavy clay soil, you’ll need to amend it.
* Space: These plants get BIG. Give each plant at least 3-4 feet of space in all directions. Trust me on this one; overcrowding leads to problems.
* Accessibility: Choose a spot that’s easy to access for watering and harvesting. You don’t want to be battling through thorny bushes to get to your zucchini.
Now, let’s talk soil preparation. This is where the “low-maintenance” aspect really starts to take shape. We’re aiming for rich, well-draining soil that retains moisture.
1. Clear the Area: Remove any weeds, grass, rocks, or debris from the planting area. A clean slate is essential.
2. Amend the Soil: This is the most important step! I highly recommend amending your soil with plenty of organic matter. Here’s what I use:
* Compost: This is your best friend. Compost improves soil structure, drainage, and fertility. Add a generous layer (2-4 inches) and work it into the top 6-8 inches of soil.
* Well-rotted Manure: If you have access to it, well-rotted manure is a fantastic addition. It’s packed with nutrients that zucchini plants love. Use it sparingly, though, as too much can burn the roots.
* Peat Moss (Optional): If your soil is particularly sandy, peat moss can help retain moisture. However, it’s not essential, and there are more sustainable alternatives like coconut coir.
3. Till or Dig: Use a garden fork or tiller to thoroughly mix the amendments into the soil. You want a loose, crumbly texture.
4. Level the Surface: Rake the area smooth to create a level planting surface.
Creating a Self-Watering System (Optional but Highly Recommended)
This is where we take the “low-maintenance” to the next level. A self-watering system drastically reduces the amount of time you spend watering, especially during hot summer months. There are a few ways to do this, but I’m going to share my favorite method using buried ollas or DIY versions.
What are Ollas?
Ollas are unglazed clay pots that are buried in the soil with only the neck exposed. You fill them with water, and the water slowly seeps out through the porous clay, directly watering the roots of your plants. It’s an ancient and incredibly effective irrigation method.
DIY Olla Alternative:
If you don’t want to buy ollas, you can easily make your own using plastic bottles or buckets.
Here’s how:
1. Gather Your Materials: You’ll need a large plastic bottle (2-liter soda bottle or larger) or a bucket with a lid. You’ll also need a drill or a sharp knife.
2. Drill Holes: Drill several small holes (about 1/8 inch) all over the bottle or bucket. The more holes, the faster the water will seep out.
3. Bury the Container: Dig a hole large enough to bury the bottle or bucket near where you plan to plant your zucchini. Leave the neck of the bottle or the top of the bucket exposed.
4. Fill with Water: Fill the container with water and cover the opening to prevent evaporation and debris from falling in.
5. Plant Around the Container: Plant your zucchini seedlings or seeds around the buried container.
Using Store-Bought Ollas:
1. Dig a Hole: Dig a hole large enough to bury the olla, leaving the neck exposed.
2. Bury the Olla: Place the olla in the hole and backfill with soil, packing it firmly around the olla.
3. Fill with Water: Fill the olla with water.
4. Plant Around the Olla: Plant your zucchini seedlings or seeds around the olla.
Important Considerations for Self-Watering Systems:
* Placement: Place the olla or DIY container close to the root zone of your zucchini plant.
* Refilling: Check the water level in the olla or container regularly, especially during hot weather. Refill as needed.
* Mulch: Mulching around the olla or container will help retain moisture and reduce evaporation.
Planting Your Zucchini
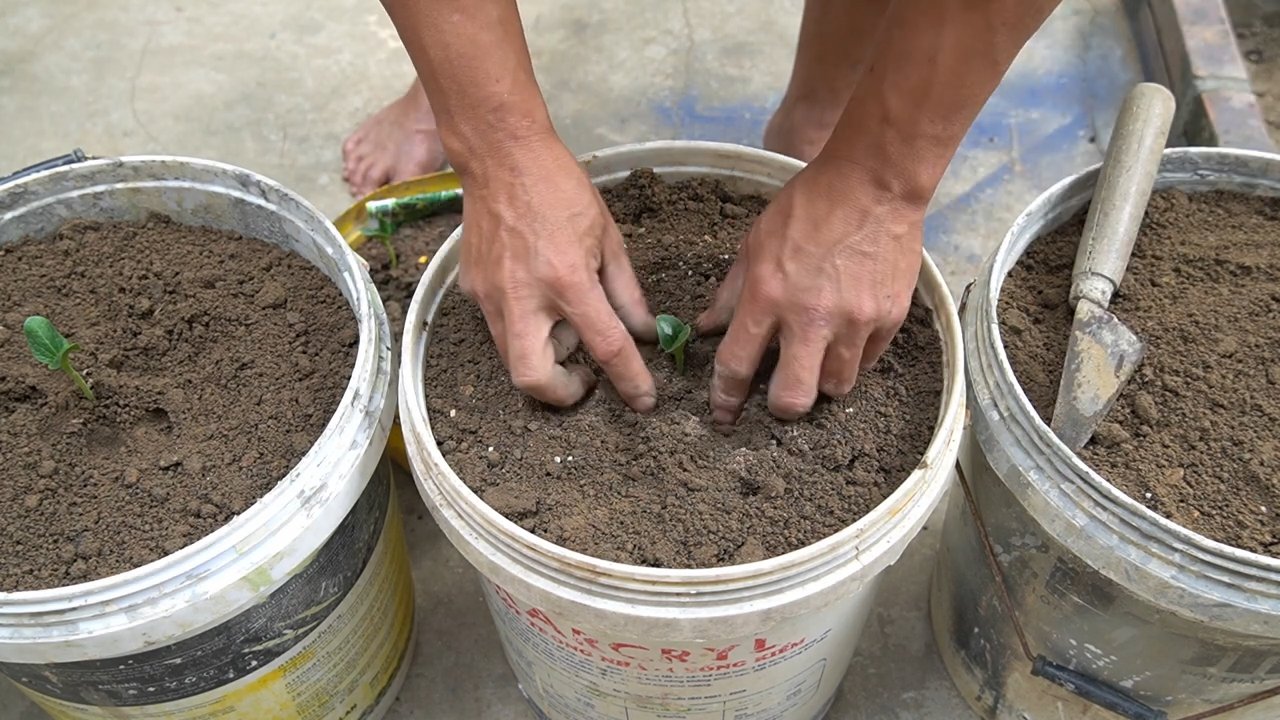
Now for the fun part! You can either start your zucchini seeds indoors a few weeks before the last frost or direct sow them in the garden after the danger of frost has passed. I prefer direct sowing because zucchini plants don’t always transplant well.
1. Sowing Seeds: Sow zucchini seeds about 1 inch deep and 3-4 feet apart.
2. Watering: Water the seeds gently after planting. Keep the soil consistently moist until the seedlings emerge.
3. Thinning (If Necessary): If more than one seedling emerges in the same spot, thin them out, leaving the strongest seedling.
Transplanting Seedlings (If Starting Indoors):
1. Harden Off: Before transplanting, gradually acclimate your seedlings to outdoor conditions by exposing them to increasing amounts of sunlight and wind over a period of 7-10 days.
2. Dig a Hole: Dig a hole slightly larger than the root ball of the seedling.
3. Gently Remove Seedling: Carefully remove the seedling from its container, being careful not to damage the roots.
4. Plant the Seedling: Place the seedling in the hole and backfill with soil, gently firming it around the base of the plant.
5. Water Thoroughly: Water the seedling thoroughly after planting.
Mulching for Weed Control and Moisture Retention
Mulching is another crucial step in creating a low-maintenance zucchini patch. A thick layer of mulch helps suppress weeds, retain moisture, and regulate soil temperature.
Here’s what I recommend:
* Organic Mulch: Straw, wood chips, shredded bark, or grass clippings are all excellent choices for mulch.
* Application: Apply a 3-4 inch layer of mulch around your zucchini plants, keeping it a few inches away from the stems to prevent rot.
* Benefits: Mulch not only suppresses weeds and retains moisture but also adds organic matter to the soil as it decomposes.
Fertilizing for Healthy Growth
Zucchini plants are heavy feeders, so they need regular fertilization to produce a bountiful harvest. However, we can keep this low-maintenance by using slow-release fertilizers or organic amendments.
Here are a few options:
* Slow-Release Fertilizer: Apply a slow-release fertilizer at planting time according to the package directions. This will provide a steady supply of nutrients throughout the growing season.
* Compost Tea: Water your zucchini plants with compost tea every few weeks. Compost tea is a nutrient-rich liquid that’s easy to make and apply.
* Side-Dressing with Compost: Side-dress your zucchini plants with compost every few weeks. Simply sprinkle a layer of compost around the base of the plants and gently work it into the soil.
Pest and Disease Management (The Low-Maintenance Way)
Zucchini plants can be susceptible to a few pests and diseases, but with a little preventative care, you can minimize problems.
Here are some tips:
* Squash Vine Borers: These are the bane of every zucchini grower’s existence! To prevent them, wrap the base of the stems with aluminum foil or pantyhose. You can also use row covers early in the season to prevent the moths from laying their eggs.
* Powdery Mildew: This fungal disease can be a problem in humid climates. To prevent it, ensure good air circulation around your plants and water them at the base, avoiding wetting the leaves. You can also spray with a solution of baking soda and water (1 teaspoon baking soda per quart of water).
* Squash
Conclusion
So, there you have it! This low maintenance zucchini setup isn’t just a gardening hack; it’s a pathway to a bountiful harvest with minimal effort. We’ve walked you through creating a self-watering system that liberates you from the daily grind of watering, allowing you to enjoy the fruits (or rather, vegetables) of your labor without being chained to your garden hose.
Why is this a must-try? Because it addresses the core challenges of zucchini cultivation: consistent moisture and efficient nutrient delivery. Zucchinis are thirsty plants, and inconsistent watering can lead to blossom end rot, stunted growth, and a generally unhappy plant. This DIY setup provides a steady, reliable source of water directly to the roots, promoting healthy growth and maximizing your yield. Furthermore, by incorporating slow-release fertilizer into the reservoir, you’re ensuring that your zucchini plants receive a continuous supply of essential nutrients, further boosting their productivity.
But the beauty of this system lies in its adaptability. Feel free to experiment with variations to suit your specific needs and resources. Consider using different types of containers 鈥?perhaps a large plastic storage bin or even a repurposed garbage can. The key is to ensure that the container is durable, watertight, and large enough to accommodate the root system of your zucchini plant. You can also adjust the type of growing medium you use. While a mix of potting soil and compost works well, you might also try adding perlite or vermiculite to improve drainage and aeration.
For those in hotter climates, consider adding a layer of mulch around the base of the plant to help retain moisture and regulate soil temperature. Straw, wood chips, or even shredded leaves can work wonders. And if you’re dealing with pests, consider companion planting with herbs like basil or marigolds, which are known to deter common zucchini pests.
This low maintenance zucchini setup is more than just a gardening technique; it’s an invitation to connect with nature, to nurture life, and to experience the satisfaction of growing your own food. It’s a way to simplify your gardening routine, freeing up your time to enjoy other pursuits. And it’s a sustainable solution that reduces water waste and promotes healthy plant growth.
We wholeheartedly encourage you to give this DIY trick a try. It’s a simple, cost-effective, and incredibly rewarding way to grow abundant zucchini. And once you’ve experienced the ease and efficiency of this system, we’re confident that you’ll never go back to traditional watering methods.
Don’t be shy about sharing your experiences! We’d love to hear about your successes, your challenges, and any variations you’ve tried. Share your photos and stories on social media using #LowMaintenanceZucchini and let’s build a community of thriving zucchini growers! Your insights could inspire others to embrace this simple yet powerful gardening technique and enjoy the delicious rewards of homegrown zucchini.
Frequently Asked Questions (FAQ)
What type of container is best for this low maintenance zucchini setup?
The ideal container should be large, durable, and watertight. A 20-gallon plastic storage bin works well, but you can also use a repurposed garbage can or any other container that meets these criteria. The size is important because zucchini plants have extensive root systems and need ample space to grow. Make sure the container is made of food-grade plastic if you’re concerned about chemicals leaching into the soil. Avoid using containers that have previously held toxic substances.
How often do I need to refill the water reservoir?
The frequency of refilling the water reservoir depends on several factors, including the size of the container, the weather conditions, and the size of the zucchini plant. In general, you should check the water level every few days and refill it when it gets low. During hot, dry weather, you may need to refill it more frequently. A good rule of thumb is to refill the reservoir when it’s about one-third full. You can also use a water level indicator to monitor the water level more accurately.
What type of fertilizer should I use in the reservoir?
A slow-release fertilizer specifically formulated for vegetables is recommended. Look for a fertilizer with a balanced NPK ratio (nitrogen, phosphorus, and potassium). Follow the instructions on the fertilizer packaging for the correct dosage. You can also use organic fertilizers, such as compost tea or fish emulsion, but you may need to apply them more frequently. Avoid using fertilizers that are high in nitrogen, as this can promote excessive foliage growth at the expense of fruit production.
Can I use this setup for other vegetables besides zucchini?
Yes, this setup can be adapted for other vegetables that require consistent moisture, such as tomatoes, cucumbers, and peppers. However, you may need to adjust the size of the container and the type of fertilizer depending on the specific needs of the plant. For example, tomatoes may benefit from a fertilizer that is higher in phosphorus, while peppers may prefer a slightly acidic soil. Research the specific needs of the vegetable you’re growing and adjust the setup accordingly.
What if I don’t have access to a drill?
If you don’t have a drill, you can use a sharp knife or a screwdriver to create the drainage holes in the container. Be careful when using these tools to avoid injury. You can also purchase self-watering planters that already have drainage holes and a built-in reservoir. These planters are a convenient option if you don’t want to build your own setup.
How do I prevent pests from getting into the water reservoir?
To prevent pests from getting into the water reservoir, you can cover the opening with a piece of mesh or screen. This will allow water to enter the reservoir but will prevent insects and other pests from getting in. You can also add a few drops of neem oil to the water reservoir, as neem oil is a natural insecticide. Regularly inspect the reservoir for any signs of pests and take appropriate action if necessary.
What do I do if my zucchini plant develops blossom end rot?
Blossom end rot is a common problem in zucchini plants that is caused by a calcium deficiency. This can be due to inconsistent watering, which prevents the plant from absorbing calcium from the soil. To prevent blossom end rot, ensure that your zucchini plant receives consistent moisture by using this low maintenance zucchini setup. You can also add calcium to the soil by amending it with bone meal or crushed eggshells. If your plant already has blossom end rot, remove the affected fruits and adjust your watering schedule.
How do I know when my zucchini is ready to harvest?
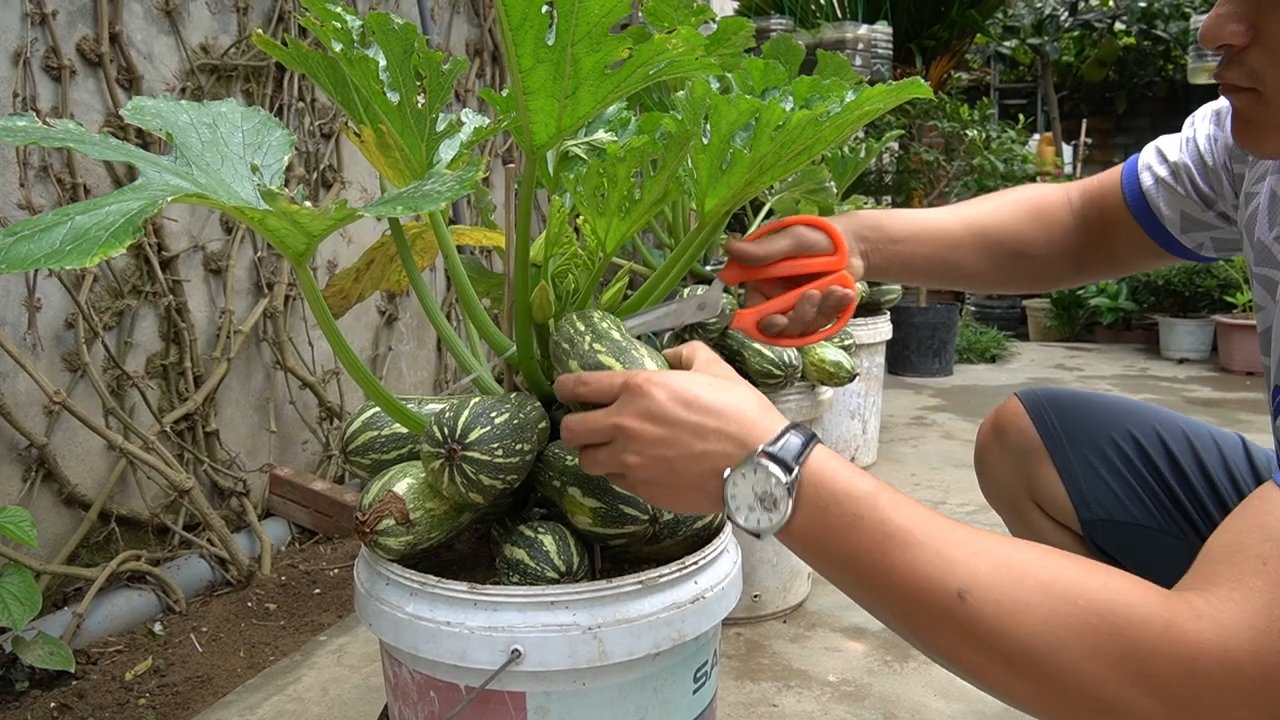
Zucchini is typically ready to harvest when it is about 6-8 inches long. The skin should be smooth and tender. If the zucchini gets too large, it can become tough and seedy. To harvest zucchini, use a sharp knife to cut the stem close to the plant. Be careful not to damage the plant when harvesting the zucchini.
Can I use this setup indoors?
While this setup is primarily designed for outdoor use, it can be adapted for indoor gardening if you have a sunny location and adequate space. You will need to provide supplemental lighting if your indoor space doesn’t receive enough natural light. You will also need to ensure that the container is placed on a waterproof surface to prevent water damage.
What are the benefits of using this low maintenance zucchini setup compared to traditional gardening methods?
The benefits of using this low maintenance zucchini setup include:
* Reduced watering frequency: The self-watering system provides a consistent supply of water to the roots, reducing the need for frequent watering.
* Improved water efficiency: The system minimizes water waste by delivering water directly to the roots, reducing evaporation and runoff.
* Enhanced nutrient delivery: The slow-release fertilizer ensures that the plant receives a continuous supply of essential nutrients.
* Reduced risk of blossom end rot: Consistent watering helps prevent calcium deficiency, which can lead to blossom end rot.
* Increased yields: Healthy, well-nourished plants produce more fruit.
* Time savings: Less time spent watering and fertilizing means more time to enjoy your garden.
* Sustainability: Reduces water waste and promotes healthy plant growth.

Leave a Comment