
Mushroom Growing in Plastic Bottles: Unlock a world of delicious possibilities right in your own home! Have you ever dreamed of harvesting fresh, flavorful mushrooms without the hassle of a sprawling garden? Well, get ready to turn that dream into reality with this incredibly simple and rewarding DIY project.
For centuries, cultivating mushrooms has been shrouded in mystery, often associated with specialized farms and intricate processes. But what if I told you that you could bypass all that and grow your own gourmet fungi using something you likely already have lying around: plastic bottles! This method not only offers a sustainable way to recycle, but also democratizes the art of mushroom cultivation, making it accessible to everyone, regardless of space or experience.
Why should you embrace this DIY trick? Because mushroom growing in plastic bottles is a game-changer! It’s perfect for urban dwellers with limited space, budget-conscious foodies, and anyone eager to connect with nature in a tangible way. Imagine the satisfaction of serving up a dish featuring mushrooms you nurtured from start to finish. Plus, it’s a fantastic conversation starter and a fun educational project for the whole family. So, let’s dive in and transform those discarded bottles into thriving mushroom havens!
Pilzzucht im Plastikflaschen-Upcycling: Dein DIY-Guide für zu Hause
Hallo Pilzfreunde! Habt ihr euch jemals gefragt, wie ihr eure eigenen köstlichen Pilze zu Hause züchten könnt, ohne viel Platz oder teure Ausrüstung zu benötigen? Dann seid ihr hier genau richtig! In diesem Artikel zeige ich euch, wie ihr mit einfachen Plastikflaschen und ein wenig Geduld eure eigene kleine Pilzfarm aufbauen könnt. Es ist nicht nur eine nachhaltige Möglichkeit, eure eigenen Lebensmittel anzubauen, sondern auch ein faszinierendes Projekt, das Spaß macht und lehrreich ist. Lasst uns loslegen!
Was ihr für eure Pilzzucht in Plastikflaschen benötigt
Bevor wir anfangen, hier eine Liste der Materialien, die ihr benötigt. Keine Sorge, die meisten davon habt ihr wahrscheinlich schon zu Hause!
* Plastikflaschen: Am besten eignen sich 1,5- oder 2-Liter-Flaschen. Je größer die Flasche, desto mehr Substrat und Pilze könnt ihr züchten. Achtet darauf, dass die Flaschen sauber und unbeschädigt sind.
* Pilzbrut: Das ist das “Saatgut” für eure Pilze. Ihr könnt verschiedene Sorten online oder in Gartencentern kaufen. Austernpilze (Pleurotus ostreatus) sind besonders anfängerfreundlich und wachsen gut in Plastikflaschen.
* Substrat: Das ist die Nährstoffquelle für eure Pilze. Eine Mischung aus Stroh, Kaffeesatz und Sägespänen ist ideal. Ihr könnt auch nur Stroh verwenden, aber die Zugabe von Kaffeesatz und Sägespänen liefert zusätzliche Nährstoffe.
* Kalk: Um den pH-Wert des Substrats zu regulieren und Schimmelbildung vorzubeugen.
* Wasser: Zum Befeuchten des Substrats.
* Sprühflasche: Zum Befeuchten der Pilze während des Wachstums.
* Bohrer oder Messer: Zum Anbringen von Belüftungslöchern in den Flaschen.
* Klebeband oder Filterpflaster: Zum Abdecken der Belüftungslöcher, um Kontamination zu verhindern.
* Handschuhe: Um das Substrat und die Pilzbrut sauber zu halten.
* Desinfektionsmittel: Um die Flaschen und Werkzeuge zu reinigen.
Vorbereitung des Substrats
Die Vorbereitung des Substrats ist ein wichtiger Schritt, um sicherzustellen, dass eure Pilze gesund und kräftig wachsen. Hier ist, wie ich es mache:
1. Substrat mischen: Mischt Stroh, Kaffeesatz und Sägespäne in einem Verhältnis von etwa 60% Stroh, 20% Kaffeesatz und 20% Sägespäne. Ihr könnt die Mengen je nach Verfügbarkeit anpassen.
2. Kalk hinzufügen: Gebt etwa 1-2% Kalk hinzu, um den pH-Wert zu erhöhen. Das hilft, Schimmelbildung zu verhindern.
3. Pasteurisieren: Das Substrat muss pasteurisiert werden, um unerwünschte Mikroorganismen abzutöten. Es gibt verschiedene Möglichkeiten, dies zu tun:
* Heißwasser-Methode: Gebt das Substrat in einen großen Topf und übergießt es mit kochendem Wasser. Lasst es 1-2 Stunden ziehen.
* Dampf-Methode: Verwendet einen Dampfgarer oder einen großen Topf mit einem Sieb, um das Substrat zu dämpfen. Dämpft es für 1-2 Stunden.
4. Abkühlen lassen: Lasst das Substrat abkühlen, bis es handwarm ist. Es sollte nicht mehr heiß sein, da sonst die Pilzbrut absterben könnte.
5. Feuchtigkeit prüfen: Das Substrat sollte feucht, aber nicht nass sein. Drückt eine Handvoll Substrat aus. Es sollten nur wenige Tropfen Wasser herauskommen. Wenn es zu trocken ist, fügt etwas Wasser hinzu. Wenn es zu nass ist, lasst es etwas abtropfen.
Die Plastikflaschen vorbereiten
Jetzt bereiten wir die Plastikflaschen für die Pilzzucht vor.
1. Reinigen und Desinfizieren: Reinigt die Plastikflaschen gründlich mit Wasser und Seife. Desinfiziert sie anschließend mit einem Desinfektionsmittel. Das ist wichtig, um Kontamination zu vermeiden.
2. Belüftungslöcher bohren: Bohrt oder schneidet kleine Löcher (ca. 5-10 mm Durchmesser) in die Seiten der Flaschen. Diese Löcher dienen der Belüftung und ermöglichen den Pilzen, zu atmen. Ich mache meistens 4-6 Löcher pro Flasche, gleichmäßig verteilt.
3. Löcher abdecken: Bedeckt die Löcher mit Klebeband oder Filterpflaster. Das verhindert, dass Schädlinge eindringen und hält die Feuchtigkeit im Inneren.
Das Substrat in die Flaschen füllen und beimpfen
Jetzt kommt der spannende Teil: das Befüllen der Flaschen mit dem Substrat und das Beimpfen mit der Pilzbrut.
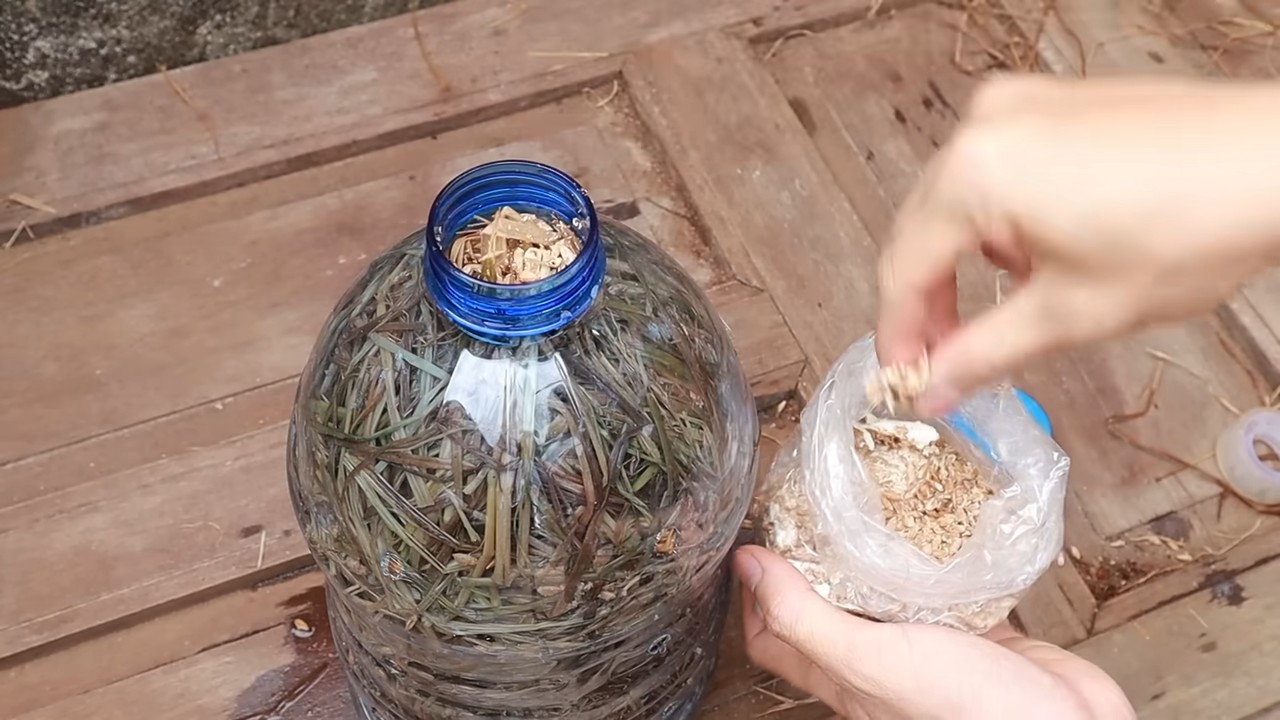
1. Schichtweise füllen: Füllt die Flaschen schichtweise mit dem Substrat und der Pilzbrut. Beginnt mit einer Schicht Substrat, dann eine Schicht Pilzbrut, dann wieder eine Schicht Substrat usw. Achtet darauf, dass die Pilzbrut gut verteilt ist.
2. Verhältnis: Ich verwende meistens ein Verhältnis von etwa 10-20% Pilzbrut zum Substrat. Das bedeutet, dass ihr für 1 kg Substrat etwa 100-200 g Pilzbrut benötigt.
3. Leicht andrücken: Drückt das Substrat leicht an, um Lufteinschlüsse zu vermeiden.
4. Obere Schicht: Die oberste Schicht sollte aus Substrat bestehen.
5. Verschließen: Verschließt die Flaschen mit dem Deckel.
Die Inkubationsphase
Die Inkubationsphase ist die Zeit, in der die Pilzbrut das Substrat besiedelt.
1. Dunkler und warmer Ort: Stellt die Flaschen an einen dunklen und warmen Ort (ca. 20-25°C). Ein Schrank oder eine dunkle Ecke im Keller ist ideal.
2. Belüftung: Sorgt für eine gute Belüftung im Raum.
3. Feuchtigkeit: Haltet die Luftfeuchtigkeit hoch (ca. 80-90%). Ihr könnt die Flaschen mit einer Sprühflasche befeuchten oder sie in eine Plastiktüte stellen, um die Feuchtigkeit zu erhöhen. Achtet darauf, dass sich kein Kondenswasser in der Tüte bildet.
4. Kontrolle: Kontrolliert die Flaschen regelmäßig auf Schimmelbildung. Wenn ihr Schimmel entdeckt, entfernt die betroffene Stelle sofort.
5. Dauer: Die Inkubationsphase dauert in der Regel 2-3 Wochen. Während dieser Zeit sollte das Substrat vollständig von dem weißen Myzel der Pilze durchzogen sein.
Die Fruchtungsphase
Nach der Inkubationsphase beginnt die Fruchtungsphase, in der die Pilze wachsen.
1. Licht: Stellt die Flaschen an einen helleren Ort, aber vermeidet direkte Sonneneinstrahlung.
2. Temperatur: Die ideale Temperatur für die Fruchtung liegt bei etwa 15-20°C.
3. Feuchtigkeit: Haltet die Luftfeuchtigkeit hoch (ca. 80-90%). Besprüht die Pilze regelmäßig mit Wasser.
4. Belüftung: Sorgt für eine gute Belüftung.
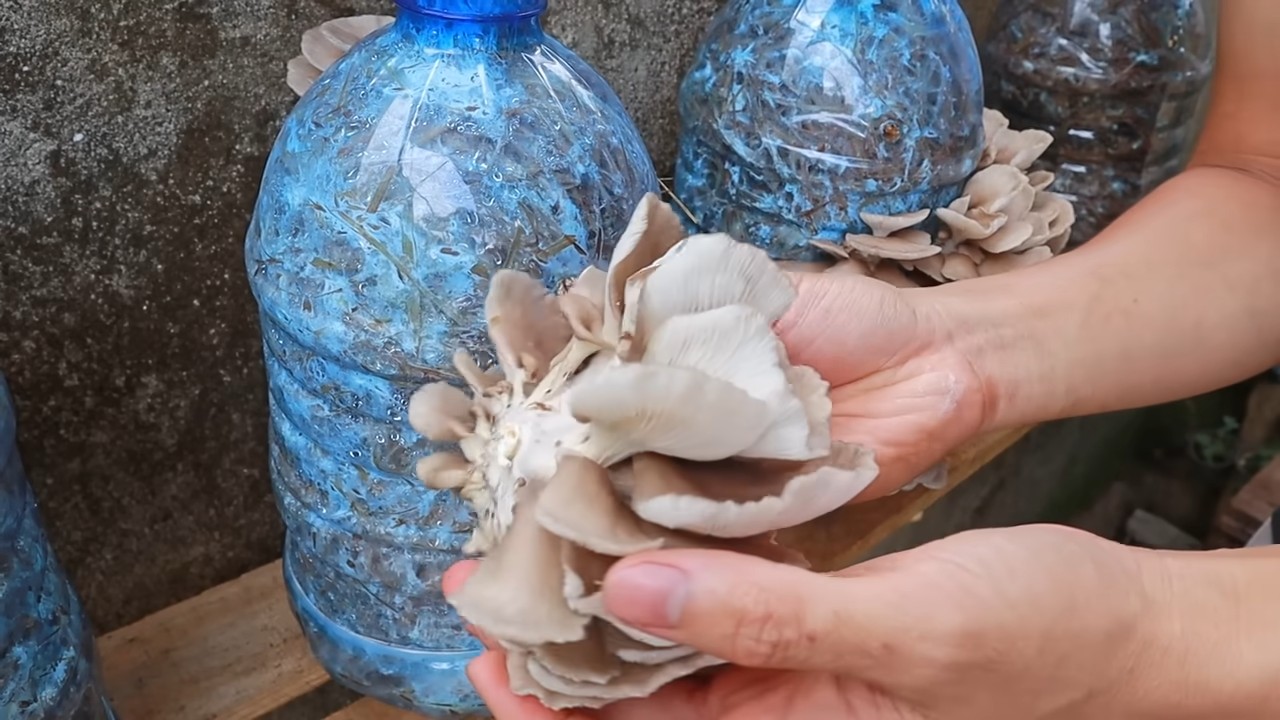
5. Ernte: Die Pilze sind erntereif, wenn die Hüte sich vollständig entwickelt haben und die Ränder leicht nach oben biegen. Schneidet die Pilze mit einem scharfen Messer ab.
Nach der Ernte
Nach der ersten Ernte könnt ihr mit etwas Glück noch weitere Ernten erzielen.
1. Ruhephase: Lasst das Substrat für einige Tage ruhen.
2. Befeuchten: Befeuchtet das Substrat erneut.
3. Wiederholung: Wiederholt die Fruchtungsphase.
Tipps und Tricks für eine erfolgreiche Pilzzucht
* Sauberkeit ist das A und O: Achtet auf absolute Sauberkeit, um Kontamination zu vermeiden.
* Geduld: Die Pilzzucht braucht Zeit
Conclusion
So, there you have it! Transforming humble plastic bottles into thriving mushroom farms is not just a quirky DIY project; it’s a sustainable, cost-effective, and incredibly rewarding way to enjoy fresh, delicious mushrooms right from your own home. We’ve walked you through the process, highlighting the simplicity and accessibility of this method. Forget expensive mushroom growing kits or relying solely on store-bought varieties. This method puts the power of cultivation directly into your hands, allowing you to control the quality and freshness of your harvest.
The beauty of this DIY mushroom growing technique lies in its adaptability. While we’ve focused on a specific method using plastic bottles, don’t be afraid to experiment! Consider using different types of substrate. Straw, coffee grounds, and even cardboard can be incorporated to create a nutrient-rich environment for your fungi friends. You can also explore different mushroom varieties. Oyster mushrooms are a great starting point due to their resilience and rapid growth, but once you’ve mastered the basics, venture into the world of shiitake, lion’s mane, or even more exotic species. Remember to research the specific needs of each variety to ensure optimal growing conditions.
Beyond the delicious culinary benefits, this project offers a fantastic opportunity to learn about the fascinating world of mycology. Observing the entire life cycle of a mushroom, from inoculation to fruiting, is an educational experience for both adults and children. It’s a tangible way to connect with nature and understand the vital role fungi play in our ecosystem. Furthermore, by repurposing plastic bottles, you’re actively contributing to a more sustainable lifestyle, reducing waste and promoting environmental consciousness.
This method of growing mushrooms is also incredibly space-efficient. Whether you have a sprawling garden or a small apartment balcony, you can easily find a suitable spot for your bottle-based mushroom farm. The vertical nature of the setup maximizes space utilization, allowing you to cultivate a significant amount of mushrooms in a relatively small area. This makes it an ideal option for urban dwellers and anyone looking to make the most of limited space.
We strongly encourage you to give this DIY mushroom growing project a try. It’s a fun, engaging, and ultimately rewarding experience that will provide you with a constant supply of fresh, flavorful mushrooms. Don’t be intimidated by the process; it’s much simpler than it seems. With a little patience and attention to detail, you’ll be harvesting your own homegrown mushrooms in no time.
And most importantly, we want to hear about your experiences! Share your successes, your challenges, and any variations you’ve tried in the comments below. Let’s create a community of mushroom enthusiasts, sharing knowledge and inspiring each other to grow our own food sustainably. Your insights could be invaluable to other aspiring mushroom farmers. So, grab some plastic bottles, gather your supplies, and embark on this exciting journey of DIY mushroom cultivation. Happy growing!
Frequently Asked Questions (FAQ)
What type of mushrooms are best for growing in plastic bottles?
Oyster mushrooms (Pleurotus ostreatus) are generally considered the easiest and most forgiving variety for beginners. They are fast-growing, relatively tolerant of varying conditions, and produce a generous yield. Other suitable options include shiitake (Lentinula edodes), although they require a bit more patience and specific substrate, and lion’s mane (Hericium erinaceus), known for its unique texture and health benefits. However, for your first attempt, we highly recommend starting with oyster mushrooms to get a feel for the process. Remember to always source your mushroom spawn from a reputable supplier to ensure quality and viability.
What is the best substrate to use in plastic bottles for mushroom growing?
The ideal substrate depends on the type of mushroom you’re growing. For oyster mushrooms, pasteurized straw is a popular and readily available option. You can also use coffee grounds, cardboard, or a mixture of these materials. Shiitake mushrooms prefer a more woody substrate, such as hardwood sawdust or wood chips. It’s crucial to properly pasteurize or sterilize your substrate to eliminate competing molds and bacteria that could hinder mushroom growth. Pasteurization involves heating the substrate to a temperature that kills harmful microorganisms without destroying beneficial nutrients. Sterilization, on the other hand, completely eliminates all microorganisms, but it can also remove some essential nutrients. Choose the method that best suits your needs and resources.
How do I pasteurize the substrate for mushroom growing?
There are several methods for pasteurizing substrate. One common method involves soaking the substrate in hot water (around 160-180°F or 71-82°C) for 1-2 hours. You can use a large pot or container and a thermometer to monitor the water temperature. Another method is to steam the substrate in a pressure cooker or steamer for a similar duration. After pasteurization, allow the substrate to cool completely before inoculating it with mushroom spawn. Ensure the substrate is not too wet, as this can create anaerobic conditions that inhibit mushroom growth. The ideal moisture content should be similar to a wrung-out sponge.
How long does it take for mushrooms to grow in plastic bottles?
The time it takes for mushrooms to grow depends on several factors, including the mushroom variety, the substrate used, and the environmental conditions. Oyster mushrooms typically begin to fruit within 2-3 weeks of inoculation, while shiitake mushrooms may take several months. Maintaining optimal temperature and humidity levels is crucial for promoting rapid growth. Regularly misting the substrate and providing adequate ventilation can help create the ideal environment for mushroom fruiting. Be patient and observant, and you’ll be rewarded with a bountiful harvest.
How do I maintain the humidity levels inside the plastic bottle mushroom farm?
Maintaining adequate humidity is essential for successful mushroom cultivation. You can mist the inside of the bottle regularly with a spray bottle, ensuring the substrate remains moist but not waterlogged. Covering the bottle with a plastic bag or creating a humidity tent can also help retain moisture. Monitor the humidity levels using a hygrometer if possible, and adjust your misting schedule accordingly. Aim for a humidity level of around 80-90% during the fruiting stage.
What are some common problems I might encounter when growing mushrooms in plastic bottles, and how can I solve them?
One common problem is contamination by mold or bacteria. This can be prevented by properly pasteurizing or sterilizing the substrate and maintaining a clean growing environment. If you notice any signs of contamination, such as green or black mold, remove the affected area immediately. Another problem is insufficient humidity, which can lead to stunted growth or dried-out mushrooms. Increase the frequency of misting or create a more humid environment. Pests, such as fungus gnats, can also be a nuisance. Use sticky traps or introduce beneficial nematodes to control pest populations.
Can I reuse the plastic bottles for multiple mushroom growing cycles?
Yes, you can reuse the plastic bottles, but it’s essential to thoroughly clean and disinfect them between cycles to prevent the buildup of contaminants. Wash the bottles with soap and water, and then sanitize them with a bleach solution (1 part bleach to 10 parts water). Rinse the bottles thoroughly with clean water before using them again. However, keep in mind that plastic can degrade over time, so you may need to replace the bottles after several cycles.
Where is the best location to place my plastic bottle mushroom farm?
The ideal location for your mushroom farm is a cool, dark, and humid environment. A basement, garage, or shaded outdoor area are all suitable options. Avoid direct sunlight, as it can overheat the bottles and dry out the substrate. Maintain a temperature range of 60-75°F (15-24°C) for optimal growth. Good ventilation is also important to prevent the buildup of carbon dioxide.
How do I harvest the mushrooms from the plastic bottles?
Harvest the mushrooms when the caps are fully developed but before they start to release spores. Gently twist or cut the mushrooms from the substrate, being careful not to damage the surrounding mycelium. Harvesting at the right time will ensure the best flavor and texture. After harvesting, the substrate may produce additional flushes of mushrooms. Continue to mist and maintain the humidity levels to encourage further growth.
Is growing mushrooms in plastic bottles safe?
Yes, growing edible mushrooms in plastic bottles is generally safe, as long as you follow proper hygiene and sanitation practices. Ensure that you are using food-grade plastic bottles and that you thoroughly clean and disinfect them before use. Always source your mushroom spawn from a reputable supplier and only consume mushrooms that you have positively identified as edible. If you are unsure about the safety of a particular mushroom, it’s best to err on the side of caution and discard it.
Leave a Comment