
Mushroom Growing Setup DIY: Unlock the secrets to cultivating your own delicious and nutritious mushrooms right at home! Have you ever dreamt of harvesting fresh, gourmet mushrooms just steps from your kitchen? Imagine the satisfaction of adding homegrown shiitakes to your stir-fry or earthy oyster mushrooms to your pasta. This isn’t just a culinary adventure; it’s a journey into a fascinating world of fungi, and I’m here to guide you every step of the way.
For centuries, mushroom cultivation has been a revered practice, deeply rooted in various cultures. From ancient Chinese medicinal traditions to European culinary artistry, mushrooms have held a place of honor. Today, with a growing emphasis on sustainable living and healthy eating, the demand for homegrown produce is soaring. But let’s face it, buying exotic mushrooms at the grocery store can be expensive. That’s where this Mushroom Growing Setup DIY guide comes in!
This DIY project isn’t just about saving money; it’s about taking control of your food source, reducing your carbon footprint, and experiencing the pure joy of nurturing life. Plus, it’s surprisingly easier than you might think! Many people are intimidated by the idea of growing mushrooms, but with the right knowledge and a little bit of effort, you can create a thriving mushroom farm in your own home. I’ll break down the process into simple, manageable steps, so you can confidently embark on your mushroom-growing adventure. Get ready to transform a small space into a fungal paradise and enjoy the delicious rewards of your labor!
DIY Mushroom Growing Setup: From Spores to Spores!
Hey there, fellow fungi fanatics! Ever dreamed of harvesting your own delicious mushrooms right in your home? Well, you’ve come to the right place. I’m going to walk you through building your very own mushroom growing setup, step-by-step. It might seem a little daunting at first, but trust me, it’s incredibly rewarding (and tasty!). We’ll be focusing on a simple, low-tech method perfect for beginners, using readily available materials. Let’s get started!
What You’ll Need: The Shopping List
Before we dive in, let’s gather our supplies. This is crucial for a smooth and successful mushroom growing experience. Don’t worry, most of these items are easy to find at your local hardware store, garden center, or even online.
* **Sterile Substrate:** This is the food source for your mushrooms. I recommend using pasteurized straw or supplemented sawdust for beginners. You can buy pre-pasteurized substrate online, or pasteurize it yourself (more on that later!).
* **Mushroom Spawn:** This is essentially mushroom “seeds.” You can purchase spawn online or from specialty mushroom suppliers. Oyster mushrooms are a great choice for beginners because they are relatively easy to grow and quite forgiving.
* **Growing Container:** A large plastic tub with a lid works perfectly. Make sure it’s opaque or dark colored to prevent light from inhibiting mycelial growth. A size around 50-70 liters is ideal.
* **Spray Bottle:** For misting the mushrooms to maintain humidity.
* **Perlite or Vermiculite:** These are used to create a humidity-holding layer at the bottom of the container. Perlite is my personal preference.
* **Rubbing Alcohol (Isopropyl Alcohol):** For sterilizing surfaces and tools. This is super important to prevent contamination.
* **Gloves:** To keep your hands clean and prevent contamination.
* **Mask:** To avoid inhaling dust or spores during the process.
* **Drill (Optional):** For drilling ventilation holes in the container.
* **Micropore Tape (Optional):** To cover the ventilation holes and allow for air exchange while preventing contaminants from entering.
* **Large Pot or Container (If Pasteurizing Straw):** For pasteurizing the straw substrate.
* **Thermometer (If Pasteurizing Straw):** To monitor the water temperature during pasteurization.
Phase 1: Preparing the Substrate
The substrate is the foundation of your mushroom growing operation. It’s where the mycelium (the vegetative part of the mushroom) will colonize and eventually produce mushrooms. Proper preparation is key to success.
Pasteurizing Straw (If Using Straw)
If you’re using straw as your substrate, you’ll need to pasteurize it to kill off any competing organisms. This gives your mushroom spawn a head start.
1. **Chop the Straw:** Cut the straw into smaller pieces, about 2-4 inches long. This makes it easier to pack into the container and allows for better colonization.
2. **Soak the Straw:** Submerge the chopped straw in a large pot or container filled with water. Make sure all the straw is completely covered.
3. **Heat the Water:** Heat the water to a temperature of 160-180°F (71-82°C). Use a thermometer to monitor the temperature. Maintain this temperature for about 1-2 hours. This process kills off most of the unwanted bacteria and fungi.
4. **Drain the Straw:** Carefully drain the hot water from the straw. You can use a colander or a large strainer.
5. **Cool the Straw:** Allow the straw to cool down to room temperature. This is important because hot straw can kill the mushroom spawn. You want the straw to be moist but not dripping wet. Squeeze out any excess water.
Preparing Supplemented Sawdust (If Using Sawdust)
Supplemented sawdust usually comes pre-pasteurized, but it’s always a good idea to double-check the instructions from the supplier. If it needs pasteurization, follow similar steps to the straw pasteurization, but be careful not to over-saturate the sawdust.
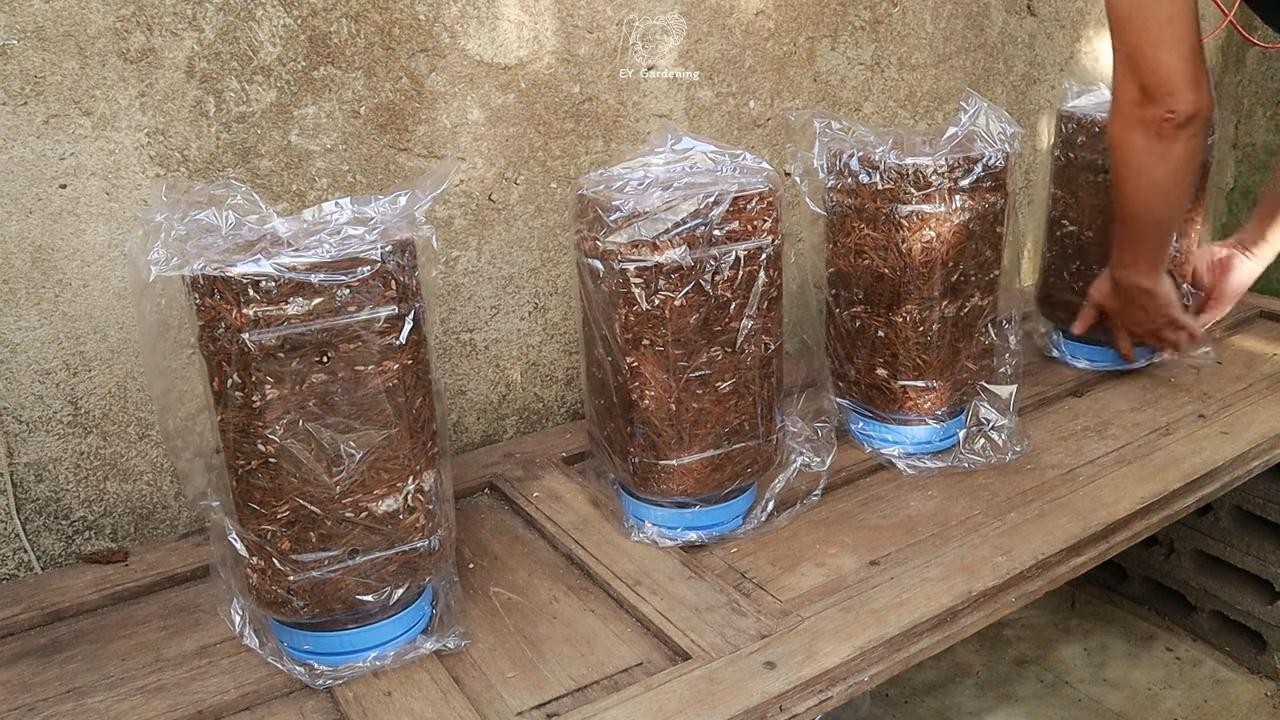
Phase 2: Setting Up the Growing Container
Now that our substrate is ready, let’s set up the growing container. This is where the magic happens!
1. **Clean and Sterilize the Container:** Thoroughly clean the plastic tub with soap and water. Then, sterilize it with rubbing alcohol. Wipe down all surfaces, including the lid.
2. **Create a Humidity Layer:** Pour a layer of perlite or vermiculite (about 2-3 inches deep) into the bottom of the container. This layer will help maintain humidity inside the container.
3. **Moisten the Perlite/Vermiculite:** Lightly mist the perlite or vermiculite with water until it’s damp but not soaking wet.
4. **Drill Ventilation Holes (Optional):** If you want to provide extra ventilation, drill several small holes (about 1/4 inch in diameter) around the sides of the container, near the top. Space them a few inches apart.
5. **Cover Ventilation Holes (Optional):** Cover the ventilation holes with micropore tape. This allows for air exchange while preventing contaminants from entering.
Phase 3: Inoculating the Substrate
This is the most exciting part! We’re finally introducing the mushroom spawn to the substrate.
1. **Clean Your Hands and Tools:** Put on gloves and sterilize your hands with rubbing alcohol. Also, sterilize any tools you’ll be using, such as a spoon or fork, to mix the spawn and substrate.
2. **Layer the Substrate and Spawn:** In the growing container, create alternating layers of substrate and spawn. Start with a layer of substrate, then sprinkle a layer of spawn on top. Repeat this process until you’ve used all the substrate and spawn. The final layer should be a layer of substrate. Aim for a spawn rate of about 5-10% of the substrate weight.
3. **Mix Gently (Optional):** Some growers prefer to gently mix the spawn and substrate together. This can help speed up colonization. However, be careful not to compact the substrate too much.
4. **Close the Lid:** Securely close the lid of the growing container.
Phase 4: Incubation
During the incubation phase, the mycelium will colonize the substrate. This is a crucial period, so it’s important to maintain the right conditions.
1. **Find a Dark, Warm Place:** Place the growing container in a dark, warm place with a temperature of around 70-75°F (21-24°C). A closet, basement, or spare room works well.
2. **Monitor Colonization:** Check the container regularly for signs of colonization. You should see white, fuzzy growth (the mycelium) spreading throughout the substrate.
3. **Be Patient:** Colonization can take anywhere from 2-4 weeks, depending on the type of mushroom and the environmental conditions.
Hey there, fellow fungi fanatics! Ever dreamed of harvesting your own delicious mushrooms right in your home? Well, you’ve come to the right place. I’m going to walk you through building your very own mushroom growing setup, step-by-step. It might seem a little daunting at first, but trust me, it’s incredibly rewarding (and tasty!). We’ll be focusing on a simple, low-tech method perfect for beginners, using readily available materials. Let’s get started!
What You’ll Need: The Shopping List
Before we dive in, let’s gather our supplies. This is crucial for a smooth and successful mushroom growing experience. Don’t worry, most of these items are easy to find at your local hardware store, garden center, or even online.
* **Sterile Substrate:** This is the food source for your mushrooms. I recommend using pasteurized straw or supplemented sawdust for beginners. You can buy pre-pasteurized substrate online, or pasteurize it yourself (more on that later!).
* **Mushroom Spawn:** This is essentially mushroom “seeds.” You can purchase spawn online or from specialty mushroom suppliers. Oyster mushrooms are a great choice for beginners because they are relatively easy to grow and quite forgiving.
* **Growing Container:** A large plastic tub with a lid works perfectly. Make sure it’s opaque or dark colored to prevent light from inhibiting mycelial growth. A size around 50-70 liters is ideal.
* **Spray Bottle:** For misting the mushrooms to maintain humidity.
* **Perlite or Vermiculite:** These are used to create a humidity-holding layer at the bottom of the container. Perlite is my personal preference.
* **Rubbing Alcohol (Isopropyl Alcohol):** For sterilizing surfaces and tools. This is super important to prevent contamination.
* **Gloves:** To keep your hands clean and prevent contamination.
* **Mask:** To avoid inhaling dust or spores during the process.
* **Drill (Optional):** For drilling ventilation holes in the container.
* **Micropore Tape (Optional):** To cover the ventilation holes and allow for air exchange while preventing contaminants from entering.
* **Large Pot or Container (If Pasteurizing Straw):** For pasteurizing the straw substrate.
* **Thermometer (If Pasteurizing Straw):** To monitor the water temperature during pasteurization.
Phase 1: Preparing the Substrate
The substrate is the foundation of your mushroom growing operation. It’s where the mycelium (the vegetative part of the mushroom) will colonize and eventually produce mushrooms. Proper preparation is key to success.
Pasteurizing Straw (If Using Straw)
If you’re using straw as your substrate, you’ll need to pasteurize it to kill off any competing organisms. This gives your mushroom spawn a head start.
1. **Chop the Straw:** Cut the straw into smaller pieces, about 2-4 inches long. This makes it easier to pack into the container and allows for better colonization.
2. **Soak the Straw:** Submerge the chopped straw in a large pot or container filled with water. Make sure all the straw is completely covered.
3. **Heat the Water:** Heat the water to a temperature of 160-180°F (71-82°C). Use a thermometer to monitor the temperature. Maintain this temperature for about 1-2 hours. This process kills off most of the unwanted bacteria and fungi.
4. **Drain the Straw:** Carefully drain the hot water from the straw. You can use a colander or a large strainer.
5. **Cool the Straw:** Allow the straw to cool down to room temperature. This is important because hot straw can kill the mushroom spawn. You want the straw to be moist but not dripping wet. Squeeze out any excess water.
Preparing Supplemented Sawdust (If Using Sawdust)
Supplemented sawdust usually comes pre-pasteurized, but it’s always a good idea to double-check the instructions from the supplier. If it needs pasteurization, follow similar steps to the straw pasteurization, but be careful not to over-saturate the sawdust.
Phase 2: Setting Up the Growing Container
Now that our substrate is ready, let’s set up the growing container. This is where the magic happens!
1. **Clean and Sterilize the Container:** Thoroughly clean the plastic tub with soap and water. Then, sterilize it with rubbing alcohol. Wipe down all surfaces, including the lid.
2. **Create a Humidity Layer:** Pour a layer of perlite or vermiculite (about 2-3 inches deep) into the bottom of the container. This layer will help maintain humidity inside the container.
3. **Moisten the Perlite/Vermiculite:** Lightly mist the perlite or vermiculite with water until it’s damp but not soaking wet.
4. **Drill Ventilation Holes (Optional):** If you want to provide extra ventilation, drill several small holes (about 1/4 inch in diameter) around the sides of the container, near the top. Space them a few inches apart.
5. **Cover Ventilation Holes (Optional):** Cover the ventilation holes with micropore tape. This allows for air exchange while preventing contaminants from entering.
Phase 3: Inoculating the Substrate
This is the most exciting part! We’re finally introducing the mushroom spawn to the substrate.
1. **Clean Your Hands and Tools:** Put on gloves and sterilize your hands with rubbing alcohol. Also, sterilize any tools you’ll be using, such as a spoon or fork, to mix the spawn and substrate.
2. **Layer the Substrate and Spawn:** In the growing container, create alternating layers of substrate and spawn. Start with a layer of substrate, then sprinkle a layer of spawn on top. Repeat this process until you’ve used all the substrate and spawn. The final layer should be a layer of substrate. Aim for a spawn rate of about 5-10% of the substrate weight.
3. **Mix Gently (Optional):** Some growers prefer to gently mix the spawn and substrate together. This can help speed up colonization. However, be careful not to compact the substrate too much.
4. **Close the Lid:** Securely close the lid of the growing container.
Phase 4: Incubation
During the incubation phase, the mycelium will colonize the substrate. This is a crucial period, so it’s important to maintain the right conditions.
1. **Find a Dark, Warm Place:** Place the growing container in a dark, warm place with a temperature of around 70-75°F (21-24°C). A closet, basement, or spare room works well.
2. **Monitor Colonization:** Check the container regularly for signs of colonization. You should see white, fuzzy growth (the mycelium) spreading throughout the substrate.
3. **Be Patient:** Colonization can take anywhere from 2-4 weeks, depending on the type of mushroom and the environmental conditions.
4. **Avoid Disturbing the Container:** Try to avoid opening the container during the incubation phase, as this can introduce contaminants.
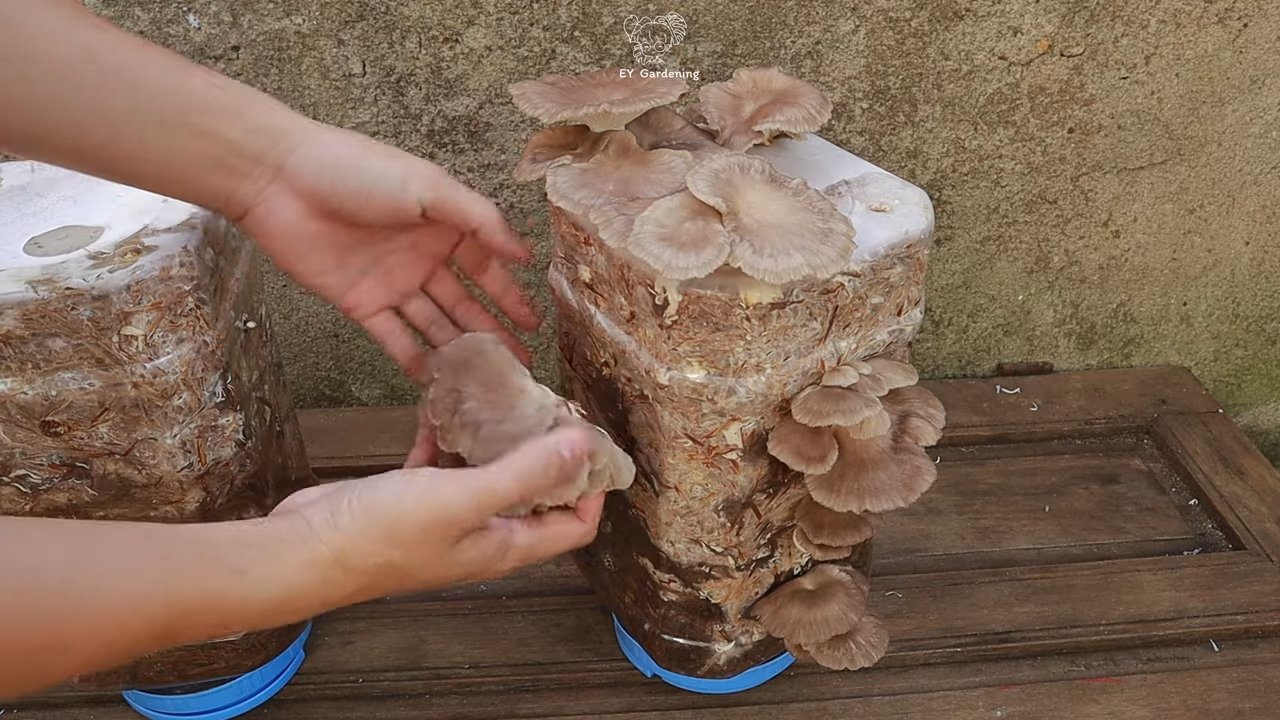
Phase 5: Fruiting
Once the substrate is fully colonized, it’s time to initiate fruiting. This is when the mushrooms will start to form.
1. **Introduce Light:** Move the container to a location with indirect light. Direct sunlight can dry out the substrate and damage the developing mushrooms.
2. **Increase Humidity:** Increase the humidity inside the container by misting the substrate with water 2-3 times a day. You can also mist the sides of the container. The goal is to keep the substrate moist but not soaking wet.
3. **Increase Ventilation:** If you haven’t already, open the ventilation holes (if you drilled them) or crack the lid of the container slightly to allow for fresh air exchange.
4. **Monitor for Pinning:** Keep an eye out for small mushroom “pins” forming on the surface of the substrate. These are the baby mushrooms!
5. **Maintain Conditions:** Continue to mist the mushrooms regularly and provide adequate ventilation.
Phase 6: Harvesting
The moment we’ve all been waiting for! It’s time to harvest your homegrown mushrooms.
1. **Harvest at the Right Time:** Harvest the mushrooms when the caps are fully developed but before they start to release spores. For oyster mushrooms, this is usually when the edges of the caps start to flatten out or curl upwards.
2. **Harvest Carefully:** To harvest the mushrooms, gently twist and pull them from the substrate. Be careful not to damage the surrounding mycelium.
3. **Clean the Mushrooms:** Brush off any excess substrate from the mushrooms.
4. **Enjoy Your Harvest!** Cook your freshly harvested mushrooms and enjoy the fruits (or fungi!) of your labor.
Phase 7: Subsequent Flushes
After harvesting your first flush of mushrooms, you can often get several more flushes from the same substrate.
1. **Soak the Substrate:** After harvesting, soak the substrate in water for 1
Conclusion
So, there you have it! Creating your own mushroom growing setup DIY isn’t just a cost-effective alternative to expensive pre-made kits; it’s a deeply rewarding experience that connects you to the fascinating world of fungi. From selecting your substrate to carefully monitoring humidity and temperature, each step of the process offers a chance to learn and adapt, fostering a deeper appreciation for the natural world.
Why is this DIY approach a must-try? Because it empowers you to take control of your food source, reduces your reliance on commercially grown mushrooms (often shipped long distances), and allows you to cultivate varieties that might not be readily available in your local grocery store. Imagine the satisfaction of harvesting your own gourmet oyster mushrooms or shiitakes, knowing that you nurtured them from start to finish. The taste of freshly grown mushrooms, bursting with flavor and nutrients, is simply unparalleled.
But the benefits extend beyond the culinary. This project is a fantastic educational opportunity for families, teaching children about the life cycle of fungi, the importance of sustainable practices, and the joy of growing their own food. It’s also a great way to reduce waste by utilizing materials like coffee grounds or cardboard as substrate.
Don’t be afraid to experiment! Once you’ve mastered the basic setup, you can explore different mushroom varieties, each with its unique growing requirements and flavor profiles. Consider adding a small fan to your setup to improve air circulation, or experimenting with different lighting conditions to optimize growth. You could even build a more elaborate fruiting chamber using a greenhouse or repurposed container.
Variations to Consider:
* Substrate Choices: While we’ve focused on readily available substrates like straw or coffee grounds, you can also explore using hardwood sawdust, supplemented with bran or other nutrients, for more demanding mushroom species.
* Fruiting Chamber Designs: Get creative with your fruiting chamber! A simple plastic tub with holes drilled for ventilation works well, but you can also build a more sophisticated chamber with automated humidity and temperature control.
* Mushroom Varieties: Don’t limit yourself to just one type of mushroom. Experiment with oyster mushrooms (easy for beginners), shiitake mushrooms (require hardwood substrate), or even more exotic varieties like lion’s mane or reishi.
We understand that embarking on a DIY project can sometimes feel daunting, but we encourage you to take the plunge. The initial investment is minimal, and the rewards are immense. The process of creating your own mushroom growing setup DIY is not only fun but also educational and sustainable.
So, gather your materials, prepare your substrate, and get ready to witness the magic of mushroom cultivation firsthand. We’re confident that you’ll be amazed by the results.
We’d love to hear about your experiences! Share your photos, tips, and challenges in the comments below. Let’s build a community of mushroom enthusiasts and learn from each other. Happy growing!
Frequently Asked Questions (FAQ)
What are the easiest mushrooms to grow for beginners?
Oyster mushrooms are generally considered the easiest mushrooms to grow for beginners. They are fast-growing, relatively forgiving of environmental fluctuations, and can thrive on a variety of substrates, including straw, coffee grounds, and even cardboard. Their adaptability makes them an excellent choice for those new to mushroom cultivation. Other relatively easy options include shiitake mushrooms (though they require hardwood substrate) and wine cap mushrooms, which can be grown outdoors in wood chips.
How long does it take to grow mushrooms from a DIY setup?
The time it takes to grow mushrooms varies depending on the species, the substrate used, and the environmental conditions. Oyster mushrooms can often be harvested within a few weeks of colonization, while shiitake mushrooms may take several months. Generally, after you inoculate your substrate with mushroom spawn, it will take a few weeks for the mycelium (the vegetative part of the fungus) to fully colonize the substrate. Once colonization is complete, you can initiate fruiting by providing the right temperature, humidity, and light conditions. Keep in mind that patience is key!
What are the ideal temperature and humidity levels for growing mushrooms?
The ideal temperature and humidity levels vary depending on the mushroom species. However, as a general guideline, most mushrooms prefer temperatures between 60-75°F (15-24°C) and high humidity levels (80-90%). Oyster mushrooms are relatively tolerant of temperature fluctuations, while shiitake mushrooms prefer cooler temperatures for fruiting. Maintaining high humidity is crucial for preventing the substrate from drying out and promoting healthy mushroom growth. You can use a humidifier or mist the fruiting chamber regularly to maintain the desired humidity levels.
What kind of lighting do mushrooms need?
Mushrooms don’t require intense light like plants do. In fact, direct sunlight can be harmful. However, they do need some light to trigger fruiting. Indirect sunlight or artificial light (such as a fluorescent or LED grow light) for a few hours a day is usually sufficient. The light helps the mushrooms orient themselves and develop properly.
What is the best substrate for growing mushrooms?
The best substrate depends on the mushroom species you are growing. Oyster mushrooms thrive on straw, coffee grounds, and cardboard. Shiitake mushrooms require hardwood sawdust or logs. Wine cap mushrooms prefer wood chips. When choosing a substrate, make sure it is clean and free from contaminants. Pasteurizing or sterilizing the substrate before inoculation is essential to prevent the growth of unwanted molds and bacteria.
How do I prevent contamination in my mushroom growing setup?
Contamination is a common challenge in mushroom cultivation. To minimize the risk of contamination, it’s crucial to maintain a clean and sterile environment. Pasteurize or sterilize your substrate before inoculation. Use sterile techniques when handling the spawn and substrate. Ensure proper ventilation in your fruiting chamber to prevent the buildup of moisture, which can promote mold growth. Regularly inspect your setup for signs of contamination, such as green, black, or orange mold. If you detect contamination, remove the affected area immediately to prevent it from spreading.
Can I use coffee grounds to grow mushrooms?
Yes, coffee grounds are an excellent substrate for growing oyster mushrooms. They are readily available, rich in nutrients, and have already been pasteurized during the brewing process. To use coffee grounds, collect them from your local coffee shop or home brewing setup. Mix them with other substrates like straw or sawdust to provide additional nutrients and structure. Make sure the coffee grounds are fresh and free from mold.
How often should I water my mushrooms?
You should water your mushrooms regularly to maintain high humidity levels. Mist the fruiting chamber with water several times a day, especially when the air is dry. Avoid overwatering, as this can lead to mold growth. The goal is to keep the substrate moist but not waterlogged.
How do I know when my mushrooms are ready to harvest?
Mushrooms are typically ready to harvest when the caps have fully opened and the edges are starting to curl upwards. The exact timing depends on the mushroom species. Oyster mushrooms are usually harvested when the caps are about 2-4 inches in diameter. Shiitake mushrooms are harvested when the caps have flattened out and the gills are visible.
What can I do with my spent mushroom substrate?
Spent mushroom substrate is a valuable resource that can be used as compost in your garden. It is rich in nutrients and beneficial microorganisms that can improve soil health. You can also use it as mulch around plants to help retain moisture and suppress weeds. Alternatively, you can add it to your compost pile to enrich the compost.
Leave a Comment