
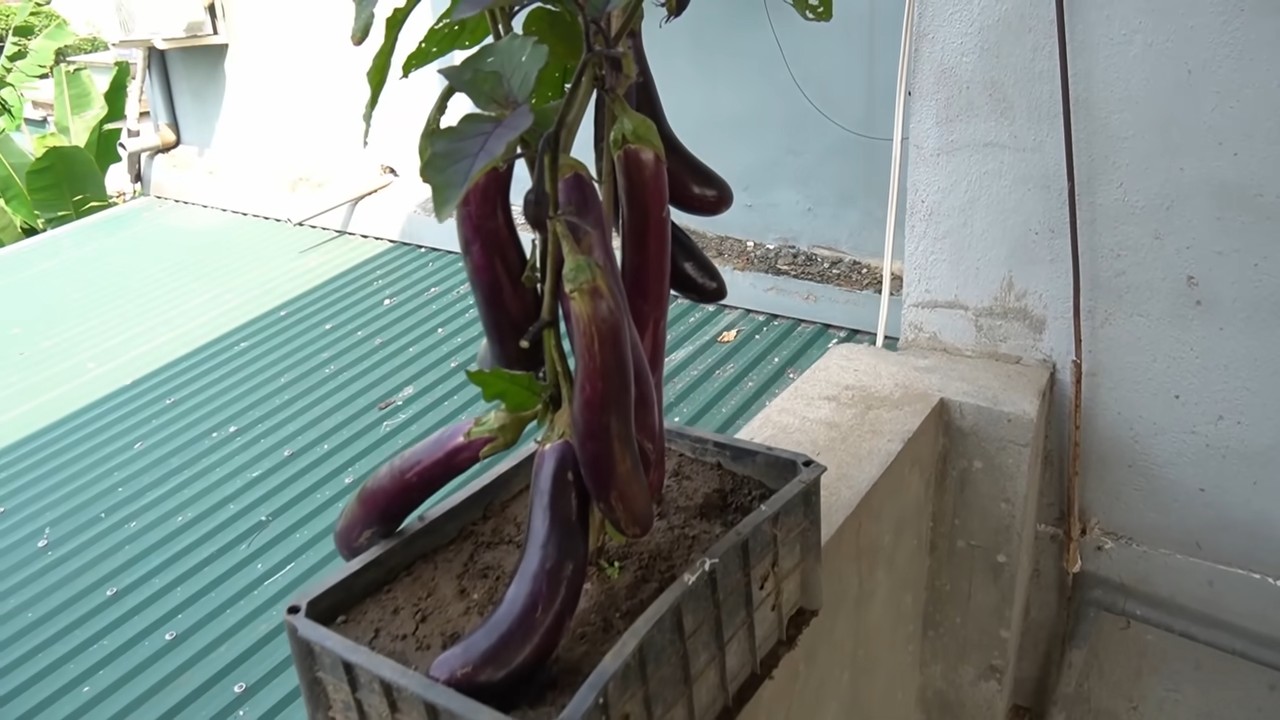
No Dig Eggplant Bucket Garden: Imagine harvesting plump, juicy eggplants right from your patio, balcony, or even a sunny corner of your kitchen! Forget back-breaking tilling and endless weeding – we’re diving into the wonderful world of no-dig gardening, specifically tailored for growing eggplants in buckets.
For centuries, container gardening has allowed people to cultivate food and beauty in limited spaces. From the hanging gardens of Babylon to the humble window boxes of today, the desire to connect with nature and grow our own food is deeply ingrained in the human spirit. But let’s face it, traditional gardening can be intimidating, especially for beginners. That’s where this DIY trick comes in!
This No Dig Eggplant Bucket Garden method is a game-changer because it simplifies the entire process. No more wrestling with heavy soil, battling weeds, or worrying about poor soil quality. We’ll show you how to create the perfect growing environment for your eggplants in a simple bucket, using readily available materials. This is perfect for apartment dwellers, those with limited mobility, or anyone who simply wants a low-effort, high-reward gardening experience. Ready to get your hands dirty (well, not too dirty!) and enjoy fresh, homegrown eggplants? Let’s get started!
No-Dig Eggplant Bucket Garden: Grow Your Own Delicious Eggplants Anywhere!
Hey there, fellow gardening enthusiasts! Are you dreaming of fresh, homegrown eggplants but lack the space or the energy for traditional in-ground gardening? Well, I’ve got fantastic news for you! I’m going to walk you through creating a super easy and productive no-dig eggplant bucket garden. This method is perfect for beginners, apartment dwellers, or anyone who wants a low-maintenance way to enjoy these beautiful purple veggies. Let’s get started!
What You’ll Need: The Supply List
Before we dive in, let’s gather all the necessary materials. Trust me, having everything ready beforehand will make the whole process smoother and more enjoyable.
* Buckets: 5-gallon buckets are ideal. You can use new ones from a hardware store or recycle old ones (just make sure they’re clean and food-safe if they previously held anything questionable). I usually aim for at least 3 buckets to start, allowing for a decent harvest.
* Eggplant Seedlings: Purchase healthy eggplant seedlings from a local nursery or garden center. Choose varieties that are well-suited to your climate. I personally love ‘Black Beauty’ for its classic flavor and reliable production.
* Potting Mix: This is crucial! Don’t use garden soil directly in your buckets. A high-quality potting mix provides the right drainage and aeration for healthy root growth. Look for a mix that contains peat moss, perlite, and vermiculite.
* Compost: Compost is your secret weapon for nutrient-rich soil. It adds essential organic matter and beneficial microbes to your growing medium. You can use homemade compost or purchase it from a garden center.
* Slow-Release Fertilizer: A slow-release fertilizer will provide your eggplants with a steady supply of nutrients throughout the growing season. Choose a balanced fertilizer specifically formulated for vegetables.
* Watering Can or Hose: Essential for keeping your eggplants hydrated.
* Drill (Optional): For drainage holes, if your buckets don’t already have them.
* Landscape Fabric or Weed Barrier (Optional): To line the bottom of the buckets and prevent soil from washing out.
* Mulch (Optional): Straw, wood chips, or shredded leaves to help retain moisture and suppress weeds.
* Stakes or Tomato Cages (Optional): Eggplants can get quite heavy with fruit, so staking or caging them can provide support.
Step-by-Step Guide: Building Your Eggplant Bucket Garden
Okay, now for the fun part! Let’s get our hands dirty and create these amazing eggplant bucket gardens.
1. Prepare the Buckets:
* Drainage: If your buckets don’t already have drainage holes, drill several (about 4-6) evenly spaced holes in the bottom. This is absolutely essential to prevent waterlogging, which can lead to root rot.
* Lining (Optional): If you’re concerned about soil washing out through the drainage holes, line the bottom of each bucket with a piece of landscape fabric or weed barrier. Simply cut a circle slightly larger than the bottom of the bucket and place it inside.
2. Create the Soil Mixture:
* The Magic Ratio: In a large container or wheelbarrow, mix together the potting mix, compost, and slow-release fertilizer. A good ratio is roughly 2 parts potting mix, 1 part compost, and follow the instructions on your fertilizer package for the correct amount. I usually eyeball it, but aim for a well-blended mixture that looks rich and dark.
* Mix Thoroughly: Use a shovel or your hands (wearing gloves, of course!) to thoroughly combine all the ingredients. Make sure the fertilizer is evenly distributed throughout the mixture.
3. Fill the Buckets:
* Layering: Start by adding a layer of the soil mixture to the bottom of each bucket, filling it about halfway.
* Compost Boost: Add a layer of pure compost on top of the soil mixture. This will provide an extra boost of nutrients to the eggplant roots.
* Top it Off: Finish filling the buckets with the remaining soil mixture, leaving about an inch or two of space at the top. This will make watering easier and prevent soil from splashing out.
4. Plant the Eggplant Seedlings:
* Gentle Removal: Carefully remove the eggplant seedlings from their nursery pots. Gently loosen the roots with your fingers to encourage them to spread out.
* Planting Depth: Dig a hole in the center of each bucket that is large enough to accommodate the root ball of the seedling. Place the seedling in the hole, ensuring that the top of the root ball is level with the surface of the soil.
* Backfill and Water: Gently backfill the hole with soil, firming it around the base of the plant. Water thoroughly to settle the soil and help the roots establish.
5. Mulch (Optional):
* Moisture Retention: Apply a layer of mulch around the base of each eggplant plant. This will help retain moisture in the soil, suppress weeds, and regulate soil temperature.
* Application: Spread the mulch evenly around the plant, keeping it a few inches away from the stem to prevent rot.
6. Staking or Caging (Optional):
* Support System: Eggplants can become quite heavy with fruit, so providing support is a good idea, especially for larger varieties.
* Installation: Insert a stake next to each plant or place a tomato cage around it. As the plant grows, tie the stems to the stake or guide them through the cage to provide support.
7. Watering and Sunlight:
* Consistent Moisture: Eggplants need consistent moisture to thrive. Water deeply whenever the top inch of soil feels dry to the touch. Avoid overwatering, as this can lead to root rot.
* Sunlight is Key: Place your eggplant buckets in a location that receives at least 6-8 hours of direct sunlight per day. This is crucial for healthy growth and abundant fruit production.
Ongoing Care: Keeping Your Eggplants Happy and Healthy
Now that your eggplant bucket garden is set up, it’s important to provide ongoing care to ensure a bountiful harvest.
* Watering: As mentioned earlier, water deeply and regularly, especially during hot, dry weather. Check the soil moisture frequently and adjust your watering schedule accordingly.
* Fertilizing: Even with slow-release fertilizer, your eggplants will benefit from supplemental feeding throughout the growing season. Use a liquid fertilizer specifically formulated for vegetables every 2-3 weeks. Follow the instructions on the fertilizer package for the correct dosage.
* Pest Control: Keep an eye out for common eggplant pests, such as aphids, flea beetles, and spider mites. If you notice any infestations, take action promptly. You can use insecticidal soap, neem oil, or other organic pest control methods. I always prefer organic options whenever possible.
* Weed Control: Although the mulch will help suppress weeds, you may still need to pull out any that pop up. Be sure to remove them carefully to avoid disturbing the eggplant roots.
* Pruning: Pruning can help improve air circulation and encourage fruit production. Remove any yellowing or dead leaves, as well as any suckers (small shoots that grow from the base of the plant).
* Pollination: Eggplants are self-pollinating, but you can help them along by gently shaking the plants or using a small paintbrush to transfer pollen from one flower to another. This is especially helpful in enclosed spaces or during periods of high humidity.
Harvesting Your Eggplants: The Moment of Truth!
The best part of growing your own eggplants is, of course, harvesting them!
* Timing is Everything: Eggplants are typically ready to harvest about 60-80 days after transplanting, depending on the variety. Look for fruits that are firm, glossy, and have a deep, rich color.
* Size Matters: Harvest eggplants when they are the size you prefer. Smaller eggplants tend to be more tender and less bitter than larger ones.
* Gentle Harvesting: Use a sharp knife or pruning shears to cut the eggplant from the plant, leaving a small stem attached. Be careful not to damage the plant or the other fruits.
* Enjoy Your Bounty: Once harvested, eggplants can be stored in the refrigerator for up to a week. Use them in your favorite recipes, such as eggplant parmesan, ratatouille, or grilled eggplant slices.
Troubleshooting: Common Issues and Solutions
Even with the best care, you may encounter some challenges along the way. Here are a few common issues and how to address them:
* Yellowing Leaves: This can be caused by overwatering, underwatering, nutrient deficiencies, or pests. Check the soil moisture, fertilize as needed, and inspect the plants for pests.
* Blossom

Conclusion
So, there you have it! Creating your own no-dig eggplant bucket garden is not just a fun project; it’s a game-changer for anyone looking to enjoy fresh, homegrown eggplants without the back-breaking labor and space constraints of traditional gardening. We’ve walked you through the simple steps, highlighting how accessible and rewarding this method can be.
Why is this DIY trick a must-try? Because it democratizes gardening. Whether you’re a seasoned green thumb or a complete beginner, this method eliminates the intimidation factor. You don’t need acres of land, specialized tools, or a deep understanding of soil science. All you need are a few buckets, some readily available materials, and a little bit of sunshine.
Beyond the ease of setup, the no-dig eggplant bucket garden offers incredible flexibility. You can easily move your eggplants around to chase the sun, protect them from unexpected frost, or even bring them indoors during extreme weather. This level of control is simply not possible with in-ground gardening. Furthermore, the contained environment minimizes weed growth and makes pest control significantly easier.
But the benefits don’t stop there. This method is also incredibly water-efficient. The bucket system allows for targeted watering, reducing water waste and ensuring that your eggplants receive the precise amount of moisture they need. This is particularly important in regions with water scarcity or during periods of drought.
Ready to take your eggplant cultivation to the next level? Consider these variations:
* **Companion Planting:** Plant basil or marigolds in the same bucket as your eggplant. These companion plants can help deter pests and attract beneficial insects.
* **Vertical Support:** As your eggplant grows, it may need some support. Use bamboo stakes or a small trellis to provide vertical support and prevent the branches from breaking under the weight of the fruit.
* **Fertilizer Boost:** While the initial soil mix provides a good foundation, your eggplants will benefit from regular fertilization. Use a balanced, slow-release fertilizer or a liquid fertilizer specifically formulated for fruiting vegetables.
* **Variety is the Spice of Life:** Don’t limit yourself to just one type of eggplant! Experiment with different varieties, such as Japanese eggplant, Italian eggplant, or even white eggplant. Each variety offers a unique flavor and texture.
Ultimately, the no-dig eggplant bucket garden is a testament to the power of simple, sustainable gardening practices. It’s a way to connect with nature, grow your own food, and enjoy the satisfaction of harvesting fresh, delicious eggplants right from your own backyard (or balcony!).
We wholeheartedly encourage you to give this DIY trick a try. It’s an investment in your health, your well-being, and your connection to the natural world. And most importantly, it’s a lot of fun!
Once you’ve set up your own no-dig eggplant bucket garden, we’d love to hear about your experience. Share your photos, tips, and challenges in the comments below. Let’s build a community of eggplant enthusiasts and inspire others to embrace the joy of homegrown produce. Remember, the best way to learn is by doing, and the best way to improve is by sharing. So, get your buckets ready, plant those seeds, and let’s grow some amazing eggplants together! This **no-dig eggplant bucket garden** is waiting for you!
Frequently Asked Questions (FAQ)
What kind of buckets should I use?
Ideally, you should use food-grade buckets that are at least 5 gallons in size. Five-gallon buckets provide enough space for the eggplant’s root system to develop properly. Avoid using buckets that have previously contained chemicals or other potentially harmful substances. If you’re unsure, it’s best to purchase new buckets specifically for gardening. Make sure the buckets are dark in color to prevent algae growth. You can also drill drainage holes in the bottom of the buckets to ensure proper water drainage.
What kind of soil should I use?
A well-draining potting mix is essential for successful eggplant growth in buckets. Avoid using garden soil, as it can become compacted and restrict root growth. A good potting mix typically consists of a blend of peat moss, perlite, and vermiculite. You can also add compost to the mix to provide additional nutrients. A good ratio is 2 parts potting mix, 1 part compost, and 1 part perlite. This will provide good drainage and aeration for the roots.
How often should I water my eggplant bucket garden?
The frequency of watering will depend on the weather conditions and the size of your eggplant. Generally, you should water your eggplants when the top inch of soil feels dry to the touch. During hot, dry weather, you may need to water them daily. Be sure to water deeply, allowing the water to drain out of the bottom of the bucket. Avoid overwatering, as this can lead to root rot. A good rule of thumb is to water until you see water draining from the drainage holes.
How much sunlight do eggplants need?
Eggplants require at least 6-8 hours of direct sunlight per day to thrive. Choose a location for your bucket garden that receives plenty of sunlight throughout the day. If you live in a particularly hot climate, you may need to provide some afternoon shade to prevent the eggplants from getting scorched. You can use shade cloth or move the buckets to a shadier location during the hottest part of the day.
How do I fertilize my eggplant bucket garden?
Eggplants are heavy feeders and require regular fertilization to produce abundant fruit. Start fertilizing your eggplants about two weeks after transplanting them into the buckets. Use a balanced, slow-release fertilizer or a liquid fertilizer specifically formulated for fruiting vegetables. Follow the instructions on the fertilizer package for application rates. You can also supplement with compost tea or other organic fertilizers. Fertilize every 2-3 weeks throughout the growing season.
How do I protect my eggplants from pests and diseases?
Regularly inspect your eggplants for signs of pests or diseases. Common pests that affect eggplants include aphids, flea beetles, and spider mites. You can control these pests with insecticidal soap, neem oil, or by handpicking them off the plants. Diseases that can affect eggplants include fungal diseases such as powdery mildew and early blight. Prevent these diseases by providing good air circulation, avoiding overhead watering, and applying a fungicide if necessary. Companion planting with basil or marigolds can also help deter pests.
When can I harvest my eggplants?
Eggplants are typically ready to harvest about 60-80 days after transplanting. The exact timing will depend on the variety of eggplant you are growing. Harvest your eggplants when they are firm, glossy, and have reached their mature size. The skin should be smooth and unblemished. Use a sharp knife or pruning shears to cut the eggplant from the plant, leaving a small stem attached. Overripe eggplants will become bitter and seedy.
Can I grow other vegetables in buckets using the no-dig method?
Absolutely! The no-dig bucket gardening method is versatile and can be used to grow a wide variety of vegetables, including tomatoes, peppers, cucumbers, and herbs. The key is to choose the right size bucket for the specific vegetable you are growing and to provide adequate support if needed. Research the specific needs of each vegetable to ensure optimal growth.
What do I do with the soil at the end of the growing season?
At the end of the growing season, you can reuse the soil in your no-dig eggplant bucket garden. Remove any remaining plant debris and mix in some fresh compost or other organic matter to replenish the nutrients. You can also add a soil amendment such as bone meal or rock phosphate to improve the soil’s fertility. Alternatively, you can use the soil to amend your garden beds or compost it for future use.
Is this method suitable for small spaces like balconies or patios?
Yes, absolutely! One of the biggest advantages of the no-dig eggplant bucket garden is its suitability for small spaces. It’s perfect for balconies, patios, decks, or any other area with limited space. The buckets are easy to move around, allowing you to maximize sunlight exposure and protect your plants from harsh weather. This method allows anyone, regardless of their living situation, to enjoy the benefits of homegrown eggplants.

Leave a Comment