
Peanut sprouts DIY guide: Ever thought about growing your own crunchy, nutritious sprouts right in your kitchen? It’s easier than you think, and I’m here to show you how! Forget those bland store-bought sprouts; imagine the satisfaction of harvesting your own fresh, flavorful peanut sprouts.
Sprouting, in general, has a rich history, dating back thousands of years in various cultures, particularly in Asia. It was a clever way to enhance the nutritional value of grains and legumes, making them more digestible and packed with vitamins. Think of it as ancient food alchemy! Now, while peanut sprouts might not be as historically prominent as other sprouts, they offer a unique twist on this age-old practice.
Why should you try this peanut sprouts DIY guide? Well, for starters, peanut sprouts are nutritional powerhouses! They’re loaded with vitamins, minerals, and enzymes, and the sprouting process actually increases their bioavailability, meaning your body can absorb them more easily. Plus, in today’s world, where we’re all looking for ways to eat healthier and be more sustainable, growing your own food, even in small batches, is a fantastic step. It’s a fun, rewarding project that connects you to your food source and provides you with a delicious, healthy snack. So, let’s dive in and unlock the secrets to growing your own peanut sprouts!
Erdnussprossen selber ziehen: Eine einfache Schritt-für-Schritt-Anleitung
Hallo liebe Pflanzenfreunde! Habt ihr schon mal daran gedacht, Erdnussprossen selber zu ziehen? Es ist einfacher als ihr denkt und eine tolle Möglichkeit, eure eigenen frischen und gesunden Snacks zu produzieren. Erdnussprossen sind nicht nur lecker, sondern auch reich an Vitaminen, Mineralien und Proteinen. In diesem Artikel zeige ich euch, wie ihr mit wenigen Handgriffen eure eigenen Erdnussprossen ziehen könnt. Los geht’s!
Was ihr für die Erdnussprossenzucht benötigt:
* Rohe, ungesalzene Erdnüsse: Achtet darauf, dass die Erdnüsse unbehandelt und nicht geröstet sind. Am besten eignen sich Bio-Erdnüsse.
* Ein Keimglas oder ein anderes geeignetes Gefäß: Ein Einmachglas, ein spezielles Sprossenglas oder sogar eine Plastikschale mit Löchern im Boden funktionieren gut.
* Ein feinmaschiges Sieb oder ein Stück Gaze: Zum Abdecken des Glases und zum Abgießen des Wassers.
* Sauberes Wasser: Am besten gefiltertes Wasser oder abgekochtes, abgekühltes Wasser.
* Ein dunkler, warmer Ort: Erdnussprossen keimen am besten im Dunkeln.
* Geduld: Die Keimung dauert ein paar Tage.
Schritt-für-Schritt-Anleitung zur Erdnussprossenzucht
1. Die Erdnüsse vorbereiten:
* Zuerst solltet ihr die Erdnüsse gründlich unter fließendem Wasser abspülen. So entfernt ihr eventuelle Verunreinigungen.
* Anschließend gebt ihr die Erdnüsse in ein Gefäß und bedeckt sie mit reichlich Wasser. Lasst die Erdnüsse für 8-12 Stunden einweichen. Das Einweichen weicht die Schale auf und erleichtert die Keimung. Ich lasse sie meistens über Nacht einweichen.
* Nach dem Einweichen gießt ihr das Wasser ab und spült die Erdnüsse erneut gründlich ab.
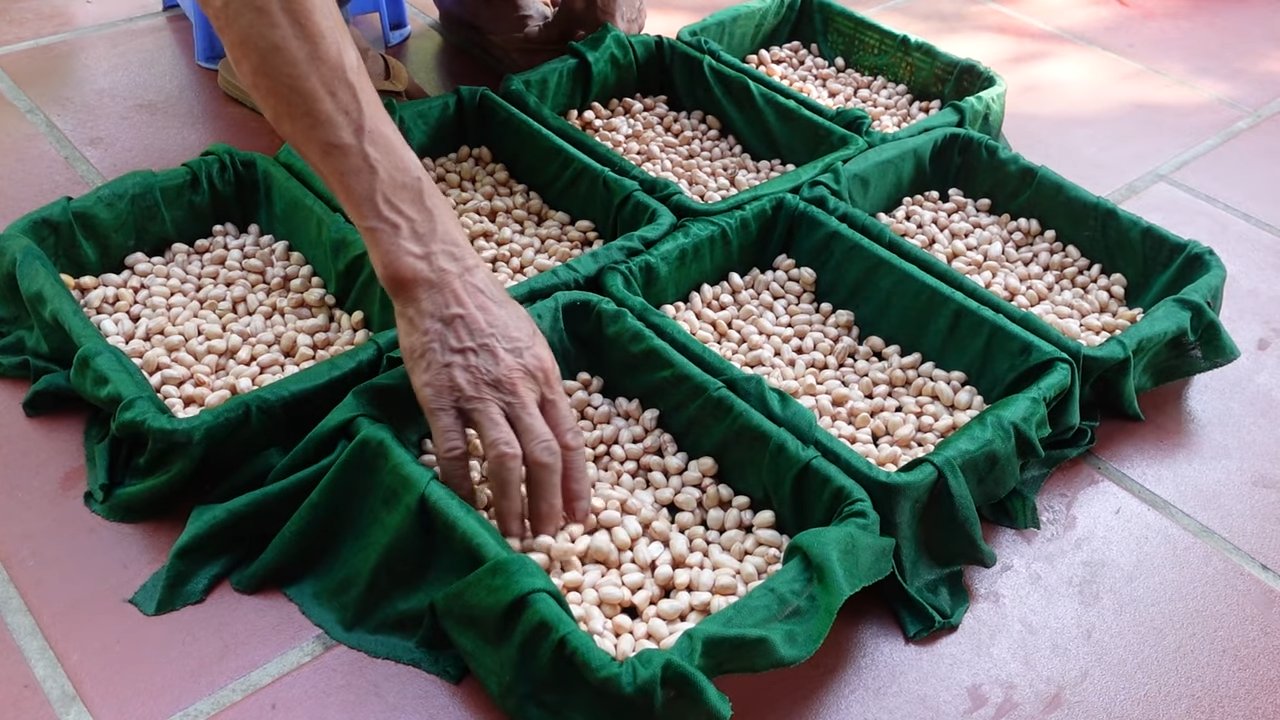
2. Das Keimglas vorbereiten:
* Reinigt euer Keimglas oder das gewählte Gefäß gründlich mit heißem Wasser und Spülmittel. Spült es anschließend gut aus, um alle Spülmittelreste zu entfernen.
* Gebt die eingeweichten und abgespülten Erdnüsse in das Keimglas. Achtet darauf, dass das Glas nicht zu voll ist, da die Erdnüsse beim Keimen noch an Volumen zunehmen. Ich fülle das Glas meistens nur zu etwa einem Viertel.
* Bedeckt die Öffnung des Glases mit einem feinmaschigen Sieb oder einem Stück Gaze und befestigt es mit einem Gummiband. Das Sieb oder die Gaze verhindert, dass die Erdnüsse herausfallen, und ermöglicht gleichzeitig eine gute Belüftung.
3. Die Erdnüsse spülen und keimen lassen:
* Spült die Erdnüsse mindestens zweimal täglich mit frischem Wasser. Füllt das Glas mit Wasser, schwenkt es vorsichtig, um alle Erdnüsse zu benetzen, und gießt das Wasser dann durch das Sieb oder die Gaze ab.
* Stellt das Keimglas an einen dunklen, warmen Ort. Eine Temperatur von 20-25 Grad Celsius ist ideal. Vermeidet direkte Sonneneinstrahlung, da diese die Keimung behindern kann. Ich stelle mein Keimglas meistens in einen Küchenschrank.
* Wiederholt das Spülen und Abgießen zweimal täglich für die nächsten 3-5 Tage. Ihr werdet sehen, wie die Erdnüsse langsam zu keimen beginnen. Die kleinen Sprossen werden sichtbar.
* Achtet darauf, dass die Erdnüsse immer feucht, aber nicht zu nass sind. Staunässe kann zu Schimmelbildung führen.
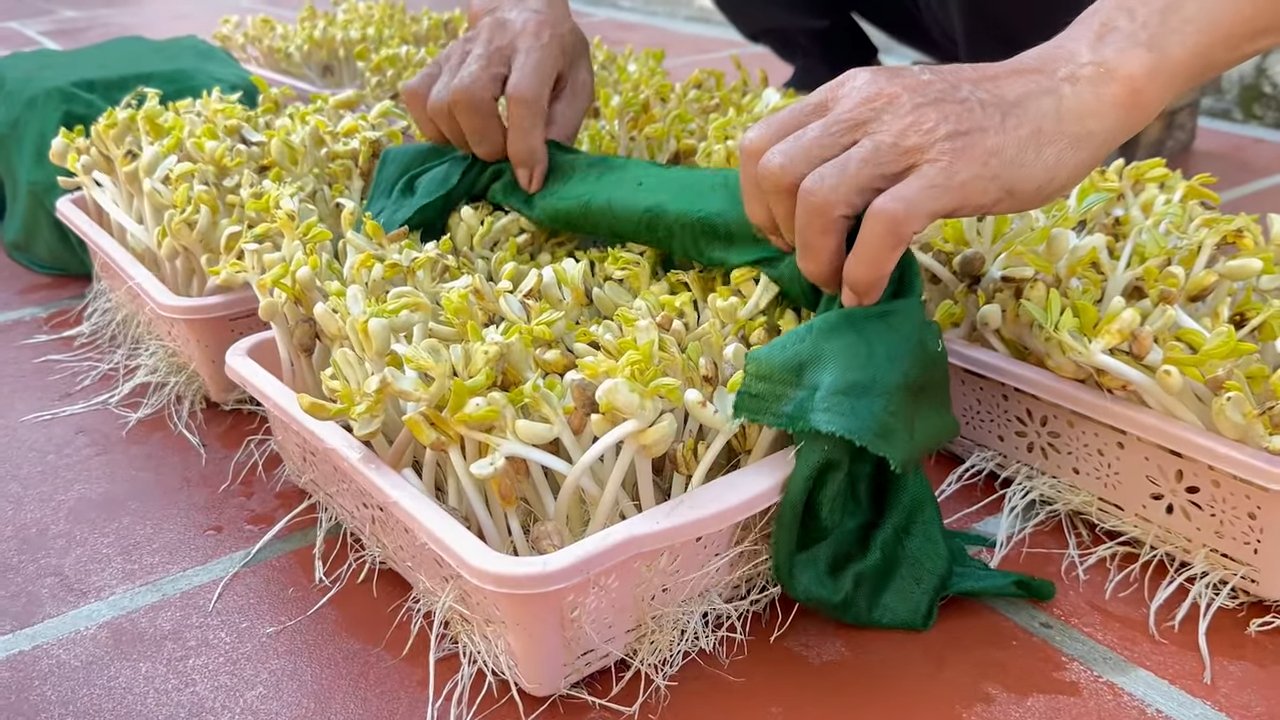
4. Die Erdnussprossen ernten und lagern:
* Sobald die Sprossen die gewünschte Länge erreicht haben (meistens nach 3-5 Tagen), könnt ihr die Erdnussprossen ernten.
* Spült die Erdnussprossen noch einmal gründlich unter fließendem Wasser ab.
* Entfernt eventuelle Schalenreste.
* Lasst die Erdnussprossen gut abtropfen.
* Bewahrt die Erdnussprossen in einem luftdichten Behälter im Kühlschrank auf. Sie sind dort etwa 3-5 Tage haltbar.
Tipps und Tricks für die erfolgreiche Erdnussprossenzucht
* Die Qualität der Erdnüsse: Achtet unbedingt auf die Qualität der Erdnüsse. Verwendet nur rohe, ungesalzene und unbehandelte Erdnüsse. Bio-Erdnüsse sind die beste Wahl.
* Die richtige Temperatur: Die ideale Temperatur für die Keimung liegt zwischen 20 und 25 Grad Celsius. Vermeidet zu hohe oder zu niedrige Temperaturen.
* Die richtige Feuchtigkeit: Die Erdnüsse müssen immer feucht sein, aber nicht zu nass. Spült sie regelmäßig, aber achtet darauf, dass kein Wasser im Glas stehen bleibt.
* Die Hygiene: Achtet auf eine gute Hygiene, um Schimmelbildung zu vermeiden. Reinigt das Keimglas regelmäßig und spült die Erdnüsse gründlich ab.
* Die Dunkelheit: Erdnussprossen keimen am besten im Dunkeln. Stellt das Keimglas an einen dunklen Ort.
* Die Geduld: Die Keimung dauert ein paar Tage. Habt Geduld und gebt nicht auf, wenn die Sprossen nicht sofort wachsen.
Verwendungsmöglichkeiten für Erdnussprossen
Erdnussprossen sind vielseitig verwendbar und können in verschiedenen Gerichten verwendet werden. Hier sind ein paar Ideen:
* Roh als Snack: Erdnussprossen sind ein gesunder und leckerer Snack für zwischendurch.
* Im Salat: Erdnussprossen verleihen Salaten eine knackige Textur und einen nussigen Geschmack.
* Im Wok: Erdnussprossen sind eine tolle Zutat für Wok-Gerichte.
* In Suppen: Erdnussprossen können Suppen mit zusätzlichen Nährstoffen und Geschmack bereichern.
* Auf Sandwiches: Erdnussprossen sind eine gesunde und leckere Ergänzung für Sandwiches.
* Als Garnitur: Erdnussprossen können als Garnitur für verschiedene Gerichte verwendet werden.
Häufige Probleme und Lösungen
* Schimmelbildung: Schimmelbildung ist ein häufiges Problem bei der Sprossenzucht. Um Schimmelbildung zu vermeiden, solltet ihr auf eine gute Hygiene achten, die Erdnüsse regelmäßig spülen und sicherstellen, dass kein Wasser im Glas stehen bleibt. Wenn ihr Schimmel entdeckt, solltet ihr die betroffenen Erdnüsse sofort entfernen und das Glas gründlich reinigen.
* Keine Keimung: Wenn die Erdnüsse nicht keimen, kann das verschiedene Ursachen haben. Möglicherweise sind die Erdnüsse zu alt oder wurden falsch gelagert. Achtet darauf, frische und qualitativ hochwertige Erdnüsse zu verwenden. Eine weitere Ursache könnte eine zu niedrige Temperatur sein. Stellt das Keimglas an einen wärmeren Ort.
* Verfaulte Erdnüsse: Wenn die Erdnüsse verfaulen, kann das an einer zu hohen Feuchtigkeit liegen. Spült die Erdnüsse weniger häufig und achtet darauf, dass kein Wasser im Glas stehen bleibt.
Fazit
Erdnussprossen selber zu ziehen ist eine einfache und lohnende Möglichkeit, eure eigenen frischen und gesunden Snacks zu produzieren. Mit dieser Schritt-für-Schritt-Anleitung und den Tipps und Tricks könnt ihr ganz einfach eure eigenen Erdnussprossen ziehen und genießen. Probiert es aus und lasst es euch schmecken! Ich wünsche euch viel Erfolg bei der Erdnussprossenzucht!
Conclusion
So, there you have it! Cultivating your own peanut sprouts is not just a fun project; it’s a gateway to a world of fresh, nutritious, and surprisingly versatile ingredients right in your own kitchen. We’ve walked you through the simple steps, highlighting the ease and accessibility of this rewarding DIY endeavor. Forget those bland, store-bought sprouts – with this method, you’re in control of the entire process, ensuring the highest quality and freshest flavor.
Why is this peanut sprouts DIY trick a must-try? Because it empowers you to take control of your food source, reduces your reliance on commercially produced sprouts (which can sometimes be associated with food safety concerns), and unlocks a treasure trove of culinary possibilities. The vibrant, nutty flavor of freshly sprouted peanuts adds a unique dimension to salads, stir-fries, sandwiches, and even smoothies. Plus, you’ll be amazed at the nutritional boost these little sprouts provide. They’re packed with vitamins, minerals, and enzymes, making them a powerhouse of goodness for your body.
But the beauty of this DIY project lies in its adaptability. Feel free to experiment with different soaking times to achieve your preferred level of sprout development. Some prefer shorter sprouts with a more subtle flavor, while others enjoy longer, more pronounced sprouts. You can also try sprouting different varieties of peanuts to discover unique flavor profiles. Consider adding a touch of spice to your soaking water – a pinch of chili flakes or a clove of garlic can infuse your sprouts with a subtle kick.
Don’t be afraid to get creative in the kitchen! Use your peanut sprouts as a crunchy topping for your favorite Asian-inspired dishes. Blend them into a creamy peanut butter alternative. Or simply enjoy them as a healthy and satisfying snack. The possibilities are truly endless.
We wholeheartedly encourage you to embark on this peanut sprouts DIY adventure. It’s a simple, rewarding, and delicious way to connect with your food and enhance your culinary repertoire. Once you’ve experienced the joy of growing your own sprouts, you’ll never look at store-bought sprouts the same way again.
And most importantly, we want to hear about your experience! Share your photos, tips, and recipes with us in the comments below. Let’s build a community of sprout enthusiasts and inspire others to discover the magic of homemade peanut sprouts. What variations did you try? What dishes did you create? Your insights and experiences will help others succeed and unlock even more potential from this amazing DIY trick. So, grab a bag of peanuts, follow our simple guide, and get ready to sprout your way to a healthier and more delicious life!
Frequently Asked Questions (FAQ)
1. What kind of peanuts should I use for sprouting?
The best peanuts for sprouting are raw, unroasted, and unsalted peanuts. Look for peanuts that are specifically labeled as “raw” or “unprocessed.” Avoid peanuts that have been roasted, salted, or flavored in any way, as these treatments can inhibit germination. Organic peanuts are also a great choice, ensuring that your sprouts are free from pesticides and other harmful chemicals. Spanish peanuts, Virginia peanuts, or Valencia peanuts all work well. Just make sure they are raw!
2. How long does it take for peanuts to sprout?
The sprouting process typically takes between 2 to 5 days, depending on the temperature and humidity of your environment. Warmer temperatures will generally speed up the process, while cooler temperatures may slow it down. It’s important to monitor your sprouts closely and rinse them regularly to prevent mold growth. You’ll know they’re ready when the sprouts are about 1/2 to 1 inch long.
3. How often should I rinse the peanuts during the sprouting process?
Rinsing is crucial for preventing mold and bacteria growth. You should rinse your peanuts at least twice a day, preferably in the morning and evening. Use cool, clean water and make sure to drain the peanuts thoroughly after each rinse. This helps to remove any accumulated moisture and prevent spoilage.
4. What if I see mold growing on my peanuts?
If you notice any signs of mold growth, such as fuzzy white or green patches, it’s best to discard the entire batch of peanuts. Mold can produce toxins that are harmful to your health. It’s always better to be safe than sorry. To prevent mold growth, ensure that you are rinsing the peanuts regularly and providing adequate ventilation.
5. How do I store peanut sprouts after they have sprouted?
Once your peanut sprouts have reached your desired length, you can store them in the refrigerator for up to a week. To store them properly, rinse them thoroughly and drain them well. Then, place them in a clean, airtight container lined with a paper towel. The paper towel will help to absorb any excess moisture and keep the sprouts fresh.
6. Are there any health benefits to eating peanut sprouts?
Yes, peanut sprouts are packed with nutrients and offer a variety of health benefits. They are a good source of protein, fiber, vitamins, and minerals. Sprouting increases the bioavailability of these nutrients, making them easier for your body to absorb. Peanut sprouts are also rich in enzymes, which aid in digestion. Some studies suggest that peanut sprouts may have antioxidant and anti-inflammatory properties.
7. Can I eat the entire peanut sprout, including the peanut itself?
Yes, you can eat the entire peanut sprout, including the peanut itself. The peanut will become softer and more digestible during the sprouting process. However, some people may find the taste of the peanut skin to be slightly bitter. If you prefer, you can remove the skin before eating the sprouts.
8. What are some creative ways to use peanut sprouts in my cooking?
Peanut sprouts are incredibly versatile and can be used in a variety of dishes. They can be added to salads, stir-fries, sandwiches, and wraps. They can also be blended into smoothies or used as a topping for soups and stews. For a unique twist, try pickling your peanut sprouts or using them to make a peanut sprout salad with a tangy vinaigrette.
9. Can I sprout other types of nuts and seeds using the same method?
Yes, the same basic method can be used to sprout other types of nuts and seeds, such as almonds, sunflower seeds, and lentils. However, the soaking and sprouting times may vary depending on the type of nut or seed. It’s always best to research the specific requirements for each type of nut or seed before starting the sprouting process.
10. Is it safe to eat peanut sprouts if I have a peanut allergy?
No, if you have a peanut allergy, you should avoid eating peanut sprouts. Sprouting does not eliminate the allergens that cause allergic reactions. Even a small amount of peanut sprout can trigger a severe allergic reaction in individuals with peanut allergies. Always consult with your doctor or allergist if you have any concerns about food allergies.
Leave a Comment