
Potato growing no garden? Absolutely! Imagine harvesting a bounty of fresh, earthy potatoes right from your balcony or patio, even without a traditional garden plot. It sounds like a dream, right? Well, it’s a dream that’s easily within reach with a few clever DIY tricks!
For centuries, potatoes have been a staple food source across the globe, originating in the Andes Mountains of South America. They’ve nourished civilizations and fueled culinary traditions. But you don’t need acres of farmland to participate in this rich history. I’m here to show you how to bring the joy of potato cultivation to your own home, regardless of space limitations.
In today’s world, where access to fresh, healthy produce can sometimes be a challenge, learning how to grow your own food is more important than ever. Plus, let’s be honest, there’s something incredibly satisfying about nurturing a plant from seed (or in this case, a seed potato!) to harvest. This DIY guide will provide you with simple, effective methods for potato growing no garden, using containers, grow bags, and other innovative solutions.
So, if you’re ready to ditch the store-bought spuds and embark on a rewarding gardening adventure, even without a traditional garden, keep reading! I’ll walk you through everything you need to know to successfully grow your own delicious potatoes, no matter how small your space may be.
Growing Potatoes in a Bag: No Garden? No Problem!
Hey there, fellow gardening enthusiasts! Ever dreamt of harvesting your own homegrown potatoes but thought you needed a sprawling garden to do it? Well, I’m here to tell you that’s simply not true! You can absolutely grow delicious potatoes even if you only have a balcony, patio, or even just a sunny corner indoors. The secret? Growing them in a bag! It’s a super fun, easy, and rewarding project, and I’m going to walk you through every step.
What You’ll Need: The Potato Growing Arsenal
Before we dive in, let’s gather our supplies. This is a pretty low-cost project, which is always a win in my book!
* A Large Bag: Think big! You’ll need a sturdy bag, ideally made of burlap, heavy-duty plastic (like a builder’s bag), or even a large grow bag specifically designed for potatoes. Aim for a bag that’s at least 2 feet in diameter and 2-3 feet tall. The bigger, the better, as it gives the potatoes plenty of room to grow. I’ve even used old compost bags successfully!
* Seed Potatoes: These aren’t just any potatoes you find at the grocery store. Seed potatoes are specifically grown for planting and are certified disease-free. You can find them at your local garden center or online. Choose a variety you love to eat! I personally love Yukon Gold for their creamy texture and all-purpose use.
* Potting Mix: This is crucial! Don’t use garden soil, as it’s too heavy and doesn’t drain well in a container. Opt for a high-quality potting mix that’s light, airy, and well-draining. You can also amend it with compost for extra nutrients.
* Compost (Optional but Recommended): Compost is like a superfood for your potatoes! It adds essential nutrients and improves soil structure.
* Water: Obvious, but important! You’ll need a consistent water source to keep your potatoes happy and hydrated.
* Sunlight: Potatoes need at least 6-8 hours of sunlight per day to thrive. Choose a sunny spot for your bag.
* Sharp Knife (For Cutting Seed Potatoes): If your seed potatoes are large, you’ll need to cut them into smaller pieces.
* Gardening Gloves (Optional): To keep your hands clean!
Preparing Your Seed Potatoes: Getting Ready to Grow
This step is important for maximizing your potato yield. You want to encourage those little “eyes” on the potatoes to sprout before planting.
1. Chitting (Sprouting) Your Seed Potatoes: This is the process of encouraging sprouts to form on your seed potatoes before planting. It gives them a head start and results in earlier and more abundant harvests.
* A few weeks before you plan to plant, place your seed potatoes in a cool, bright location (but not in direct sunlight). An egg carton or a tray works well.
* You’ll notice small “eyes” or buds starting to sprout. This is exactly what we want!
* Let them sprout for a few weeks until the sprouts are about 1/2 to 1 inch long.
2. Cutting Large Seed Potatoes (If Necessary): If your seed potatoes are larger than an egg, you can cut them into smaller pieces.
* Make sure each piece has at least 2-3 “eyes” or sprouts.
* Let the cut pieces sit for a day or two to allow the cut surfaces to callous over. This helps prevent rot.
Planting Your Potatoes: The Fun Begins!
Now for the exciting part – planting!
1. Prepare the Bag: If you’re using a plastic bag, poke several drainage holes in the bottom to prevent waterlogging.
2. Add the Initial Soil Layer: Pour about 4-6 inches of potting mix into the bottom of the bag. Mix in some compost if you’re using it.
3. Plant the Seed Potatoes: Place the seed potato pieces (or whole small seed potatoes) on top of the soil layer, with the sprouts facing upwards. Space them about 8-12 inches apart. If you’re only planting one seed potato, place it in the center of the bag.
4. Cover the Seed Potatoes: Cover the seed potatoes with another 4-6 inches of potting mix.
5. Water Thoroughly: Water the bag well until the water drains out of the drainage holes.
The Growing Process: Nurturing Your Potato Plants
This is where patience comes in! But trust me, it’s worth the wait.
1. Watering: Keep the soil consistently moist, but not soggy. Water when the top inch of soil feels dry to the touch. Avoid overwatering, as this can lead to rot.
2. Sunlight: Make sure your bag receives at least 6-8 hours of sunlight per day. If you’re growing indoors, you may need to supplement with grow lights.
3. “Hilling” Your Potatoes: This is the key to maximizing your potato harvest! As the potato plants grow, you’ll need to add more soil to the bag.
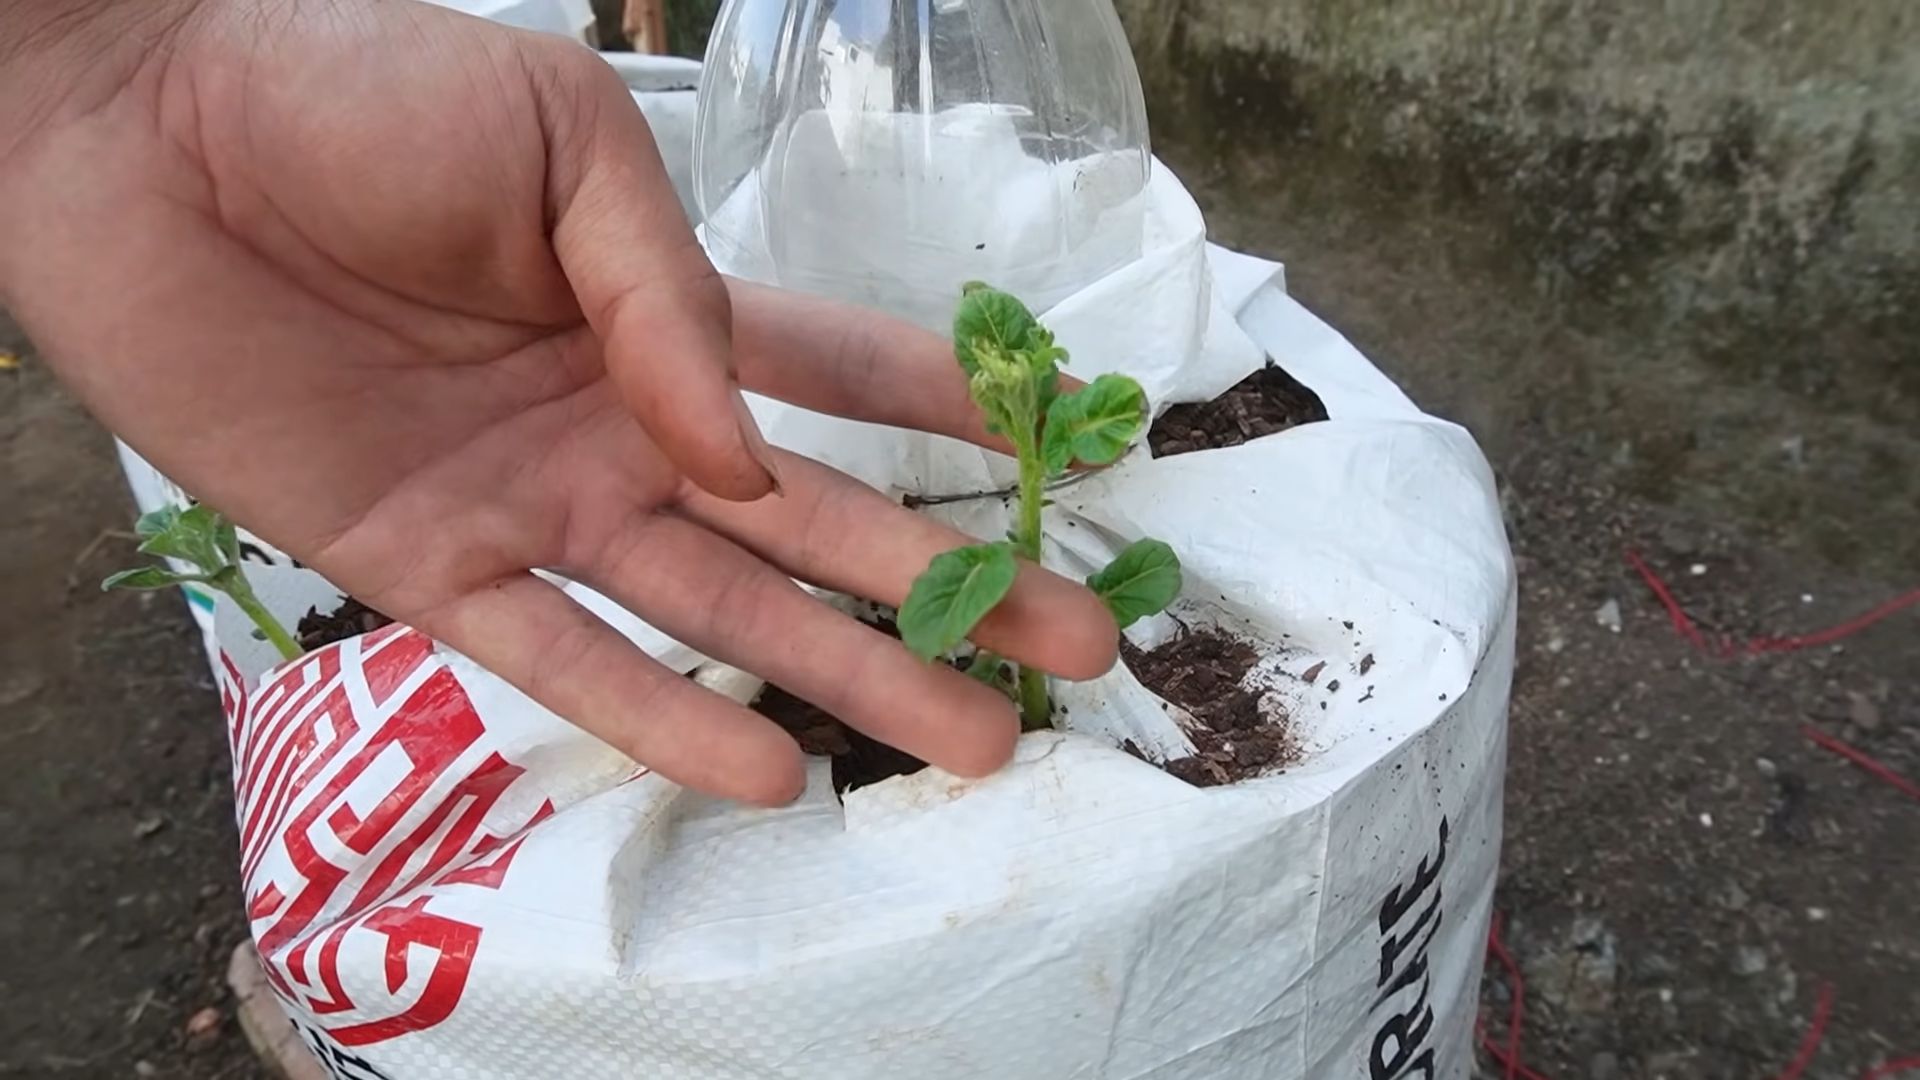
* When the potato plants reach about 6-8 inches tall, add another 4-6 inches of potting mix to the bag, covering the stems. Leave the top few leaves exposed.
* Repeat this process every few weeks as the plants grow, until the bag is almost full. This encourages the plants to produce more potatoes along the buried stems.
4. Fertilizing (Optional): If you want to give your potatoes an extra boost, you can fertilize them every few weeks with a balanced liquid fertilizer. Follow the instructions on the fertilizer package.
5. Pest Control: Keep an eye out for pests like aphids or potato beetles. If you spot any, you can treat them with insecticidal soap or neem oil.
Harvesting Your Potatoes: The Grand Finale!
This is the moment you’ve been waiting for!
1. When to Harvest: You can start harvesting “new potatoes” (small, tender potatoes) about 2-3 weeks after the plants flower. To do this, carefully reach into the bag and harvest a few potatoes without disturbing the rest of the plant.
2. Full Harvest: For a full harvest of mature potatoes, wait until the plants start to die back and the foliage turns yellow or brown. This usually takes about 3-4 months.
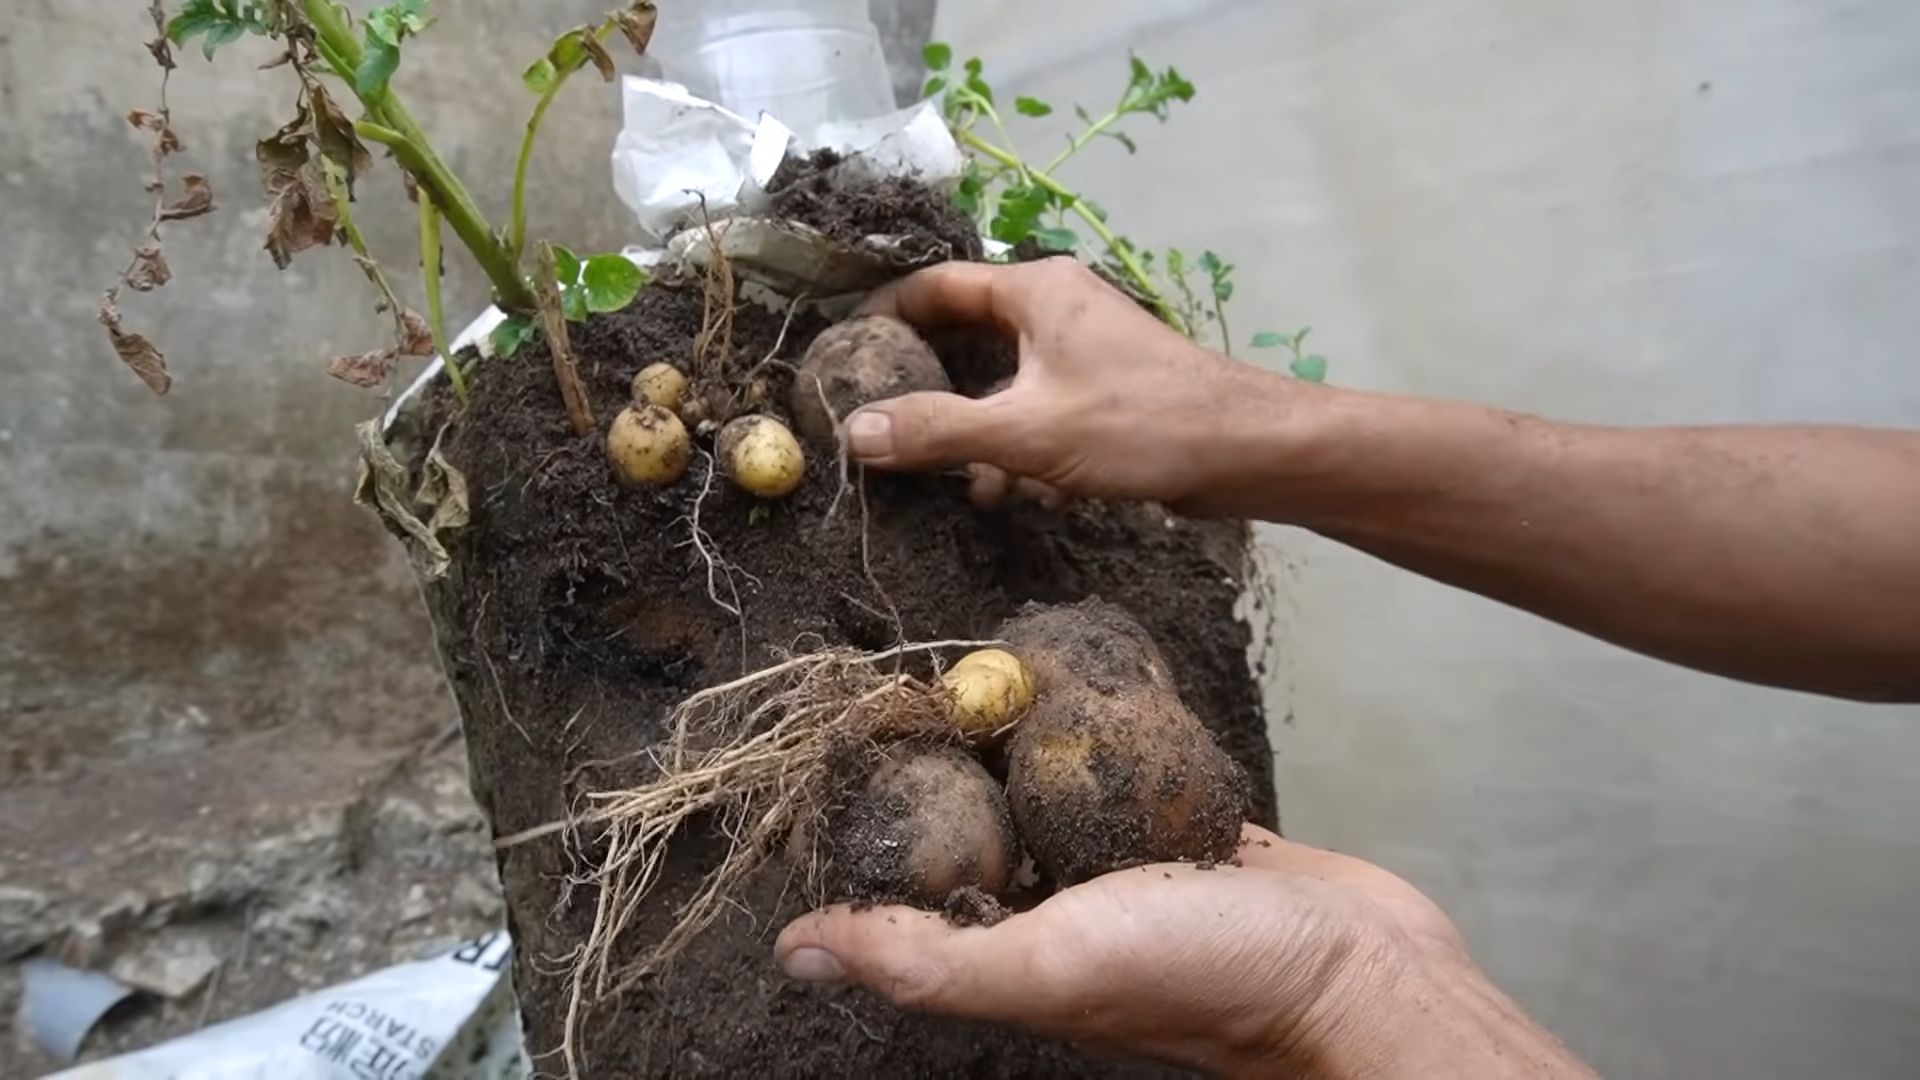
3. Harvesting: To harvest, simply tip the bag over and carefully sift through the soil to find your potatoes! It’s like a treasure hunt!
4. Curing (Optional): If you plan to store your potatoes for a longer period, you can cure them for a week or two. To do this, spread the potatoes out in a cool, dry, and dark place. This helps to toughen the skins and prevent rot.
Troubleshooting: Common Potato Growing Problems
Even with the best intentions, things can sometimes go wrong. Here are a few common problems and how to fix them:
* Yellowing Leaves: This could be a sign of overwatering, underwatering, or nutrient deficiency. Check the soil moisture and adjust your watering accordingly. You can also fertilize with a balanced fertilizer.
* Rotting Potatoes: This is usually caused by overwatering or poor drainage. Make sure your bag has adequate drainage holes and avoid overwatering.
* Pests: Keep an eye out for pests and treat them promptly with insecticidal soap or neem oil.
* Lack of Sunlight: Potatoes need plenty of sunlight to thrive. If your bag isn’t getting enough sunlight, consider moving it to a sunnier location or supplementing with grow lights.
Choosing the Right Potato Variety: A Matter of Taste
The beauty of growing your own potatoes is that you get to choose the varieties you love the most! Here are a few popular options:
* Yukon Gold: These are my personal favorite! They’re creamy, buttery, and perfect for roasting, mashing, or boiling.
* Red Potatoes: These have a waxy texture and hold their shape well when cooked. They’re great for potato salads or boiling.
* Russet Potatoes: These are the classic baking potatoes. They’re fluffy and absorbent, making them perfect for fries or baked potatoes.
* Fingerling Potatoes: These are long, slender potatoes with a unique flavor and texture. They’re great roasted or boiled.
* Purple Potatoes: These are a fun and colorful option! They have a slightly nutty flavor and are packed with antioxidants.
Tips and Tricks for a Bumper Crop: Secrets to Success
Here are a few extra tips to help you grow the best potatoes possible:
* Rotate Your Crops: If you’re growing potatoes in the same bag year after year, it’s important to rotate your crops to prevent soilborne diseases.
* Use Organic Practices: Avoid using synthetic pesticides or
Conclusion
So, there you have it! Growing potatoes without a garden isn’t just a whimsical idea; it’s a genuinely achievable and rewarding experience. We’ve walked you through the simple steps, highlighting how accessible and adaptable this method is, regardless of your living situation. From choosing the right container to nurturing your potato plants, you’re now equipped to cultivate your own homegrown spuds, even without a traditional garden plot.
Why is this DIY potato growing trick a must-try? Because it democratizes gardening! It empowers anyone, anywhere, to connect with the earth and enjoy the unparalleled satisfaction of harvesting their own food. Imagine the pride of serving a meal featuring potatoes you nurtured from tiny seed potatoes to plump, delicious tubers. It’s a conversation starter, a learning experience, and a sustainable practice all rolled into one.
But the beauty of this method lies in its flexibility. Feel free to experiment! Try different potato varieties to discover your favorites. Russets, Yukon Golds, fingerlings – each offers a unique flavor and texture profile. Consider adding companion plants like marigolds or basil to your container to deter pests and enhance the overall health of your potato plants. You can even explore different container types. While we’ve focused on bags and bins, you could repurpose old tires or even construct a simple wooden frame. The possibilities are endless!
Don’t be afraid to get your hands dirty and embrace the learning process. Gardening is, after all, a journey of discovery. You might encounter challenges along the way, but that’s part of the fun. And remember, even a small harvest is a victory.
We wholeheartedly encourage you to try this DIY potato growing trick. It’s a simple, affordable, and incredibly rewarding way to bring the joy of gardening into your life, no matter where you live. Once you’ve harvested your first crop of homegrown potatoes, we’d love to hear about your experience! Share your photos, tips, and stories in the comments below. Let’s create a community of urban potato growers and inspire others to embrace the magic of growing their own food. Happy growing!
Frequently Asked Questions (FAQs)
What kind of potatoes are best for growing in containers?
Choosing the right potato variety is crucial for success when growing potatoes without a garden. Generally, smaller, earlier-maturing varieties tend to perform best in containers. These varieties have a shorter growing season and are less likely to outgrow their space. Some excellent choices include:
* Yukon Gold: A popular all-purpose potato with a creamy texture and buttery flavor. They are relatively early maturing and well-suited for container growing.
* Red Potatoes (e.g., Red Pontiac, Red Norland): These potatoes are known for their thin skin and waxy texture. They are also early maturing and hold their shape well when cooked.
* Fingerling Potatoes: These long, slender potatoes come in various colors and have a unique, nutty flavor. They are a good choice for container growing due to their smaller size.
* Irish Cobbler: An early-season white potato that is known for its excellent flavor and texture.
Avoid late-maturing varieties like Russet Burbank, as they require a longer growing season and a larger container.
How much sunlight do my container potatoes need?
Potatoes are sun-loving plants and require at least 6-8 hours of direct sunlight per day to thrive. Choose a location for your container that receives ample sunlight throughout the day. If you don’t have a spot that gets full sun, you can supplement with grow lights. Rotate the container regularly to ensure that all sides of the plant receive adequate sunlight. Insufficient sunlight can lead to weak, leggy growth and reduced tuber production.
How often should I water my container potatoes?
Watering is critical for successful potato growing. The soil in your container should be consistently moist but not waterlogged. Check the soil moisture regularly by sticking your finger about an inch or two into the soil. If it feels dry, it’s time to water. Water deeply until water drains out of the bottom of the container. Avoid overwatering, as this can lead to root rot. During hot, dry weather, you may need to water daily. In cooler, wetter weather, you may only need to water every few days.
What kind of soil should I use for growing potatoes in containers?
The ideal soil for container potatoes is a well-draining, nutrient-rich potting mix. Avoid using garden soil, as it can be too heavy and compact, hindering drainage and root growth. A good potting mix will retain moisture while allowing excess water to drain away. You can also amend your potting mix with compost or other organic matter to improve its fertility and drainage. A slightly acidic soil pH (around 6.0-6.5) is ideal for potatoes.
How do I “hill” my potatoes in a container?
“Hilling” is the process of adding more soil around the potato plant’s stem as it grows. This encourages the plant to produce more tubers along the buried stem. When your potato plant is about 6-8 inches tall, add a few inches of soil to the container, burying the lower part of the stem. Repeat this process every few weeks as the plant grows, until the container is nearly full. Be careful not to bury the leaves of the plant.
When will my potatoes be ready to harvest?
The time it takes for potatoes to mature depends on the variety and growing conditions. Generally, early-maturing varieties are ready to harvest in about 70-80 days, while late-maturing varieties can take up to 120 days. You can start harvesting “new potatoes” (small, immature potatoes) a few weeks after the plant flowers. To harvest new potatoes, carefully dig around the base of the plant and remove a few tubers. For a full harvest, wait until the plant’s foliage begins to yellow and die back. This indicates that the potatoes have reached maturity.
What are some common pests and diseases that affect container potatoes?
Potatoes can be susceptible to various pests and diseases, including:
* Potato Beetles: These beetles can defoliate potato plants. Handpick them off the plants or use an organic insecticide like neem oil.
* Aphids: These small insects suck sap from plants, causing them to weaken. Spray them off with a strong stream of water or use insecticidal soap.
* Fungal Diseases (e.g., Early Blight, Late Blight): These diseases can cause leaf spots and stem lesions. Prevent fungal diseases by providing good air circulation and avoiding overhead watering. Use a fungicide if necessary.
Regularly inspect your plants for signs of pests or diseases and take action promptly to prevent them from spreading.
Can I grow potatoes in a container indoors?
While it’s possible to grow potatoes indoors, it can be challenging to provide them with the necessary sunlight and growing conditions. Potatoes require at least 6-8 hours of direct sunlight per day, which can be difficult to achieve indoors without supplemental lighting. If you choose to grow potatoes indoors, use grow lights and ensure that the plants have adequate ventilation.
Can I reuse the soil from my potato container for other plants?
Yes, you can reuse the soil from your potato container for other plants, but it’s essential to amend it first. Potatoes can deplete the soil of nutrients, so you’ll need to replenish them before planting other crops. Add compost, aged manure, or other organic matter to the soil to improve its fertility and drainage. You may also want to test the soil pH and adjust it if necessary.
What if my potato plant doesn’t flower?
Not all potato varieties flower, and even those that do may not flower consistently. The absence of flowers doesn’t necessarily mean that your plant isn’t producing tubers. Focus on providing the plant with adequate sunlight, water, and nutrients, and you should still be able to harvest a good crop of potatoes. You can start checking for new potatoes a few weeks after planting, even if the plant hasn’t flowered.
Leave a Comment