
Regrow Celery from Scraps: Imagine turning kitchen waste into a thriving, crunchy snack! For centuries, resourceful gardeners have found clever ways to extend their harvests and minimize waste. From ancient civilizations saving seeds to modern-day urban farmers, the spirit of resourcefulness has always been at the heart of gardening. Now, you too can join this tradition with a simple, satisfying project: regrowing celery from scraps!
Have you ever tossed the base of a celery stalk, thinking it was destined for the compost bin? Well, I’m here to tell you that you’ve been throwing away potential celery! This DIY trick is not only incredibly easy, but it’s also a fantastic way to reduce food waste and enjoy fresh, homegrown celery without constantly buying new stalks. In today’s world, where sustainability and saving money are more important than ever, learning to regrow celery from scraps is a game-changer.
This simple hack is perfect for beginner gardeners, families looking for a fun and educational activity, or anyone who wants to add a touch of green to their kitchen windowsill. I’m excited to show you how to transform those seemingly useless celery bottoms into vibrant, leafy plants. Get ready to impress your friends and family with your newfound gardening skills and enjoy the satisfaction of growing your own food, one celery stalk at a time!
Regrow Celery from Scraps: A Beginner’s Guide
Hey there, fellow eco-enthusiasts! Ever find yourself tossing the base of your celery stalk after chopping it up for a snack or soup? Well, stop right there! Did you know you can actually regrow celery from that seemingly useless scrap? It’s a super easy and rewarding DIY project, perfect for beginners and a great way to reduce food waste. I’m going to walk you through the whole process, step-by-step, so you can have your own little celery garden going in no time.
What You’ll Need
Before we dive in, let’s gather our supplies. The good news is, you probably already have most of these things lying around:
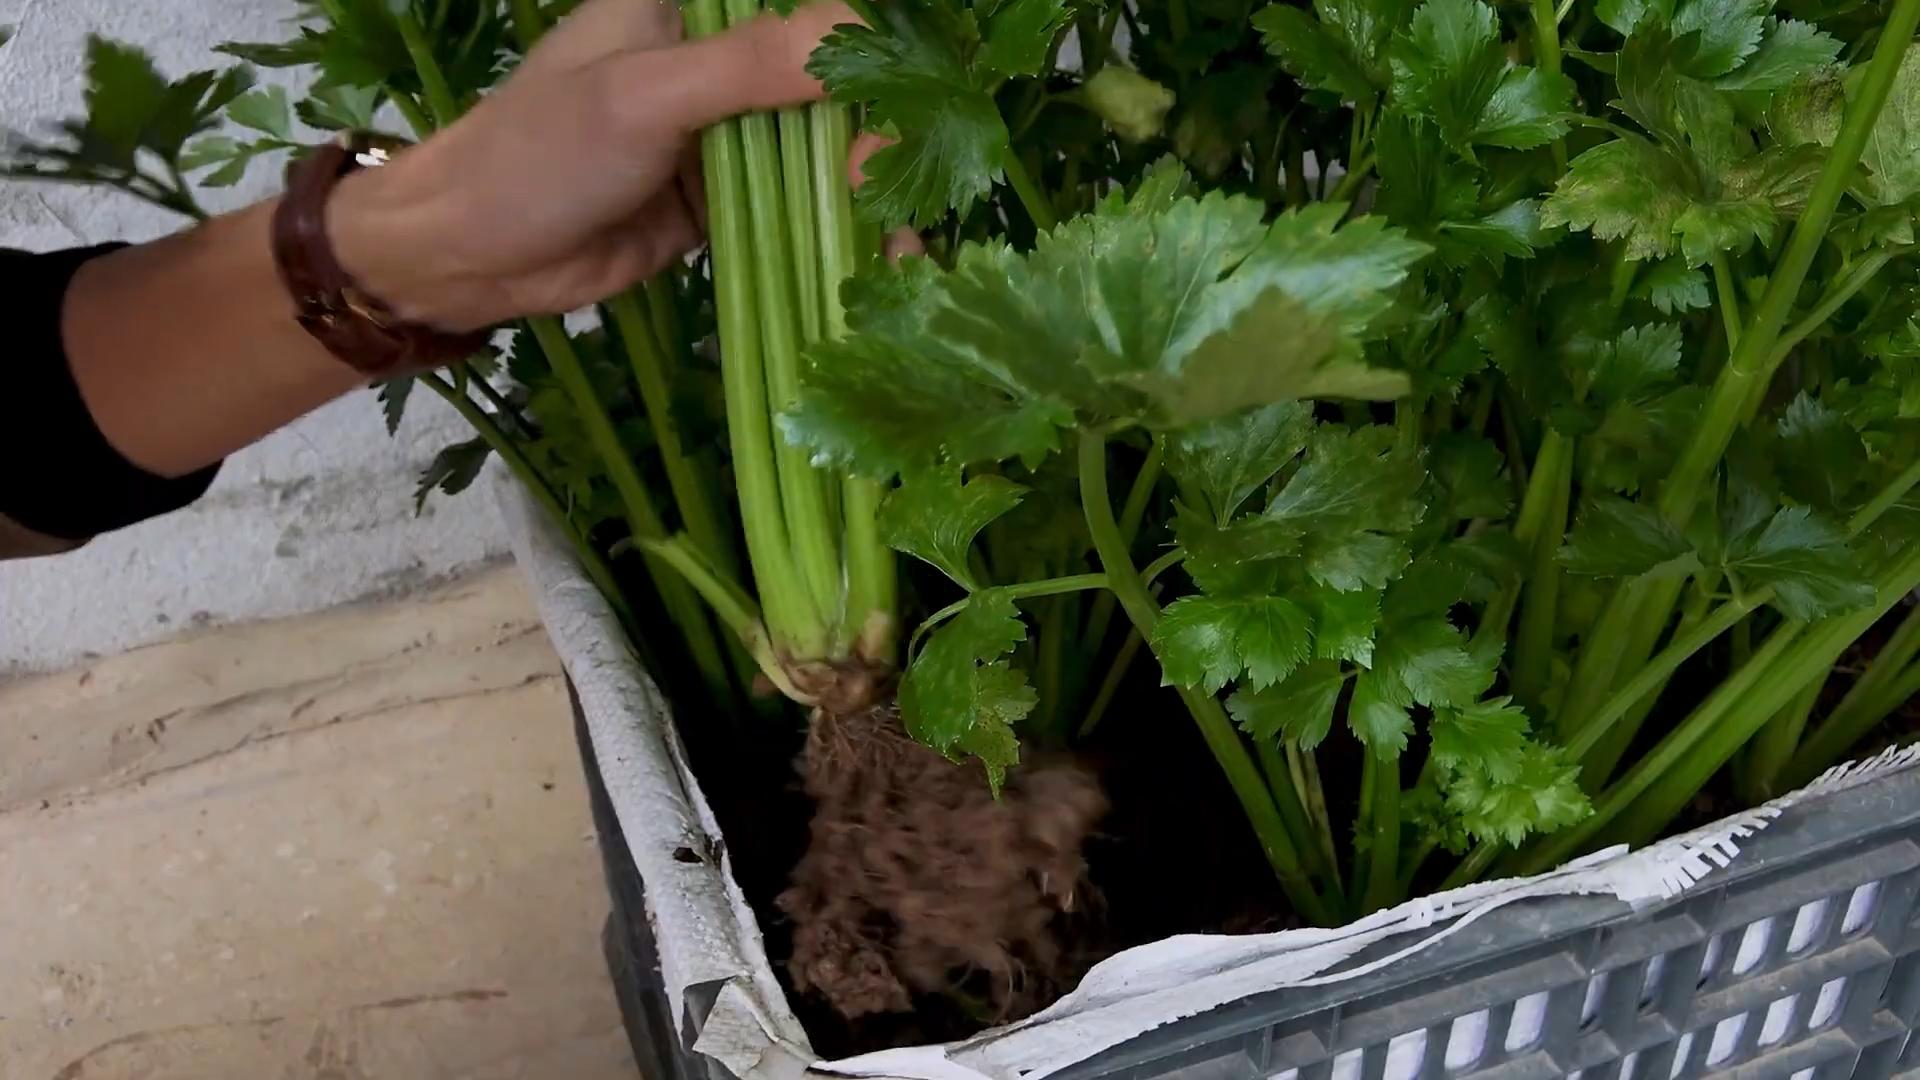
- Celery Base: The bottom 2-3 inches of a celery stalk, where the stalks are connected. Make sure it’s firm and healthy-looking, not mushy or brown.
- Shallow Dish or Bowl: Something to hold water and the celery base. A saucer, small bowl, or even a recycled plastic container will work.
- Water: Tap water is fine!
- Spray Bottle (Optional): For misting the celery.
- Potting Soil: Once the roots develop, you’ll need potting soil to transplant your celery.
- Pot or Container: Choose a pot that’s at least 6-8 inches in diameter to give your celery room to grow.
- Sunny Location: Celery loves sunlight, so find a spot that gets at least 6 hours of direct sunlight per day.
Phase 1: Rooting Your Celery Base
This is where the magic happens! We’re going to coax those roots out of the celery base.
- Prepare the Celery Base: Gently clean the celery base under cool running water to remove any dirt or debris. Don’t scrub too hard, you don’t want to damage it.
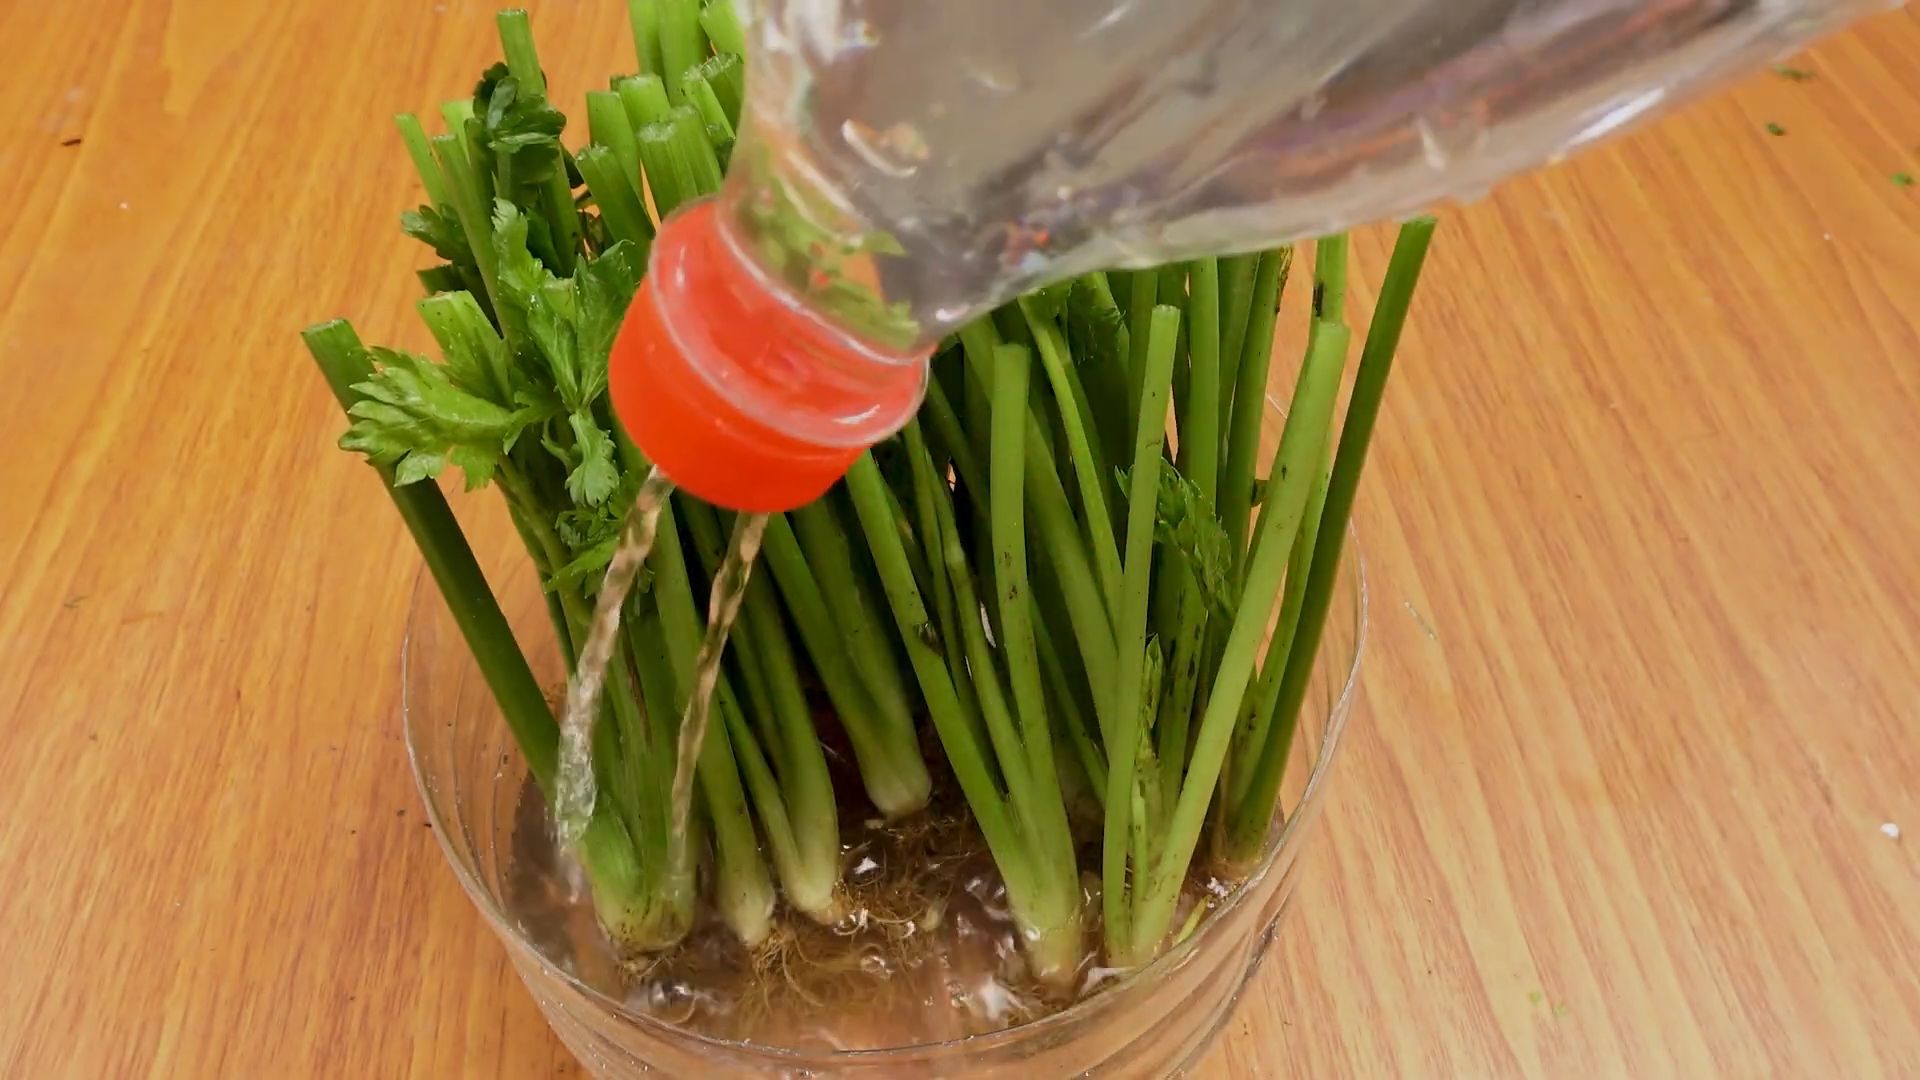
- Place in Water: Fill your shallow dish or bowl with about an inch of water. Place the celery base, cut-side up, in the water. Make sure the bottom of the base is submerged, but the top is exposed to air.
- Find a Sunny Spot: Place the dish with the celery base on a windowsill or another location that receives plenty of sunlight. Remember, at least 6 hours is ideal.
- Change the Water Regularly: This is crucial! Change the water every 1-2 days to prevent bacteria growth and keep the water fresh. This will encourage root development.
- Observe and Wait: Over the next few days, you should start to see small roots emerging from the bottom of the celery base. You might also notice some new green growth sprouting from the top. This is a good sign!
- Misting (Optional): If you live in a dry climate, you can mist the top of the celery base with water every day to keep it hydrated.
Important Tip: Be patient! It can take anywhere from 5-7 days (or even longer) for roots to appear. Don’t give up if you don’t see results immediately. Just keep changing the water and providing sunlight.
Phase 2: Transplanting to Soil
Once your celery base has developed a good network of roots (about 1-2 inches long), it’s time to move it to a pot with soil.
- Prepare the Pot: Fill your pot or container with potting soil, leaving about an inch of space at the top.
- Make a Hole: Use your finger or a small trowel to create a hole in the center of the soil, large enough to accommodate the celery base and its roots.
- Carefully Remove the Celery Base: Gently lift the celery base from the water, being careful not to damage the delicate roots.
- Plant the Celery Base: Place the celery base in the hole, making sure the roots are spread out. Cover the roots with soil, gently patting it down around the base. The top of the celery base should still be exposed.
- Water Thoroughly: Water the soil well until it’s evenly moist.
- Return to Sunny Location: Place the pot in the same sunny location where you had the celery base in water.
Phase 3: Caring for Your Regrown Celery
Now that your celery is planted in soil, it’s time to provide the ongoing care it needs to thrive.
- Watering: Celery needs consistent moisture. Water your celery regularly, keeping the soil consistently moist but not waterlogged. Check the soil moisture by sticking your finger about an inch into the soil. If it feels dry, it’s time to water.
- Sunlight: Continue to provide at least 6 hours of direct sunlight per day. If you don’t have a sunny windowsill, you might consider using a grow light.
- Fertilizing (Optional): To give your celery a boost, you can fertilize it every few weeks with a balanced liquid fertilizer. Follow the instructions on the fertilizer packaging.
- Harvesting: As your celery grows, you can harvest individual stalks as needed. Simply cut them off at the base of the plant. The plant will continue to produce new stalks.
- Pest Control: Keep an eye out for pests like aphids or slugs. If you notice any pests, you can try spraying them with insecticidal soap or hand-picking them off the plant.
- Bolting: If your celery starts to bolt (produce a flower stalk), it means it’s getting ready to seed. Bolting can make the celery stalks taste bitter. To prevent bolting, make sure your celery is getting enough water and is not exposed to extreme temperatures. You can also pinch off the flower stalk as soon as you see it.
Troubleshooting
Sometimes things don’t go exactly as planned. Here are a few common issues you might encounter and how to address them:
- Celery Base Rotting: If the celery base starts to rot, it’s likely due to bacteria growth. Make sure you’re changing the water regularly and that the celery base is not sitting in stagnant water.
- Slow Root Growth: If you’re not seeing roots develop after a week, try moving the celery base to a warmer location or adding a small amount of rooting hormone to the water.
- Yellowing Leaves: Yellowing leaves can be a sign of overwatering or underwatering. Adjust your watering schedule accordingly. It could also be a sign of nutrient deficiency, so consider fertilizing your celery.
- Stunted Growth: Stunted growth can be caused by a lack of sunlight or nutrients. Make sure your celery is getting enough sunlight and fertilize it regularly.
Extra Tips for Success
Here are a few extra tips to help you get the most out of your celery-growing adventure:
- Choose Healthy Celery: Start with a fresh, firm celery base that shows no signs of decay.
- Use Filtered Water: If your tap water is heavily chlorinated, consider using filtered water for the initial rooting phase.
- Rotate Your Celery: If you’re growing your celery indoors, rotate the pot regularly to ensure that all sides of the plant receive equal sunlight.
- Consider Companion Planting: Celery grows well with other plants like onions, garlic, and tomatoes.
- Enjoy the Process! Growing celery from scraps is a fun and rewarding experience. Don’t be afraid to experiment and learn as you go.
What to expect from regrown celery
It’s important to manage expectations. Regrown celery from scraps won’t be as large or robust as the celery you buy at the store. It will likely produce thinner stalks. However, it’s still a great way to get fresh celery for soups, salads, or snacks, and it’s a fantastic way to reduce food waste. Plus, it’s incredibly satisfying to watch something grow from what would have otherwise been thrown away!
Beyond the Basics
Once you’ve mastered regrowing celery from scraps, you can explore other ways to propagate celery, such as growing it from seed. You can also experiment with different varieties of celery to see which ones grow best in your area.
Final Thoughts
I hope this guide has inspired you to give regrowing celery from scraps a try. It’s a simple, sustainable, and rewarding project that anyone can do. So, next time you’re chopping up celery, don’t throw away the base – give it a new life! Happy growing!
Conclusion
So, there you have it! Regrowing celery from scraps isn’t just a fun science experiment; it’s a practical way to reduce food waste, save money, and enjoy fresh, homegrown celery right from your kitchen. It’s a simple, rewarding process that connects you to the food you eat and offers a sustainable alternative to constantly buying celery from the grocery store.
Why is this DIY trick a must-try? Because it’s incredibly easy, requires minimal effort, and yields tangible results. Imagine the satisfaction of watching a discarded celery base transform into a vibrant, leafy plant, ready to add a crisp, refreshing touch to your salads, soups, and snacks. It’s a small act with a big impact, both on your wallet and the environment.
But the fun doesn’t stop there! Feel free to experiment with different variations. Try planting your regrown celery in a larger pot or even directly in your garden for a more substantial harvest. You can also try regrowing other vegetables from scraps, such as lettuce, green onions, or even bok choy. The possibilities are endless!
This method of regrowing celery is a game changer for anyone looking to be more sustainable and resourceful in the kitchen. It’s a fantastic project for kids, teaching them about plant life cycles and the importance of reducing waste. It’s also a great way to add a touch of green to your home, even if you don’t have a traditional garden.
We encourage you to give this DIY trick a try. It’s a simple, satisfying, and sustainable way to enjoy fresh celery. And once you’ve experienced the joy of regrowing your own celery, we’d love to hear about it! Share your experiences, tips, and photos with us in the comments below. Let’s build a community of resourceful gardeners and inspire others to embrace the power of regrowing from scraps. Happy growing!
Frequently Asked Questions (FAQs)
How long does it take to regrow celery from scraps?
The initial sprouting and root development typically take about 5-7 days in water. After transplanting to soil, it can take several weeks to a few months for the celery to grow to a usable size. The exact timeframe depends on factors like sunlight, temperature, and soil quality. Don’t expect a full-sized celery stalk like you buy in the store right away. The initial growth will focus on producing leafy greens, which are perfect for adding to salads, soups, and smoothies.
What kind of water should I use?
Tap water is generally fine, but if your tap water is heavily chlorinated, it’s best to let it sit out for 24 hours before using it. This allows the chlorine to dissipate. Filtered water is also a good option. Avoid using distilled water, as it lacks the minerals that plants need to thrive. Change the water every 1-2 days to keep it fresh and prevent bacterial growth.
How much sunlight does the regrowing celery need?
Celery needs plenty of sunlight to thrive. Aim for at least 6 hours of direct sunlight per day. If you’re growing your celery indoors, place it near a sunny window. If you don’t have a sunny window, you can supplement with a grow light. Insufficient sunlight can lead to leggy growth and a less flavorful celery.
What kind of soil is best for regrowing celery?
Celery prefers well-draining, nutrient-rich soil. A good potting mix will work well for container growing. If you’re planting in the garden, amend the soil with compost or other organic matter to improve drainage and fertility. Celery also prefers slightly acidic soil, with a pH between 6.0 and 6.8.
How often should I water the regrown celery?
Keep the soil consistently moist, but not waterlogged. Water when the top inch of soil feels dry to the touch. Overwatering can lead to root rot, so make sure the pot has good drainage. During hot weather, you may need to water more frequently.
Can I regrow celery multiple times from the same base?
Yes, you can! After harvesting the leafy greens, leave about an inch of the base intact and repeat the process. However, the subsequent growth may be less vigorous than the first time. Eventually, the base will lose its ability to regenerate, but you can usually get a few harvests from a single base.
What if my celery base starts to rot?
If you notice any signs of rot, such as a slimy texture or foul odor, discard the base immediately. Rot is usually caused by overwatering or poor drainage. To prevent rot, make sure the pot has drainage holes and avoid letting the celery base sit in standing water.
Can I eat the celery leaves that grow?
Absolutely! The celery leaves are perfectly edible and have a similar flavor to the stalks, although they can be slightly more intense. Use them in salads, soups, stews, or as a garnish. They’re also a great addition to smoothies and juices.
My regrown celery is very small. What am I doing wrong?
Several factors can contribute to small celery growth. Make sure your celery is getting enough sunlight, water, and nutrients. Also, consider the size of the container. If the roots are cramped, the plant won’t be able to grow to its full potential. Transplanting to a larger pot or the garden can help. Finally, be patient! It takes time for celery to grow, especially when regrowing from scraps.
Is regrowing celery from scraps organic?
Whether your regrown celery is organic depends on the celery you started with and the growing conditions. If you started with organic celery and use organic soil and fertilizer, then your regrown celery will be organic. However, if you started with non-organic celery or use non-organic inputs, then your regrown celery will not be organic.
What kind of fertilizer should I use for regrowing celery?
A balanced liquid fertilizer, diluted to half strength, is a good option for regrowing celery. You can also use a slow-release granular fertilizer. Apply fertilizer every 2-3 weeks during the growing season. Avoid over-fertilizing, as this can burn the roots. Look for fertilizers specifically formulated for vegetables or herbs.
Can I grow celery indoors year-round?
Yes, you can grow celery indoors year-round, provided you have enough light and warmth. Place your celery near a sunny window or use a grow light to supplement natural light. Maintain a consistent temperature between 60-70°F (15-21°C).
What are some common pests that affect celery?
Common pests that can affect celery include aphids, spider mites, and celery leaf miners. Inspect your plants regularly for signs of infestation. If you find pests, you can try washing them off with a strong stream of water or using an insecticidal soap.
How do I harvest the regrown celery?
You can harvest the celery leaves as needed, snipping them off with scissors. If you want to harvest the entire plant, wait until it has reached a reasonable size and carefully dig it up. You can then separate the stalks and use them as you would store-bought celery.
Can I regrow celery in a hydroponic system?
Yes, celery can be regrown in a hydroponic system. This can be a great way to grow celery indoors without soil. You’ll need a hydroponic setup, nutrient solution, and a grow light. Follow the instructions for your specific hydroponic system.
What are the benefits of regrowing celery from scraps?
The benefits are numerous! You reduce food waste, save money on groceries, enjoy fresh, homegrown celery, and connect with the food you eat. It’s a sustainable and rewarding practice that’s good for you and the environment. Plus, it’s a fun and educational project for kids and adults alike. Embracing this simple technique of regrowing celery is a step towards a more sustainable and self-sufficient lifestyle.


Leave a Comment