
Rooftop Asparagus Garden DIY: Your Guide to Urban Gardening Success!
Imagine stepping onto your rooftop and harvesting fresh, delicious asparagus spears, ready to be steamed, grilled, or tossed into a vibrant salad. Sounds like a dream, right? Well, it doesn’t have to be! This article is your ultimate guide to creating your very own rooftop asparagus garden DIY project, transforming your unused space into a thriving edible oasis. For centuries, asparagus has been prized for its delicate flavor and nutritional benefits, even gracing the tables of Roman emperors. Now, you can bring this culinary treasure to your own home, regardless of whether you have a sprawling backyard or not.
Why should you embark on this rooftop asparagus garden DIY adventure? Because fresh, homegrown asparagus tastes infinitely better than anything you can buy in the store! Plus, gardening is incredibly therapeutic, offering a chance to connect with nature and de-stress. In today’s fast-paced world, having a little green space to nurture can be a game-changer for your well-being. And let’s be honest, who wouldn’t want to impress their friends and family with their urban gardening skills? I’m here to guide you through every step, from choosing the right containers to ensuring proper drainage, so you can enjoy a bountiful harvest for years to come. Let’s get started!
Creating Your Own Rooftop Asparagus Oasis
Okay, so you want to grow asparagus on your roof? Awesome! It might sound a little crazy, but trust me, it’s totally doable and incredibly rewarding. Fresh, homegrown asparagus is a culinary delight, and having it just steps away from your kitchen is a dream. This guide will walk you through every step, from planning to planting to (eventually!) harvesting. Let’s get started!
Planning Your Rooftop Garden
Before you even think about buying asparagus crowns, we need to make sure your rooftop is ready for the challenge. Asparagus is a perennial, meaning it will come back year after year, so this is a long-term commitment.
* Assess Your Roof’s Load Capacity: This is the most crucial step. Asparagus beds, especially when filled with soil and water, can get heavy. Contact a structural engineer or building professional to determine the weight your roof can safely handle. Don’t skip this! Safety first!
* Consider Sunlight: Asparagus needs at least 6-8 hours of direct sunlight per day. Observe your rooftop throughout the day to see where the sun shines the brightest and longest.
* Water Access: You’ll need a reliable water source nearby. Hauling water buckets up to the roof is no fun (trust me, I’ve been there!). Consider a hose connection or even a rainwater harvesting system.
* Drainage: Proper drainage is essential to prevent root rot. We’ll address this in the container construction phase, but keep it in mind during planning.
* Wind Protection: Rooftops can be windy! Strong winds can damage young asparagus spears. Consider installing windbreaks, like trellises or screens, especially if your roof is exposed.
* Container Size and Material: Asparagus roots grow deep, so you’ll need large, durable containers. We’ll discuss options in detail later.
* Variety Selection: Choose asparagus varieties that are well-suited to your climate. ‘Jersey Knight’ and ‘Millennium’ are popular choices, but your local garden center can offer recommendations based on your region.
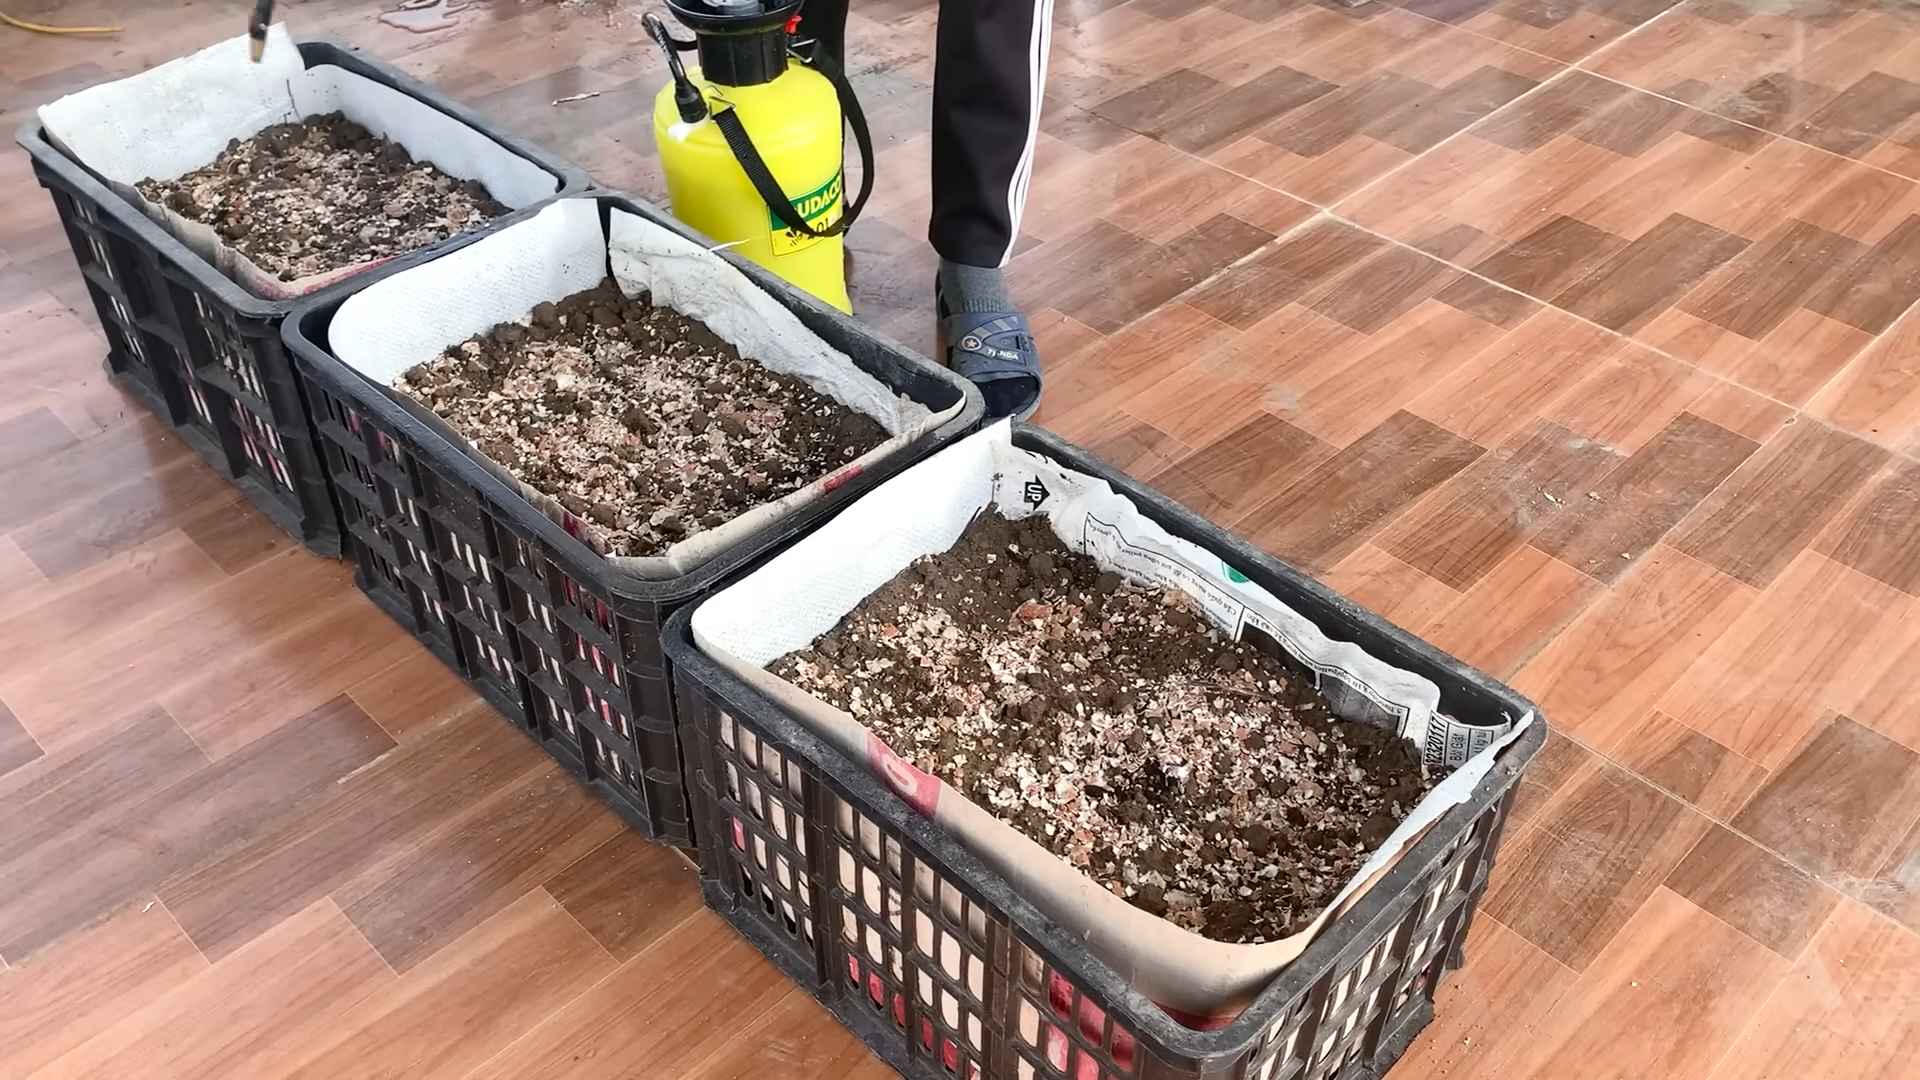
Building Your Asparagus Containers
Now that we’ve planned, let’s get our hands dirty! Building the right containers is key to asparagus success.
* Choosing the Right Container:
* Size Matters: Asparagus needs room to spread its roots. Aim for containers that are at least 12 inches deep and 18 inches wide. Larger is better! I recommend something closer to 24 inches deep if possible.
* Material Options:
* Wood: Cedar or redwood are naturally rot-resistant and look great. Line the inside with plastic to prolong their lifespan.
* Plastic: Durable and lightweight, but can get brittle in extreme temperatures. Choose food-grade plastic.
* Metal: Can heat up quickly in the sun, potentially damaging roots. Avoid dark-colored metal containers.
* Raised Beds: If your roof can handle the weight, consider building a raised bed directly on the rooftop. This provides ample space for asparagus to thrive.
* Drainage is Key:
* Drill plenty of drainage holes in the bottom of your containers.
* Add a layer of gravel or broken pottery to the bottom to improve drainage.
* Consider using landscape fabric to prevent soil from washing out through the drainage holes.
Step-by-Step Container Construction (Wooden Container Example):
1. Gather Your Materials: You’ll need cedar or redwood planks (enough to build a box at least 12 inches deep and 18 inches wide), screws, a drill, a saw, landscape fabric, gravel, and a staple gun.
2. Cut the Wood: Cut the planks to the desired dimensions for the sides, bottom, and ends of your container.
3. Assemble the Box: Screw the sides, bottom, and ends together to form a sturdy box.
4. Line with Landscape Fabric: Staple landscape fabric to the inside of the box to protect the wood and prevent soil from washing out.
5. Add Drainage: Drill drainage holes in the bottom of the box.
6. Add Gravel: Pour a layer of gravel into the bottom of the box to improve drainage.
Preparing the Soil
Asparagus loves well-drained, fertile soil. This is not the time to skimp!
* Soil Mix Recipe:
* 1/3 Compost: Provides nutrients and improves drainage.
* 1/3 Topsoil: Provides structure and support.
* 1/3 Sand or Perlite: Improves drainage and aeration.
* pH Level: Asparagus prefers a slightly acidic to neutral pH (6.5-7.0). Test your soil and amend as needed with lime to raise the pH or sulfur to lower it.
* Adding Nutrients: Incorporate a slow-release fertilizer into the soil mix. Bone meal is a great source of phosphorus, which is essential for root development.
Step-by-Step Soil Preparation:
1. Mix the Ingredients: In a large container or wheelbarrow, thoroughly mix the compost, topsoil, and sand or perlite.
2. Test the pH: Use a soil testing kit to determine the pH level of your soil mix.
3. Amend as Needed: If the pH is too low, add lime according to the package instructions. If it’s too high, add sulfur.
4. Incorporate Fertilizer: Mix in the slow-release fertilizer according to the package instructions.
Planting Your Asparagus Crowns
Now for the exciting part! Planting the asparagus crowns is the first step towards your rooftop harvest.
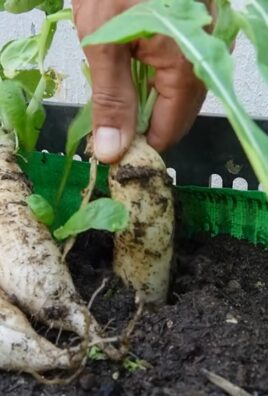
* Choosing Crowns: Select healthy, one-year-old crowns from a reputable nursery. Look for crowns that are plump and have plenty of roots.
* Timing: Plant asparagus crowns in early spring, as soon as the soil can be worked.
* Spacing: Space the crowns about 12-18 inches apart in the container.
Step-by-Step Planting:
1. Dig Trenches: Dig trenches in the prepared soil that are about 6-8 inches deep and 12-18 inches apart.
2. Create Mounds: Create small mounds of soil in the bottom of the trenches.
3. Place the Crowns: Place the asparagus crowns on top of the mounds, spreading the roots out around the mound.
4. Cover with Soil: Gently cover the crowns with about 2 inches of soil.
5. Water Thoroughly: Water the newly planted crowns thoroughly.
6. Gradually Fill the Trenches: As the asparagus spears emerge, gradually fill in the trenches with soil over the next few weeks. This encourages the crowns to develop a strong root system.
Caring for Your Asparagus Garden
Asparagus requires patience. You won’t be harvesting much, if anything, in the first year. But with proper care, you’ll be rewarded with years of delicious spears.
* Watering: Keep the soil consistently moist, but not waterlogged. Water deeply whenever the top inch of soil feels dry.
* Fertilizing: Fertilize your asparagus plants in early spring with a balanced fertilizer. You can also side-dress with compost throughout the growing season.
* Weeding: Keep the area around your asparagus plants free of weeds. Weeds compete for nutrients and water.
* Mulching: Apply a layer of mulch around your asparagus plants to help retain moisture, suppress weeds, and regulate soil temperature.
* Pest and Disease Control: Monitor your asparagus plants for pests and diseases. Common pests include asparagus beetles and aphids. Common diseases include rust and crown rot. Treat any problems promptly with appropriate organic or chemical controls.
* Fern Care: After the harvest season, allow the asparagus ferns to grow and mature. These ferns will provide energy for the crowns to store for the following year’s growth. In late fall or early winter, after the ferns have turned brown, cut them back to about 2 inches above the ground.
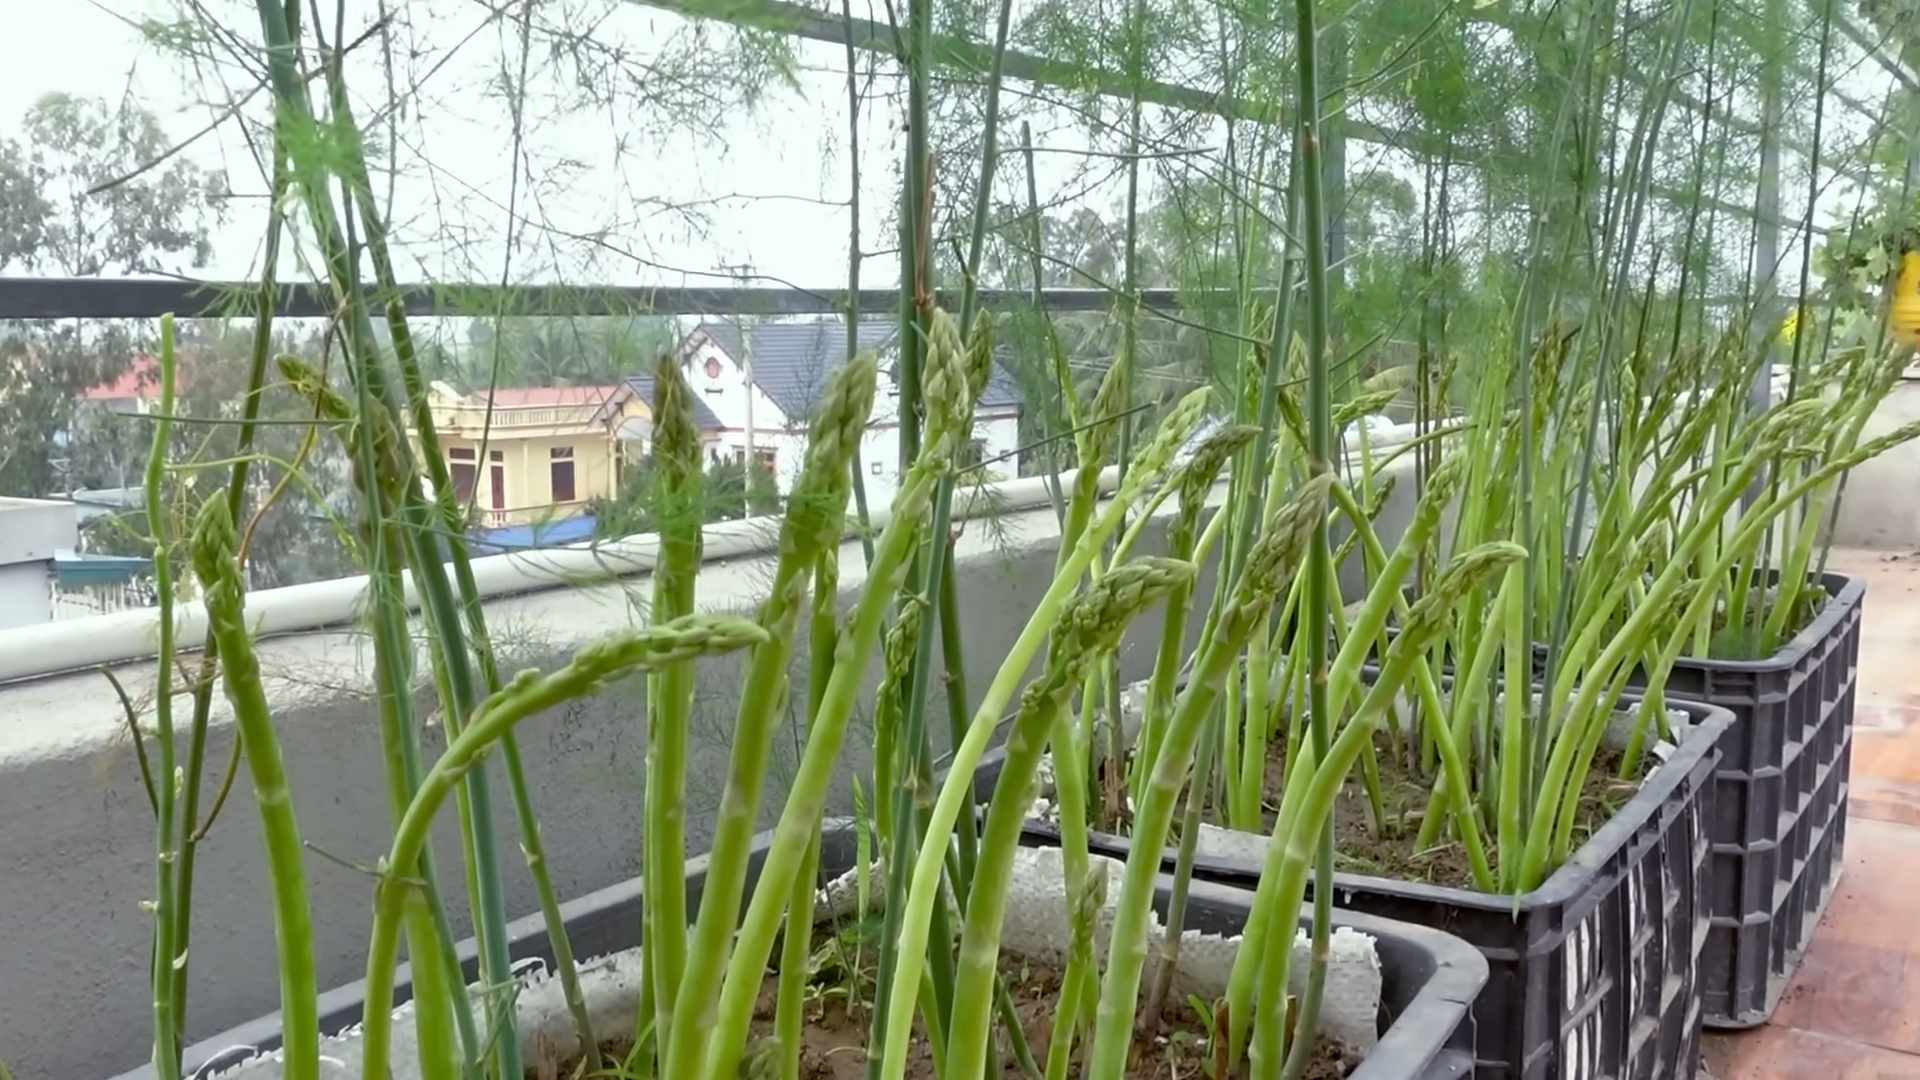
Harvesting Your Asparagus
Patience is a virtue, especially when it comes to asparagus!
* The First Year: Resist the urge to harvest any spears in the first year. This allows the plants to establish a strong root system.
* The Second Year: You can harvest a few spears in the second year, but limit the harvest to a few weeks.
* Subsequent Years: In subsequent years, you can harvest asparagus for 6-8 weeks in the spring.
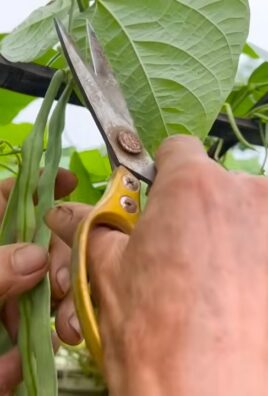
* Harvesting Technique: Harvest asparagus spears when they are about 6-8 inches tall and the tips are still tightly closed. Cut the spears at ground level with a sharp knife.
Important Considerations:
* Over-Harvesting: Avoid over-harvesting, as this can
Conclusion
So, there you have it! Creating your own rooftop asparagus garden isn’t just a trendy gardening project; it’s a sustainable, space-saving, and incredibly rewarding way to enjoy fresh, delicious asparagus right at your fingertips. We’ve walked you through the process, from selecting the right container and soil to nurturing your asparagus crowns for years of bountiful harvests.
Why is this DIY trick a must-try? Because it empowers you to take control of your food source, even in the most urban environments. Imagine stepping onto your rooftop and harvesting tender, vibrant asparagus spears, knowing exactly where they came from and how they were grown. No more questionable grocery store produce; just pure, homegrown goodness. Plus, an asparagus patch is a perennial investment. Once established, your rooftop garden will provide you with fresh asparagus every spring for 15-20 years! That’s a significant return on your initial effort.
But the benefits extend beyond just fresh produce. A rooftop garden, especially one as visually appealing as an asparagus patch, can transform your outdoor space into a tranquil oasis. It’s a conversation starter, a source of pride, and a way to connect with nature in the heart of the city. The lush green foliage of the asparagus ferns adds beauty and texture, creating a calming and inviting atmosphere.
Now, let’s talk about variations. While we’ve focused on a container-based system, you can adapt this method to raised beds if you have the space and structural support. Consider companion planting to maximize your rooftop garden’s potential. Herbs like basil, parsley, and thyme thrive alongside asparagus and can help deter pests. Marigolds are also excellent companions, adding a splash of color and further pest control.
For those with limited sunlight, choose a location that receives at least six hours of direct sunlight per day. If that’s not possible, consider using grow lights to supplement natural light. Experiment with different asparagus varieties to find the ones that thrive best in your specific climate and rooftop conditions. Jersey Knight and Purple Passion are popular choices known for their high yields and disease resistance.
Don’t be afraid to get creative with your container design. Use repurposed materials like old wooden crates or metal tubs to add a rustic charm to your rooftop garden. Paint your containers in vibrant colors to create a visually stunning display. The possibilities are endless!
We understand that embarking on a new gardening project can be daunting, but we encourage you to take the leap and try this DIY rooftop asparagus garden. The rewards are well worth the effort. The taste of freshly harvested asparagus is unlike anything you’ll find in a store, and the satisfaction of growing your own food is truly unparalleled.
So, grab your gloves, gather your supplies, and get ready to transform your rooftop into a thriving asparagus haven. We’re confident that you’ll be amazed by the results. And most importantly, we want to hear about your experience! Share your photos, tips, and challenges in the comments below. Let’s build a community of rooftop asparagus gardeners and inspire others to embrace the joys of urban farming. Let us know what kind of DIY asparagus garden you created!
Frequently Asked Questions (FAQ)
What kind of container is best for growing asparagus on a rooftop?
The ideal container for a rooftop asparagus garden should be large, durable, and have good drainage. A container that is at least 24 inches deep and 24 inches wide is recommended to accommodate the extensive root system of asparagus. Materials like plastic, wood, or metal can be used, but ensure the container is sturdy enough to withstand the weight of the soil and plants, especially when wet. Consider using containers with drainage holes to prevent waterlogging, which can lead to root rot. You can also line the bottom of the container with gravel or broken pottery to improve drainage. Dark-colored containers can absorb more heat, which can be beneficial in cooler climates, but may require more frequent watering in hotter regions.
How often should I water my rooftop asparagus garden?
Watering frequency depends on several factors, including the climate, container size, and soil type. Generally, asparagus needs consistent moisture, especially during the growing season. Check the soil moisture regularly by sticking your finger about an inch deep into the soil. If it feels dry to the touch, it’s time to water. Water deeply until the water drains out of the drainage holes. Avoid overwatering, as this can lead to root rot. During hot, dry periods, you may need to water daily. In cooler, wetter weather, you may only need to water every few days. Mulching around the base of the plants can help retain moisture and reduce the need for frequent watering.
What kind of fertilizer should I use for my asparagus plants?
Asparagus plants are heavy feeders and benefit from regular fertilization. A balanced fertilizer with an NPK ratio of 10-10-10 or 14-14-14 is a good option. Apply fertilizer in early spring before the spears emerge and again after the harvest season. Follow the instructions on the fertilizer package for application rates. You can also amend the soil with compost or well-rotted manure to provide a slow-release source of nutrients. Avoid using fertilizers that are too high in nitrogen, as this can promote excessive foliage growth at the expense of spear production. Organic fertilizers, such as bone meal and blood meal, can also be used to provide essential nutrients.
How long does it take for asparagus plants to produce spears?
Asparagus plants typically take two to three years to mature and produce a significant harvest. In the first year, focus on establishing a strong root system. Allow the ferns to grow and develop without harvesting any spears. In the second year, you can harvest a few spears for a short period (about two weeks). In the third year and beyond, you can harvest spears for a longer period (six to eight weeks). Patience is key when growing asparagus. The longer you wait to harvest, the stronger the plants will become and the more spears they will produce in the long run.
How do I protect my rooftop asparagus garden from pests and diseases?
Regularly inspect your asparagus plants for signs of pests and diseases. Common pests include asparagus beetles, aphids, and spider mites. Asparagus beetles can be handpicked or controlled with insecticidal soap or neem oil. Aphids and spider mites can be washed off with a strong stream of water or treated with insecticidal soap. Diseases such as rust and crown rot can be prevented by ensuring good drainage and air circulation. Avoid overcrowding the plants and remove any infected foliage promptly. Crop rotation can also help prevent soilborne diseases. Consider using organic pest control methods to minimize the use of harmful chemicals.
Can I grow asparagus in a shady location on my rooftop?
Asparagus plants need at least six hours of direct sunlight per day to thrive. While they can tolerate some shade, they will not produce as many spears in a shady location. If your rooftop receives limited sunlight, consider using grow lights to supplement natural light. Choose a location that receives the most sunlight possible and orient the plants to maximize sun exposure. You can also try growing asparagus varieties that are more tolerant of shade, although they may still not produce as well as those grown in full sun.
What do I do with the asparagus ferns after the harvest season?
After the harvest season, allow the asparagus ferns to grow and develop fully. They will photosynthesize and store energy in the roots for the following year’s growth. In late fall or early winter, after the ferns have turned brown and died back, cut them down to the ground level. This will help prevent diseases and pests from overwintering in the foliage. You can also apply a layer of mulch around the base of the plants to protect the roots from freezing temperatures.
How do I overwinter my rooftop asparagus garden in cold climates?
In cold climates, it’s important to protect your rooftop asparagus garden from freezing temperatures. Mulch heavily around the base of the plants with straw, leaves, or wood chips to insulate the roots. If you are growing asparagus in containers, you can move the containers to a sheltered location, such as a garage or shed, during the coldest months. Water the plants sparingly during the winter to prevent the soil from drying out completely. In early spring, remove the mulch and begin watering regularly as the weather warms up.
What are some good companion plants for asparagus?
Companion planting can benefit asparagus by attracting beneficial insects, repelling pests, and improving soil health. Good companion plants for asparagus include basil, parsley, thyme, marigolds, tomatoes, and peppers. Basil repels asparagus beetles, while parsley attracts beneficial insects that prey on aphids and other pests. Thyme helps improve soil drainage and prevent fungal diseases. Marigolds repel nematodes and other soil pests. Tomatoes and peppers provide shade and support for asparagus ferns. Avoid planting asparagus near onions, garlic, or other alliums, as they can inhibit asparagus growth.
How do I know when to harvest asparagus spears?
Harvest asparagus spears when they are about 6-8 inches tall and have tightly closed tips. The spears should be firm and tender. Use a sharp knife or asparagus knife to cut the spears at ground level. Avoid cutting too close to the crown, as this can damage the plant. Harvest spears regularly during the harvest season to encourage continued production. As the weather warms up, you may need to harvest spears daily.

Leave a Comment