
Rooftop Bok Choy Gardening: Imagine stepping onto your rooftop and harvesting fresh, crisp bok choy, ready to add a vibrant, healthy touch to your dinner. Sounds like a dream, right? Well, it doesn’t have to be! This DIY guide will unlock the secrets to successfully growing bok choy right on your rooftop, even if you’ve never gardened before.
Bok choy, also known as Chinese cabbage, has been a staple in Asian cuisine for centuries. Its mild, slightly sweet flavor and crisp texture make it incredibly versatile. Beyond its delicious taste, bok choy is packed with vitamins and nutrients, making it a fantastic addition to any diet. Traditionally, it was grown in fields, but today, with space at a premium, innovative gardeners are turning to rooftops to cultivate their own fresh produce.
Why should you try rooftop bok choy gardening? Because it’s easier than you think! Many of us are craving fresh, healthy food, but don’t have the space for a traditional garden. This DIY project allows you to maximize your space, enjoy the satisfaction of growing your own food, and reduce your reliance on store-bought produce. Plus, imagine the bragging rights when you serve a dish featuring bok choy you grew yourself! This guide will provide you with simple, step-by-step instructions and helpful tips to ensure your rooftop bok choy garden thrives. Let’s get started and transform your rooftop into a flourishing edible oasis!
Dein eigener Bok Choy Garten auf dem Dach: Eine DIY Anleitung
Hey Gartenfreunde! Habt ihr auch so wenig Platz, aber trotzdem Lust auf frisches Gemüse? Dann habe ich genau das Richtige für euch: Einen Bok Choy Garten auf dem Dach! Klingt verrückt? Ist es aber nicht! Mit dieser Anleitung zeige ich euch, wie ihr euren eigenen kleinen Gemüsegarten auf dem Dach zaubern könnt. Bok Choy ist super einfach anzubauen, wächst schnell und schmeckt einfach köstlich. Los geht’s!
Was du brauchst: Die Materialliste
Bevor wir loslegen, brauchen wir natürlich ein paar Dinge. Keine Sorge, das meiste davon habt ihr vielleicht schon zu Hause oder könnt es günstig besorgen.
* Geeignete Behälter: Hier sind eurer Fantasie keine Grenzen gesetzt! Ihr könnt alte Plastikkisten, Eimer, Pflanzsäcke oder sogar ausrangierte Badewannen verwenden. Wichtig ist nur, dass sie Löcher im Boden haben, damit das Wasser ablaufen kann. Ich persönlich mag Pflanzsäcke, weil sie leicht sind und sich gut transportieren lassen.
* Hochwertige Pflanzerde: Spart hier nicht am falschen Ende! Gute Erde ist das A und O für gesunde Pflanzen. Ich empfehle eine spezielle Gemüseerde, die reich an Nährstoffen ist.
* Bok Choy Samen: Die bekommt ihr im Gartencenter, im Baumarkt oder online. Achtet darauf, dass die Samen frisch sind, damit sie gut keimen. Es gibt verschiedene Bok Choy Sorten, also wählt einfach die, die euch am besten gefällt.
* Drainagematerial: Das verhindert Staunässe und sorgt dafür, dass die Wurzeln nicht faulen. Ich verwende gerne Blähton oder Kies.
* Gießkanne oder Gartenschlauch: Zum Bewässern eurer Pflanzen.
* Gartenschere oder Messer: Zum Ernten des Bok Choy.
* Optional:
* Kompost: Um die Erde mit zusätzlichen Nährstoffen anzureichern.
* Mulch: Um die Feuchtigkeit im Boden zu halten und Unkraut zu unterdrücken.
* Schneckenkorn oder Schneckenbarrieren: Bok Choy ist leider sehr beliebt bei Schnecken.
* Dünger: Für eine extra Portion Nährstoffe während der Wachstumsphase. Ich empfehle einen organischen Gemüsedünger.
Vorbereitung ist alles: Die Vorbereitungsphase
Bevor wir mit dem Pflanzen loslegen, müssen wir ein paar Vorbereitungen treffen.
1. Dach checken: Bevor ihr tonnenweise Erde auf euer Dach schleppt, solltet ihr sicherstellen, dass es das Gewicht auch aushält. Fragt im Zweifelsfall einen Statiker. Außerdem solltet ihr prüfen, ob es eine Abdichtung gibt, um Wasserschäden zu vermeiden.
2. Behälter vorbereiten: Reinigt eure Behälter gründlich mit Wasser und Seife. Wenn sie keine Löcher im Boden haben, bohrt welche hinein.
3. Drainage einfüllen: Füllt eine Schicht Drainagematerial (Blähton oder Kies) in die Behälter. Das sorgt für eine gute Drainage und verhindert Staunässe.
4. Erde einfüllen: Füllt die Behälter mit Pflanzerde. Lasst oben ein paar Zentimeter Platz, damit das Wasser beim Gießen nicht überläuft.
5. Optional: Kompost untermischen: Wenn ihr Kompost habt, könnt ihr ihn jetzt unter die Erde mischen. Das reichert die Erde mit zusätzlichen Nährstoffen an.
Aussaat und Anzucht: Der Start für deinen Bok Choy
Jetzt kommt der spannende Teil: Die Aussaat!
1. Samen aussäen: Verteilt die Bok Choy Samen gleichmäßig auf der Erde. Drückt sie leicht an und bedeckt sie mit einer dünnen Schicht Erde.
2. Angießen: Gießt die Erde vorsichtig an, sodass sie gut durchfeuchtet ist. Achtet darauf, dass die Samen nicht weggespült werden.
3. Standort wählen: Stellt die Behälter an einen sonnigen Standort. Bok Choy braucht mindestens 6 Stunden Sonne pro Tag.
4. Feucht halten: Haltet die Erde feucht, aber nicht nass. Am besten gießt ihr regelmäßig, aber in kleinen Mengen.
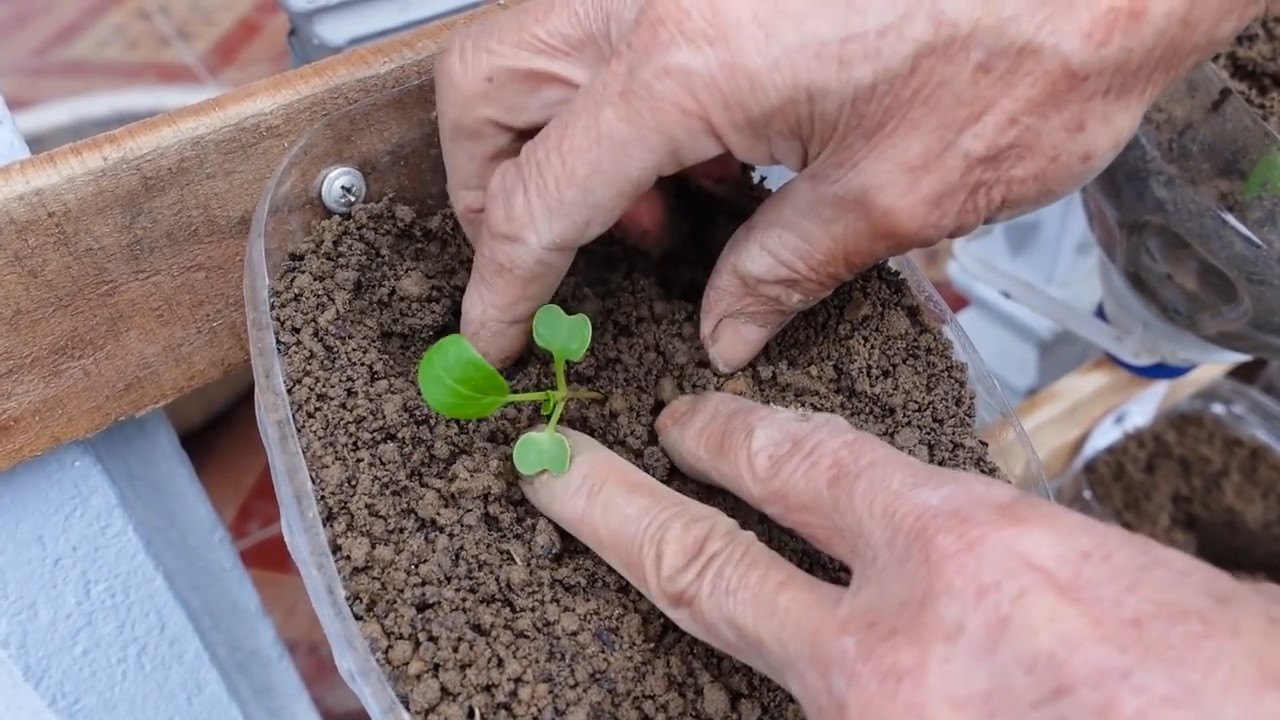
5. Keimung abwarten: Nach ein paar Tagen sollten die ersten Keimlinge zu sehen sein. Habt Geduld, es kann auch etwas länger dauern.
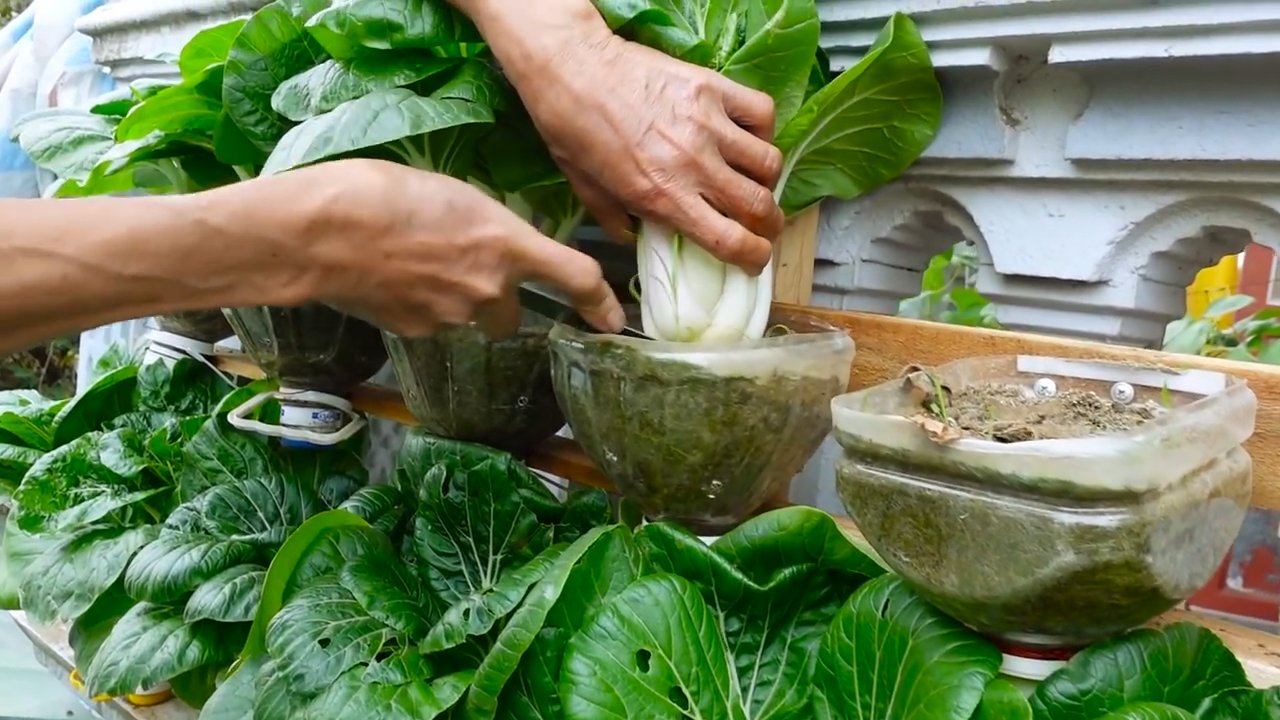
6. Vereinzeln: Wenn die Keimlinge groß genug sind (ca. 5 cm), müsst ihr sie vereinzeln. Das bedeutet, dass ihr die schwächsten Pflanzen entfernt, damit die stärkeren genug Platz zum Wachsen haben. Lasst zwischen den Pflanzen etwa 15-20 cm Platz.
Pflege und Wachstum: So bleibt dein Bok Choy fit
Damit euer Bok Choy prächtig gedeiht, braucht er regelmäßige Pflege.
1. Gießen: Gießt eure Pflanzen regelmäßig, besonders an heißen Tagen. Die Erde sollte immer feucht sein, aber nicht nass.
2. Düngen: Düngt eure Pflanzen regelmäßig mit einem organischen Gemüsedünger. Das sorgt für eine gute Nährstoffversorgung und fördert das Wachstum.
3. Unkraut entfernen: Entfernt regelmäßig Unkraut, damit es euren Pflanzen keine Nährstoffe wegnimmt.
4. Schnecken bekämpfen: Bok Choy ist leider sehr beliebt bei Schnecken. Ihr könnt Schneckenkorn verwenden oder Schneckenbarrieren aufstellen, um eure Pflanzen zu schützen. Ich persönlich sammle die Schnecken lieber ab, das ist umweltfreundlicher.
5. Mulchen: Mulcht die Erde mit Stroh oder Rasenschnitt. Das hält die Feuchtigkeit im Boden, unterdrückt Unkraut und schützt die Pflanzen vor Spritzwasser.
6. Schädlinge und Krankheiten: Achtet auf Schädlinge und Krankheiten. Bei Befall könnt ihr natürliche Pflanzenschutzmittel verwenden.
Erntezeit: Endlich frischer Bok Choy!
Nach etwa 4-6 Wochen könnt ihr euren ersten Bok Choy ernten!
1. Erntezeitpunkt: Der Bok Choy ist erntereif, wenn die Blätter eine schöne Größe haben und fest sind.
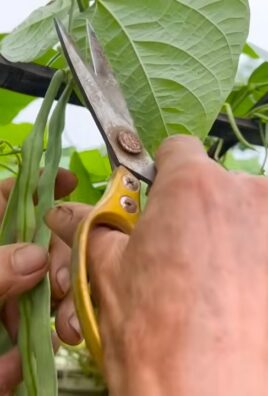
2. Ernten: Schneidet den Bok Choy mit einem scharfen Messer oder einer Gartenschere knapp über dem Boden ab.
3. Lagerung: Der Bok Choy hält sich im Kühlschrank einige Tage frisch. Am besten lagert ihr ihn in einem Plastikbeutel.
4. Genießen: Jetzt könnt ihr euren selbst angebauten Bok Choy genießen! Er schmeckt super in Salaten, Suppen, Wok-Gerichten oder einfach nur gedünstet.
Zusätzliche Tipps und Tricks
* Saison: Bok Choy ist ein kühles Gemüse und wächst am besten im Frühjahr oder Herbst. Im Sommer kann es zu heiß werden.
* Sortenwahl: Es gibt verschiedene Bok Choy Sorten. Wählt die, die euch am besten gefällt. Es gibt zum Beispiel grüne, weiße, rote und lila Sorten.
* Nachsaat: Säät regelmäßig neue Samen aus, damit ihr immer frischen Bok Choy habt.
* Kombination mit anderen Pflanzen: Bok Choy verträgt sich gut mit anderen Gemüsesorten wie Salat, Radieschen oder Karotten.
* Dachgarten gestalten: Macht euren Dachgarten zu einem kleinen Paradies! Ihr könnt ihn mit Blumen, Kräutern und anderen Gemüsesorten bepflanzen.
Häufige Probleme und Lösungen
* Schneckenbefall: Schneckenkorn verwenden, Schneckenbarrieren aufstellen oder Schnecken absammeln.
* Gelbe Blätter: Nährstoffmangel. Düngen!
* Schädlinge: Natürliche Pflanzenschutzmittel verwenden.
* Staunässe: Für eine gute Drainage sorgen.
* Sonnenbrand: An heißen Tagen für Schatten sorgen.
Ich hoffe, diese Anleitung hat euch geholfen, euren eigenen Bok Choy Garten auf dem Dach anzulegen. Viel Spaß beim Gärtnern und guten Appetit! Lasst mich wissen, wie es bei euch läuft! Ich freue mich über eure Kommentare und Fotos.
Conclusion
So, there you have it! Transforming your rooftop into a thriving bok choy garden is not only achievable, but incredibly rewarding. We’ve walked you through the simple steps, from preparing your containers and choosing the right soil to nurturing your plants and harvesting your delicious, homegrown greens. This DIY trick is a must-try for several compelling reasons.
First and foremost, imagine the satisfaction of harvesting fresh, crisp bok choy just steps from your kitchen. No more trips to the grocery store, no more wondering about the origin of your produce. You’ll have complete control over the growing process, ensuring your bok choy is free from harmful pesticides and packed with nutrients. The taste difference alone is enough to convince anyone to give rooftop gardening a shot. Freshly harvested bok choy has a delicate sweetness and satisfying crunch that you simply can’t replicate with store-bought varieties.
Beyond the culinary benefits, rooftop gardening offers a fantastic opportunity to connect with nature, even in the heart of the city. Tending to your plants can be a therapeutic and stress-relieving activity, providing a welcome escape from the hustle and bustle of urban life. Plus, you’ll be contributing to a greener environment by reducing your carbon footprint and supporting local biodiversity.
But the advantages don’t stop there. Growing your own bok choy can also be a significant cost-saver. Once you’ve invested in the initial supplies, the ongoing expenses are minimal. You’ll be amazed at how much money you can save by growing your own vegetables, especially if you regularly consume bok choy.
Now, let’s talk about variations. While we’ve focused on bok choy, the principles of rooftop container gardening can be applied to a wide range of other vegetables and herbs. Consider adding some companion plants to your bok choy garden, such as marigolds to deter pests or chives to enhance the flavor. You could also experiment with different varieties of bok choy, such as Shanghai bok choy or baby bok choy, to add variety to your harvest.
For those with limited rooftop space, vertical gardening techniques can be a game-changer. Utilize wall-mounted planters or stacked containers to maximize your growing area. You can even create a living wall of bok choy, adding a unique and visually appealing element to your rooftop oasis.
If you live in a particularly windy area, be sure to provide adequate protection for your plants. Windbreaks, such as trellises or screens, can help to prevent damage and ensure your bok choy thrives. Similarly, if your rooftop receives intense sunlight, consider using shade cloth to protect your plants from scorching.
Don’t be afraid to experiment and adapt the techniques to suit your specific environment and preferences. The beauty of DIY gardening is that it’s a constantly evolving process. You’ll learn something new with each growing season, and you’ll become more adept at nurturing your plants and maximizing your harvest.
We wholeheartedly encourage you to try this DIY trick and embark on your own rooftop bok choy gardening adventure. It’s a rewarding experience that will bring you fresh, delicious produce, a connection with nature, and a sense of accomplishment.
Once you’ve harvested your first crop, we’d love to hear about your experience! Share your photos, tips, and challenges in the comments section below. Let’s create a community of rooftop gardeners and inspire others to embrace the joys of growing their own food. Happy gardening!
Frequently Asked Questions (FAQ)
1. What kind of containers are best for rooftop bok choy gardening?
The best containers for rooftop bok choy gardening are those that are durable, lightweight, and have adequate drainage. Plastic pots, fabric grow bags, and even repurposed containers like old buckets or tubs can work well. Ensure the containers are large enough to accommodate the mature size of the bok choy plants, typically at least 12 inches in diameter and depth. Consider the weight of the containers when filled with soil and water, especially if your rooftop has weight restrictions. Lightweight materials like plastic or fabric are preferable to heavy clay pots. Drainage is crucial to prevent root rot, so make sure your containers have drainage holes. If using repurposed containers, drill holes in the bottom if they don’t already have them.
2. What type of soil should I use for growing bok choy on my rooftop?
Bok choy thrives in well-draining, nutrient-rich soil. A good potting mix specifically formulated for vegetables is ideal. Avoid using garden soil directly from the ground, as it can be too heavy and compacted for container gardening. Look for a potting mix that contains a blend of peat moss, perlite, and vermiculite. These ingredients help to improve drainage, aeration, and water retention. You can also amend your potting mix with compost or other organic matter to boost its nutrient content. Bok choy prefers a slightly acidic to neutral soil pH, around 6.0 to 7.0. You can test your soil pH using a soil testing kit and adjust it accordingly with lime (to raise pH) or sulfur (to lower pH).
3. How often should I water my rooftop bok choy plants?
Watering frequency depends on several factors, including the weather, the type of container you’re using, and the size of your plants. Generally, bok choy plants need consistent moisture to thrive. Check the soil moisture regularly by sticking your finger about an inch into the soil. If the soil feels dry to the touch, it’s time to water. Water deeply, until water drains out of the drainage holes. Avoid overwatering, as this can lead to root rot. During hot, dry weather, you may need to water your plants daily. In cooler, wetter weather, you may only need to water every few days. Consider using a soaker hose or drip irrigation system to provide consistent and efficient watering.
4. How much sunlight does bok choy need to grow well on a rooftop?
Bok choy prefers full sun to partial shade. Ideally, it should receive at least 4-6 hours of direct sunlight per day. If your rooftop is particularly sunny, providing some afternoon shade can help to prevent the leaves from scorching. In hotter climates, bok choy may benefit from more shade, especially during the hottest part of the day. If your rooftop is shaded for most of the day, you can supplement with grow lights to ensure your plants receive adequate light.
5. What are some common pests and diseases that affect bok choy, and how can I prevent them?
Common pests that affect bok choy include aphids, cabbage worms, and flea beetles. Diseases include downy mildew and clubroot. To prevent pests, inspect your plants regularly for signs of infestation. Handpick any pests you find, or use insecticidal soap or neem oil to control them. Row covers can also be used to protect your plants from pests. To prevent diseases, ensure good air circulation around your plants and avoid overwatering. Rotate your crops each year to prevent soilborne diseases from building up. If you notice any signs of disease, remove the affected leaves immediately and treat the plants with a fungicide if necessary.
6. How do I harvest bok choy from my rooftop garden?
Bok choy can be harvested at any stage of growth, depending on your preference. Baby bok choy can be harvested as early as 30 days after planting, while mature bok choy can be harvested in 45-60 days. To harvest, simply cut the entire plant at the base with a sharp knife. You can also harvest individual leaves as needed, starting with the outer leaves. This will allow the plant to continue producing new leaves. Harvest bok choy in the morning, when the leaves are crisp and hydrated.
7. Can I grow bok choy on my rooftop during the winter?
Whether you can grow bok choy on your rooftop during the winter depends on your climate. Bok choy is a cool-season crop that can tolerate light frosts. In mild climates, you may be able to grow bok choy throughout the winter. In colder climates, you may need to provide protection from frost and freezing temperatures. This can be done by covering your plants with row covers, blankets, or plastic sheeting. You can also move your containers indoors to a sunny location.
8. How can I fertilize my rooftop bok choy plants?
Bok choy benefits from regular fertilization. Use a balanced fertilizer specifically formulated for vegetables. You can use a granular fertilizer, applying it according to the package directions. Alternatively, you can use a liquid fertilizer, diluting it with water and applying it every few weeks. Avoid over-fertilizing, as this can lead to excessive leaf growth and reduced flavor.
9. What are some companion plants for bok choy?
Companion plants can help to improve the growth and health of bok choy. Some good companion plants for bok choy include:
* Marigolds: Deter pests
* Chives: Enhance flavor and deter pests
* Garlic: Deter pests
* Lettuce: Provides ground cover and suppresses weeds
* Spinach: Provides ground cover and suppresses weeds
10. How do I deal with strong winds on my rooftop garden?
Strong winds can damage bok choy plants, especially young seedlings. To protect your plants from wind, consider using windbreaks such as trellises, screens, or fences. You can also use heavier containers to prevent them from being blown over. Staking your plants can also help to prevent them from being damaged by wind.

Leave a Comment