
Rooftop Corn Growing DIY: Imagine stepping onto your rooftop and harvesting fresh, juicy corn – a taste of summer right in the heart of the city! Sounds like a dream, right? Well, it doesn’t have to be! For centuries, humans have cultivated corn, or maize, in diverse environments, from the fertile valleys of Mesoamerica to small backyard gardens. Now, you can join this rich agricultural tradition, even without a sprawling farm.
In this article, I’m going to share some amazing DIY tricks and hacks that will empower you to grow your own corn on your rooftop. Why is this so important? Well, access to fresh, healthy produce is becoming increasingly vital, especially in urban areas. Plus, there’s nothing quite like the satisfaction of nurturing a plant from seed to harvest. Rooftop Corn Growing DIY isn’t just a fun project; it’s a step towards sustainable living and a delicious way to connect with nature.
Many people think growing corn requires acres of land, but I’m here to bust that myth! With the right techniques and a little bit of know-how, you can transform your rooftop into a thriving cornfield. Get ready to learn some simple, effective, and budget-friendly methods that will have you enjoying homegrown corn on the cob in no time!
DIY Rooftop Corn Growing: A Beginner’s Guide
Hey there, fellow DIY enthusiasts! Ever dreamt of growing your own corn, but lack a sprawling backyard? Well, I’m here to tell you that rooftop corn growing is totally achievable, and I’m going to walk you through every step of the process. It’s a rewarding experience, and nothing beats the taste of fresh, homegrown corn on the cob!
Planning Your Rooftop Corn Garden
Before we dive into the nitty-gritty, let’s talk planning. This is crucial for success.
* Assess Your Rooftop: First and foremost, make sure your roof can handle the weight. Corn plants, especially when mature and laden with ears, can get heavy. Consult a structural engineer if you have any doubts. Safety first!
* Sunlight is Key: Corn needs at least 6-8 hours of direct sunlight per day. Observe your rooftop throughout the day to determine the sunniest spot.
* Water Source: Easy access to water is essential. Lugging heavy watering cans up to the roof gets old fast. Consider a hose connection or a rainwater harvesting system.
* Container Size Matters: Corn plants have extensive root systems. You’ll need large containers, at least 20 gallons in size, per plant. Think big!
* Choose the Right Variety: Opt for shorter, more compact corn varieties specifically bred for container gardening. Some good options include ‘On Deck’, ‘Trinity’, or ‘Golden Bantam’. These are less likely to topple over in windy conditions.
* Pollination Strategy: Corn is wind-pollinated, so you need to plant in blocks, not rows, to ensure successful pollination. More on this later!
* Soil Selection: Use a high-quality potting mix that drains well but retains moisture. Avoid using garden soil, as it can compact in containers.
Gathering Your Supplies
Alright, time to gather our supplies. Here’s what you’ll need:
* Large containers (at least 20 gallons each)
* High-quality potting mix
* Corn seeds (choose a suitable variety)
* Slow-release fertilizer
* Watering can or hose
* Trowel or small shovel
* Stakes and twine (for support, if needed)
* Bird netting (optional, to protect your corn from hungry birds)
* Gloves (to keep your hands clean)
Step-by-Step Instructions: Planting Your Corn
Now for the fun part – planting!
1. Prepare Your Containers: Make sure your containers have drainage holes. If not, drill some. Add a layer of gravel or broken pottery to the bottom of each container to improve drainage.
2. Fill with Potting Mix: Fill the containers with your high-quality potting mix, leaving a few inches of space at the top.
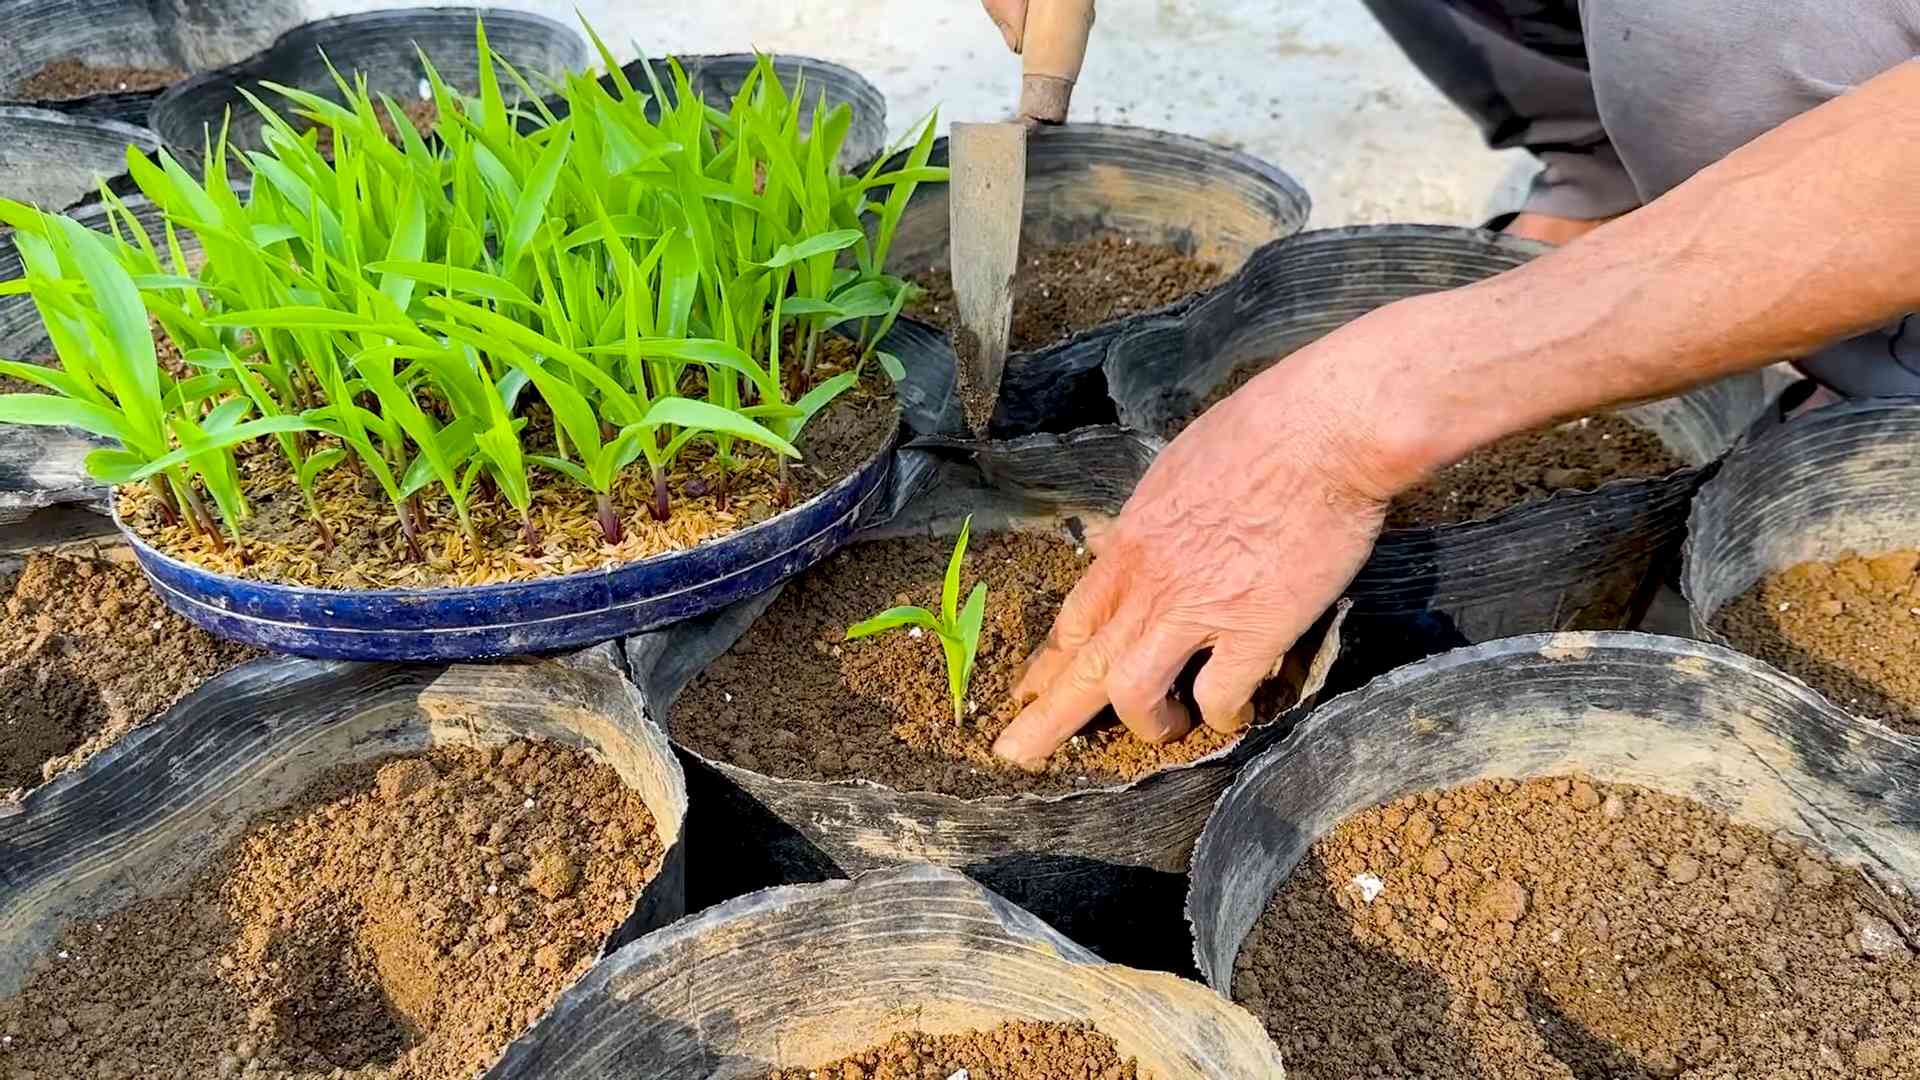
3. Plant the Seeds: Plant 3-4 corn seeds per container, about 1-2 inches deep. Space them evenly within the container. Planting multiple seeds ensures at least one will germinate successfully.
4. Water Thoroughly: Gently water the soil until it’s evenly moist, but not soggy.
5. Place in a Sunny Location: Move your containers to the sunniest spot on your rooftop.
6. Wait for Germination: Corn seeds typically germinate in 7-10 days, depending on the temperature and moisture levels. Keep the soil consistently moist during this time.
7. Thin the Seedlings: Once the seedlings are a few inches tall, thin them to one strong plant per container. Snip off the weaker seedlings at the base with scissors to avoid disturbing the roots of the remaining plant.
Caring for Your Growing Corn
Once your corn plants are established, it’s time to provide them with the care they need to thrive.
1. Watering: Corn needs consistent moisture, especially during hot weather. Water deeply whenever the top inch of soil feels dry to the touch. Avoid overhead watering, as this can promote fungal diseases. Drip irrigation is ideal.
2. Fertilizing: Corn is a heavy feeder. Apply a slow-release fertilizer according to the package directions. You can also supplement with liquid fertilizer every few weeks. Look for a fertilizer that’s high in nitrogen, especially during the early stages of growth.
3. Supporting the Plants: As your corn plants grow taller, they may become susceptible to wind damage. Use stakes and twine to provide support. Gently tie the stalks to the stakes to prevent them from toppling over.
4. Pollination Assistance (If Needed): Corn is wind-pollinated, but sometimes rooftop conditions can hinder this process. If you notice that the silks (the stringy strands emerging from the developing ears) are not turning brown and sticky, you may need to hand-pollinate. To do this, gently shake the tassels (the pollen-producing structures at the top of the plant) over the silks. You can also collect pollen from the tassels with a small brush and apply it directly to the silks. Repeat this process for several days to ensure successful pollination.
5. Pest and Disease Control: Keep an eye out for common corn pests, such as corn earworms and aphids. Handpick any pests you find or use an organic insecticide if necessary. To prevent fungal diseases, ensure good air circulation around your plants and avoid overhead watering.
6. Weed Control: Remove any weeds that sprout in your containers to prevent them from competing with your corn plants for nutrients and water.
Harvesting Your Rooftop Corn
The moment we’ve all been waiting for – harvest time!
1. Check for Ripeness: Corn is typically ready to harvest about 20-25 days after the silks emerge. The silks should be dry and brown, and the ears should feel plump and full.
2. Test the Kernels: To test for ripeness, peel back a small portion of the husk and puncture a kernel with your fingernail. If the liquid that comes out is milky, the corn is ready to harvest. If it’s clear, the corn needs more time to mature.
3. Harvest Carefully: To harvest, grasp the ear firmly and twist it downward. The ear should snap off easily from the stalk.
4. Enjoy Your Harvest: Freshly harvested corn is best enjoyed immediately. You can grill it, boil it, roast it, or use it in your favorite recipes.
Troubleshooting Common Problems
Even with the best planning, you might encounter some challenges along the way. Here are some common problems and how to address them:
* Poor Germination: If your seeds don’t germinate, make sure the soil is consistently moist and the temperature is warm enough. You can also try soaking the seeds in water for 24 hours before planting to improve germination rates.
* Stunted Growth: Stunted growth can be caused by a lack of nutrients, insufficient sunlight, or poor drainage. Make sure you’re fertilizing regularly and that your plants are getting enough sunlight. Improve drainage by adding more drainage holes to your containers or using a lighter potting mix.
* Poor Pollination: As mentioned earlier, poor pollination can be addressed by hand-pollinating. You can also try planting more corn plants in a tighter block to increase the chances of wind pollination.
* Pest Infestations: Regularly inspect your plants for pests and take action promptly. Handpicking pests is often effective for small infestations. For larger infestations, use an organic insecticide.
* Disease Problems: Prevent fungal diseases by ensuring good air circulation around your plants and avoiding overhead watering. If you notice signs of disease, such as spots on the leaves, remove the affected leaves and treat the plant with a fungicide.
Tips for Success
Here are a few extra tips to help you succeed with your rooftop corn garden:
* Choose the Right Location: As I mentioned before, sunlight is crucial. Make sure your corn plants are getting at least 6-8 hours of direct sunlight per day.
* Use High-Quality Potting Mix: Don’t skimp on the potting mix. A good-quality potting mix will provide your plants with the nutrients and drainage they need to thrive.
* Water Regularly: Corn needs consistent moisture, especially during hot weather. Water deeply whenever the top inch of soil feels dry to the touch.
* Fertilize Regularly: Corn is a heavy feeder. Fertilize regularly with a slow-release fertilizer and supplement with liquid fertilizer every few weeks.
* Provide Support: As your corn plants grow taller, they may become susceptible to wind damage. Use stakes and twine to provide support.
* Be Patient: Growing corn takes time and effort. Don’t get discouraged if you encounter some challenges along the way. With a little patience and persistence, you’ll be enjoying fresh, homegrown corn in no time!
I hope this guide has inspired you to try growing corn on your rooftop. It’s a fun and rewarding experience, and you’ll be amazed at how much you can grow in a small space. Happy gardening!
Conclusion
So, there you have it! Growing your own corn on a rooftop might sound like a whimsical dream, but with a little planning and effort, it can become a delicious reality. This rooftop corn growing DIY project isn’t just about fresh corn on the cob; it’s about connecting with nature, embracing sustainable practices, and enjoying the satisfaction of harvesting food you’ve nurtured from seed to table.
Why is this a must-try? Because it offers a unique opportunity to maximize space, especially for urban dwellers with limited or no yard. Imagine stepping onto your rooftop and plucking ripe, juicy ears of corn, knowing exactly where they came from and how they were grown. The taste difference between homegrown and store-bought corn is undeniable – the sweetness is more pronounced, the texture is more tender, and the overall flavor is simply superior. Beyond the taste, this project is a fantastic learning experience for all ages, teaching valuable lessons about plant life cycles, pollination, and the importance of sustainable agriculture. It’s also a conversation starter, a way to impress your friends and neighbors, and a source of immense personal pride.
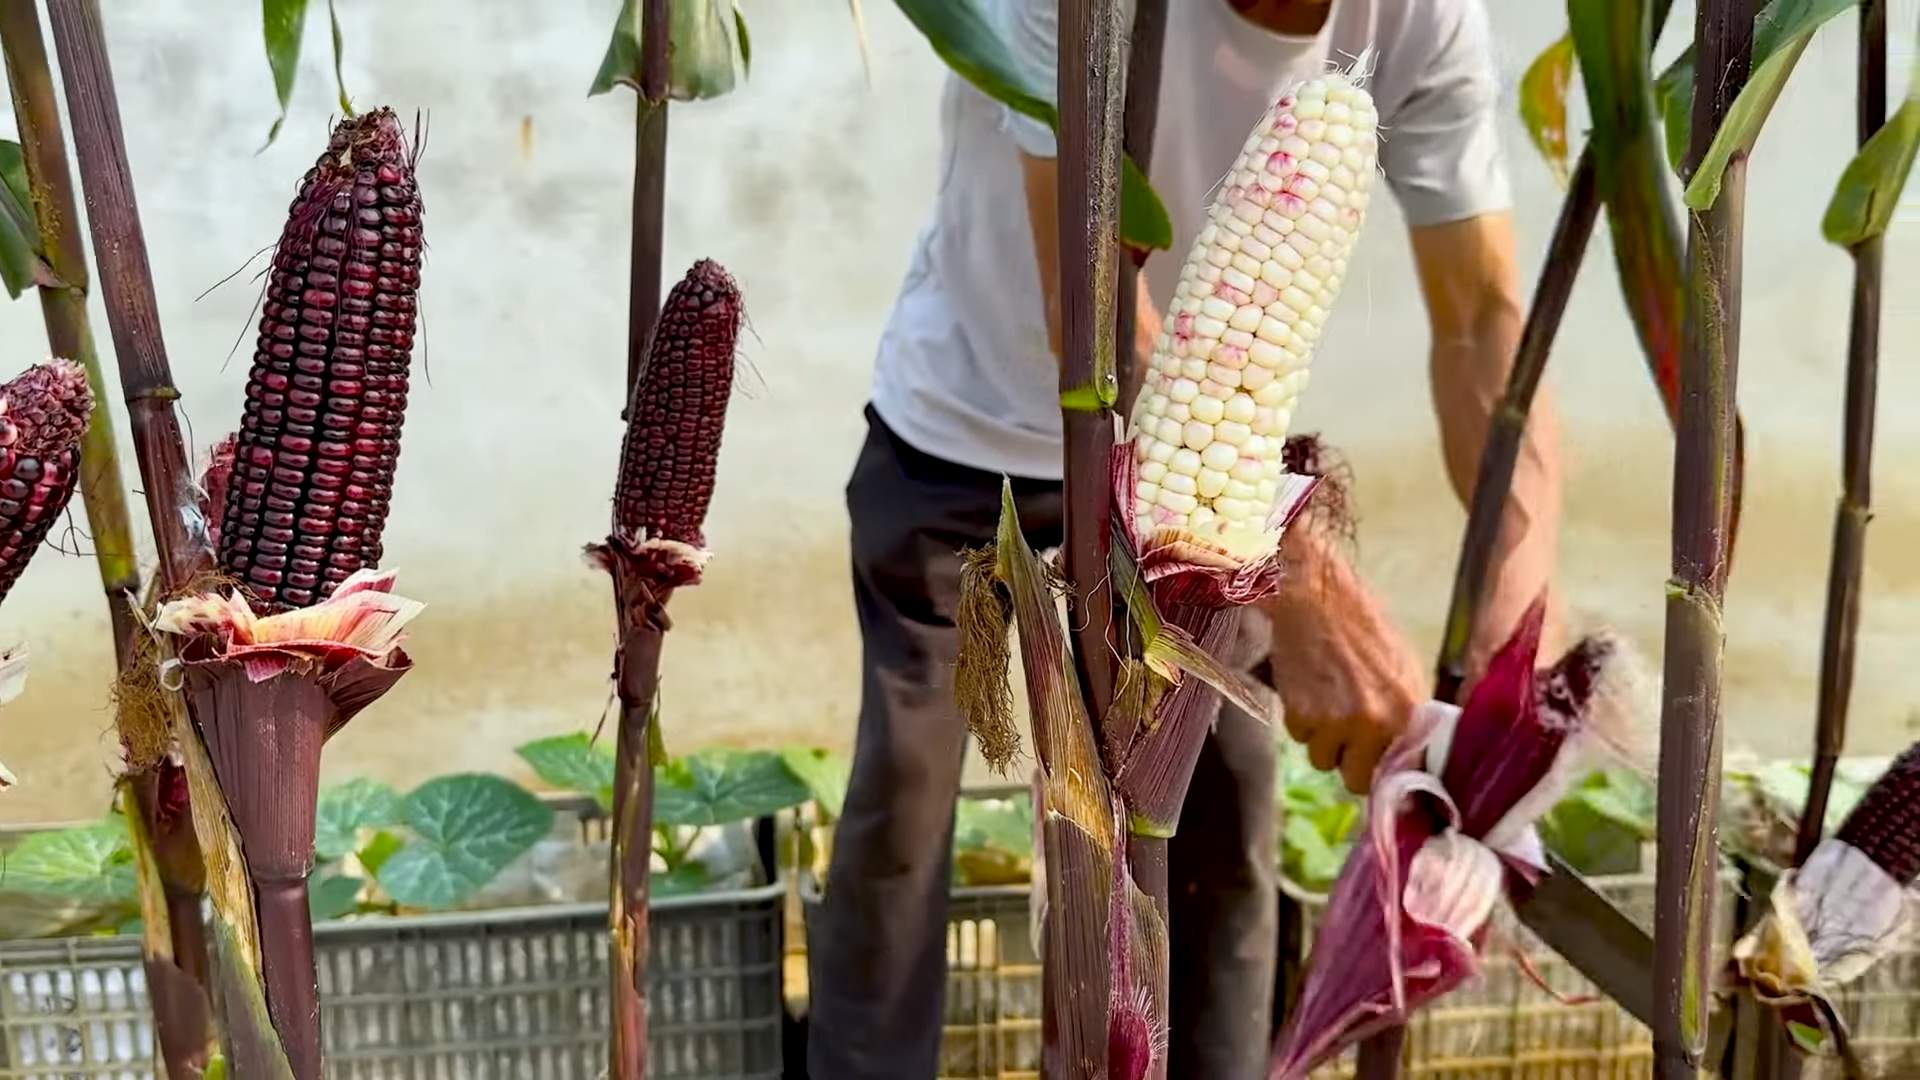
Looking for variations? Consider experimenting with different corn varieties. While sweet corn is a popular choice, you could also try growing popcorn corn for a fun family activity or ornamental corn for its beautiful, colorful kernels. You can also adapt the container size and arrangement to fit your specific rooftop space. If you have a smaller area, focus on a few well-tended containers. If you have more room, create a mini cornfield in the sky! Companion planting is another avenue to explore. Consider planting beans or squash alongside your corn to create a symbiotic relationship that benefits all three plants. Marigolds can also be planted nearby to deter pests.
Don’t be intimidated by the prospect of growing corn on your rooftop. While it requires some initial setup and ongoing care, the rewards are well worth the effort. The feeling of accomplishment you’ll experience when you harvest your first ear of corn will be unparalleled. Plus, you’ll be contributing to a more sustainable food system and reducing your carbon footprint.
We wholeheartedly encourage you to give this rooftop corn growing DIY project a try. It’s a fun, rewarding, and educational experience that will transform your rooftop into a vibrant and productive space. Once you’ve embarked on this adventure, we’d love to hear about your experiences! Share your photos, tips, and challenges in the comments section below. Let’s build a community of rooftop corn growers and inspire others to embrace the joys of urban farming. What worked for you? What challenges did you face? What are your favorite ways to enjoy your homegrown corn? Your insights will be invaluable to others who are just starting out. So, grab your seeds, soil, and containers, and get ready to experience the magic of growing your own corn on your rooftop! Happy growing!
Frequently Asked Questions (FAQ)
1. What kind of containers are best for growing corn on a rooftop?
The ideal containers for growing corn on a rooftop are large, sturdy, and well-draining. Corn plants have extensive root systems and require ample space to thrive. We recommend using containers that are at least 12-18 inches in diameter and depth. Plastic containers are a lightweight and cost-effective option, but terracotta pots can also be used, although they tend to dry out more quickly. Fabric pots are another excellent choice, as they allow for better air circulation and drainage, preventing root rot. Ensure that your containers have drainage holes to prevent waterlogging. Consider the weight of the containers when filled with soil and water, especially when placing them on a rooftop. Distribute the weight evenly and consult with a structural engineer if you have any concerns about the load-bearing capacity of your roof.
2. What type of soil should I use for my rooftop corn garden?
Corn plants are heavy feeders and require nutrient-rich soil to produce a bountiful harvest. A well-draining potting mix that is specifically formulated for vegetables is ideal. Avoid using garden soil, as it can be too heavy and compact for container gardening. Amend your potting mix with compost or other organic matter to improve its fertility and drainage. You can also add slow-release fertilizer to provide a steady supply of nutrients throughout the growing season. Regularly monitor the soil’s pH level and adjust it as needed to maintain a slightly acidic to neutral range (6.0-7.0).
3. How much sunlight does rooftop corn need?
Corn plants require at least 6-8 hours of direct sunlight per day to thrive. Choose a location on your rooftop that receives ample sunlight throughout the day. If your rooftop is partially shaded, try to position your containers in the sunniest spot. You can also use reflective materials, such as white paint or aluminum foil, to bounce sunlight onto your plants. If you live in a particularly hot climate, consider providing some afternoon shade to prevent your plants from overheating.
4. How often should I water my rooftop corn plants?
Rooftop corn plants require regular watering, especially during hot and dry weather. Check the soil moisture regularly by sticking your finger into the soil. If the top inch of soil feels dry, it’s time to water. Water deeply and thoroughly, ensuring that the water reaches the roots. Avoid overwatering, as this can lead to root rot. Consider using a soaker hose or drip irrigation system to provide a consistent and efficient water supply. Mulching around the base of your plants can also help to retain moisture and suppress weeds.
5. How do I pollinate my rooftop corn plants?
Corn is wind-pollinated, meaning that the pollen from the tassels (male flowers) must be transferred to the silks (female flowers) by the wind. On a rooftop, where wind conditions may be less consistent, you may need to assist with pollination. You can do this by gently shaking the tassels to release pollen or by using a small paintbrush to collect pollen from the tassels and apply it to the silks. Repeat this process every day for several days to ensure that all of the silks are pollinated. You’ll know that pollination has been successful when the silks turn brown and dry.
6. What are some common pests and diseases that affect rooftop corn, and how can I prevent them?
Common pests that can affect rooftop corn include aphids, corn earworms, and spider mites. Diseases that can affect corn include rust and smut. To prevent pest and disease problems, start with healthy plants and provide them with optimal growing conditions. Regularly inspect your plants for signs of pests or diseases and take action promptly if you notice any problems. You can use organic pest control methods, such as insecticidal soap or neem oil, to control pests. To prevent diseases, ensure good air circulation around your plants and avoid overwatering. Remove any infected leaves or plants promptly to prevent the spread of disease.
7. When is the best time to harvest my rooftop corn?
The best time to harvest your rooftop corn is when the silks have turned brown and dry, and the kernels are plump and milky. To test for ripeness, peel back a portion of the husk and puncture a kernel with your fingernail. If the liquid that comes out is milky, the corn is ready to harvest. If the liquid is clear, the corn needs more time to ripen. To harvest, simply twist the ear of corn and pull it away from the stalk.
8. Can I grow different varieties of corn together on my rooftop?
While it’s possible to grow different varieties of corn together on your rooftop, it’s important to be aware of the potential for cross-pollination. If you grow different varieties of corn that are not isolated from each other, they may cross-pollinate, resulting in kernels that are a mix of the two varieties. This may not be a problem if you’re just growing corn for personal consumption, but it can be an issue if you’re saving seeds for future planting. To prevent cross-pollination, you can either grow only one variety of corn or isolate different varieties by a distance of at least 250 feet.
9. How can I support my corn stalks on a rooftop, especially during windy conditions?
Corn stalks can be susceptible to wind damage, especially on a rooftop where wind exposure may be higher. To support your corn stalks, you can use stakes or trellises. Insert stakes into the soil near the base of each plant and tie the stalks to the stakes with twine. You can also use a trellis to provide additional support. Choose a sturdy trellis that can withstand strong winds. Another option is to plant your corn in a sheltered location, such as near a wall or fence.
10. Is rooftop corn growing DIY project suitable for beginners?
Yes, the rooftop corn growing DIY project is suitable for beginners, but it requires some basic gardening knowledge and a willingness to learn. Start with a small number of plants and gradually increase the scale of your operation as you gain experience. Don’t be afraid to experiment and try new things. The most important thing is to have fun and enjoy the process of growing your own food. Remember to research your specific climate and growing conditions to ensure the best possible results.

Leave a Comment