
Rooftop Swiss Chard Gardening: Imagine stepping onto your rooftop and harvesting vibrant, colorful Swiss chard, ready to add a burst of freshness to your next meal. Sounds idyllic, right? Well, it’s more achievable than you might think! For centuries, urban dwellers have sought ways to bring nature closer, and rooftop gardens, in particular, have blossomed as a testament to human ingenuity and our innate connection to the earth. From the hanging gardens of Babylon to modern-day green roofs, the desire to cultivate our own food in limited spaces is deeply ingrained.
But why Swiss chard, and why on your roof? Well, Swiss chard is incredibly versatile, packed with nutrients, and surprisingly easy to grow. And let’s face it, in today’s world, knowing where your food comes from and having access to fresh, organic produce is more important than ever. Plus, let’s be honest, store-bought Swiss chard just doesn’t compare to the flavor and satisfaction of harvesting your own. This DIY guide will provide you with the essential tricks and hacks you need to successfully start your own rooftop Swiss chard gardening project, even if you’re a complete beginner. I’m here to show you that with a little planning and effort, you can transform your rooftop into a thriving edible oasis!

Dein eigener Dachgarten: Schweizer Mangold anbauen – So geht’s!
Hey Gärtnerfreunde! Habt ihr auch so ein ungenutztes Dach, das nach Leben schreit? Dann lasst uns das ändern! Ich zeige euch, wie ihr einen wunderschönen und ertragreichen Dachgarten mit Schweizer Mangold anlegt. Keine Angst, es ist einfacher als ihr denkt und das Ergebnis ist einfach fantastisch: frischer, knackiger Mangold direkt vom Dach auf euren Teller!
Was du für deinen Dachgarten brauchst:
Bevor wir loslegen, hier eine Liste mit allem, was du benötigst. Keine Sorge, vieles davon hast du vielleicht schon zu Hause!
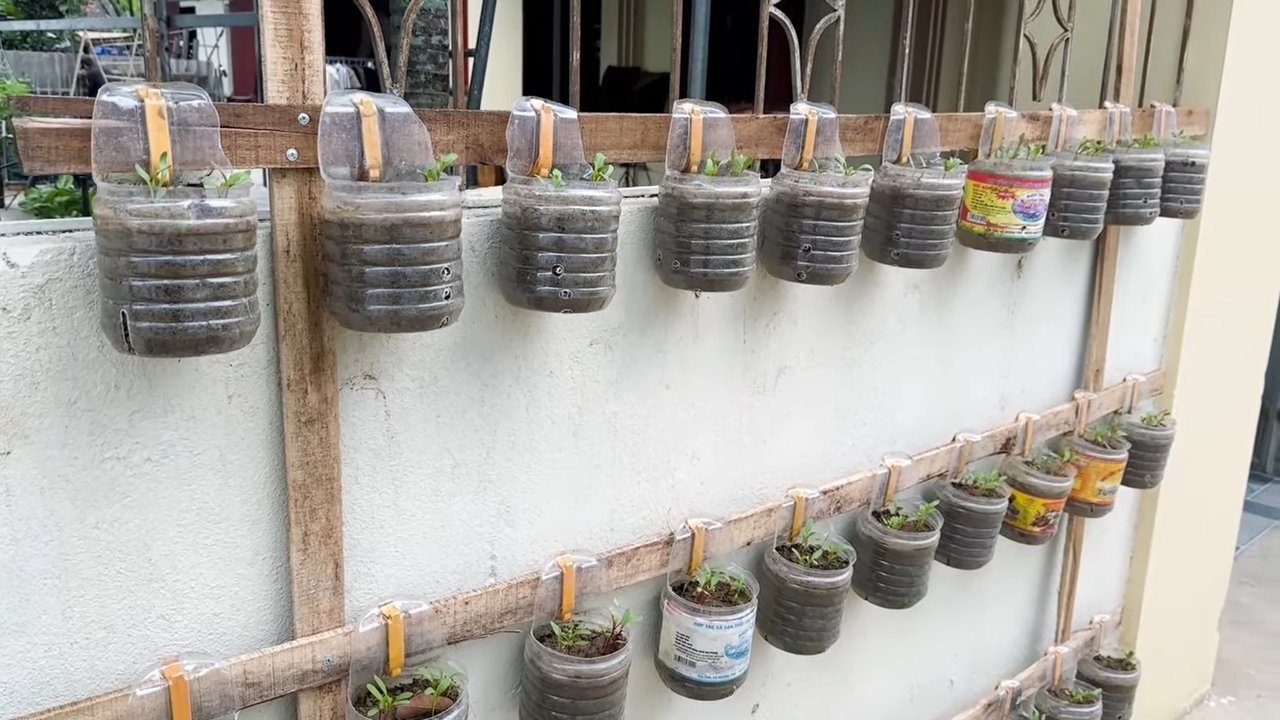
* Geeignete Pflanzgefäße: Das A und O! Wähle leichte, aber robuste Behälter. Denk an eine gute Drainage!
* Hochwertige Pflanzerde: Billige Erde rächt sich. Investiere in gute Qualität, am besten Bio-Erde.
* Schweizer Mangold Samen oder Jungpflanzen: Je nachdem, wie schnell du ernten möchtest.
* Drainagematerial: Blähton, Kies oder Tonscherben für den Boden der Pflanzgefäße.
* Gießkanne oder Schlauch: Zum Bewässern deiner Pflanzen.
* Gartenschere: Zum Ernten und Ausputzen.
* Handschuhe: Zum Schutz deiner Hände.
* Organischer Dünger: Für eine reiche Ernte.
* (Optional) Rankhilfe: Wenn du Sorten mit besonders langen Stielen anbaust.
* (Optional) Schneckenschutz: Mangold ist leider sehr beliebt bei Schnecken.
Sicherheit geht vor!
Bevor wir mit dem Bepflanzen loslegen, ein paar wichtige Sicherheitshinweise:
* Dachlast prüfen: Informiere dich, wie viel Gewicht dein Dach tragen kann. Überlastung kann gefährlich sein!
* Sicherheitsvorkehrungen treffen: Trage festes Schuhwerk und achte auf einen sicheren Stand.
* Windschutz: Auf dem Dach kann es windig sein. Schütze deine Pflanzen vor starkem Wind.
* Sonnenschutz: Gerade im Sommer kann die Sonne auf dem Dach sehr intensiv sein. Achte auf ausreichenden Sonnenschutz für dich und deine Pflanzen.
Schritt-für-Schritt Anleitung: Dein Dachgarten mit Schweizer Mangold
So, jetzt geht’s ans Eingemachte! Folge diesen Schritten und bald kannst du deinen eigenen Mangold ernten.
1. Vorbereitung der Pflanzgefäße
1. Reinigung: Reinige deine Pflanzgefäße gründlich mit Wasser und eventuell etwas Spülmittel. Achte darauf, dass keine alten Erdreste oder Schädlinge zurückbleiben.
2. Drainage: Fülle den Boden der Pflanzgefäße mit einer Schicht Drainagematerial (Blähton, Kies oder Tonscherben). Das verhindert Staunässe und sorgt für eine gute Belüftung der Wurzeln. Eine Schicht von ca. 5-10 cm ist ideal.
3. Erde einfüllen: Fülle die Pflanzgefäße mit hochwertiger Pflanzerde. Lass oben einen Rand von ca. 5 cm frei. Die Erde sollte locker und luftig sein.
4. Erde anfeuchten: Befeuchte die Erde leicht mit einer Gießkanne. Sie sollte feucht, aber nicht nass sein.
2. Aussaat oder Einpflanzen
Hier hast du zwei Möglichkeiten: Entweder du säst die Mangoldsamen direkt in die Pflanzgefäße oder du pflanzt Jungpflanzen ein. Ich persönlich bevorzuge Jungpflanzen, weil es schneller geht und man gleich sieht, was man hat.
Aussaat (wenn du Samen verwendest):
1. Saatrillen ziehen: Ziehe mit dem Finger oder einem kleinen Werkzeug Saatrillen in die Erde. Die Rillen sollten ca. 1-2 cm tief sein.
2. Samen auslegen: Lege die Mangoldsamen in die Saatrillen. Achte auf einen Abstand von ca. 5-10 cm zwischen den Samen.
3. Mit Erde bedecken: Bedecke die Samen mit einer dünnen Schicht Erde.
4. Angießen: Gieße die Erde vorsichtig an.
5. Feucht halten: Halte die Erde feucht, bis die Samen keimen. Das kann je nach Sorte und Temperatur 1-2 Wochen dauern.
Einpflanzen (wenn du Jungpflanzen verwendest):
1. Pflanzlöcher graben: Grabe mit einem kleinen Spaten oder deinen Fingern Pflanzlöcher in die Erde. Die Löcher sollten so tief sein, wie die Wurzelballen der Jungpflanzen.
2. Pflanzen einsetzen: Setze die Jungpflanzen vorsichtig in die Pflanzlöcher. Achte darauf, dass die Wurzelballen nicht beschädigt werden.
3. Mit Erde auffüllen: Fülle die Pflanzlöcher mit Erde auf und drücke die Erde leicht an.
4. Angießen: Gieße die Pflanzen gründlich an.
3. Pflege des Schweizer Mangolds
Jetzt kommt der wichtigste Teil: die Pflege! Mangold ist relativ pflegeleicht, aber ein paar Dinge solltest du beachten.
1. Bewässerung: Gieße deine Mangoldpflanzen regelmäßig, besonders an heißen Tagen. Die Erde sollte immer leicht feucht sein, aber Staunässe solltest du vermeiden. Am besten gießt du morgens oder abends, wenn die Sonne nicht so stark scheint.
2. Düngung: Dünge deine Mangoldpflanzen regelmäßig mit organischem Dünger. Das sorgt für eine reiche Ernte und gesunde Pflanzen. Ich verwende gerne Kompost oder Hornspäne. Dünge am besten alle 2-3 Wochen.
3. Unkraut entfernen: Entferne regelmäßig Unkraut aus den Pflanzgefäßen. Unkraut konkurriert mit dem Mangold um Nährstoffe und Wasser.
4. Schneckenbekämpfung: Mangold ist leider sehr beliebt bei Schnecken. Schütze deine Pflanzen mit Schneckenkorn oder anderen Schneckenabwehrmitteln. Du kannst auch eine Barriere aus Kaffeesatz oder Sägemehl um die Pflanzen legen.
5. Ausputzen: Entferne regelmäßig welke oder beschädigte Blätter. Das fördert das Wachstum der Pflanze und verhindert Krankheiten.
6. Rankhilfe (optional): Wenn du Sorten mit besonders langen Stielen anbaust, kann eine Rankhilfe sinnvoll sein. Das verhindert, dass die Stiele abknicken.
4. Erntezeit!
Juhu, der schönste Teil! Nach ca. 6-8 Wochen kannst du deinen ersten Mangold ernten.
1. Blätter ernten: Ernte die äußeren Blätter, wenn sie groß genug sind. Die inneren Blätter können weiterwachsen.
2. Stiele ernten: Du kannst auch die Stiele ernten. Schneide sie einfach mit einer Gartenschere ab.
3. Regelmäßig ernten: Je öfter du erntest, desto mehr Mangold wächst nach.
Zusätzliche Tipps für deinen Dachgarten
* Sonnenschutz: Gerade im Sommer kann die Sonne auf dem Dach sehr intensiv sein. Schütze deine Pflanzen mit einem Sonnensegel oder einer Markise.
* Windschutz: Auf dem Dach kann es windig sein. Schütze deine Pflanzen mit einer Windschutzwand oder einer Hecke.
* Bewässerungssystem: Wenn du keine Zeit hast, regelmäßig zu gießen, kannst du ein automatisches Bewässerungssystem installieren.
* Kombination mit anderen Pflanzen: Mangold lässt sich gut mit anderen Pflanzen kombinieren, z.B. mit Salat, Radieschen oder Kräutern.
* Sortenvielfalt: Probiere verschiedene Mangoldsorten aus. Es gibt viele verschiedene Farben und Formen.
Häufige Probleme und Lösungen
* Gelbe Blätter: Können auf Nährstoffmangel hindeuten. Dünge mit organischem Dünger.
* Schneckenbefall: Schütze deine Pflanzen mit Schneckenkorn oder anderen Schneckenabwehrmitteln.
* Pilzkrankheiten: Sorge für eine gute Belüftung und vermeide Staunässe.
* Blattläuse: Bekämpfe Blattläuse mit einem natürlichen Insektizid.
Ich hoffe, diese Anleitung hilft dir dabei, deinen eigenen Dachgarten mit Schweizer Mangold anzulegen. Es ist wirklich ein tolles Gefühl, frisches Gemüse direkt
Conclusion
So, there you have it! Transforming your rooftop into a thriving Swiss chard garden is not just a whimsical dream, but a tangible reality within your reach. We’ve explored the ins and outs of creating a flourishing rooftop oasis, specifically tailored for the vibrant and versatile Swiss chard. From selecting the right containers and soil to mastering the art of watering and pest control, you’re now equipped with the knowledge to embark on this rewarding journey.
Why is this DIY trick a must-try? Because it offers a multitude of benefits that extend far beyond simply growing your own food. Imagine stepping onto your rooftop and being greeted by a burst of color and freshness. Picture yourself harvesting crisp, nutritious Swiss chard leaves, knowing exactly where they came from and how they were grown. This is about more than just gardening; it’s about connecting with nature, reducing your carbon footprint, and enjoying the unparalleled satisfaction of nurturing life with your own hands.
But the beauty of rooftop Swiss chard gardening lies in its adaptability. Feel free to experiment with different varieties of Swiss chard, from the classic rainbow chard with its vibrant stems to the more subtle and earthy varieties. Consider companion planting with herbs like basil or rosemary to deter pests and enhance the flavor of your chard. You can even incorporate vertical gardening techniques to maximize space and create a stunning visual display.
Don’t be afraid to get creative and personalize your rooftop garden to suit your unique style and preferences. Perhaps you’ll add a small seating area where you can relax and enjoy the fruits (or rather, vegetables) of your labor. Or maybe you’ll incorporate decorative elements like trellises or sculptures to enhance the aesthetic appeal of your rooftop oasis.
The possibilities are endless, and the rewards are immeasurable. Growing your own Swiss chard on your rooftop is an investment in your health, your well-being, and the environment. It’s a chance to reconnect with nature, learn new skills, and create something truly special.
We wholeheartedly encourage you to give this DIY trick a try. Start small, be patient, and don’t be afraid to make mistakes. Gardening is a learning process, and every challenge is an opportunity to grow and improve. And most importantly, have fun!
Once you’ve experienced the joy of harvesting your own homegrown Swiss chard, we’d love to hear about your experience. Share your tips, tricks, and photos with us in the comments below. Let’s create a community of rooftop gardeners who are passionate about growing their own food and sharing their knowledge with others. Together, we can transform our rooftops into vibrant, sustainable spaces that nourish our bodies and our souls. So, grab your gardening gloves, gather your supplies, and get ready to embark on an exciting adventure in rooftop Swiss chard gardening!
Frequently Asked Questions (FAQ)
What are the best Swiss chard varieties for rooftop gardening?
Choosing the right Swiss chard variety is crucial for success. Rainbow chard is a popular choice due to its vibrant colors and mild flavor. Other excellent options include Fordhook Giant, known for its large, dark green leaves, and Bright Lights, which offers a mix of colorful stems. Consider the size of your containers and the amount of sunlight your rooftop receives when making your selection. Smaller varieties might be better suited for limited spaces, while those with larger leaves may require more sunlight and nutrients. Don’t be afraid to experiment with different varieties to find your personal favorite!
How much sunlight does Swiss chard need on a rooftop?
Swiss chard thrives in full sun, requiring at least 6 hours of direct sunlight per day. However, it can tolerate partial shade, especially in hotter climates. If your rooftop receives less than 6 hours of sunlight, consider using grow lights to supplement the natural light. Monitor your plants closely and adjust their position as needed to ensure they are receiving adequate sunlight. Signs of insufficient sunlight include leggy growth, pale leaves, and reduced yields.
What type of soil is best for growing Swiss chard in containers?
Swiss chard prefers well-draining, fertile soil with a pH between 6.0 and 7.0. A good potting mix specifically designed for vegetables is ideal. You can also create your own mix by combining equal parts of compost, peat moss, and perlite or vermiculite. Avoid using garden soil, as it can be too heavy and may contain pests or diseases. Ensure your containers have adequate drainage holes to prevent waterlogging, which can lead to root rot.
How often should I water my rooftop Swiss chard?
Watering frequency depends on several factors, including the weather, the size of your containers, and the type of soil you’re using. Generally, you should water your Swiss chard whenever the top inch of soil feels dry to the touch. Water deeply, ensuring the entire root ball is moistened. Avoid overwatering, as this can lead to root rot. During hot, dry weather, you may need to water more frequently. Consider using a moisture meter to accurately assess the moisture level of the soil.
How do I fertilize my rooftop Swiss chard?
Swiss chard is a heavy feeder and benefits from regular fertilization. Start by incorporating compost into the soil before planting. Then, fertilize every 2-3 weeks with a balanced liquid fertilizer or a slow-release granular fertilizer. Follow the instructions on the fertilizer package carefully. Avoid over-fertilizing, as this can lead to excessive foliage growth at the expense of root development. You can also use organic fertilizers like fish emulsion or seaweed extract.
What are common pests and diseases that affect Swiss chard on rooftops?
Common pests that can affect Swiss chard include aphids, slugs, snails, and leaf miners. To control these pests, you can use organic methods such as handpicking, insecticidal soap, or neem oil. Diseases that can affect Swiss chard include leaf spot and downy mildew. To prevent these diseases, ensure good air circulation, avoid overhead watering, and remove any infected leaves promptly. Consider using disease-resistant varieties of Swiss chard.
How do I harvest Swiss chard from my rooftop garden?
You can begin harvesting Swiss chard leaves when they are about 6-8 inches long. Harvest the outer leaves first, leaving the inner leaves to continue growing. Use a sharp knife or scissors to cut the leaves near the base of the plant. Avoid pulling the leaves, as this can damage the plant. Regular harvesting encourages continued production.
Can I grow Swiss chard in containers year-round on my rooftop?
In mild climates, Swiss chard can be grown year-round. In colder climates, it can be grown as a spring and fall crop. Swiss chard is relatively frost-tolerant, but it may need protection during severe freezes. You can use row covers or move the containers indoors to protect the plants from frost.
How can I maximize space in my rooftop Swiss chard garden?
Vertical gardening techniques are a great way to maximize space in a rooftop garden. Consider using trellises, hanging baskets, or stacked planters to grow your Swiss chard. You can also plant Swiss chard alongside other vegetables or herbs in the same container. Companion planting can help deter pests and improve the overall health of your plants.
What are some creative ways to use my homegrown Swiss chard?
Swiss chard is a versatile vegetable that can be used in a variety of dishes. It can be sautéed, steamed, boiled, or added to soups, stews, and salads. The stems can be cooked separately from the leaves and have a slightly different flavor and texture. Swiss chard is also a good source of vitamins, minerals, and antioxidants. Get creative and experiment with different recipes to find your favorite ways to enjoy your homegrown Swiss chard!


Leave a Comment