
Tire planters for grapes might sound a little unconventional, but trust me, it’s a brilliant way to give your grapevines a stylish and sustainable home! Have you ever looked at an old tire and thought, “That could be a planter?” Well, I’m here to tell you it absolutely can! For centuries, resourceful gardeners have been finding creative ways to repurpose materials, and this DIY project is a modern twist on that tradition. Think of it as upcycling with a purpose – giving new life to something destined for the landfill while simultaneously creating a thriving space for your grapes.
Why should you consider tire planters for your grapes? Well, for starters, they offer excellent drainage and insulation, which grapes absolutely love. Plus, they’re incredibly durable and can withstand the elements for years to come. But beyond the practical benefits, there’s the sheer satisfaction of creating something unique and beautiful with your own two hands. In a world of mass-produced goods, this project allows you to express your creativity and add a personal touch to your garden.
This DIY project is perfect for anyone who wants to grow grapes in a limited space, or simply wants to add a touch of rustic charm to their outdoor area. So, grab those old tires, gather your tools, and let’s get started on creating some amazing tire planters for grapes that will have your neighbors green with envy!
DIY Tire Planters for a Thriving Grape Vine
Okay, grape lovers! Let’s get our hands dirty and create some awesome tire planters perfect for growing your own delicious grapes. I’m going to walk you through the whole process, step-by-step, so even if you’re a beginner, you can totally nail this project. We’ll be upcycling old tires, giving them a new life as beautiful and functional planters for your grape vines. Get ready to enjoy the fruits (literally!) of your labor.
Materials You’ll Need
Before we dive in, let’s gather everything we need. This will make the whole process smoother and more enjoyable.
* Old Tires (the number depends on how many planters you want)
* Utility Knife or Jigsaw
* Gloves (essential for protecting your hands)
* Safety Glasses (always prioritize safety!)
* Measuring Tape
* Marker or Chalk
* Drill with Drill Bits (for drainage holes)
* Landscape Fabric or Burlap
* Potting Soil (specifically formulated for grapes is ideal)
* Gravel or Pebbles (for drainage)
* Spray Paint (optional, for decorating the tires)
* Primer (if spray painting, for better adhesion)
* Grape Vine Seedling or Young Plant
* Watering Can
* Gardening Trowel or Shovel
Preparing the Tires
This is where we transform those old tires into something special.
1. Cleaning the Tires: First things first, give those tires a good scrub! Use soap and water to remove any dirt, grime, or debris. A pressure washer can be super helpful here, but a good old-fashioned scrub brush will also do the trick. Let them dry completely before moving on. Trust me, you’ll appreciate working with clean tires.
2. Cutting the Tires (Optional): This step is optional, but it can add a lot of visual appeal to your planters. You can cut the top sidewall off one or more tires to create different depths and shapes.
* Marking the Cut Line: Use your measuring tape and marker to draw a consistent line around the tire where you want to cut. I usually go for about halfway down the sidewall, but you can adjust this to your liking.
* Cutting with a Utility Knife: If you’re using a utility knife, be extremely careful! Score the line deeply several times before attempting to cut all the way through. This can be tough, so take your time and wear gloves.
* Cutting with a Jigsaw: A jigsaw is much easier and faster. Follow your marked line carefully, and let the saw do the work. Wear safety glasses to protect your eyes from flying debris.
* Smoothing the Edges: After cutting, the edges might be a bit rough. Use a file or sandpaper to smooth them out and prevent any accidental cuts later on.
3. Drilling Drainage Holes: Drainage is crucial for healthy grape vines. Use your drill to create several drainage holes in the bottom of each tire. I usually drill about 4-6 holes, spaced evenly around the bottom. Make sure the holes are large enough to allow water to drain freely.
Painting and Decorating (Optional)
This is where you can really get creative and personalize your tire planters!
1. Priming the Tires: If you’re planning to paint your tires, priming them first is essential for better paint adhesion and a longer-lasting finish. Apply a thin, even coat of primer to the entire surface of the tire. Let it dry completely according to the manufacturer’s instructions.
2. Painting the Tires: Now for the fun part! Choose your favorite spray paint colors and apply several thin, even coats to the tires. Avoid applying too much paint at once, as this can lead to drips and runs. Let each coat dry completely before applying the next.
* Creative Ideas: Get creative with your designs! You can use stencils to create patterns, paint different sections of the tire different colors, or even add some decorative accents like mosaic tiles or rope.
3. Letting the Paint Dry: Once you’re happy with your paint job, let the tires dry completely before moving on to the next step. This usually takes at least 24 hours, depending on the type of paint you used.
Preparing the Planter for Planting
Now we’re getting ready to actually plant our grape vine!
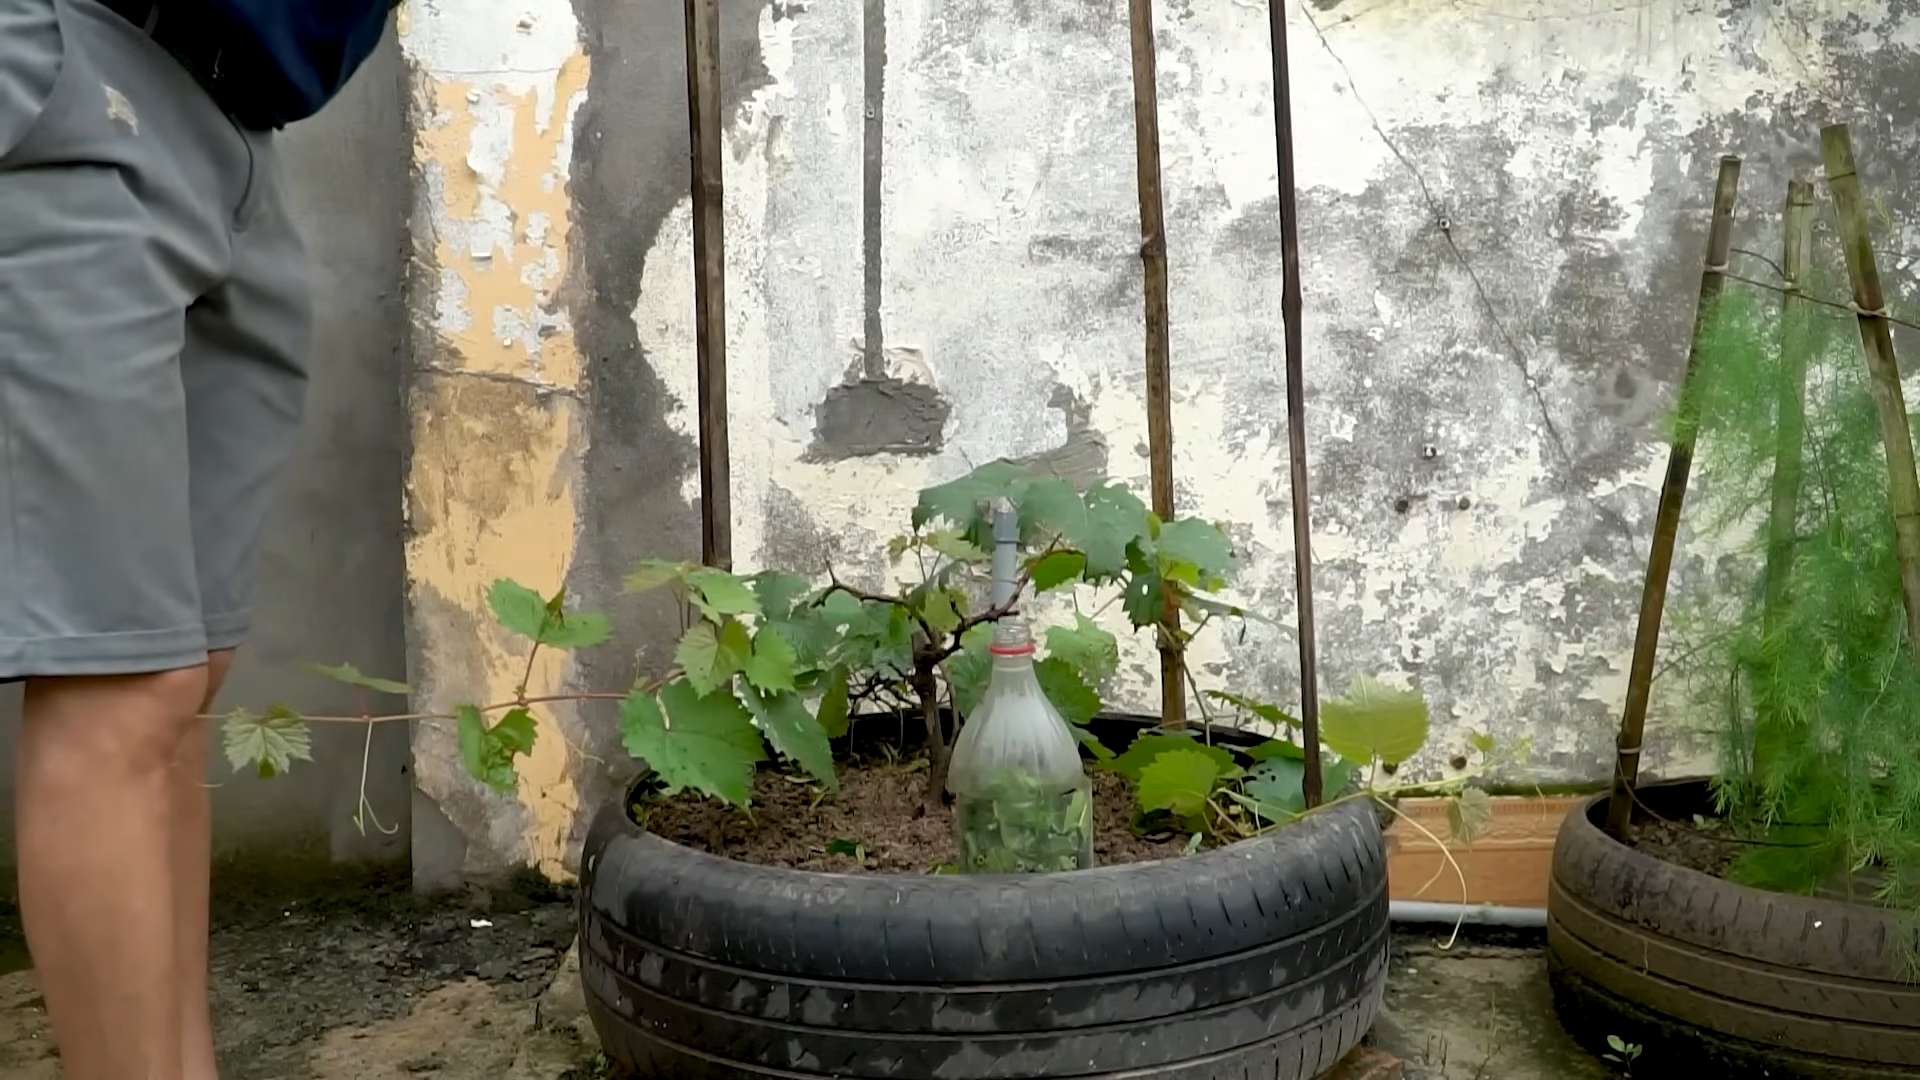
1. Lining the Tires: Line the inside of each tire with landscape fabric or burlap. This will help prevent the soil from washing out through the drainage holes and keep the soil moist. Cut the fabric to size and secure it to the inside of the tire with staples or heavy-duty tape. Make sure the fabric covers the entire inside surface of the tire.
2. Adding Drainage Material: Pour a layer of gravel or pebbles into the bottom of each tire. This will further improve drainage and prevent the roots of your grape vine from sitting in water. A layer of about 2-3 inches is usually sufficient.
3. Filling with Potting Soil: Now it’s time to fill the tires with potting soil. Use a high-quality potting soil that is specifically formulated for grapes. This type of soil will provide the nutrients and drainage that your grape vine needs to thrive. Fill the tires almost to the top, leaving a few inches of space at the top.
Planting Your Grape Vine
The moment we’ve been waiting for!
1. Digging a Hole: Use your gardening trowel or shovel to dig a hole in the center of the potting soil, large enough to accommodate the root ball of your grape vine seedling or young plant.
2. Removing the Grape Vine from its Container: Gently remove the grape vine from its container. If the roots are tightly bound, gently loosen them with your fingers.
3. Planting the Grape Vine: Place the grape vine in the hole and backfill with potting soil. Make sure the top of the root ball is level with the surrounding soil. Gently pat down the soil around the base of the plant.
4. Watering Thoroughly: Water the grape vine thoroughly after planting. This will help settle the soil and encourage the roots to grow.
Caring for Your Grape Vine
Now that your grape vine is planted, it’s important to provide it with the care it needs to thrive.
1. Watering Regularly: Water your grape vine regularly, especially during dry periods. Grape vines need consistent moisture to produce healthy fruit. Check the soil moisture regularly and water when the top inch of soil feels dry to the touch.
2. Fertilizing: Fertilize your grape vine regularly with a fertilizer that is specifically formulated for grapes. Follow the instructions on the fertilizer package carefully.
3. Pruning: Pruning is essential for maintaining the shape and productivity of your grape vine. Prune your grape vine in late winter or early spring, before new growth begins. Remove any dead, damaged, or diseased branches.
4. Providing Support: Grape vines need support to grow properly. Install a trellis or other support structure near your tire planter. As your grape vine grows, train it to climb the trellis.
5. Protecting from Pests and Diseases: Monitor your grape vine regularly for pests and diseases. Take action to control any problems as soon as they are detected. There are many organic and chemical control options available.
6. Sunlight: Grape vines need at least 6-8 hours of sunlight per day to thrive. Choose a location for your tire planter that receives plenty of sunlight.
7. Mulching: Apply a layer of mulch around the base of your grape vine. Mulch will help retain moisture in the soil, suppress weeds, and regulate soil temperature.
Enjoying Your Harvest
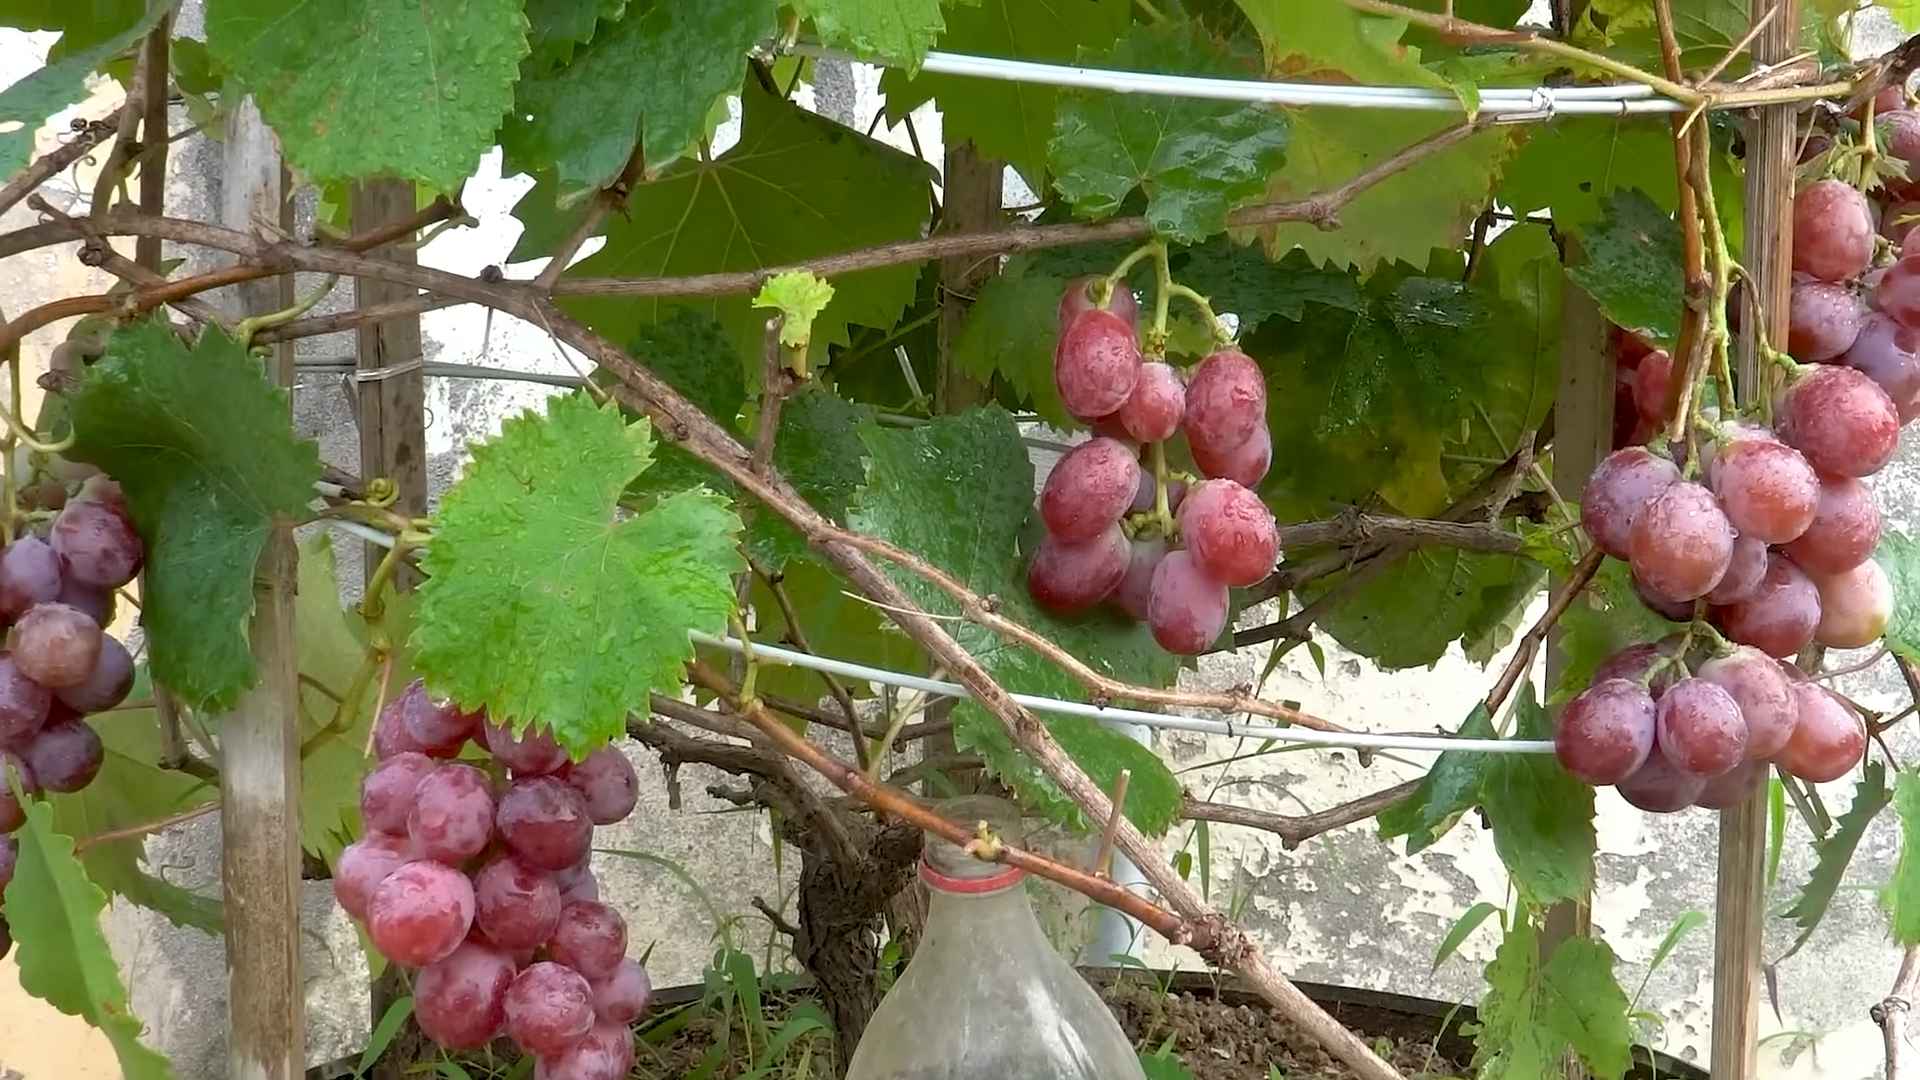
After a few years of care and attention, your grape vine will start producing delicious grapes! Harvest your grapes when they are fully ripe and enjoy the fruits of your labor. You can eat them fresh, make juice, or even turn them into wine!
I hope you found this guide helpful. Happy gardening, and may your grape vines flourish!
Conclusion
So, there you have it! Transforming old tires into charming and functional planters for your grapevines isn’t just a clever upcycling project; it’s a game-changer for your gardening endeavors. We’ve walked you through the simple steps, highlighting the benefits of this resourceful approach. From improved drainage and temperature regulation to creating a visually appealing and space-saving solution, tire planters offer a multitude of advantages for cultivating healthy and bountiful grapevines.
Why is this DIY trick a must-try? Because it’s sustainable, cost-effective, and incredibly rewarding. Instead of discarding those old tires, you’re giving them a new lease on life while simultaneously providing your grapevines with an optimal growing environment. You’re contributing to a greener planet and enjoying the fruits (literally!) of your labor. Plus, the unique aesthetic of tire planters adds a touch of rustic charm to any garden or patio.
But the beauty of this project lies in its adaptability. Feel free to experiment with different paint colors and designs to match your personal style and garden décor. Consider adding decorative elements like stencils, mosaics, or even climbing structures to further enhance the visual appeal of your tire planters. You could even create tiered planters by stacking tires of varying sizes, adding depth and dimension to your grape-growing setup.
For those with limited space, consider using smaller tires or cutting larger tires in half to create wall-mounted planters. This is a fantastic way to maximize vertical space and bring the beauty of grapevines to even the smallest balconies or patios. Another variation involves lining the inside of the tire with a layer of landscape fabric before adding soil. This helps to prevent soil erosion and keeps the tires cleaner.
Don’t be afraid to get creative with your soil mixture as well. While a standard potting mix works well, you can also incorporate compost, aged manure, or other organic amendments to provide your grapevines with the nutrients they need to thrive. Remember to choose a soil mix that drains well to prevent waterlogging, which can be detrimental to grape health.
Ultimately, the success of your tire planters depends on your willingness to experiment and adapt to the specific needs of your grapevines. Pay attention to their growth patterns, adjust your watering schedule as needed, and don’t hesitate to seek advice from local gardening experts.
We are confident that you’ll find this DIY tire planter project to be both enjoyable and beneficial. It’s a fantastic way to repurpose materials, enhance your garden, and enjoy the delicious rewards of homegrown grapes. So, gather your supplies, roll up your sleeves, and get ready to transform those old tires into thriving homes for your grapevines.
We encourage you to try this DIY trick and share your experience with us! Post photos of your finished tire planters on social media using #TirePlanterGrapes and tell us about your successes, challenges, and creative variations. We can’t wait to see what you come up with! Let’s build a community of resourceful gardeners who are passionate about upcycling and growing their own food. Happy gardening!
Frequently Asked Questions (FAQ)
1. Are tire planters safe for growing grapes? Won’t chemicals leach into the soil?
This is a common concern, and rightfully so. Modern tires are generally considered safe for gardening, especially for plants like grapes where the fruit doesn’t directly contact the tire. However, to minimize any potential risk of leaching, it’s recommended to use tires manufactured after 2007, as they contain fewer harmful chemicals. Lining the inside of the tire with a thick layer of landscape fabric or plastic sheeting provides an extra barrier between the soil and the tire, further reducing the chance of any chemicals migrating into the soil. You can also opt for using organic gardening practices and soil amendments to promote healthy soil and plant growth. Remember to thoroughly wash the tires before using them to remove any dirt or debris.
2. What size tire is best for planting grapevines?
The ideal tire size depends on the variety of grape you’re planting and its expected mature size. Generally, a standard car tire (around 24-27 inches in diameter) is sufficient for most grape varieties, especially if you plan to prune them regularly. For larger, more vigorous varieties, you might consider using a larger truck tire or even stacking two tires on top of each other to provide more root space. The key is to ensure that the tire is deep enough to accommodate the grapevine’s root system and provide adequate drainage. A good rule of thumb is to aim for a tire depth of at least 12-18 inches.
3. How do I prepare the tire for planting?
Preparing the tire is a crucial step in ensuring the success of your grape-growing project. First, thoroughly clean the tire with soap and water to remove any dirt, grime, or debris. Next, drill drainage holes in the bottom of the tire to prevent waterlogging. The number and size of the drainage holes will depend on the size of the tire and the climate you live in. As mentioned earlier, lining the inside of the tire with landscape fabric or plastic sheeting is highly recommended to create a barrier between the soil and the tire. Finally, consider painting the tire with a non-toxic, weather-resistant paint to protect it from the elements and enhance its aesthetic appeal.
4. What type of soil should I use for my tire planters?
Grapevines thrive in well-draining soil that is rich in organic matter. A good potting mix specifically formulated for fruits and vegetables is an excellent choice. You can also create your own custom soil mix by combining equal parts of potting soil, compost, and perlite or vermiculite. Compost provides essential nutrients and improves soil structure, while perlite or vermiculite enhances drainage and aeration. Avoid using heavy clay soil, as it can retain too much moisture and lead to root rot. Before planting, amend the soil with a slow-release fertilizer to provide your grapevines with a steady supply of nutrients.
5. How often should I water my grapevines in tire planters?
The watering frequency will depend on several factors, including the climate, the type of soil, and the size of the tire. Generally, grapevines in tire planters need to be watered more frequently than those planted in the ground, as the tire can heat up quickly and dry out the soil. Check the soil moisture regularly by sticking your finger into the soil. If the top inch or two feels dry, it’s time to water. Water deeply and thoroughly, ensuring that the water drains out of the drainage holes. Avoid overwatering, as this can lead to root rot. During hot, dry weather, you may need to water your grapevines daily.
6. Do I need to fertilize my grapevines in tire planters?
Yes, grapevines in tire planters will benefit from regular fertilization. Use a balanced fertilizer specifically formulated for fruits and vegetables, following the instructions on the label. Fertilize in the spring, just before the growing season begins, and again in mid-summer. You can also amend the soil with compost or aged manure throughout the growing season to provide your grapevines with a continuous supply of nutrients. Avoid over-fertilizing, as this can lead to excessive vegetative growth and reduced fruit production.
7. How do I protect my grapevines from pests and diseases in tire planters?
Regularly inspect your grapevines for signs of pests or diseases. Common grape pests include aphids, spider mites, and Japanese beetles. Common grape diseases include powdery mildew, downy mildew, and black rot. If you detect any pests or diseases, take action immediately to prevent them from spreading. You can use organic pest control methods, such as insecticidal soap or neem oil, to control pests. For diseases, you can use a fungicide specifically formulated for grapes. Proper pruning and good air circulation can also help to prevent pests and diseases.
8. Can I move the tire planters once they are filled with soil and grapevines?
Moving tire planters filled with soil and grapevines can be challenging, especially if they are large and heavy. It’s best to position the tire planters in their permanent location before filling them with soil. If you need to move them, consider using a dolly or hand truck to make the task easier. Alternatively, you can plant your grapevines in smaller containers that fit inside the tire planters. This allows you to easily remove and move the grapevines as needed.
9. How long will the tire planters last?
Tire planters are incredibly durable and can last for many years, even in harsh weather conditions. The lifespan of the tire planters will depend on the quality of the tires and the climate you live in. To extend the lifespan of your tire planters, consider painting them with a weather-resistant paint and protecting them from extreme temperatures. With proper care and maintenance, your tire planters can provide a long-lasting and sustainable solution for growing grapevines.
10. What other plants can I grow in tire planters besides grapes?
The possibilities are endless! Tire planters are versatile and can be used to grow a wide variety of plants, including vegetables, herbs, flowers, and even small trees. Some popular choices include tomatoes, peppers, cucumbers, lettuce, basil, rosemary, petunias, and marigolds. The key is to choose plants that are well-suited to the size of the tire and the climate you live in. You can also create mixed plantings by combining different types of plants in the same tire planter.


Leave a Comment