
Soil Free Sprout Growing: Imagine harvesting fresh, crunchy sprouts right from your kitchen counter, without ever getting your hands dirty with soil! Sounds like a dream, right? Well, it’s not! For centuries, cultures around the world, particularly in Asia, have embraced the power of sprouts as a nutritional powerhouse and a symbol of new beginnings. From mung bean sprouts in stir-fries to alfalfa sprouts in salads, these tiny powerhouses have been a staple for generations.
But let’s be honest, the traditional method can be a bit messy and time-consuming. That’s where our DIY guide comes in! I’m going to show you some incredibly easy and effective tricks for soil free sprout growing. Think of it as a shortcut to fresh, healthy food, perfect for busy individuals, apartment dwellers, or anyone who wants to add a burst of flavor and nutrients to their diet without the hassle of traditional gardening.
Why do you need this? Because sprouts are packed with vitamins, minerals, and enzymes, making them a fantastic addition to any meal. Plus, growing them yourself ensures they’re fresh, organic, and free from harmful chemicals. So, ditch the soil, grab your sprouting jar, and let’s embark on this exciting journey to cultivate your own mini-garden indoors!
Growing Sprouts Without Soil: A Beginner’s Guide
Hey there, fellow sprout enthusiasts! Are you tired of dealing with messy soil when trying to grow your own sprouts? I totally get it! Soil can be a pain, attracting unwanted pests and sometimes leading to mold issues. That’s why I’m so excited to share my favorite method: growing sprouts without soil! It’s cleaner, easier, and just as nutritious. Trust me, once you try it, you’ll never go back.
What You’ll Need
Before we dive into the nitty-gritty, let’s gather our supplies. The beauty of this method is that you probably already have most of these things lying around!
* **Sprouting Seeds:** This is the most important part! You can use a variety of seeds like alfalfa, broccoli, radish, mung beans, lentils, or even quinoa. Make sure you’re using seeds specifically intended for sprouting, as regular seeds might be treated with chemicals. I usually get mine from a local health food store or online.
* **Wide-Mouth Jar:** A mason jar works perfectly. The wide mouth makes it easy to rinse and drain the sprouts. I prefer using a quart-sized jar, but you can adjust the size depending on how many sprouts you want to grow.
* **Sprouting Lid or Cheesecloth:** You’ll need something to cover the jar that allows for drainage and airflow. Sprouting lids are specifically designed for this purpose and are super convenient. If you don’t have one, you can use a piece of cheesecloth secured with a rubber band.
* **Water:** Clean, filtered water is best.
* **Bowl or Stand:** You’ll need something to prop the jar upside down at an angle to allow for proper drainage. A bowl works great, or you can get a fancy sprouting stand.
* **Optional: Hydrogen Peroxide (3%):** A little bit of hydrogen peroxide can help prevent mold growth, especially in humid environments.
Choosing Your Seeds
Not all seeds are created equal when it comes to sprouting. Here’s a quick rundown of some popular choices and their unique characteristics:
* **Alfalfa:** These are tiny seeds that produce a mild, slightly sweet sprout. They’re a great source of vitamins and minerals.
* **Broccoli:** Broccoli sprouts are packed with antioxidants and have a slightly peppery flavor.
* **Radish:** Radish sprouts have a spicy kick and add a zesty flavor to salads and sandwiches.
* **Mung Beans:** These are the classic bean sprouts you find in Asian cuisine. They’re crunchy and refreshing.
* **Lentils:** Lentil sprouts are hearty and filling, with a slightly nutty flavor.
* **Quinoa:** Quinoa sprouts are a complete protein and have a mild, slightly earthy flavor.
Remember to always buy seeds specifically labeled for sprouting to ensure they are safe for consumption.
Step-by-Step Sprouting Guide
Alright, let’s get sprouting! This process is super simple, but consistency is key. You’ll need to rinse and drain your sprouts at least twice a day to keep them happy and healthy.
Phase 1: Soaking the Seeds
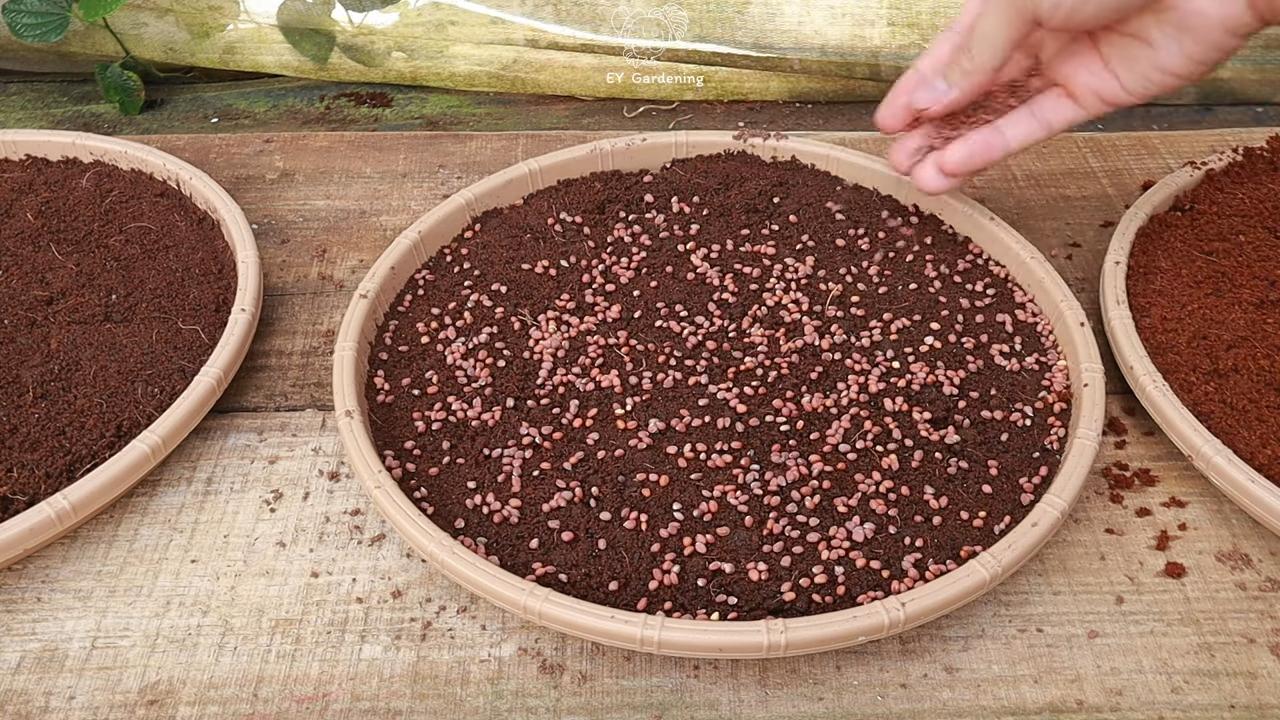
1. **Measure Your Seeds:** Start by measuring out the desired amount of seeds. A good rule of thumb is to use 1-2 tablespoons of small seeds (like alfalfa or broccoli) or 1/4 – 1/2 cup of larger seeds (like mung beans or lentils) per quart-sized jar. I usually start with a smaller amount until I get the hang of it.
2. **Rinse the Seeds:** Place the seeds in your wide-mouth jar and rinse them thoroughly with cool water. This helps remove any debris or dust.
3. **Add Water:** Fill the jar with cool water, ensuring the seeds are completely submerged. You’ll want to use about 2-3 times the volume of water as seeds.
4. **Secure the Lid:** Cover the jar with your sprouting lid or cheesecloth and secure it with a rubber band.
5. **Soak the Seeds:** Let the seeds soak for the appropriate amount of time. This varies depending on the type of seed:
* Alfalfa, Broccoli, Radish: 4-8 hours
* Mung Beans, Lentils: 8-12 hours
* Quinoa: 2-4 hours
I usually soak my seeds overnight for convenience.
Phase 2: Rinsing and Draining
1. **Drain the Water:** After the soaking period, drain the water from the jar completely. Make sure to get rid of all the excess water.
2. **Rinse the Seeds:** Rinse the seeds thoroughly with cool water.
3. **Drain Again:** Drain the water again, ensuring all excess water is removed.
4. **Invert the Jar:** Place the jar upside down in a bowl or on a sprouting stand at an angle. This allows for proper drainage and airflow.
5. **Repeat:** Repeat the rinsing and draining process 2-3 times per day. This is crucial to prevent mold growth and keep your sprouts hydrated. I usually do it in the morning and evening.
Phase 3: Growing and Harvesting
1. **Observe Your Sprouts:** Keep an eye on your sprouts as they grow. You’ll start to see tiny tails emerging from the seeds within a day or two.
2. **Maintain Moisture:** Continue rinsing and draining your sprouts 2-3 times per day, ensuring they stay moist but not waterlogged.
3. **Provide Indirect Light:** While sprouts don’t need direct sunlight, they do benefit from some indirect light. Place your jar in a well-lit area, but avoid direct sunlight, which can overheat the sprouts.
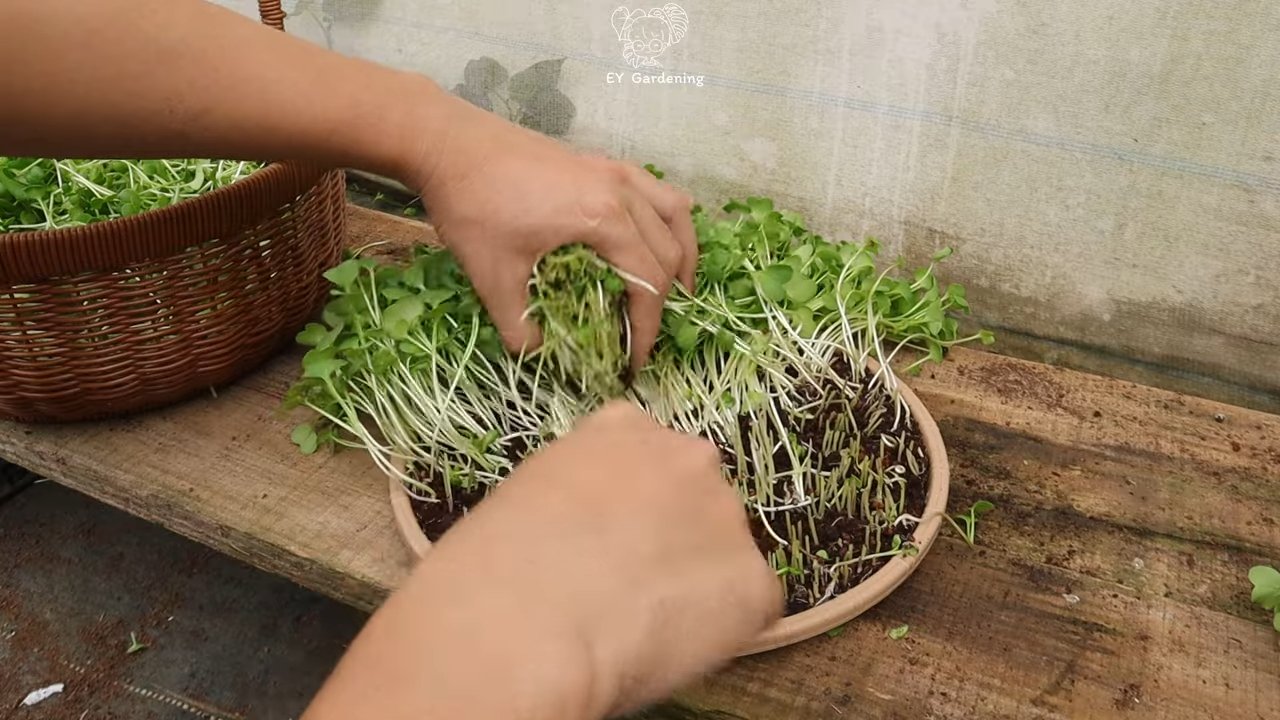
4. **Harvesting:** The time it takes to harvest your sprouts depends on the type of seed and your personal preference. Generally, sprouts are ready to harvest in 3-7 days. You’ll know they’re ready when they have developed small leaves and have reached your desired size.
5. **Final Rinse:** Before harvesting, give your sprouts a final rinse.
6. **Optional Green Up:** For some sprouts like alfalfa and clover, exposing them to indirect sunlight for a day or two before harvesting will help them “green up” and develop chlorophyll, which enhances their nutritional value.
7. **Drain Thoroughly:** Drain the sprouts thoroughly after the final rinse.
Troubleshooting
Even with the best intentions, sometimes things can go wrong. Here are a few common issues and how to address them:
* **Mold Growth:** Mold is the biggest enemy of sprouting. If you see any signs of mold (fuzzy white or gray patches), discard the entire batch immediately. To prevent mold, ensure you’re rinsing and draining your sprouts thoroughly and frequently. You can also add a teaspoon of 3% hydrogen peroxide to the rinsing water to help inhibit mold growth.
* **Slow Growth:** If your sprouts are growing slowly, it could be due to several factors:
* **Temperature:** Sprouts prefer a temperature between 65-75°F (18-24°C). If your home is too cold, they may grow slower.
* **Water Quality:** Use clean, filtered water for rinsing and soaking.
* **Seed Quality:** Make sure you’re using high-quality sprouting seeds.
* **Unpleasant Odor:** An unpleasant odor can indicate bacterial growth. If you notice a foul smell, discard the batch.
Storing Your Sprouts
Once you’ve harvested your sprouts, it’s important to store them properly to maintain their freshness and prevent spoilage.
1. **Dry Thoroughly:** After the final rinse, spread the sprouts out on a clean kitchen towel or paper towel and gently pat them dry. This helps remove excess moisture, which can lead to spoilage.
2. **Store in the Refrigerator:** Place the dried sprouts in a clean, airtight container lined with a paper towel. The paper towel will absorb any excess moisture.
3. **Shelf Life:** Properly stored sprouts can last for up to a week in the refrigerator.
4. **Inspect Before Use:** Before using your sprouts, always inspect them for any signs of spoilage, such as a slimy texture or unpleasant odor. Discard any sprouts that look or smell off.
Tips and Tricks for Sprouting Success
Here are a few extra tips and tricks I’ve learned along the way to help you become a sprouting pro:
* **Start Small:** When you’re first starting out, begin with a small amount of seeds. This will help you get the hang of the process and avoid wasting seeds if something goes wrong.
* **Experiment with Different Seeds:** Don’t be afraid to try different types of seeds to find your favorites. Each type of sprout has its own unique flavor and nutritional profile.
* **Use a Sprouting Calendar:** Keep track of when you started your sprouts and when they should be ready to harvest. This will help you stay organized and avoid over- or under-sprouting.
* **Rotate Your Crops:** Start a new batch of sprouts every few days to ensure you always have a fresh supply on hand.
* **
Conclusion
So, there you have it! Embracing the world of soil-free sprout growing is not just a trendy experiment; it’s a gateway to a healthier, more sustainable, and frankly, more fascinating way to nourish yourself. We’ve explored the simplicity and efficiency of this method, highlighting how it bypasses the common pitfalls of traditional soil-based sprouting, like mold and inconsistent germination. The benefits are undeniable: fresher, cleaner sprouts, a reduced risk of contamination, and a significantly smaller footprint on our planet.
But why is this DIY trick a must-try? Because it empowers you to take control of your food source, even in the smallest of spaces. Imagine having a constant supply of nutrient-packed sprouts, ready to add a burst of flavor and vitality to your salads, sandwiches, and stir-fries. It’s a game-changer for anyone seeking to improve their diet and connect with the origins of their food.
Beyond the basic method, there’s a whole universe of variations to explore. Experiment with different types of seeds – broccoli, alfalfa, radish, mung beans, and lentils are all excellent choices. Try varying the sprouting time to achieve your preferred level of crunch and flavor. Consider adding a touch of natural light (indirect, of course) to enhance chlorophyll production and boost the nutritional value of your sprouts. You can even explore different sprouting containers, from repurposed glass jars to multi-tiered sprouting systems, to find what works best for your space and lifestyle.
Don’t be afraid to get creative with your soil-free sprout growing! Infuse your sprouting water with a hint of lemon juice or apple cider vinegar to further inhibit mold growth. Add a sprinkle of seaweed powder to the water to provide your sprouts with extra minerals. The possibilities are endless, and the rewards are well worth the effort.
We wholeheartedly encourage you to embark on this sprouting adventure. It’s a simple, rewarding, and incredibly satisfying way to bring fresh, healthy food into your life. And most importantly, we want to hear about your experiences! Share your successes, your challenges, and your unique variations in the comments below. Let’s build a community of soil-free sprouting enthusiasts and learn from each other. Your insights could inspire others to take the plunge and discover the joys of growing their own food, one sprout at a time. So, grab your seeds, your jar, and get sprouting! You won’t regret it.
Frequently Asked Questions (FAQ)
What types of seeds are best for soil-free sprouting?
The beauty of soil-free sprouting is its versatility. You can sprout a wide variety of seeds, but some are particularly well-suited for this method. Broccoli seeds, alfalfa seeds, radish seeds, mung beans, and lentils are all excellent choices. They germinate readily, produce flavorful sprouts, and are relatively easy to manage. Other options include clover, mustard, and even some grains like quinoa and amaranth. Experiment to find your favorites! Just be sure to use seeds specifically intended for sprouting, as seeds treated for planting may contain chemicals that are not safe for consumption.
How often should I rinse my sprouts?
Rinsing is crucial for successful soil-free sprout growing. Aim to rinse your sprouts at least twice a day, ideally in the morning and evening. In warmer climates or during hot weather, you may need to rinse them more frequently, perhaps three or even four times a day. The goal is to keep the sprouts consistently moist but not waterlogged. Proper rinsing helps prevent mold growth and ensures that the sprouts receive the hydration they need to thrive. Use cool, clean water for rinsing, and be sure to drain the water thoroughly after each rinse.
How long does it take for sprouts to be ready to eat?
The sprouting time varies depending on the type of seed and your personal preference. Generally, most sprouts are ready to eat within 3 to 7 days. Alfalfa and clover sprouts typically take 5 to 7 days, while radish and broccoli sprouts may be ready in as little as 3 to 5 days. Mung beans can be sprouted in just 2 to 3 days. The best way to determine when your sprouts are ready is to taste them. They should be crisp and flavorful, with a slightly nutty or peppery taste. Avoid eating sprouts that have a musty or moldy odor.
How do I prevent mold growth in my sprouts?
Mold growth is a common concern when sprouting, but it can be easily prevented with proper technique. The key is to maintain good hygiene and ensure adequate ventilation. Always start with clean seeds and a clean sprouting container. Rinse your sprouts thoroughly and frequently, as described above. Avoid overcrowding the container, as this can restrict airflow and create a breeding ground for mold. Ensure that the container is well-drained to prevent water from pooling at the bottom. If you live in a humid environment, consider using a fan to improve air circulation around your sprouts. You can also add a small amount of lemon juice or apple cider vinegar to the rinsing water to help inhibit mold growth.
How should I store my sprouts after they are ready to eat?
Once your sprouts are ready to eat, rinse them one last time and drain them thoroughly. Gently pat them dry with a clean paper towel to remove excess moisture. Store the sprouts in a clean, airtight container in the refrigerator. They should keep for up to a week, but they are best consumed within a few days for optimal freshness and flavor. Avoid storing sprouts in a sealed plastic bag, as this can trap moisture and promote spoilage.
Can I grow sprouts in direct sunlight?
While sprouts need light to develop chlorophyll and enhance their nutritional value, direct sunlight can be too intense and can actually damage them. It’s best to provide your sprouts with indirect sunlight or filtered light. A location near a window that receives morning sun is ideal. If you don’t have access to natural light, you can use a grow light to supplement their lighting needs. Just be sure to keep the light at a safe distance to prevent overheating.
Is soil-free sprout growing safe? Are there any risks?
Soil-free sprout growing is generally safe, but it’s important to take precautions to minimize the risk of contamination. Always use seeds specifically intended for sprouting, as seeds treated for planting may contain chemicals that are not safe for consumption. Rinse your sprouts thoroughly and frequently to prevent mold growth. If you notice any signs of mold or spoilage, discard the sprouts immediately. Individuals with weakened immune systems should consult with their doctor before consuming raw sprouts. By following these simple guidelines, you can enjoy the many benefits of soil-free sprout growing with confidence.

Leave a Comment