
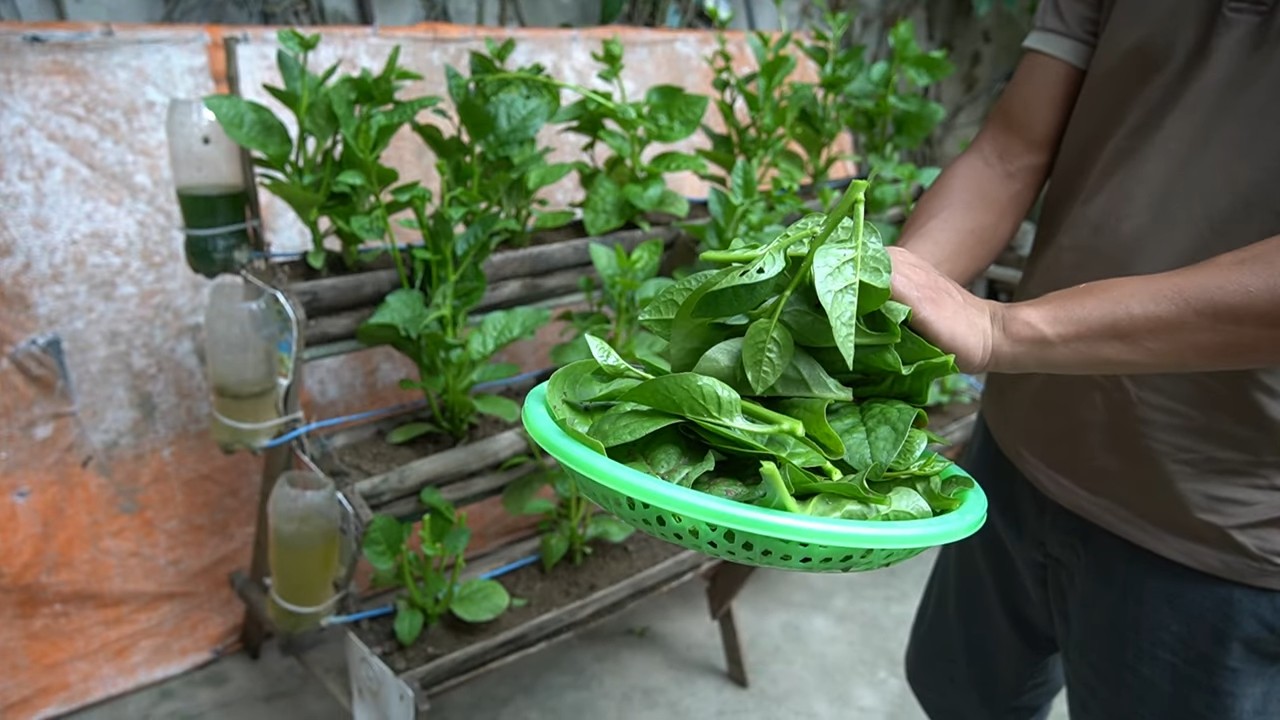
Spinach tower DIY projects are taking the gardening world by storm, and for good reason! Imagine harvesting fresh, vibrant spinach right from your patio, balcony, or even a sunny corner indoors. No more trips to the grocery store for wilted greens – just a quick snip and you’ve got a healthy addition to your salad, smoothie, or stir-fry.
The concept of vertical gardening, which the spinach tower embodies, isn’t new. Cultures throughout history, from the Hanging Gardens of Babylon to modern-day urban farms, have utilized vertical space to maximize yields. But the beauty of a DIY spinach tower lies in its accessibility. It’s a project anyone can tackle, regardless of their gardening experience or the size of their living space.
Why do you need this DIY trick in your life? Well, for starters, it’s incredibly space-efficient. If you’re short on garden space, a spinach tower allows you to grow a surprising amount of spinach in a small footprint. Plus, it’s a fantastic way to deter pests and weeds, keeping your precious spinach safe and sound. I’m excited to share this easy and rewarding project with you, so you can enjoy fresh, homegrown spinach all season long. Let’s dive into creating your very own spinach tower DIY masterpiece!
Spinat-Turm selber bauen: Eine platzsparende Lösung für deinen Garten
Hallo Gartenfreunde! Habt ihr auch das Problem, dass der Platz im Garten begrenzt ist, aber ihr trotzdem so viel frisches Gemüse wie möglich anbauen wollt? Dann habe ich heute die perfekte Lösung für euch: einen Spinat-Turm! Dieser vertikale Garten ist nicht nur platzsparend, sondern auch ein echter Hingucker. Und das Beste daran: Ihr könnt ihn ganz einfach selber bauen! Ich zeige euch, wie es geht.
Was du für deinen Spinat-Turm brauchst
Bevor wir loslegen, hier eine Liste mit allen Materialien und Werkzeugen, die du benötigst:
* Ein großes Kunststoffrohr (ca. 150-200 cm lang, Durchmesser ca. 20-30 cm): Dieses Rohr bildet das Grundgerüst unseres Turms. Achte darauf, dass es lebensmittelecht ist, falls du später auch andere Gemüsesorten anbauen möchtest.
* Ein kleineres Kunststoffrohr (ca. 150-200 cm lang, Durchmesser ca. 5-10 cm): Dieses Rohr dient zur Bewässerung des Turms.
* Bohrmaschine mit verschiedenen Bohrern: Wir brauchen Bohrer in verschiedenen Größen, um Löcher für die Pflanzen und das Bewässerungssystem zu bohren.
* Lochsäge (passend zum Durchmesser der Pflanzlöcher): Eine Lochsäge erleichtert das Bohren der Pflanzlöcher erheblich.
* Sand oder Kies: Für die Drainage am Boden des Turms.
* Pflanzerde: Am besten eine hochwertige Gemüseerde.
* Spinat-Setzlinge oder -Samen: Je nachdem, wie schnell du ernten möchtest.
* Gartenvlies (optional): Um die Erde im Turm zu halten und Unkrautwachstum zu verhindern.
* Maßband oder Zollstock: Zum Abmessen der Abstände für die Pflanzlöcher.
* Stift oder Marker: Zum Anzeichnen der Löcher.
* Handschuhe: Zum Schutz deiner Hände.
* Schutzbrille: Zum Schutz deiner Augen beim Bohren.
* Gießkanne oder Schlauch: Zum Bewässern des Turms.
* Evtl. Steine oder Ziegel: Um den Turm zu stabilisieren.
Schritt-für-Schritt-Anleitung zum Bau deines Spinat-Turms
Jetzt geht’s ans Eingemachte! Folge diesen Schritten, um deinen eigenen Spinat-Turm zu bauen:
1. Vorbereitung des großen Rohrs
1. Reinigung: Reinige das große Kunststoffrohr gründlich mit Wasser und Seife, um eventuelle Rückstände zu entfernen.
2. Anzeichnen der Pflanzlöcher: Miss den Umfang des Rohrs und teile ihn durch die Anzahl der Pflanzlöcher, die du pro Reihe haben möchtest. Ich empfehle, mit 3-4 Löchern pro Reihe zu beginnen. Markiere die Positionen der Löcher mit einem Stift oder Marker. Achte darauf, dass die Löcher versetzt angeordnet sind, damit die Pflanzen genügend Platz zum Wachsen haben. Der Abstand zwischen den Reihen sollte etwa 15-20 cm betragen.
3. Bohren der Pflanzlöcher: Verwende die Lochsäge, um die Pflanzlöcher zu bohren. Die Größe der Löcher sollte ausreichend sein, um die Spinat-Setzlinge oder -Samen aufzunehmen. Ich empfehle einen Durchmesser von ca. 5-7 cm. Trage dabei unbedingt eine Schutzbrille!
4. Entgraten der Löcher: Entferne scharfe Kanten oder Grate an den Löchern mit einem Messer oder Schleifpapier, um die Pflanzen nicht zu verletzen.
2. Vorbereitung des Bewässerungsrohrs
1. Reinigung: Reinige auch das kleinere Kunststoffrohr gründlich.
2. Bohren der Bewässerungslöcher: Bohre mit einem kleinen Bohrer (ca. 3-5 mm) Löcher in das kleinere Rohr. Die Löcher sollten gleichmäßig über die gesamte Länge des Rohrs verteilt sein. Der Abstand zwischen den Löchern sollte etwa 5-10 cm betragen. Achte darauf, dass die Löcher nicht zu groß sind, damit das Wasser nicht zu schnell abfließt.
3. Verschließen des unteren Endes: Verschließe das untere Ende des kleineren Rohrs mit einem Stopfen oder Klebeband, damit das Wasser nicht direkt ausläuft.
3. Zusammenbau des Spinat-Turms
1. Drainage: Stelle das große Rohr an den gewünschten Standort. Fülle den Boden des Rohrs mit einer Schicht Sand oder Kies, um eine gute Drainage zu gewährleisten. Die Schicht sollte etwa 10-15 cm hoch sein.
2. Einsetzen des Bewässerungsrohrs: Stelle das kleinere Rohr mittig in das große Rohr.
3. Befüllen mit Erde: Fülle das große Rohr mit Pflanzerde. Achte darauf, dass die Erde gut verdichtet ist, damit sie nicht zusammensackt. Lasse dabei die Pflanzlöcher frei.
4. Optional: Gartenvlies: Wenn du möchtest, kannst du die Innenseite des großen Rohrs mit Gartenvlies auskleiden, bevor du die Erde einfüllst. Das Vlies verhindert, dass Erde durch die Pflanzlöcher austritt und hält Unkraut fern.
4. Bepflanzung des Spinat-Turms
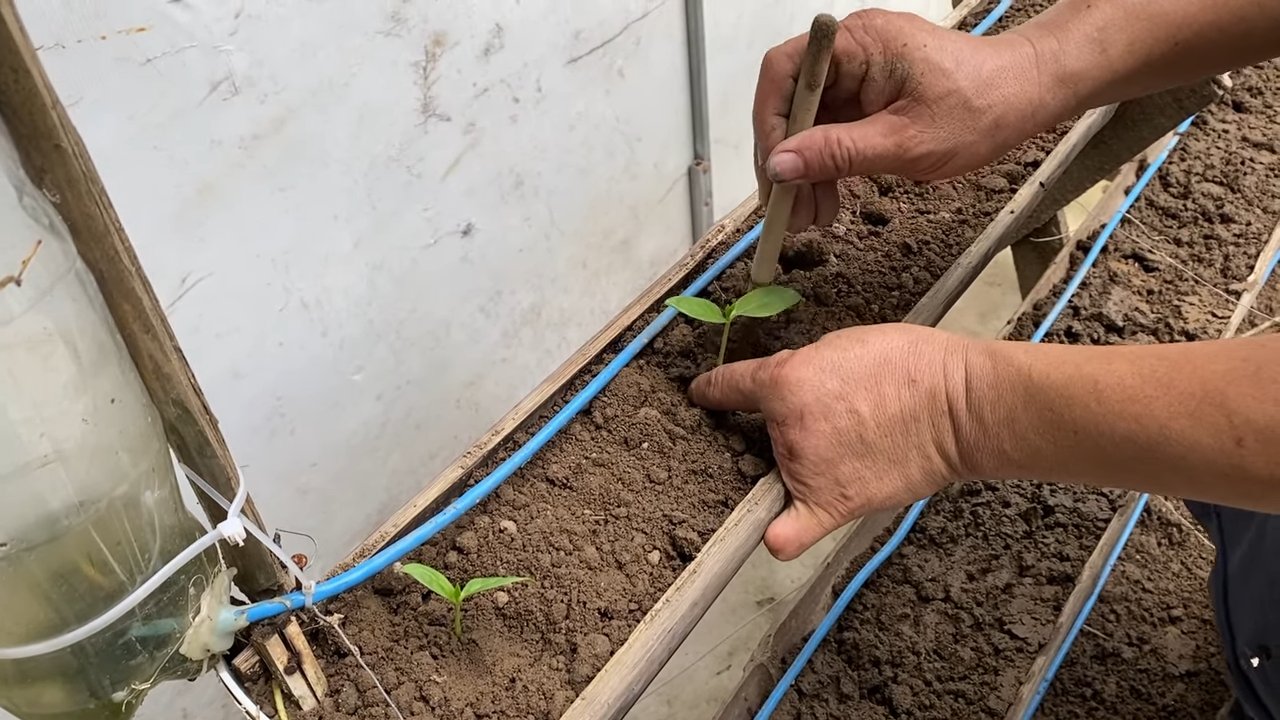
1. Einsetzen der Spinat-Setzlinge: Setze die Spinat-Setzlinge vorsichtig in die Pflanzlöcher. Achte darauf, dass die Wurzeln gut mit Erde bedeckt sind. Wenn du Samen verwendest, säe sie direkt in die Pflanzlöcher und bedecke sie leicht mit Erde.
2. Bewässerung: Gieße den Spinat-Turm gründlich, sowohl über das Bewässerungsrohr als auch direkt in die Pflanzlöcher.
3. Standort: Stelle den Spinat-Turm an einen sonnigen bis halbschattigen Standort. Spinat bevorzugt einen kühlen Standort.
5. Pflege deines Spinat-Turms
1. Bewässerung: Gieße den Spinat-Turm regelmäßig, besonders bei trockenem Wetter. Überprüfe die Feuchtigkeit der Erde, indem du mit dem Finger in die Erde stichst. Die Erde sollte feucht, aber nicht nass sein.
2. Düngung: Dünge den Spinat regelmäßig mit einem organischen Dünger. Befolge dabei die Anweisungen auf der Verpackung.
3. Schutz vor Schädlingen: Kontrolliere den Spinat regelmäßig auf Schädlinge wie Blattläuse oder Schnecken. Bei Bedarf kannst du biologische Schädlingsbekämpfungsmittel einsetzen.
4. Ernte: Ernte den Spinat, sobald die Blätter groß genug sind. Du kannst entweder einzelne Blätter oder die ganze Pflanze ernten.
Zusätzliche Tipps und Tricks
* Stabilität: Wenn dein Spinat-Turm nicht stabil genug steht, kannst du ihn mit Steinen oder Ziegeln beschweren.
* Materialien: Anstelle eines Kunststoffrohrs kannst du auch andere Materialien wie Holz oder Ton verwenden. Achte jedoch darauf, dass die Materialien wetterfest und ungiftig sind.
* Andere Pflanzen: Du kannst den Spinat-Turm auch mit anderen Pflanzen bepflanzen, die ähnliche Ansprüche an Standort und Pflege haben, z.B. Kräuter, Salat oder Erdbeeren.
* Winterfest machen: Wenn du den Spinat-Turm im Winter draußen stehen lassen möchtest, solltest du ihn mit Vlies abdecken, um die Pflanzen vor Frost zu schützen.
* Bewässerungssystem optimieren: Du kannst das Bewässerungssystem optimieren, indem du einen Tropfschlauch an das kleinere Rohr anschließt. So wird das Wasser noch gleichmäßiger verteilt.
* Farbenfrohe Gestaltung: Bemal das große Rohr mit bunten Farben oder Mustern, um deinen Spinat-Turm zu einem echten Hingucker zu machen.
Häufige Fehler und wie du sie vermeidest
* Zu kleine Pflanzlöcher: Achte darauf, dass die Pflanzlöcher groß genug sind, damit die Pflanzen genügend Platz zum Wachsen haben.
* Schlechte Drainage: Eine schlechte Drainage kann zu Staunässe führen, die die Wurzeln der Pflanzen schädigt. Sorge für eine gute Drainage, indem du den Boden des Rohrs mit Sand oder Kies f
Conclusion
So, there you have it! Creating your own spinach tower is not just a fun project; it’s a game-changer for anyone looking to maximize their garden space, enjoy a continuous supply of fresh, organic spinach, and add a touch of vertical artistry to their outdoor (or even indoor!) environment. We’ve walked you through the process, highlighting the simplicity and affordability of this DIY endeavor.
Why is this a must-try? Because it addresses several key gardening challenges simultaneously. Limited space? No problem! The spinach tower allows you to grow a significant amount of spinach in a fraction of the ground area required by traditional methods. Pest control concerns? The elevated structure naturally deters many ground-dwelling pests, making your spinach less susceptible to damage. And let’s not forget the sheer aesthetic appeal – a lush, green spinach tower is a beautiful addition to any garden, patio, or balcony.
But the benefits don’t stop there. The improved air circulation around the plants reduces the risk of fungal diseases, and the well-draining soil mix ensures that your spinach roots stay healthy and happy. Plus, harvesting is a breeze! No more bending over and straining your back – simply pluck the leaves as needed, right from the tower.
Ready to take your gardening to new heights?
Consider these variations to personalize your spinach tower:
* Herb Spiral Hybrid: Incorporate other leafy greens like lettuce, kale, or even herbs like parsley and chives into your tower. This creates a diverse and visually stunning edible structure.
* Strawberry Spinach Combo: Plant strawberries at the top of the tower, allowing them to cascade down the sides. The strawberries will benefit from the added sunlight, and the combination of red berries and green spinach is simply delightful.
* Indoor Spinach Oasis: If you live in an apartment or have limited outdoor space, you can easily adapt this project for indoor use. Simply use a smaller container, provide adequate drainage, and supplement with grow lights if necessary.
* Tiered Tower: Instead of a single tower, create a tiered structure with multiple levels. This adds visual interest and allows you to grow different varieties of spinach or other plants on each tier.
Don’t be afraid to experiment with different materials and designs to create a spinach tower that perfectly suits your needs and preferences. The possibilities are endless!
We are confident that you’ll find this DIY spinach tower project rewarding and enjoyable. It’s a fantastic way to connect with nature, grow your own food, and add a touch of creativity to your gardening endeavors.
So, grab your tools, gather your materials, and get ready to build your own spinach tower. We can’t wait to see what you create!
Share your spinach tower success stories with us! Post photos of your creations on social media using #SpinachTowerDIY and tag us. We’d love to see your innovative designs and hear about your experiences. Happy gardening!
Frequently Asked Questions (FAQ)
What type of soil is best for a spinach tower?
The ideal soil mix for a spinach tower is a well-draining blend that retains moisture but doesn’t become waterlogged. A good combination is equal parts of potting soil, compost, and perlite or vermiculite. The potting soil provides a base for nutrients, the compost adds organic matter and improves drainage, and the perlite or vermiculite enhances aeration and prevents compaction. Avoid using heavy garden soil, as it can become compacted in the tower and restrict root growth. You can also add a slow-release fertilizer to the soil mix to provide a steady supply of nutrients to your spinach plants.
How often should I water my spinach tower?
Watering frequency depends on several factors, including the weather, the size of your tower, and the type of soil you’re using. Generally, you should water your spinach tower when the top inch of soil feels dry to the touch. During hot, dry weather, you may need to water daily, while in cooler, wetter conditions, you may only need to water every few days. When watering, make sure to saturate the soil thoroughly, allowing the water to drain out of the bottom of the tower. Avoid overwatering, as this can lead to root rot. A good way to check if your spinach needs water is to stick your finger into the soil – if it feels dry, it’s time to water.
What are the best spinach varieties to grow in a tower?
Almost any spinach variety can be grown in a tower, but some are better suited than others. Consider bolt-resistant varieties, especially if you live in a warm climate, as these are less likely to go to seed prematurely. Some popular choices include ‘Bloomsdale Long Standing,’ ‘Space,’ ‘Tyee,’ and ‘Malabar’. ‘Baby’ spinach varieties are also a good option, as they produce smaller leaves that are perfect for salads. Experiment with different varieties to see which ones thrive best in your tower and climate.
How much sunlight does a spinach tower need?
Spinach thrives in full sun to partial shade. Ideally, your spinach tower should receive at least 4-6 hours of direct sunlight per day. However, in hot climates, providing some afternoon shade can help prevent the leaves from wilting or burning. If you’re growing your spinach tower indoors, you’ll need to supplement with grow lights to provide adequate light. Place the grow lights about 6-12 inches above the plants and keep them on for 12-16 hours per day.
How do I prevent pests from attacking my spinach tower?
The elevated structure of a spinach tower naturally deters many ground-dwelling pests. However, you may still encounter aphids, spider mites, or other common garden pests. To prevent infestations, inspect your plants regularly and remove any pests you find by hand. You can also spray your spinach with a solution of insecticidal soap or neem oil. Encourage beneficial insects like ladybugs and lacewings, which prey on aphids and other pests. Companion planting with herbs like basil or marigolds can also help repel pests.
How do I harvest spinach from my tower?
Harvesting spinach from a tower is easy! Simply pluck the outer leaves as needed, leaving the inner leaves to continue growing. This cut-and-come-again method allows you to harvest spinach continuously throughout the growing season. Harvest spinach in the morning, when the leaves are crisp and cool. Avoid harvesting during the hottest part of the day, as the leaves may be wilted. Wash the spinach leaves thoroughly before using them in salads, smoothies, or cooked dishes.
Can I grow other plants in my spinach tower?
Yes, you can definitely grow other plants in your spinach tower! Companion planting can be beneficial for both the spinach and the other plants. Good companions for spinach include lettuce, kale, strawberries, herbs like basil and chives, and flowers like marigolds and nasturtiums. Avoid planting aggressive or sprawling plants that could overshadow the spinach. Consider the light and water requirements of each plant when choosing companions.
How long will my spinach tower last?
The lifespan of your spinach tower depends on the materials you use and the climate you live in. A tower made from durable materials like cedar wood or concrete blocks can last for many years. A tower made from less durable materials like plastic or fabric may only last for a few seasons. To extend the lifespan of your tower, protect it from harsh weather conditions and repair any damage promptly. Regularly replenish the soil with compost and fertilizer to keep your plants healthy and productive.


Leave a Comment