
Sprout Beans Indoors Container gardening is a fantastic way to get a head start on your growing season, especially if you live in an area with a shorter growing season or unpredictable weather! Have you ever dreamed of enjoying fresh, homegrown beans weeks before your neighbors even think about planting? Well, you’re in the right place! This DIY guide will unlock the secrets to successfully sprouting beans indoors using containers, giving you a vibrant and bountiful harvest.
Beans have been a staple food source for centuries, with evidence of their cultivation dating back thousands of years in both the Old and New Worlds. From ancient civilizations to modern-day gardens, beans have nourished and sustained communities. Now, you can tap into that rich history and bring the joy of bean cultivation into your own home.
Why should you bother learning how to sprout beans indoors container style? Simple! It offers several advantages. You can protect your delicate seedlings from pests, diseases, and harsh weather conditions. Plus, starting indoors gives your beans a significant head start, resulting in earlier and more abundant harvests. Imagine the satisfaction of harvesting your own fresh, delicious beans while others are still waiting for the ground to warm up! This guide will provide you with easy-to-follow instructions and helpful tips to ensure your indoor bean-sprouting adventure is a resounding success. Let’s get started!
Sprout Beans Indoors: A Beginner’s Guide to Container Gardening
Hey there, fellow plant enthusiasts! Ever dreamt of fresh, homegrown beans but thought you needed a sprawling garden? Think again! I’m here to show you how incredibly easy it is to sprout beans indoors using just a container. This is a fantastic project for beginners, kids, or anyone with limited space. Get ready to enjoy the satisfaction of watching your little bean sprouts transform into delicious, edible plants!
Choosing Your Beans and Container
Before we dive into the nitty-gritty, let’s talk about bean varieties and container selection. Not all beans are created equal when it comes to indoor sprouting.
* **Bean Varieties:** Bush beans are your best bet for container gardening. They’re compact and don’t require extensive support like pole beans. Some excellent choices include:
* Bush Blue Lake 274
* Provider
* Contender
* Derby
* Royal Burgundy (for a pop of color!)
* **Container Size:** The size of your container depends on how many bean plants you want to grow. A good rule of thumb is to provide at least 6 inches of space per plant. So, a 12-inch diameter pot can comfortably accommodate two bean plants.
* **Container Material:** Plastic, terracotta, or even repurposed containers like buckets work well. Just make sure your container has drainage holes! Drainage is crucial to prevent root rot.
* **Soil:** Use a well-draining potting mix. Avoid using garden soil, as it can compact and hinder drainage in containers. I personally love using a mix of peat moss, perlite, and vermiculite.
Gathering Your Supplies
Alright, let’s get our supplies in order. Here’s what you’ll need:
* Bean seeds (bush bean variety)
* A suitable container with drainage holes
* Well-draining potting mix
* Watering can or spray bottle
* A sunny windowsill or grow light
* Optional: Seed starting tray (for pre-sprouting)
* Optional: Plant labels
Step-by-Step Sprouting Guide
Now for the fun part! Let’s get those beans sprouting.
Phase 1: Pre-Sprouting (Optional but Recommended)
Pre-sprouting your beans can give them a head start and improve germination rates. This step is optional, but I highly recommend it, especially if you’re new to this.
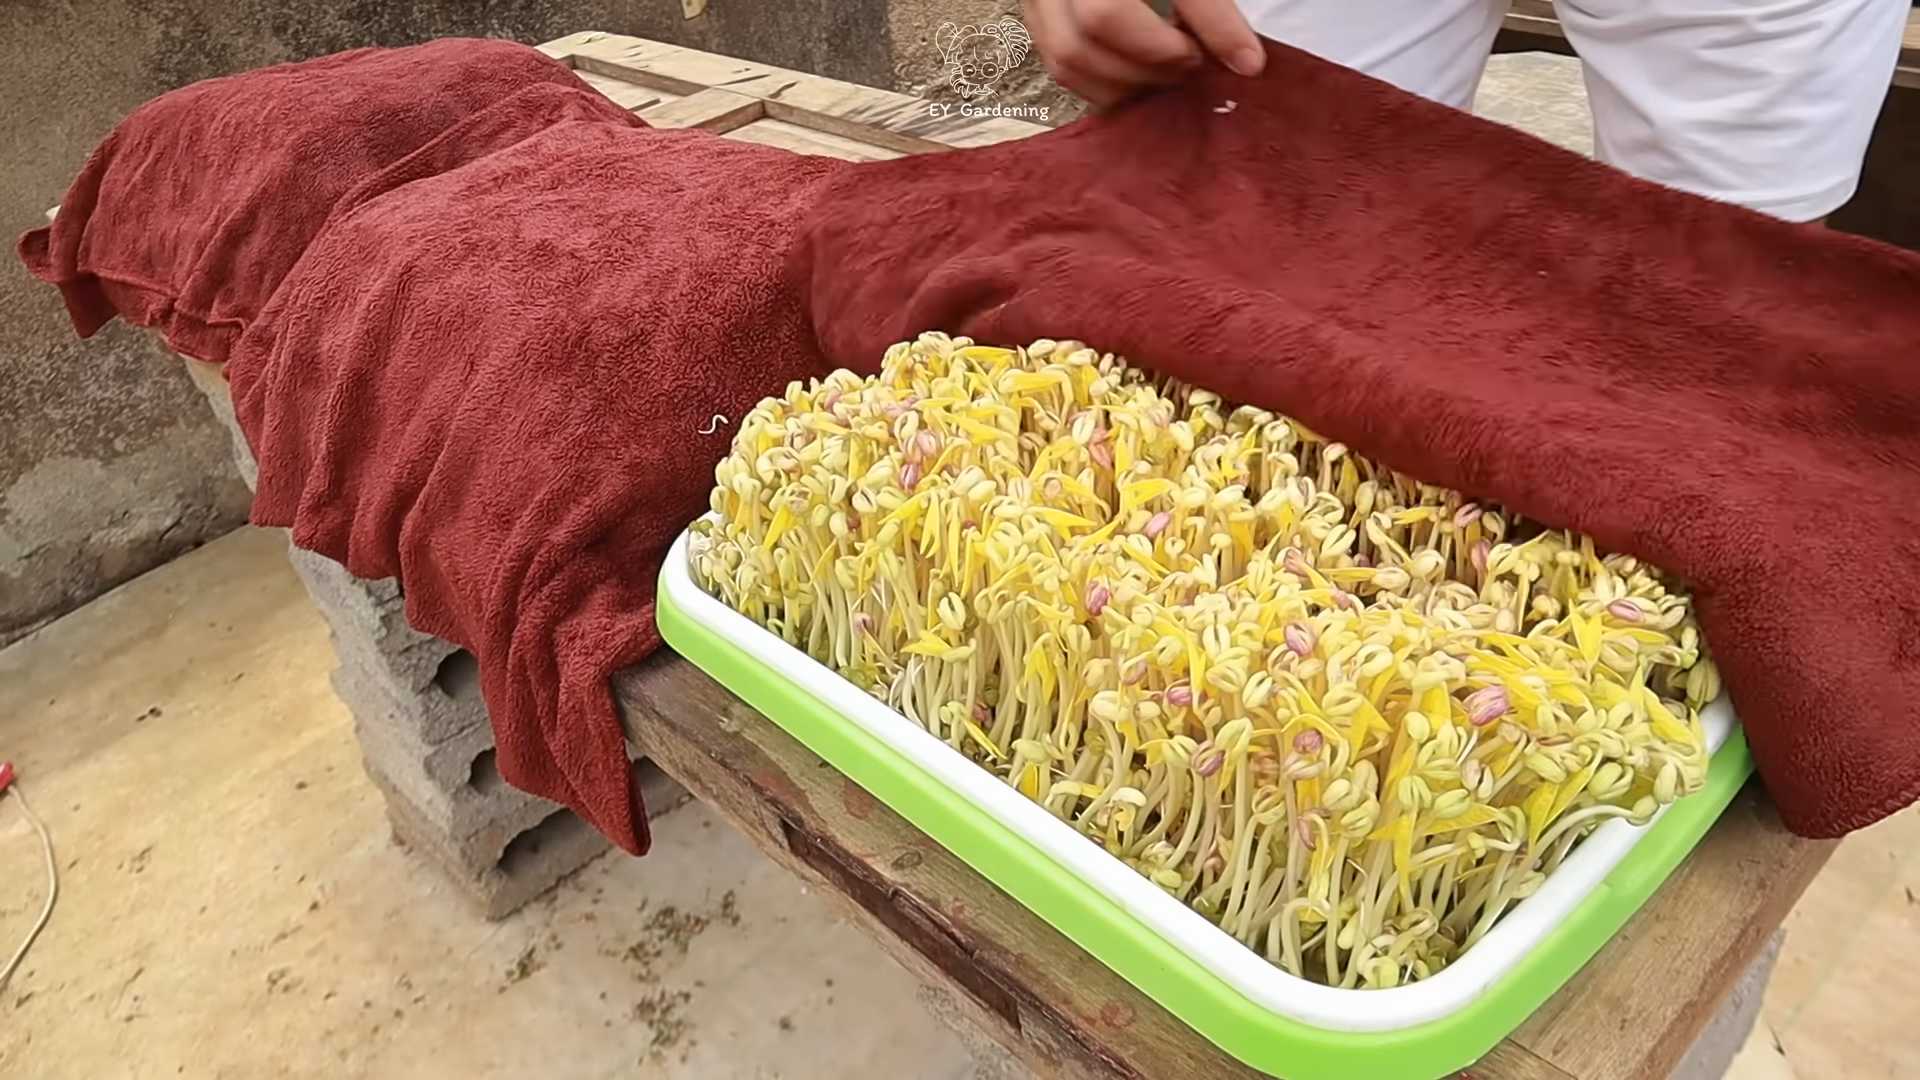
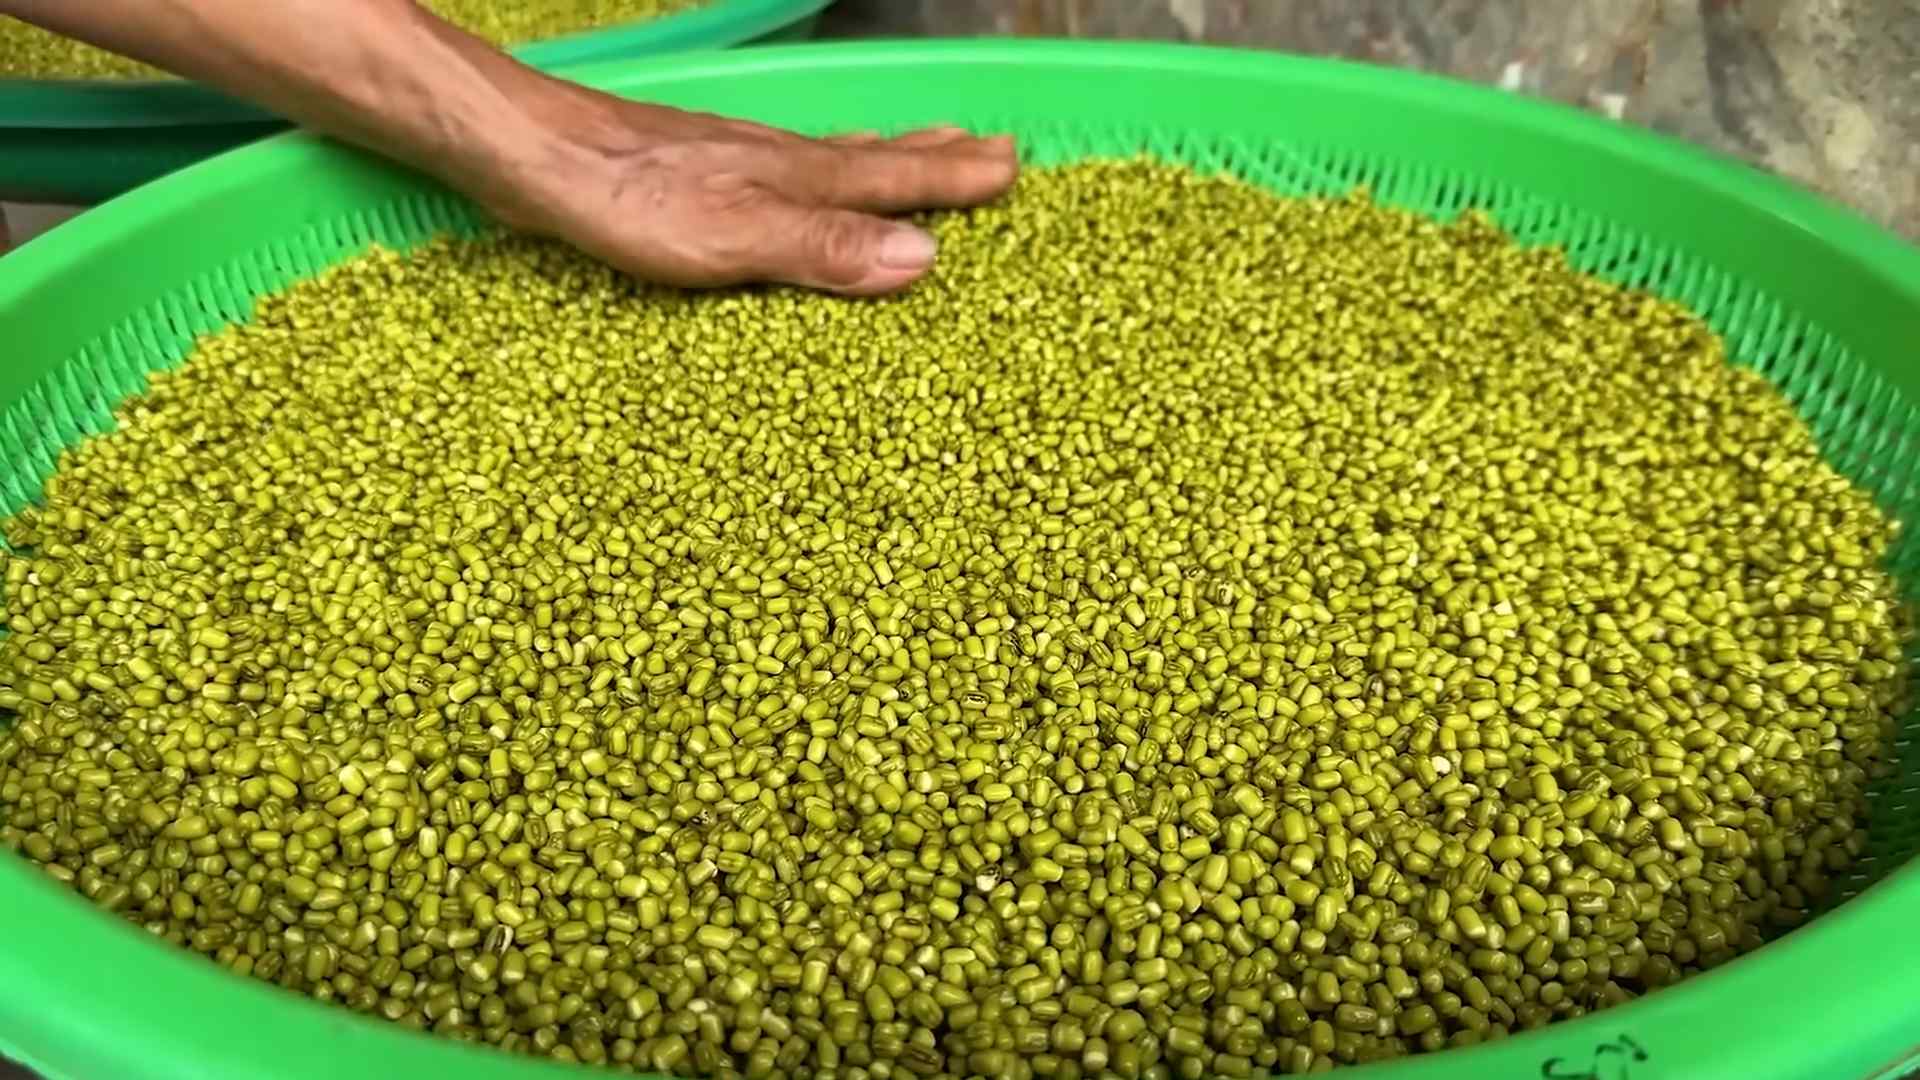
1. **Soak the Beans:** Place your bean seeds in a small bowl and cover them with lukewarm water. Let them soak for 12-24 hours. This softens the seed coat and encourages germination.
2. **Prepare a Seed Starting Tray (or Damp Paper Towels):** You can use a seed starting tray filled with a seed starting mix or simply place the soaked beans between two damp paper towels.
3. **Maintain Moisture:** Keep the seed starting mix or paper towels consistently moist, but not soggy. I like to mist them with a spray bottle.
4. **Provide Warmth:** Place the tray or paper towels in a warm location, around 70-75°F (21-24°C).
5. **Wait for Sprouts:** Check the beans daily. You should see small sprouts emerging within 2-5 days.
Phase 2: Planting Your Sprouted Beans
Once your beans have sprouted (or if you skipped the pre-sprouting step), it’s time to plant them in your container.
1. **Fill the Container:** Fill your container with potting mix, leaving about an inch of space at the top.
2. **Create Planting Holes:** Make small holes in the soil, about 1 inch deep and spaced 6 inches apart.
3. **Plant the Beans:** Gently place the sprouted beans (or unsprouted beans if you skipped pre-sprouting) into the holes, with the sprout facing upwards.
4. **Cover the Beans:** Cover the beans with soil and gently pat it down.
5. **Water Thoroughly:** Water the soil thoroughly until water drains out of the drainage holes.
Phase 3: Caring for Your Bean Sprouts
Now that your beans are planted, it’s crucial to provide them with the right care to ensure healthy growth.
1. **Sunlight:** Place your container in a sunny windowsill that receives at least 6-8 hours of direct sunlight per day. If you don’t have enough natural light, use a grow light. I’ve found that LED grow lights work really well and are energy-efficient.
2. **Watering:** Keep the soil consistently moist, but not waterlogged. Water when the top inch of soil feels dry to the touch. Avoid overwatering, as this can lead to root rot.
3. **Temperature:** Maintain a temperature between 65-75°F (18-24°C).
4. **Fertilizing:** Once your bean plants have developed their first true leaves (the leaves that appear after the initial seed leaves), you can start fertilizing them with a balanced liquid fertilizer diluted to half strength. Fertilize every 2-3 weeks.
5. **Support (Optional):** While bush beans are generally self-supporting, you may want to provide them with some support, especially as they start to produce beans. You can use small stakes or a tomato cage.
6. **Pest Control:** Keep an eye out for pests like aphids or spider mites. If you spot any, you can try spraying them with insecticidal soap or neem oil. I prefer using natural pest control methods whenever possible.
Troubleshooting Common Issues
Even with the best care, you might encounter some challenges along the way. Here are some common issues and how to address them:
* **Poor Germination:** If your beans aren’t sprouting, it could be due to several factors:
* Old seeds: Bean seeds have a limited shelf life. Make sure you’re using fresh seeds.
* Cold soil: Bean seeds need warm soil to germinate.
* Overwatering: Soggy soil can cause the seeds to rot.
* Underwatering: Dry soil can prevent germination.
* **Yellowing Leaves:** Yellowing leaves can indicate a nutrient deficiency. Try fertilizing your plants with a balanced liquid fertilizer. It can also be a sign of overwatering.
* **Leggy Growth:** Leggy growth (tall, spindly plants) is usually caused by insufficient light. Make sure your plants are receiving enough sunlight or are under a grow light.
* **Lack of Flowers or Beans:** This could be due to several factors:
* Insufficient sunlight: Bean plants need plenty of sunlight to produce flowers and beans.
* Lack of pollination: While bean plants are self-pollinating, you can help them along by gently shaking the plants to release pollen.
* High temperatures: Extreme heat can inhibit flowering.
Harvesting Your Beans
The moment you’ve been waiting for! Depending on the variety, your beans should be ready to harvest in about 50-60 days after planting.
1. **Check for Maturity:** The beans should be firm and plump, but not too large or tough.
2. **Harvest Regularly:** Harvest your beans regularly to encourage continued production.
3. **Pick Carefully:** Gently snap the beans off the plant, being careful not to damage the stems.
Enjoying Your Homegrown Beans
Congratulations! You’ve successfully sprouted and grown beans indoors. Now it’s time to enjoy the fruits (or rather, beans) of your labor. Freshly harvested beans are incredibly delicious and versatile. You can eat them raw in salads, steam them, sauté them, or add them to soups and stews.
Growing beans indoors is a rewarding experience that anyone can enjoy. With a little patience and care, you can have a steady supply of fresh, homegrown beans right at your fingertips. Happy gardening!
Conclusion
So, there you have it! Sprouting beans indoors in a container is not only incredibly easy, but it’s also a rewarding experience that brings the garden to your kitchen. Forget about relying solely on store-bought sprouts, which can sometimes be expensive and lack the freshness you desire. With this simple DIY trick, you’re in complete control of the process, ensuring you have a constant supply of nutritious and delicious sprouts right at your fingertips.
Why is this a must-try? Because it’s a game-changer for anyone looking to boost their diet with fresh, living foods. Sprouting increases the nutritional value of beans, making them easier to digest and packed with vitamins, minerals, and enzymes. Plus, it’s a fantastic way to introduce kids to the wonders of gardening and healthy eating. Imagine the joy of watching those tiny sprouts emerge and knowing you nurtured them from seed to sprout!
But the fun doesn’t stop there. Feel free to experiment with different types of beans. Mung beans are a classic choice, but you can also try lentils, adzuki beans, or even chickpeas. Each bean offers a unique flavor and texture, adding variety to your salads, sandwiches, and stir-fries. Consider adding a touch of spice to your sprouting water for a subtle flavor infusion. A pinch of turmeric or a dash of chili flakes can add a delightful kick to your sprouts.
Another variation to consider is the type of container you use. While a mason jar with a sprouting lid is a popular option, you can also use a plastic container with holes drilled in the lid or even a sprouting bag. The key is to ensure proper drainage and ventilation to prevent mold growth.
Don’t be intimidated by the process. It’s much simpler than it sounds. The most important thing is to rinse the beans regularly and provide them with adequate moisture. Within a few days, you’ll be amazed at how quickly they transform into vibrant, edible sprouts.
We wholeheartedly encourage you to give this DIY trick a try. It’s a simple, affordable, and incredibly satisfying way to grow your own food and enhance your well-being. Once you experience the joy of sprouting beans indoors in a container, you’ll wonder why you didn’t start sooner.
And most importantly, we want to hear about your experience! Share your photos, tips, and variations in the comments below. Let’s create a community of sprout enthusiasts and inspire others to embrace the power of homegrown goodness. Happy sprouting!
Frequently Asked Questions (FAQ)
What types of beans are best for sprouting indoors?
Mung beans are the most popular and easiest to sprout, making them a great starting point. Lentils, adzuki beans, chickpeas, and even some types of peas also sprout well. Avoid sprouting kidney beans or other beans that are toxic when raw; these require thorough cooking. Always use beans specifically intended for sprouting or cooking, as some beans sold for planting may be treated with chemicals.
How long does it take for beans to sprout?
The sprouting time varies depending on the type of bean and the ambient temperature. Generally, you can expect to see sprouts within 2 to 5 days. Mung beans tend to sprout the fastest, often showing signs of growth within 24 hours. Keep in mind that warmer temperatures will accelerate the sprouting process, while cooler temperatures may slow it down.
How often should I rinse the beans?
Rinsing is crucial for preventing mold growth and ensuring healthy sprouts. Aim to rinse the beans at least twice a day, preferably in the morning and evening. In warmer climates or during hot weather, you may need to rinse them more frequently, even up to three or four times a day. Use cool, clean water and ensure that all the water drains away completely after each rinse.
What if my sprouts start to smell bad?
A foul odor is a sign of bacterial growth or mold, which means your sprouts are no longer safe to eat. This can happen if the beans are not rinsed frequently enough or if the container doesn’t have adequate drainage. Discard the sprouts immediately and thoroughly clean your sprouting container before starting a new batch.
How do I prevent mold from growing on my sprouts?
Preventing mold is all about maintaining proper hygiene and ventilation. Ensure that your sprouting container is clean and sanitized before each use. Rinse the beans regularly with cool, clean water and make sure all the water drains away completely. Avoid overcrowding the container with too many beans, as this can restrict airflow. Provide adequate ventilation by using a sprouting lid or a container with holes. If you live in a humid environment, consider using a fan to improve air circulation around the sprouts.
How long do sprouted beans last in the refrigerator?
Sprouted beans are best consumed fresh, but they can be stored in the refrigerator for up to 5 days. To store them, rinse them thoroughly, drain them well, and place them in a clean container lined with a paper towel. The paper towel will help absorb excess moisture and prevent them from becoming soggy. Check the sprouts daily for any signs of spoilage and discard them if they develop a foul odor or slimy texture.
Can I eat the bean hulls or should I remove them?
Whether or not to eat the bean hulls is a matter of personal preference. Some people find them slightly bitter or tough, while others don’t mind them at all. You can remove the hulls by gently rubbing the sprouts between your hands under running water. However, removing the hulls is not necessary, and they are perfectly safe to eat. They also contain fiber and nutrients.
Are there any health benefits to eating sprouted beans?
Yes, sprouted beans are incredibly nutritious and offer a range of health benefits. Sprouting increases the levels of vitamins, minerals, and enzymes in beans, making them easier to digest and more readily absorbed by the body. Sprouted beans are also a good source of fiber, protein, and antioxidants. They can help boost your immune system, improve digestion, and protect against chronic diseases.
Can I sprout any type of seed indoors?
While many seeds can be sprouted indoors, it’s important to research which ones are safe and suitable for sprouting. Some seeds, such as those from nightshade plants (tomatoes, potatoes, eggplants), are toxic and should never be sprouted for consumption. Always use seeds specifically intended for sprouting or cooking, and avoid using seeds that have been treated with chemicals.
What is the best location for sprouting beans indoors?
The ideal location for sprouting beans is a cool, dark, and well-ventilated area. Avoid placing the sprouts in direct sunlight, as this can cause them to overheat and dry out. A kitchen counter away from direct sunlight or a pantry shelf are good options. The key is to provide them with consistent moisture and adequate airflow.
Leave a Comment