
Squash Growing Small Garden can feel like a daunting task, especially when you’re dreaming of bountiful harvests but are limited on space. But don’t let a small garden deter you from cultivating these versatile and delicious vegetables! I’m here to tell you that with a few clever tricks and DIY hacks, you can absolutely enjoy homegrown squash, even if you’re working with a tiny plot, a balcony, or even just a few containers.
For centuries, squash has been a staple crop in many cultures, providing nourishment and playing a significant role in traditional diets. From the ancient civilizations of the Americas to modern-day kitchens, squash has proven its resilience and adaptability. But let’s face it, traditional squash growing methods often require sprawling vines and ample space, making it seem impossible for urban gardeners or those with limited yards.
That’s where this DIY guide comes in! I’m going to share some of my favorite and most effective techniques for squash growing small garden spaces. We’ll explore vertical gardening solutions, container gardening secrets, and clever pruning strategies that will maximize your yield without sacrificing precious square footage. Imagine harvesting fresh, flavorful squash right from your own little oasis – it’s not just a dream, it’s an achievable reality! So, let’s dive in and unlock the secrets to successful squash growing, no matter how small your garden may be.
Growing Squash in a Small Garden: A DIY Vertical Trellis Guide
Hey there, fellow gardeners! So, you’re dreaming of homegrown squash but your garden space is, shall we say, *cozy*? Don’t despair! I’m here to tell you that you absolutely can grow squash, even in a small garden, with a little ingenuity and a vertical trellis. I’ve done it myself, and I’m excited to share my DIY trellis method with you. It’s easier than you think, and the results are delicious!
Why Vertical Gardening for Squash?
Before we dive into the how-to, let’s quickly chat about why vertical gardening is a game-changer for squash in small spaces.
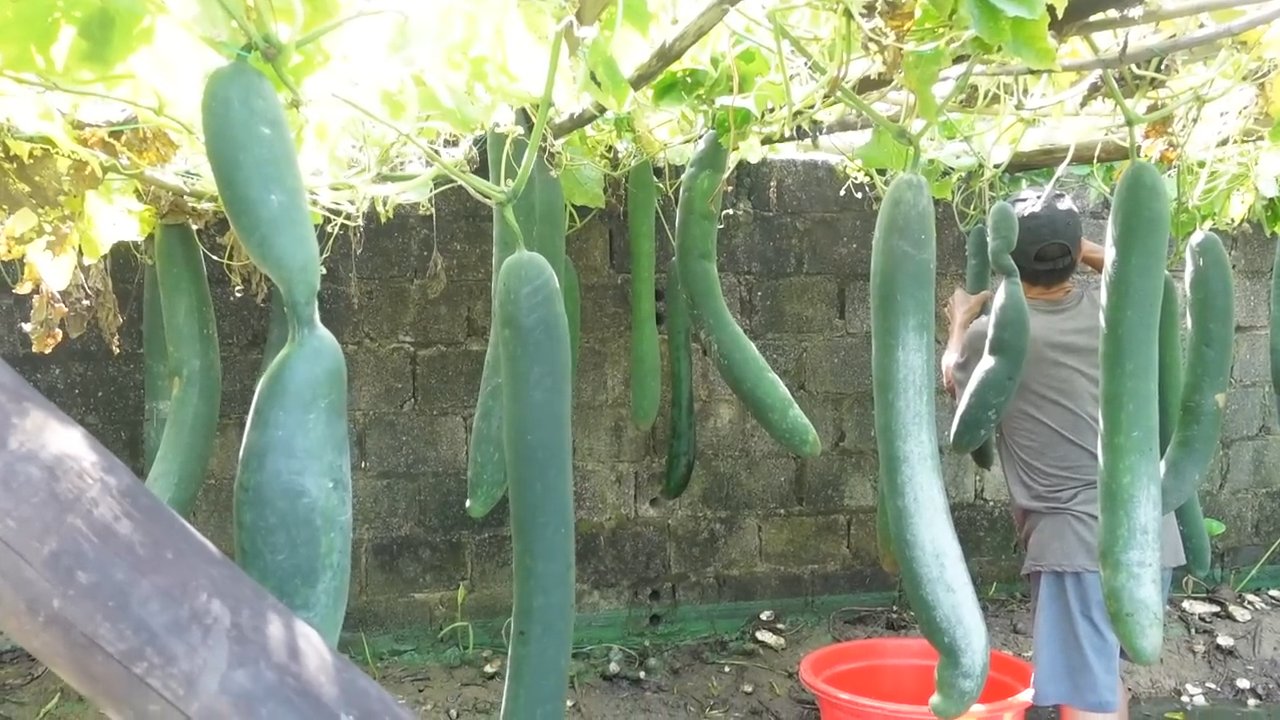
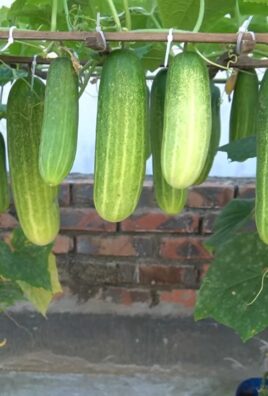
* Space Saving: This is the big one! Squash vines can sprawl like crazy. Training them upwards saves precious ground space, allowing you to grow more in the same area.
* Improved Air Circulation: Lifting the leaves off the ground improves air circulation, which helps prevent fungal diseases like powdery mildew.
* Easier Harvesting: No more crawling around on your hands and knees to find hidden squash! They’ll be hanging right there, easy to spot and pick.
* Sunlight Exposure: Vertical gardening ensures that all parts of the plant get adequate sunlight, leading to better fruit production.
* Aesthetic Appeal: Let’s be honest, a squash-covered trellis looks pretty darn cool! It adds a unique and beautiful element to your garden.
Choosing the Right Squash Variety
Not all squash varieties are created equal when it comes to vertical gardening. Bush varieties are, well, bushy and not suited for climbing. You’ll want to choose vining varieties. Here are a few of my favorites that work well on a trellis:
* Butternut Squash: These are relatively lightweight and easy to train.
* Delicata Squash: Another good choice for smaller gardens, with a manageable size.
* Spaghetti Squash: While they can get a bit heavy, with proper support, they do well on a trellis.
* Acorn Squash: Similar to butternut, a good all-around choice.
* Smaller Pumpkins (like Jack Be Little): If you’re feeling ambitious, you can even try smaller pumpkins!
Important Note: Avoid larger pumpkin varieties like Atlantic Giant, as they’ll be too heavy for most trellises.
Materials You’ll Need
Okay, let’s gather our supplies! This is what I used for my trellis, but feel free to adapt it based on what you have available and the size of your garden.
* Wooden Posts (4×4): I used two 8-foot posts. The length will depend on how tall you want your trellis. Remember, part of the post will be buried in the ground.
* Treated Lumber (2×4): For the top and bottom supports. I used two pieces, each about 4 feet long. Adjust the length based on the width you want your trellis to be.
* Heavy-Duty Wire Mesh or Cattle Panel: This will be the climbing surface for your squash. Choose a mesh size that’s easy for the vines to grip. I prefer cattle panel because it’s super sturdy.
* Screws or Nails: For attaching the lumber and mesh. I recommend using exterior-grade screws for durability.
* Wire or Zip Ties: For securing the vines to the trellis.
* Post Hole Digger or Shovel: For digging the holes for the posts.
* Level: To ensure your trellis is straight.
* Measuring Tape: For accurate measurements.
* Drill: For pre-drilling holes (optional, but recommended).
* Gloves: To protect your hands.
* Safety Glasses: Always a good idea when working with tools!
* Concrete Mix (optional): For setting the posts in concrete for extra stability.
Building Your DIY Squash Trellis: Step-by-Step
Alright, let’s get building! Here’s how I constructed my vertical squash trellis.
Phase 1: Preparing the Posts and Lumber
1. Cut the Lumber (if needed): If your lumber isn’t already the desired length, cut it to size using a saw. I wanted my trellis to be about 4 feet wide, so I cut my 2x4s to 4 feet each.
2. Treat the Wood (optional): If you’re using untreated lumber, consider applying a wood preservative to protect it from the elements. This will extend the life of your trellis.
3. Pre-Drill Holes (optional): Pre-drilling holes before screwing in the screws can prevent the wood from splitting, especially if you’re using hardwood.
Phase 2: Assembling the Frame
1. Attach the Top and Bottom Supports: Position the 2×4 lumber pieces horizontally between the two 4×4 posts. Make sure they are level and evenly spaced. Attach them securely using screws or nails. I usually put two or three screws at each connection point for extra strength.
2. Double-Check for Square: Use a square or measuring tape to ensure the frame is square. This will help prevent the trellis from leaning.
Phase 3: Installing the Wire Mesh or Cattle Panel
1. Measure and Cut the Mesh: Measure the inside dimensions of your frame. Cut the wire mesh or cattle panel to fit snugly inside the frame. Use wire cutters or bolt cutters for this. Be careful, as the cut edges can be sharp!
2. Attach the Mesh to the Frame: Secure the wire mesh or cattle panel to the frame using screws, nails, or heavy-duty staples. Make sure it’s attached securely at multiple points along the frame. I like to use U-nails for this, as they grip the mesh well.
Phase 4: Installing the Trellis in the Garden
1. Choose Your Location: Select a sunny spot in your garden for your trellis. Squash needs at least 6-8 hours of sunlight per day.
2. Dig the Post Holes: Use a post hole digger or shovel to dig holes for the posts. The depth of the holes will depend on the height of your trellis and the type of soil you have. I usually dig my holes about 2-3 feet deep.
3. Position the Trellis: Carefully lower the trellis into the holes. Make sure it’s level and plumb (straight up and down).
4. Backfill the Holes: Backfill the holes with soil, tamping it down firmly around the posts.
5. Set the Posts in Concrete (optional): For extra stability, you can set the posts in concrete. Mix the concrete according to the instructions on the bag. Pour the concrete into the holes around the posts, making sure the trellis remains level and plumb. Allow the concrete to cure completely before planting your squash.
Planting Your Squash
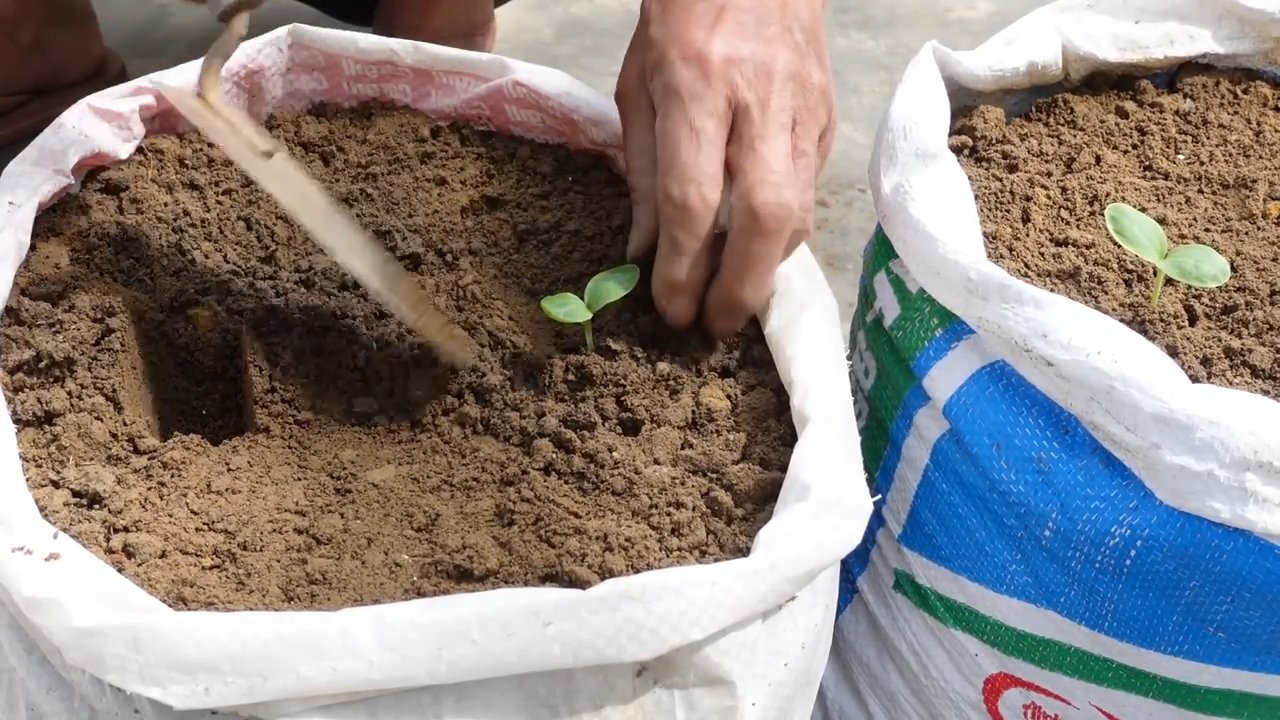
1. Prepare the Soil: Amend the soil around the base of the trellis with compost or other organic matter. Squash are heavy feeders and need nutrient-rich soil.
2. Plant the Seeds or Seedlings: Plant your squash seeds or seedlings according to the instructions on the seed packet or plant tag. Space them about 12-18 inches apart at the base of the trellis.
3. Water Thoroughly: Water the newly planted seeds or seedlings thoroughly.
Training the Vines
This is where the fun begins! As the squash vines grow, you’ll need to train them to climb the trellis.
1. Guide the Vines: Gently guide the vines towards the trellis. Use wire or zip ties to loosely attach the vines to the mesh. Don’t tie them too tightly, as this can damage the vines.
2. Prune as Needed: As the vines grow, you may need to prune them to keep them from getting too unruly. Remove any dead or diseased leaves.
3. Support the Fruit: As the squash fruits develop, they may need extra support, especially if they’re heavy. You can use slings made from old t-shirts or pantyhose to support the fruit. Tie the slings to the trellis.
Caring for Your Vertical Squash Garden
* Water Regularly: Squash needs consistent moisture, especially during hot weather. Water deeply and regularly, especially when the fruits are developing.
* Fertilize: Fertilize your squash plants every few weeks with a balanced fertilizer.
* Watch for Pests and Diseases: Keep an eye out for common squash pests like squash bugs and squash vine borers. Treat any infestations promptly. Also, watch for fungal diseases like powdery mildew. Improve air circulation and apply a fungicide if necessary.
* Harvesting: Harvest your squash when they are mature and the skin is hard. The exact timing will depend on the variety of squash you’re growing.
Troubleshooting
* Vines Not Climbing: If your vines aren’t climbing on their own, gently guide them
Conclusion
So, there you have it! Growing squash in a small garden doesn’t have to be a pipe dream. By embracing these simple yet effective DIY techniques, you can transform your limited space into a thriving squash patch, overflowing with delicious and nutritious produce. We’ve shown you how to maximize vertical space, optimize soil conditions, and even hand-pollinate to ensure a bountiful harvest, all without needing acres of land.
This isn’t just about saving money; it’s about connecting with your food, understanding the growing process, and enjoying the unparalleled satisfaction of harvesting something you nurtured from seed to table. Imagine the vibrant colors and textures of your homegrown squash adorning your autumn meals, knowing that you cultivated them with your own two hands, right in your own small garden.
But the beauty of this DIY approach lies in its adaptability. Feel free to experiment with different squash varieties suited to smaller spaces, like bush varieties or those with shorter vines. Consider companion planting with herbs like basil or marigolds to deter pests naturally. You can even try succession planting to extend your harvest season. The possibilities are truly endless!
Don’t be afraid to get your hands dirty and embrace the learning curve. Gardening is a journey, and every challenge is an opportunity to grow, both literally and figuratively. We are confident that with a little planning, creativity, and these DIY tips, you’ll be amazed at what you can achieve, even in the most compact of gardens.
We wholeheartedly encourage you to give this DIY squash growing method a try. Start small, learn as you go, and most importantly, have fun! And once you’ve reaped the rewards of your labor, we’d love to hear about your experience. Share your photos, tips, and triumphs in the comments below. Let’s build a community of small-space squash growers and inspire others to embrace the joy of homegrown goodness. Your success story could be the motivation someone else needs to start their own gardening adventure. So, what are you waiting for? Grab your seeds, prepare your soil, and get ready to enjoy the delicious bounty of your very own small-garden squash patch!
Frequently Asked Questions (FAQ)
What are the best squash varieties for a small garden?
Choosing the right squash variety is crucial for success in a limited space. Bush varieties are generally the best option as they have a compact growth habit compared to vining types. Some excellent choices include:
* Bush Delicata: This variety offers a sweet, nutty flavor and a manageable size.
* Spaghetti Squash (Bush): A compact version of the popular spaghetti squash, perfect for small gardens.
* Patty Pan Squash: These small, scallop-shaped squash are prolific producers and take up minimal space.
* Zucchini (Bush Varieties): Look for bush zucchini varieties like ‘Black Beauty’ or ‘Early Crookneck’ for a more compact growth habit.
* Butterbush Squash: A miniature butternut squash that’s ideal for containers and small gardens.
Remember to check the seed packet or plant label for information on the plant’s mature size and spacing requirements.
How much sunlight do squash plants need?
Squash plants are sun-loving vegetables and require at least 6-8 hours of direct sunlight per day to thrive. Insufficient sunlight can lead to weak growth, reduced fruit production, and increased susceptibility to pests and diseases. Choose a location in your garden that receives ample sunlight throughout the day. If you’re growing squash in containers, make sure you can move them to a sunnier spot if needed.
What type of soil is best for growing squash?
Squash plants prefer well-draining, fertile soil that is rich in organic matter. Amend your soil with compost, aged manure, or other organic materials to improve its structure, drainage, and nutrient content. A slightly acidic to neutral soil pH (around 6.0 to 7.0) is ideal. You can test your soil pH using a soil testing kit and amend it accordingly. Good drainage is essential to prevent root rot, so avoid planting squash in heavy clay soil or areas that tend to stay waterlogged.
How often should I water my squash plants?
Squash plants need consistent moisture, especially during hot weather and fruit development. Water deeply and regularly, aiming to keep the soil consistently moist but not waterlogged. Water at the base of the plants to avoid wetting the foliage, which can increase the risk of fungal diseases. A good rule of thumb is to water when the top inch of soil feels dry to the touch. Mulching around the plants can help retain moisture and suppress weeds.
How do I hand-pollinate squash flowers?
Squash plants have separate male and female flowers. If you’re not seeing fruit develop, it may be due to poor pollination. Hand-pollination can help ensure a good harvest, especially in small gardens where pollinator activity may be limited. To hand-pollinate, identify the male and female flowers. Male flowers have a long, slender stem, while female flowers have a small, immature fruit at the base. Use a small paintbrush or cotton swab to collect pollen from the male flower and transfer it to the stigma of the female flower. The best time to hand-pollinate is in the morning when the flowers are open.
How do I deal with common squash pests and diseases?
Squash plants can be susceptible to various pests and diseases, including squash bugs, squash vine borers, powdery mildew, and squash mosaic virus. Regularly inspect your plants for signs of pests or diseases. Use organic pest control methods, such as insecticidal soap, neem oil, or hand-picking pests. To prevent diseases, ensure good air circulation, avoid overhead watering, and remove any infected leaves or plants promptly. Companion planting with herbs like basil or marigolds can also help deter pests.
Can I grow squash in containers?
Yes, you can successfully grow squash in containers, especially bush varieties. Choose a large container (at least 20 gallons) with drainage holes. Fill the container with a high-quality potting mix amended with compost. Provide adequate sunlight and water, and fertilize regularly. You may need to stake or support the plants as they grow.
How do I know when my squash is ripe?
The ripeness of squash varies depending on the variety. Generally, squash is ripe when the skin is hard and difficult to pierce with your fingernail. The color should be deep and uniform. For winter squash, the stem should be dry and hard. For summer squash, harvest when the fruits are young and tender.
Can I save seeds from my homegrown squash?
Yes, you can save seeds from your homegrown squash, but keep in mind that squash plants can cross-pollinate, so the seeds may not produce true-to-type plants. To save seeds, allow the squash to fully mature on the vine. Scoop out the seeds, rinse them thoroughly, and dry them completely before storing them in an airtight container in a cool, dark place.
What are some creative ways to use my homegrown squash?
The possibilities are endless! You can roast it, grill it, sauté it, or use it in soups, stews, casseroles, and baked goods. Summer squash is delicious grilled or sautéed with herbs and garlic. Winter squash can be roasted and used in pies, soups, or as a side dish. You can even make squash noodles or use it as a filling for ravioli. Get creative and experiment with different recipes to discover your favorite ways to enjoy your homegrown squash.


Leave a Comment